The Triumph Dolomite Club - Discussion Forum

The Number One Club for owners of Triumph's range of small saloons from the 1960s and 1970s.
It is currently Thu Apr 25, 2024 5:46 am

All times are UTC+01:00


Post new topic  Reply to topic  [ 357 posts ]  Go to page Previous 112 13 14 15 1624 Next
Author Message
PostPosted: Wed Jul 23, 2014 6:10 pm 
Offline
Future Club member hopefully!
User avatar

Joined: Sun Oct 21, 2012 11:15 pm
Posts: 822
Quote:
Marks gearbox was probably shot blasted with a product called Honite or glass bead media. When I worked for Bombardier Transportation Ltd we used this media in a small blast cabinet to clean the brass brush boxes on D.C electric motors. The brush boxes were like new after they were cleaned. I had my inlet manifold cleaned the same way by Wrexham Metal Finishing it came up like new.

http://www.google.co.uk/imgres?imgurl=h ... =0&ndsp=19

Regards
Paul

Top tip! Will remember that one /
:)

_________________
1980 Dolomite Sprint Track Day Car....KLJ 895W. now redtopiffied :P

viewtopic.php?f=19&t=23031

Volkswagen Golf MK3 Gti....R301UUJ. RIP 22-5-13
Volkswagen Golf MK4 TDGTI 150 MM53VNT Sold 7-8-17
BMW 320d Coupe M-Sport YL08 XBZ with factory fitted Performance Pack - Sold 22/05/21
BMW 330d Touring M-Sport WN63 XPY - best daily ever

Proud TDC Member!


Top
   
PostPosted: Fri Jul 25, 2014 12:12 pm 
Offline
Future Club member hopefully!
User avatar

Joined: Sat Sep 04, 2010 10:42 am
Posts: 980
Quote:
This weekend I have mostly been removing my engine and gearbox from my donor car.
Gearbox removed along with heavy things like clutch, flywheel, starter and alternator
Image
Mark

Are you going to have the flywheel skimmed up to ensure to proper mating face for the clutch plate.

Paul

_________________
Image


Top
   
PostPosted: Fri Jul 25, 2014 6:51 pm 
Offline
TDC Staffs Area Organiser
User avatar

Joined: Wed Oct 18, 2006 2:08 pm
Posts: 5429
Location: The Old Asylum
Yes the flywheel was skimmed and then attached to the crank along with the clutch cover and crank pulley to balance it all.

_________________
Mark

1961 Chevrolet Corvair Greenbrier Sportswagon
1980 Dolomite Sprint project using brand new shell
2009 Mazda MX5 2.0 Sport
2018 Infiniti Q30


Top
   
PostPosted: Thu Jul 28, 2016 10:15 pm 
Offline
TDC Staffs Area Organiser
User avatar

Joined: Wed Oct 18, 2006 2:08 pm
Posts: 5429
Location: The Old Asylum
I think that after 2 years I should probably provide an update on the progress of my project.

I can't quite believe where the time has gone. It's been a tricky couple of years for me for various reasons and consequently it has taken me a while to get anything done. If I'm honest I had no motivation to do anything I'd previously enjoyed and whilst I'm keen to finish the car, if you don't enjoy something then why do it? The good news is that I feel significantly better than I have for several years now and I have in the last month or so been able to get on and do a few bits and bobs.

My recent work has focused entirely on the back end of the car. Currently the car is mobile on a scrap set of axle and subframe which came with the shell. This has been extremely useful in keeping the car mobile during work. My garage is fairly small so being able to wheel it around a bit is really useful. My plan has been to build up the back end components and then go about swapping them out.

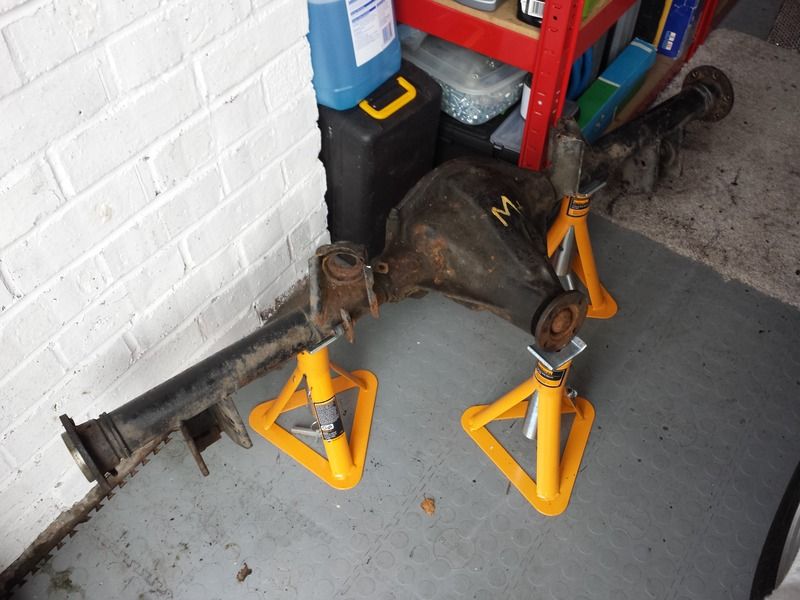
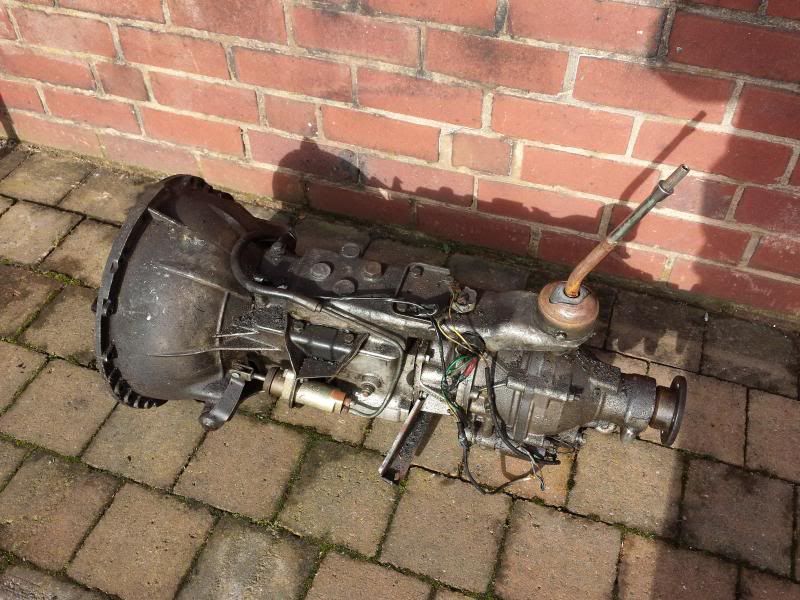
When I dismantled my original car it became apparent that my axle was in quite poor condition. Although not especially noisy it was extremely leaky from every orifice and more worryingly the tie bar mounts were heavily corroded. Looking at the numbers in more detail I don't think it's the original one either. Someone had at some point fitted a hub, or complete half shaft with 3/8" studs on one side, the other was the correct 7/16" size. I had previously purchased new hubs, studs and seals etc with a view to refurbishing it.

Image

When Mike Papworth was working on my gearbox he offered me a complete Sprint axle which had good mechanicals and no major rust problems. This seemed like an attractive option so a deal was done and I decided to use this axle, keeping my 'original' as a spare.

Image

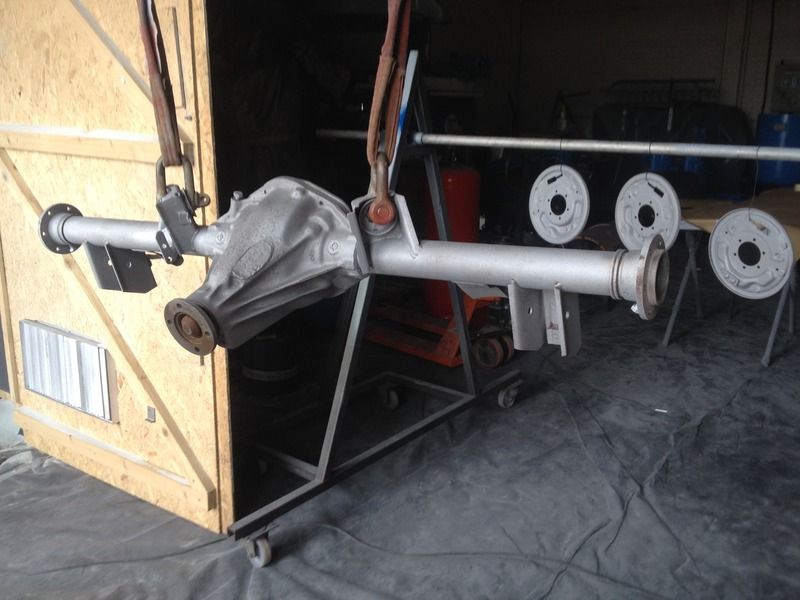
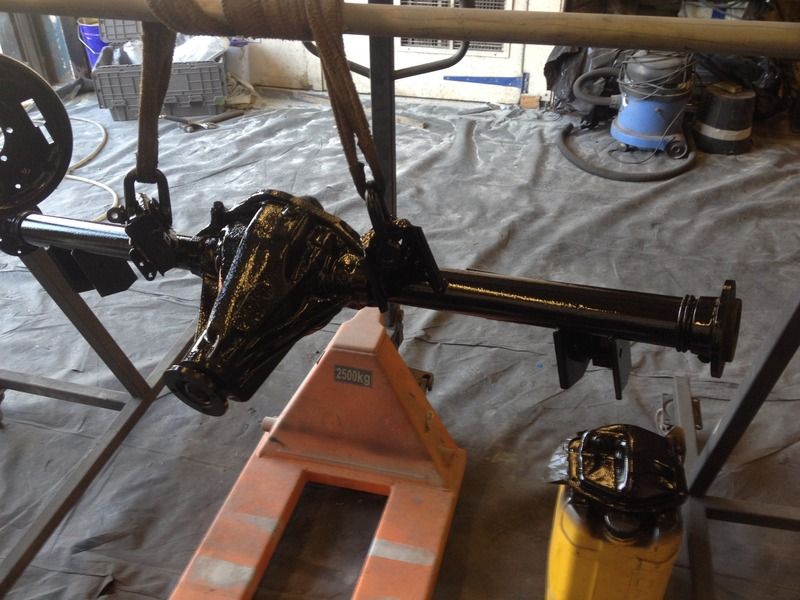
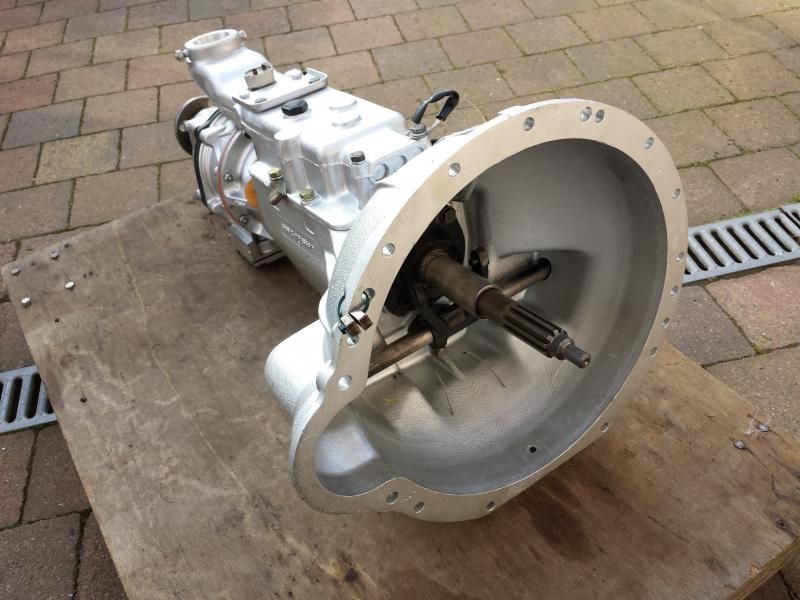
In order to get a nice finish I stripped off everything from the outside and sealed up any holes in it before having the outside blasted and then as the blaster was getting into painting he offered to paint it for me too using epoxy mastic paint which gives a nice, if matt finish. He also blasted and painted the rear back plates too.

Image

Image

When I got the axle back I perched it in the garage and it was a few months until I got on with the next job. I started by inspecting the half shaft and hub assemblies I had in stock. In total I had 4, one looked very oily, one was the wrong sized studs and the other two seemed pretty good so I chose to use those. My original plan had been to strip down the assemblies by removing the hubs and replacing the seals and bearings etc. Of course removing the hub is very difficult and though I had picked up the proper Churchill factory tool I figured that this was just making work for myself and therefore I chose not to do this, instead after a bit of a clean up I went ahead with the half shafts I had.

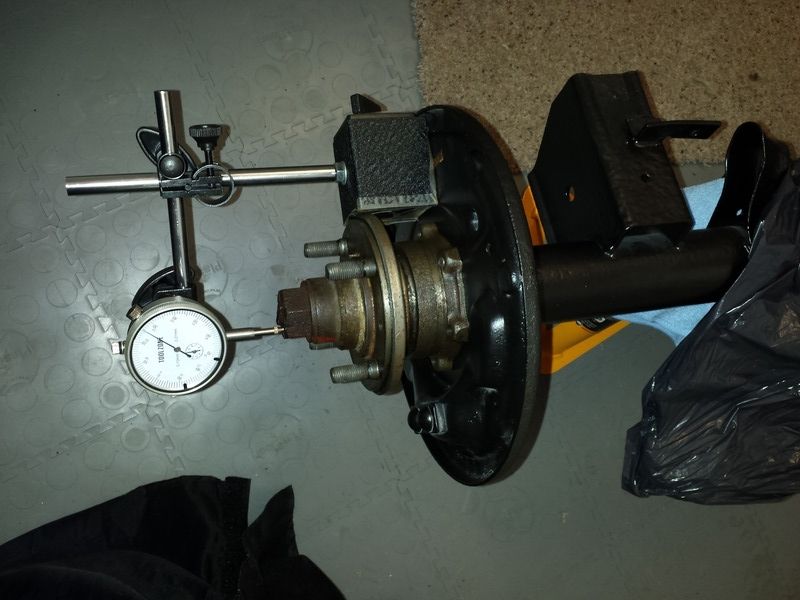
Before I fitted new seals I had a go at setting up the end float with my new drum back plates. After messing around with various shims I got it just right. That was in May of 2015, work then stopped as I started a difficult time.

Image

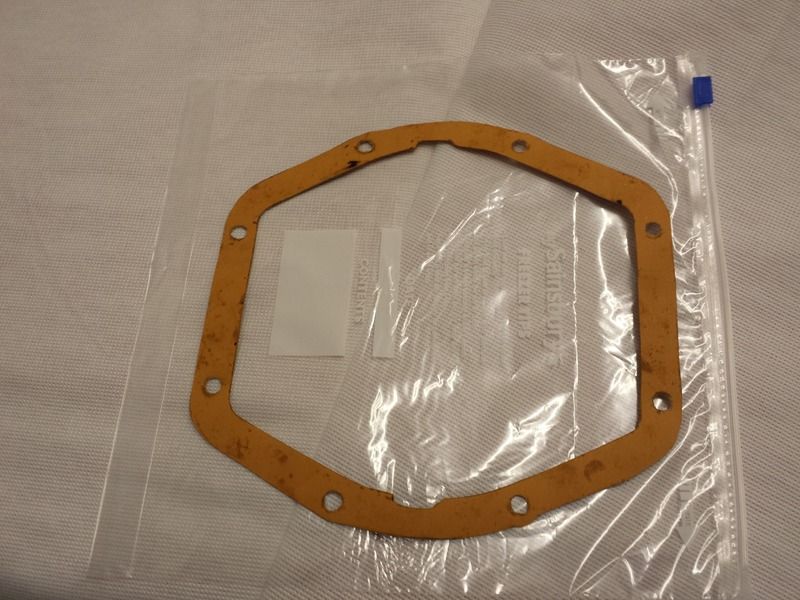
Almost exactly a year later in mid-May I decided I wanted to get on and do some more on my project. I thought the best thing to do was to start where I had left things, the axle. This had sat at the back of the garage for the last year, covered up and largely ignored. My first job was to look at the back plate gasket. Unfortunately the gasket I had bought didn't fit as it was either too small or had shrunk so was of no use.

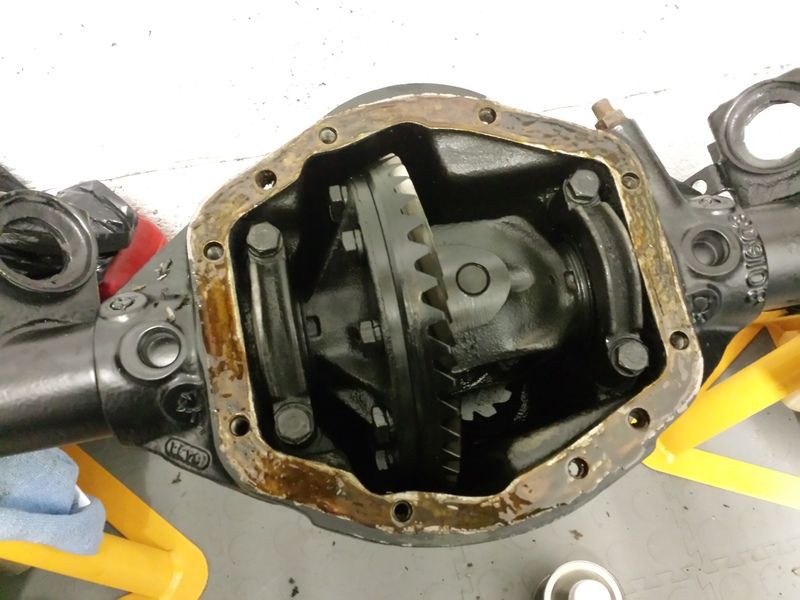
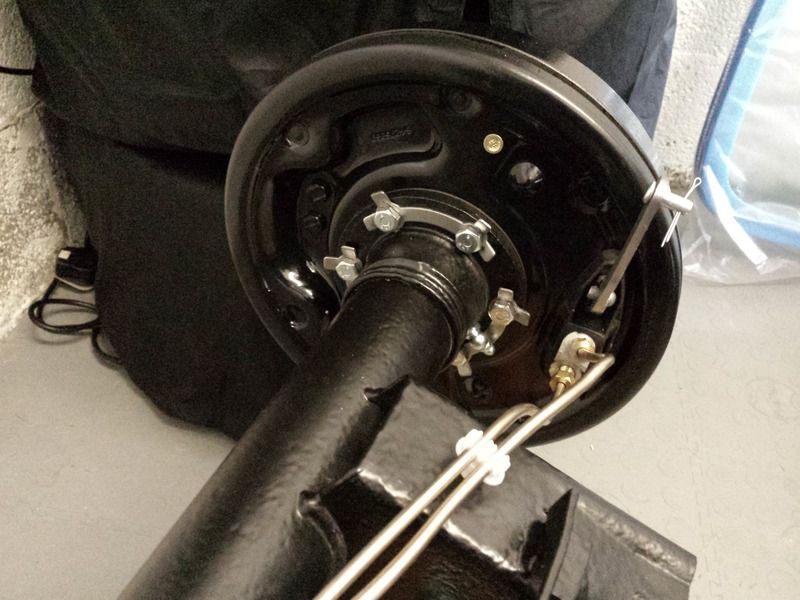
As I now work at a company who works with, races, fixes and restores classic cars I thought let's see what we use at work. My boss pointed me to a drawer full of gasket paper and so I set about making my own. I used a material which is a mixture of nitrile and paper so it's good with heat and also for applications which are prone to leaking. Sounded perfect. On taking off the diff cover I found that despite being removed for painting an original paper gasket was actually stuck to the underside of the cover so I peeled it off and used it as a template for making my own. Cutting it out to fit was straight forward enough and my trial fit proved it was perfectly adequate.

Image

I took the advice of our axle builder who recommended I use a little Heldite jointing compound on both faces. You brush a thin layer on, leave it for a bit and then bolt it together. I have not yet filled the diff with oil but it does seem to look OK and it was satisfying work to do.

Image

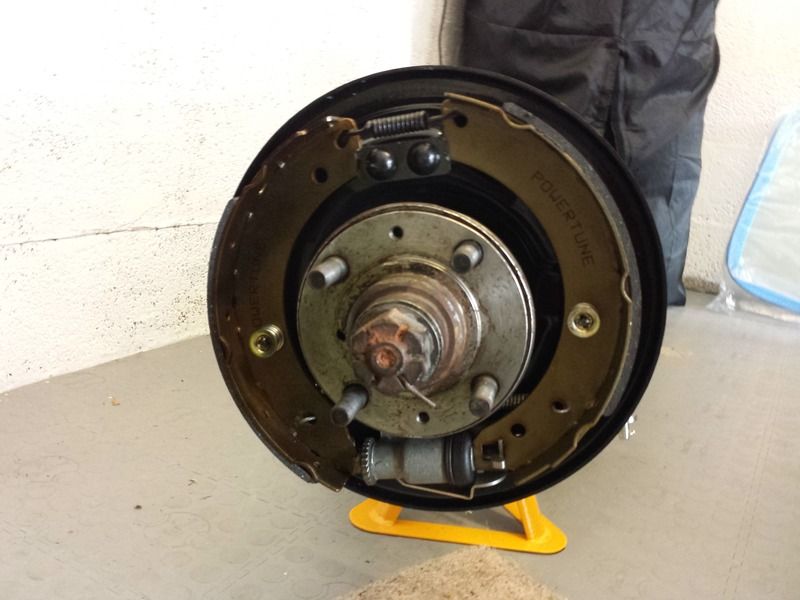
Next my attention turned to the back plates. I chose to use some NOS back plates as the used ones I had didn't have the quality of finish I was looking for. These had been blasted, primed and painted a few years ago. I built up the backplates c/w wheel cylinders, handbrake levers etc off the car. I then fitted the new back plates onto my axle with the half shafts I had previously fitted. I checked my end float again and whilst one side was perfect, the other was miles out. This meant setting up the end float again from scratch but it did really need to be done.

Image

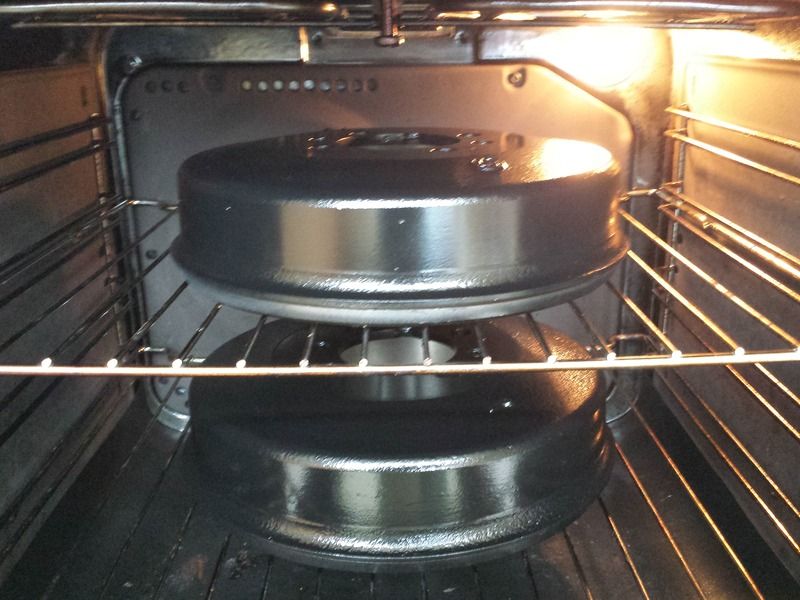
Next up were the drums. These were again NOS which I had picked up from someone nr Preston about 10 years ago. They were covered in protective wax/grease which took some time to clean off. Then I gave them a good going over with a wire brush on a drill, wiped them over and then gave them a coat of calliper paint which is both tough and good for bits that get hot. As part of the process I had to cure the paint. I waited until the wife was out and then borrowed the oven to bake them for an hour or so at about 100 degrees.

Image

Image

Image

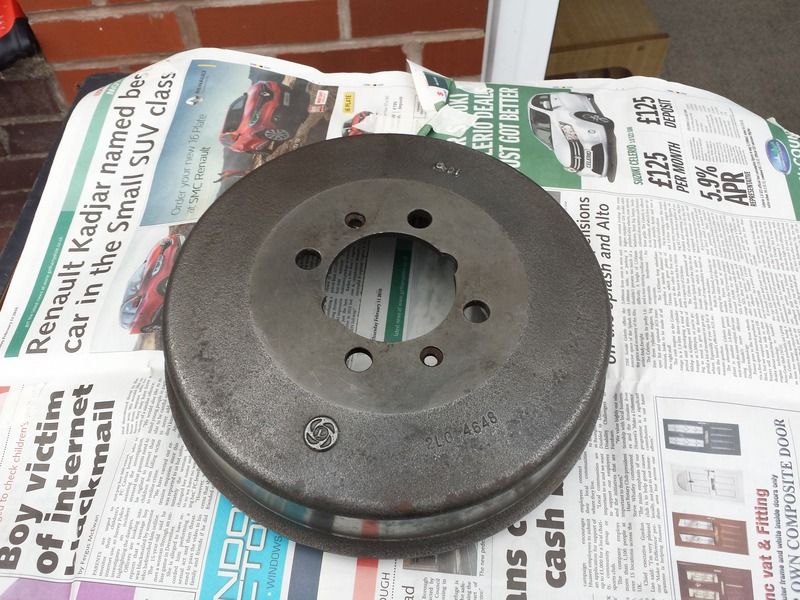
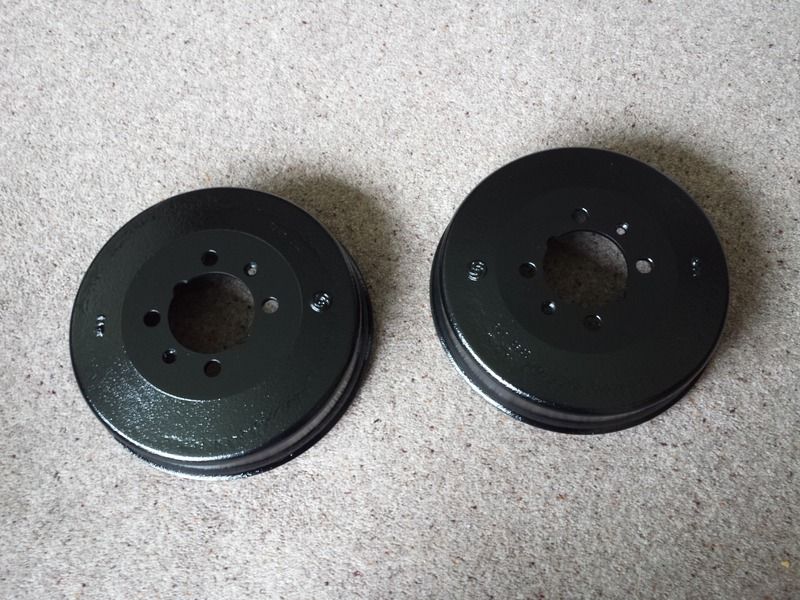
With the drums painted I could fit them using the nice and shiny new screws I had bought. One side went on perfectly, the other seemed a little tight. Having tested another drum it seemed that one hub was a bit tight so I lightly dremmelled the face to remove a few thou, drum then fitted perfectly. it's worth pointing out that before I fitted them I actually balanced the brake drums using equipment at work. Balancing the drums is a good idea as they are often not very well balanced as this can ruin the ride and not do your bearings any good either.

I then moved onto the brake pipes. I already had sections of kunifer cut, flared and unions fitted so it was 'just' a case of bending them to shape. This is not my favourite job and the end result though OK is not as good as it could be. Fortunately you don't really see it when it's fitted!

Image

Image

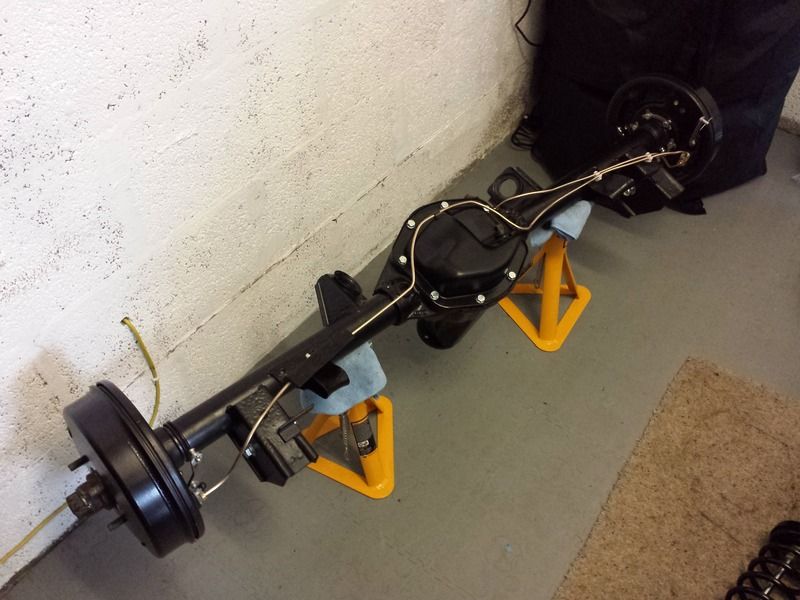
With everything now assembled the axle is now pretty much complete. I do need to properly bend over the securing tabs on the back. I thought I'd do that at a later date just to make sure nothing needs to come out as they are a real pain. I actually pre-bent them slightly to aid the proper bending over when I do that bit.

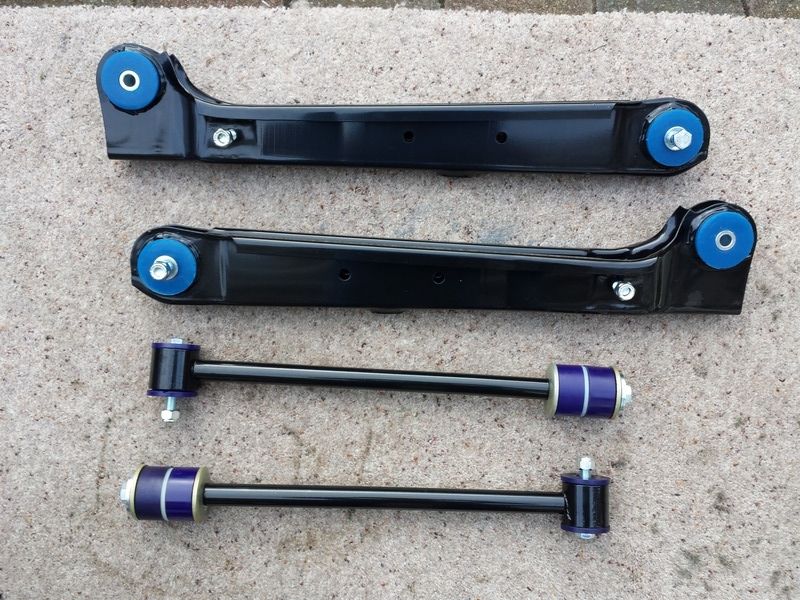
I have also been working on the suspension components too. I had previously bought some new trailing arms, tie bars , anti roll bar, springs and shock top mounts. All were blasted and powder coated which gives a nice finish. I chose to fit new polyurethane bushes which were quite easy to fit using a hydraulic press. For the trailing arms I opted to go for Polybush branded versions. These come in 2 halves so are even easier to fit. The Superflex versions come as one piece and are all a bit stiff. The Polybush comfort grade fitted here is a much closer match to the original rubber ones. I did consider fitting new rubber bushes which I removed from the new arms but decided that actually the Polybushes would be better. I know some people have questioned the wisdom of fitting polyurethane bushes to the trailing arms as they believe they cause the arms or body mounts to break. Given the mileage I will do, the use it will get (i.e. not extreme) an the fact that neither the arms nor mounts are rusty and old the Polybush comfort seemed the only way to go. I can always change them again if I have any worries.

Image

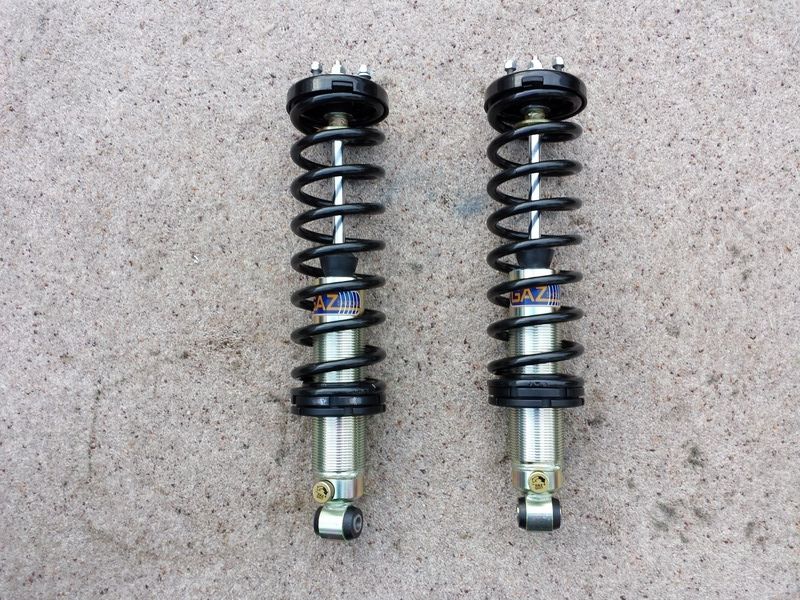
Shock wise I had in stock a set of Gaz adjustable height and ride front and rears. The springs I used are standard, actually NOS ones from Fitchetts which actually fit the top mount! With the height platform wound right down it was easy to fit the springs to the shocks without a spring compressor. I have not yet set the final height for these, they will be easier to adjust when they are on the car.

Image

Finally I collected and allocated all the nuts, bolts and washers etc. to put it all back together. The next job will be to remove the old axle and fit the new parts to the car. It might be a little while before I do this. Not because I don't want to but because I may need to move the car in a short while and I don't want to immobilise it.

_________________
Mark

1961 Chevrolet Corvair Greenbrier Sportswagon
1980 Dolomite Sprint project using brand new shell
2009 Mazda MX5 2.0 Sport
2018 Infiniti Q30


Last edited by SprintMWU773V on Wed Jul 26, 2017 2:22 pm, edited 1 time in total.

Top
   
PostPosted: Thu Jul 28, 2016 11:00 pm 
Offline
TDC Shropshire Area Organiser

Joined: Sun Aug 21, 2011 5:12 pm
Posts: 7047
Location: Highley, Shropshire
Nice work Mark! Looks like next years TDCIR concours is gonna be hard fought between you and James!

Steve

_________________
'73 2 door Toledo with Vauxhall Carlton 2.0 8v engine (The Carledo)
'78 Sprint Auto with Vauxhall Omega 2.2 16v engine (The Dolomega)
'72 Triumph 1500FWD in Slate Grey, Now with RWD and Carledo powertrain!

Maverick Triumph, Servicing, Repairs, Electrical, Recomissioning, MOT prep, Trackerjack brake fitting service.
Apprentice served Triumph Specialist for 50 years. PM for more info or quotes.


Top
   
PostPosted: Fri Jul 29, 2016 7:08 am 
Offline
TDC Member
User avatar

Joined: Sat Apr 12, 2014 11:02 pm
Posts: 2279
Location: Nr Kenilworth
Looking great Mark, I love the incriminating oven shot :mrgreen:

Tony

_________________
Membership 2014047


Top
   
PostPosted: Fri Jul 29, 2016 4:03 pm 
Offline
Future Club member hopefully!
User avatar

Joined: Sat Sep 04, 2010 10:42 am
Posts: 980
Mark

Remember our telecon some time ago about the stainless steel spacer within the poly bushes - make sure that the stainless steel spacer is slight protruding pass the outer face of the poly bush - if not you will end up with annoying sqeek when the susppension goes up and down like I did, maybe its the positon of the rear tie bar but the spacer does not look it portruding see attached picy

Image

Also you may have the open (make it wide) where the damper secures to the rear trailing arm (i had to open mine using a stretcher bolt) as the dimension of the lower damper mounting point is larger then the dimension in the trailing arm

Do a trail fit of all parts before bolting them to the car

Paul

_________________
Image


Top
   
PostPosted: Fri Jul 29, 2016 9:16 pm 
Offline
TDC Member

Joined: Sun Mar 16, 2008 2:52 pm
Posts: 2306
Quote:
Picked up my gearbox from Mike Papworth on Sunday. Mike's place is a real treasure trove
Image[/url]

The main issue was the gearbox casing itself. You'll remember from previous updates that a hole had been opened up but upon further cleaning Mike found a large crack in the casing, right under the main oil housing. You could see the crack went through the casing which could have failed. Whilst it could have been repaired perhaps Mike offered to swap the casing for another he had in stock. This does technically cause a change in numbers but really only the casing is different, all the internals are my originals. An added bonus was that the new casing had better threads in a number of areas where previously some had been repaired and not particularly well.

Image

Image

Image


[Image[/url]

The unit will be wrapped and stored now until it's ready to be mated to the engine.
Hi Mark, Is that a gasket on the Sprint bell housing ? I don't think I've seen one there before on CWL.
Ta,
Tony.


Top
   
PostPosted: Fri Aug 12, 2016 8:47 am 
Offline
TDC Staffs Area Organiser
User avatar

Joined: Wed Oct 18, 2006 2:08 pm
Posts: 5429
Location: The Old Asylum
Sorry I meant to reply to this. No there's no gasket on the bell housing as far as I'm aware.

I've just moved house, or should I say I have moved into another house whilst retaining my old one. The new place has a double garage but currently it's full of moving stuff so the Dolomite remains at the old place for now. I'll hopefully get round to moving it later this month and I can get going again. It will be easier to work in the new garage than the old one so I'll fit the new back end when the car is installed at the new place. The house was once the sales office for the development about 10 years ago and it still retains carpet tiles on the floor which will be nice to work on but perhaps less good for dealing with a leaky old British car.

_________________
Mark

1961 Chevrolet Corvair Greenbrier Sportswagon
1980 Dolomite Sprint project using brand new shell
2009 Mazda MX5 2.0 Sport
2018 Infiniti Q30


Top
   
PostPosted: Fri Aug 12, 2016 9:32 am 
Offline
Future Club member hopefully!

Joined: Tue Oct 03, 2006 9:45 pm
Posts: 11179
Location: Middlesex
Don't forget to fit the release bearing and carrier. I'm sure Mr P has already made sure your wedgelock bolt is kosher...

Or are you thinking of going the more modern internal slave route? I'd consider it...

Jonners

_________________
Note from Admin: sadly Jon passed away in February 2018 but his humour and wealth of knowledge will be fondly remembered by all. RIP Jonners.


Top
   
PostPosted: Fri Aug 12, 2016 9:38 am 
Offline
TDC Staffs Area Organiser
User avatar

Joined: Wed Oct 18, 2006 2:08 pm
Posts: 5429
Location: The Old Asylum
I think on a car that will be used infrequently an internal slave is a bad idea as when they leak you have to take the box off to replace. The Sprint slave is a pain but at least it can be done without removing the box.

new release bearing came with the clutch kit, it's an RHP one which is always a bonus.

_________________
Mark

1961 Chevrolet Corvair Greenbrier Sportswagon
1980 Dolomite Sprint project using brand new shell
2009 Mazda MX5 2.0 Sport
2018 Infiniti Q30


Top
   
PostPosted: Fri Aug 12, 2016 6:24 pm 
Offline
TDC Member
User avatar

Joined: Sat Apr 12, 2014 11:02 pm
Posts: 2279
Location: Nr Kenilworth
The saab internal slave cyl wont leak for years. Ive got one and I love it. Bit of work needed to fit of course but modernising this cuts out clutch shaft, pivot bolt and original slave probs. Ive got 2 pipes running into the bell via the original shaft hole, one for feed and one for bleed which lives up in the bulkhead area under the bonnet. I had my master leaking and whipped it off, changed the seal, bled it stood up in 2 mins. Worth it for that really :)

Tony

_________________
Membership 2014047


Top
   
PostPosted: Wed Oct 05, 2016 8:58 pm 
Offline
TDC Staffs Area Organiser
User avatar

Joined: Wed Oct 18, 2006 2:08 pm
Posts: 5429
Location: The Old Asylum
I moved my car the other weekend. Work were able to lend me a van and covered trailer and I borrowed a colleague and bribed him with some folding to help out as he has towing experience. Loading up at the old place was fairly easy, as was the 15 mile trip to the new house. Unloading was a little more difficult due to a slight uphill slope on the drive. The van clutch stank but we got there in the end.

Image

The car now resides next to my Mazda in the garage with its carpet tiled flooring! All my car parts have now been moved as well. In fact I have also put the shell on stands ready to swap the rear end out for the newly refurbished one.

What I lack currently is time, weekends seem very busy at the moment but there's a glimmer of hope very soon!

_________________
Mark

1961 Chevrolet Corvair Greenbrier Sportswagon
1980 Dolomite Sprint project using brand new shell
2009 Mazda MX5 2.0 Sport
2018 Infiniti Q30


Last edited by SprintMWU773V on Wed Jul 26, 2017 2:22 pm, edited 1 time in total.

Top
   
PostPosted: Mon Jan 23, 2017 7:20 pm 
Offline
TDC Staffs Area Organiser
User avatar

Joined: Wed Oct 18, 2006 2:08 pm
Posts: 5429
Location: The Old Asylum
After my house move back in the summer and inevitable settling in and doing all sorts of house stuff I have finally got around to some more work on the Sprint.

I moved the car from my old house to the new back in September and then when I sold the old house in November I moved the last of my parts, including my back end parts and promptly left them in the way whilst I got on with other things.

My project shell came complete with a rear axle and front assembly so I’d re-attached these when the shell was painted to enable easy moving in the garage, and of course it was very helpful when I had to move house. My first job for some considerable time was to set about installing my refurbished axle and suspension components. Removal of the old ‘temporary’ unit was pretty straightforward, at least in terms on undoing the nuts and bolts as they were not on especially tight. Supporting the axle whilst lowering it was a little tricky as it didn’t balance terribly well on my jack but between my wife and I we were able to lower it easily enough. I didn’t know the condition of the unit and didn’t really want it so a quick ‘Free Ad’ saw it taken away by a club member direct from the garage which was a real help.

Knowing my parents were visiting I knew I had a good opportunity to have some assistance with installation. Dad has plenty of experience installing these things on his cars over the years. First job was work out how to man handle the axle (complete with half shafts, drums etc) under the car. I had a handy wheeled board which slid under nicely then we got it onto the jack and raised it up. Some fiddling followed and we were able to attach the lower trailing arms and roughly position the upper tie bars. This way I knew the whole unit was roughly where it needed to be.

Next job was to install the shocks. I’ve chosen to fit Gaz height and ride adjustables to the car, mainly to allow for some lowering from standard but without going too far. I’ve retained standard springs, these were new old stock items but I had them powder coated as I wasn’t happy with the finish. As the car is not yet loaded I chose to set the height approximately, 140mm from centre of the bush to the top of the seat. I used copper grease on the threads and also a smear on the seat to prevent sticking.

Though I was initially confused it became apparent that the shock units would only fit one way so after the application of some Dum Dum to the top mounts, I lowered the trailing arms they slotted in easily enough.

Image

Image

The tie bars were rather more awkward. I’d fitted the axle without these but by raising the axle slightly and wiggling it around a bit I was eventually able to fit the rearward bushes, washers and nut. Currently these are not fully tightened nor have I put the R clips on. Last job was to attach the rear, anti roll bar. Like the other components this is a new old stock one, powder coated and fitted with shiny, new high tensile nuts and bolts.

I’ve still got some work to do on the back end, chiefly to fit the handbrake cables, brake bias valve and bend over the lock tabs. But it’s pretty much there.

I’m now going to work on the front end of the car as this will help to get quite a few more parts out of the way including the subframe which is constantly in the way. I’ve got a few bits to passivate for the next job. It’s no longer convenient to drop them at the plating place I had previously used so I’ve just purchased a DIY kit from Classic Plating and will see how I get on. When these bits are sorted I’ll build up the front subframe assembly and get it installed, should be easier than the rear end.

_________________
Mark

1961 Chevrolet Corvair Greenbrier Sportswagon
1980 Dolomite Sprint project using brand new shell
2009 Mazda MX5 2.0 Sport
2018 Infiniti Q30


Last edited by SprintMWU773V on Wed Jul 26, 2017 2:22 pm, edited 1 time in total.

Top
   
PostPosted: Mon Jan 23, 2017 8:10 pm 
Offline
TDC Shropshire Area Organiser

Joined: Sun Aug 21, 2011 5:12 pm
Posts: 7047
Location: Highley, Shropshire
Good to see you making progress again Mark! The fitting up is the most rewarding part of any build, watching the car grow from pile of parts is the mutts nuts IMO. Only bettered by the first drive!

Steve

_________________
'73 2 door Toledo with Vauxhall Carlton 2.0 8v engine (The Carledo)
'78 Sprint Auto with Vauxhall Omega 2.2 16v engine (The Dolomega)
'72 Triumph 1500FWD in Slate Grey, Now with RWD and Carledo powertrain!

Maverick Triumph, Servicing, Repairs, Electrical, Recomissioning, MOT prep, Trackerjack brake fitting service.
Apprentice served Triumph Specialist for 50 years. PM for more info or quotes.


Top
   
Display posts from previous:  Sort by  
Post new topic  Reply to topic  [ 357 posts ]  Go to page Previous 112 13 14 15 1624 Next

All times are UTC+01:00


Who is online

Users browsing this forum: DotBot [Bot] and 24 guests


You cannot post new topics in this forum
You cannot reply to topics in this forum
You cannot edit your posts in this forum
You cannot delete your posts in this forum
You cannot post attachments in this forum

Search for:
Jump to:  
Powered by phpBB® Forum Software © phpBB Limited