The Triumph Dolomite Club - Discussion Forum

The Number One Club for owners of Triumph's range of small saloons from the 1960s and 1970s.
It is currently Tue Apr 16, 2024 12:30 pm

All times are UTC+01:00


Post new topic  Reply to topic  [ 357 posts ]  Go to page Previous 111 12 13 14 1524 Next
Author Message
PostPosted: Thu Jun 05, 2014 9:40 pm 
Offline
TDC Staffs Area Organiser
User avatar

Joined: Wed Oct 18, 2006 2:08 pm
Posts: 5429
Location: The Old Asylum
Quote:
The graphogen stuff looks a bit scary to me.
I agree but fortunately it's tried and tested stuff, if I had any doubt I wouldn't let it near the engine! It's good stuff to use if an engine is going to sit for a while which mine is.

_________________
Mark

1961 Chevrolet Corvair Greenbrier Sportswagon
1980 Dolomite Sprint project using brand new shell
2009 Mazda MX5 2.0 Sport
2018 Infiniti Q30


Top
   
PostPosted: Fri Jun 13, 2014 9:41 am 
Offline
TDC Staffs Area Organiser
User avatar

Joined: Wed Oct 18, 2006 2:08 pm
Posts: 5429
Location: The Old Asylum
A thread discussing propshafts reminds me I forgot to post some pics of my refurbed prop. When I removed the prop it looked pretty scabby with evidence of play on the joints and a deteriorating centre bearing, I took it to Dave Mac Props in Coventry to refurbishand balance it. You'll also notice it has 3 UJ's on it, this at least according to a little line in the Haynes Manual would appear to be correct for a very late Sprint.

Gone from this

Image

To this

Image

It's had new joints and a new centre bearing. Also been cleaned up and painted. Prop now wrapped and in storage for when it's needed. My theory on things is to refurbish bits as I go and when they are affordable, even if this means that they might lay around for a bit. Plus refurbished clean bits are much more acceptable to leave about the house than dirty, rusty and oily ones!

_________________
Mark

1961 Chevrolet Corvair Greenbrier Sportswagon
1980 Dolomite Sprint project using brand new shell
2009 Mazda MX5 2.0 Sport
2018 Infiniti Q30


Last edited by SprintMWU773V on Wed Jul 26, 2017 2:19 pm, edited 1 time in total.

Top
   
PostPosted: Fri Jun 13, 2014 9:50 am 
Offline
TDC Motorsport Registrar
User avatar

Joined: Sun Apr 06, 2014 10:49 pm
Posts: 972
Location: Northwich
Ahhh...that's what I'm after?

What did that cost?


Top
   
PostPosted: Fri Jun 13, 2014 10:47 am 
Offline
TDC Staffs Area Organiser
User avatar

Joined: Wed Oct 18, 2006 2:08 pm
Posts: 5429
Location: The Old Asylum
I can't recall exactly but £150-£160 sounds familiar. Seemed money well spent as I don't really have proper facilities for changing the joints let alone balancing it. They offered to build me a new prop for £200 ish but I insisted that the old one was refurbished.

_________________
Mark

1961 Chevrolet Corvair Greenbrier Sportswagon
1980 Dolomite Sprint project using brand new shell
2009 Mazda MX5 2.0 Sport
2018 Infiniti Q30


Top
   
PostPosted: Fri Jun 13, 2014 10:59 am 
Offline
TDC Motorsport Registrar
User avatar

Joined: Sun Apr 06, 2014 10:49 pm
Posts: 972
Location: Northwich
My sentiments exactly.....don't mind having a go at things but accept there are some things better off left to the experts!

Cheers for the info!


Top
   
PostPosted: Tue Jun 17, 2014 2:52 pm 
Offline
TDC Staffs Area Organiser
User avatar

Joined: Wed Oct 18, 2006 2:08 pm
Posts: 5429
Location: The Old Asylum
In the Dolomite related forum I discussed a type of Mass Loaded Vinyl (MLV) I had purchased. This is backed with a closed cell foam and I thought would be perfect to replace my internal bulkhead pads which were largely destroyed when I removed them from the donor shell.

The first step was to lay the MLV out before drawing round the template with a pencil. This pad though distorted was at least in one piece.

Image

Then cut out

Image

As you can see the shape is pretty good. The original material is a little thicker but uses an open cell foam. Weight wise the new material is actually a little heavier so will be better from a sound deadening point of view.

Image

The second piece was in poor condition so I had to cobble together the bits and then sketch what I hoped was roughly the right shape.

Image

Doesn't look too bad.

Image

The pieces were them trimmed to fit the car. I ended up cutting the larger pieces down to make them easier to fit. I simply used a bit of contact adhesive to fix them into place. Overall I think the result is pretty good, you won't see them with the dash in but I am pleased with the results.

Image

With that in place I thought it was a good opportunity to move the dashboard from the living room and trial fit into the car. Went in fairly easily with just a few tweaks of the brackets. I have not fully tightened it up as I'll need to remove the dash to do a decent job of fitting the windscreen. With the dash in place there's no way you could get an effective seal in some areas. It does look nice with the dash in position, much more like a car.

Image

_________________
Mark

1961 Chevrolet Corvair Greenbrier Sportswagon
1980 Dolomite Sprint project using brand new shell
2009 Mazda MX5 2.0 Sport
2018 Infiniti Q30


Last edited by SprintMWU773V on Wed Jul 26, 2017 2:19 pm, edited 1 time in total.

Top
   
PostPosted: Tue Jun 17, 2014 7:30 pm 
Love the new style drivers seat Mark :lol:
Ian


Top
   
PostPosted: Tue Jul 08, 2014 3:16 pm 
Offline
TDC Staffs Area Organiser
User avatar

Joined: Wed Oct 18, 2006 2:08 pm
Posts: 5429
Location: The Old Asylum
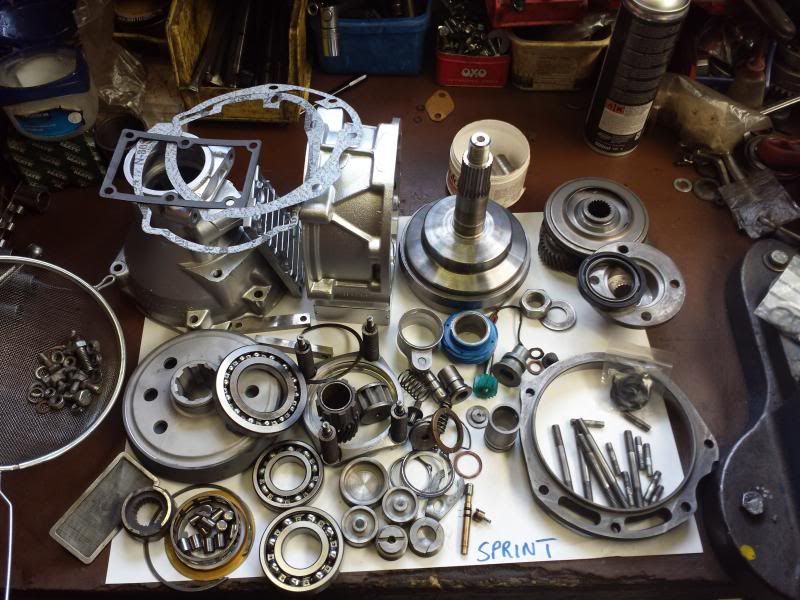
My gearbox restoration has continued with Mike Papworth providing an update, and pics of the overdrive in pieces followed by it being tested.

Image

Image

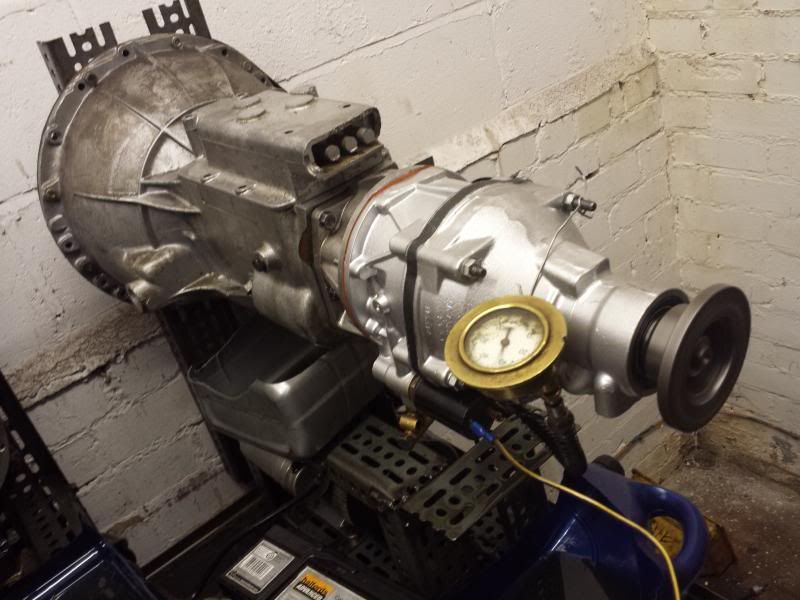
He's currently in the process of working on the rest of the gearbox and it should be ready in the next few weeks.

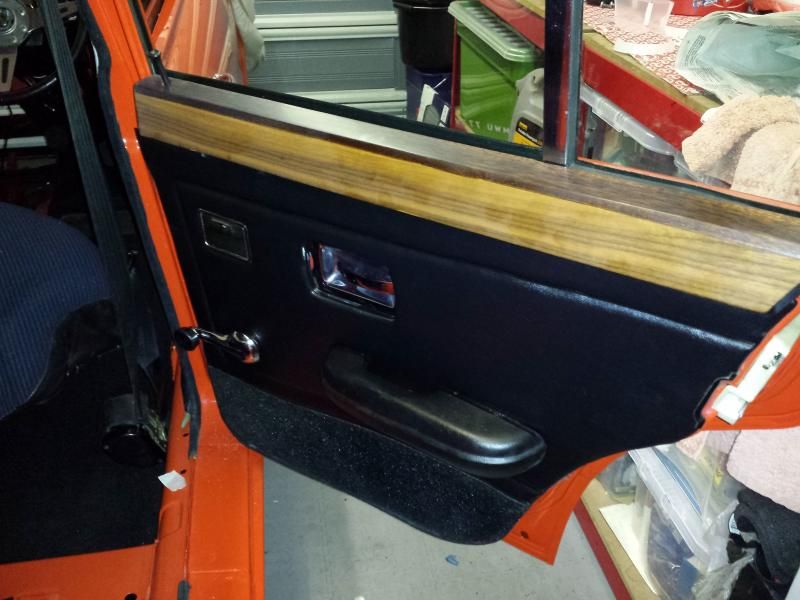
Also I've finally got round to fitting the rear glass.

Image

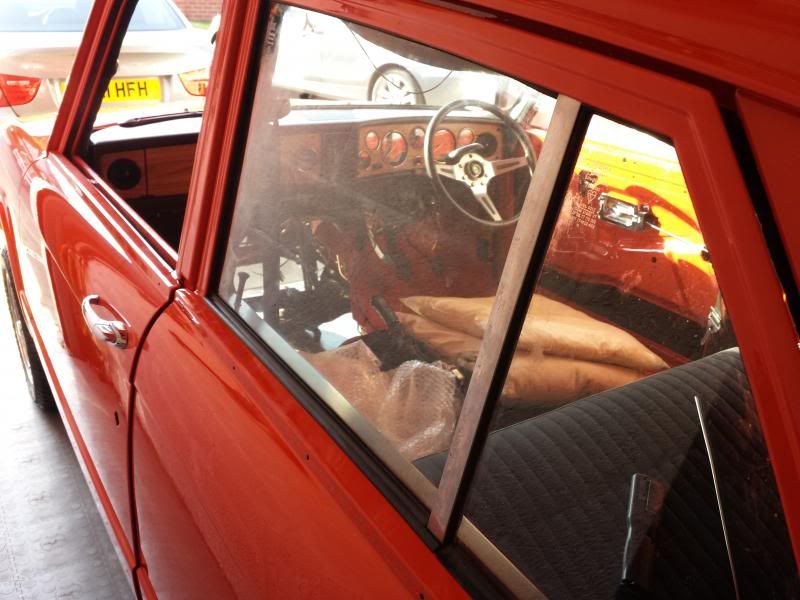
Absolute swine of a job even with a clip tool. I didn't label my glass properly so on one door ended up fitting the wrong glass which was a real pain as it's difficult to get the glass in and out. Still got there in the end and am pleased with the result. With the glass in then the wood cappings are fitted.

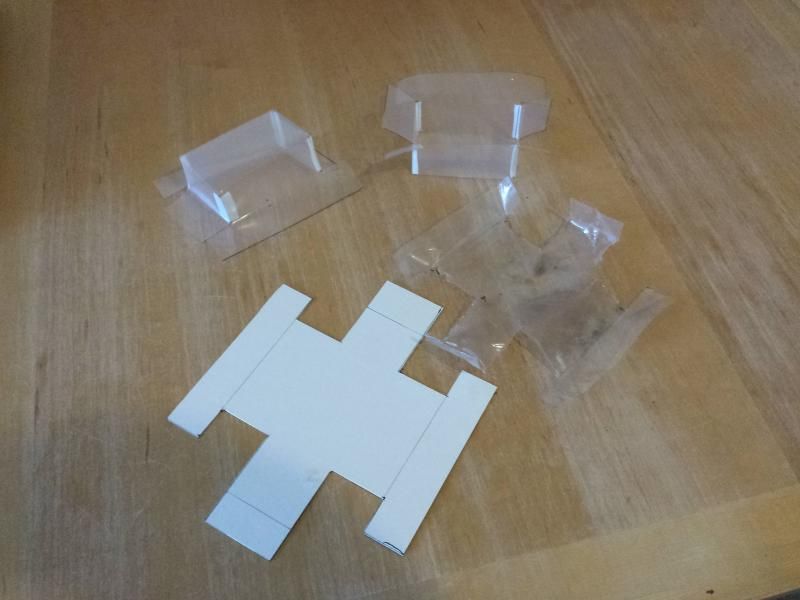
My original vapour barriers were either very damaged or missing so I made up new ones from thick builders plastic. I fitted them using butyl roll which is easy to use and also it provides a good seal. I made up new 'pockets' for the ashtrays having taken apart an old one. Again I used builders plastic and taped it together using waterproof gaffa tape. I stuck these on using the butyl roll also.

Image

Image

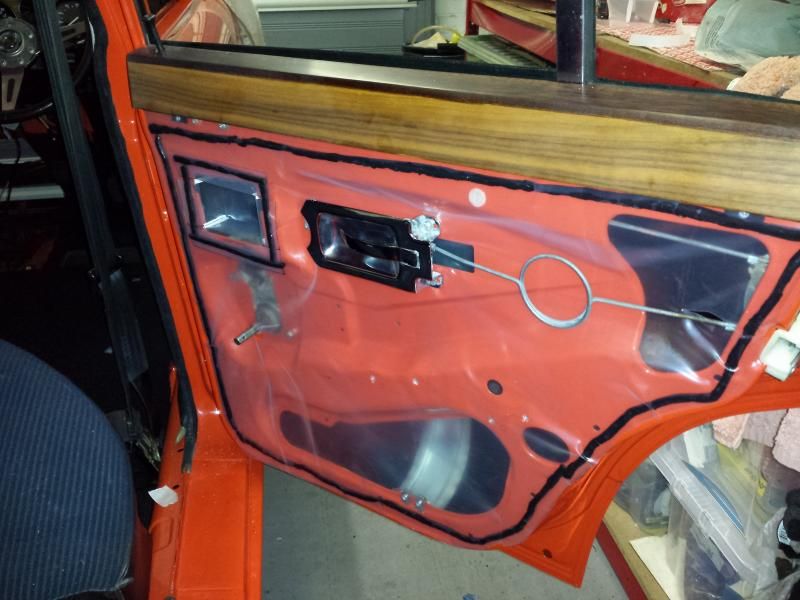
Lastly I put on the door cards, one of which had to come off again as I forgot the window winder spring!

Image

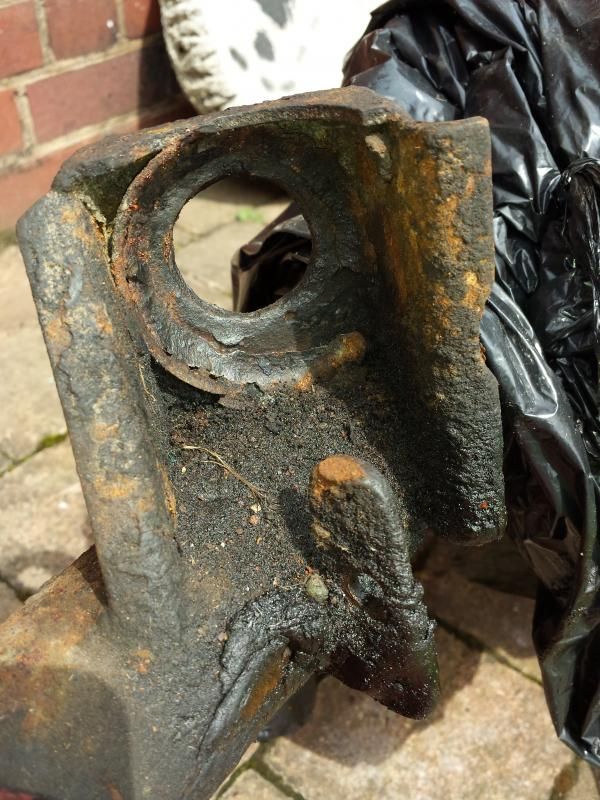
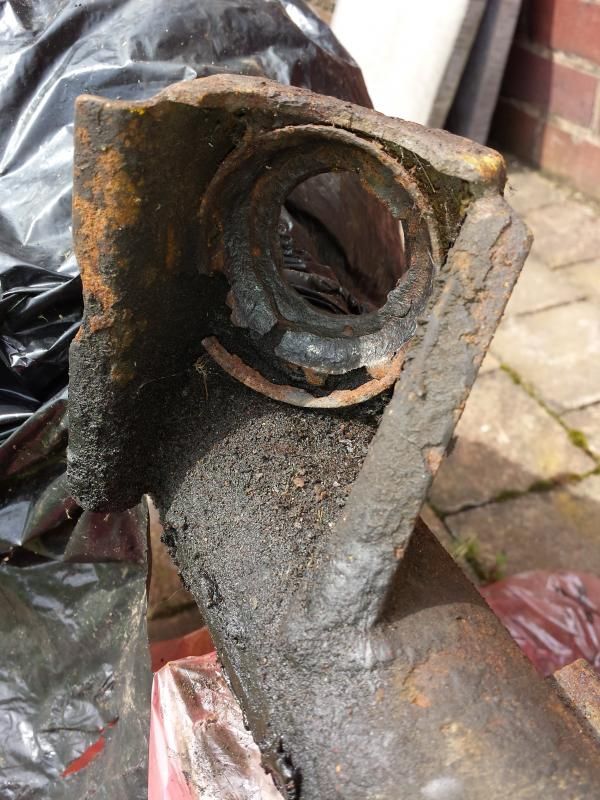
I'm not doing anything else on my engine right now as it needs to be put on the stand, then it'll be on the way, With that in mind I've now started to look at my rear axle which I can refurb and re-fit fairly easily. I stripped off the various bits of suspension attached at the weekend and discovered the rear arm mounts are badly corroded. I'll have to have these repaired, I assume there's no off the shelf repair panel for these? The rest of the axle is filthy with underseal and oil. It'll need a proper clean before anything is done to it. The axle wasn't noisy, just leaky. The hubs don't match either with one being a 3/8" stud and the other being a 7/16" so I'll need to change the 3/8" one during the build.

Image

Image

_________________
Mark

1961 Chevrolet Corvair Greenbrier Sportswagon
1980 Dolomite Sprint project using brand new shell
2009 Mazda MX5 2.0 Sport
2018 Infiniti Q30


Last edited by SprintMWU773V on Wed Jul 26, 2017 2:20 pm, edited 1 time in total.

Top
   
PostPosted: Tue Jul 08, 2014 6:51 pm 
Offline
TDC Member
User avatar

Joined: Mon Jan 19, 2009 10:46 am
Posts: 298
Location: Leiston, Suffolk
I've heard of engine core plugs making good repair replacements. I had a set and then found a better casing.

_________________
Finished with Main Engines and Steering....

1981 1500 HL man/od
1972 Series 3 Land Rover diesel
2007 MX5 Sport
2010 Citroen C1
1993 Gas Gas GT32


Top
   
PostPosted: Tue Jul 22, 2014 11:00 am 
Offline
TDC Staffs Area Organiser
User avatar

Joined: Wed Oct 18, 2006 2:08 pm
Posts: 5429
Location: The Old Asylum
Picked up my gearbox from Mike Papworth on Sunday. Mike's place is a real treasure trove of parts and gearboxes in various states of repair.

Overall the box has proven to be as expected i.e. not bad at all. I've always figured that given the faff of getting it in and out it was well worth giving it the once over and if nothing else a damn good clean as it was filthy.

This was it before back in March.

Image

The main issue was the gearbox casing itself. You'll remember from previous updates that a hole had been opened up but upon further cleaning Mike found a large crack in the casing, right under the main oil housing. You could see the crack went through the casing which could have failed. Whilst it could have been repaired perhaps Mike offered to swap the casing for another he had in stock. This does technically cause a change in numbers but really only the casing is different, all the internals are my originals. An added bonus was that the new casing had better threads in a number of areas where previously some had been repaired and not particularly well.

Image

Image

Image

The rest of the box wasn't bad. The main input shaft was found to have some corrosion on it in an undesirable place so this was replaced. The reverse idler was also pitted so this too was replaced. Overdrive was pretty good but the solenoid was not behaving so this was replaced and tested. New RHP bearings and the synchro rings were replaced with good used parts as mine were getting well worn after 125k.

Here's the finished box on my little skateboard to move it around.

Image

Image

The unit will be wrapped and stored now until it's ready to be mated to the engine.

_________________
Mark

1961 Chevrolet Corvair Greenbrier Sportswagon
1980 Dolomite Sprint project using brand new shell
2009 Mazda MX5 2.0 Sport
2018 Infiniti Q30


Last edited by SprintMWU773V on Wed Jul 26, 2017 2:21 pm, edited 1 time in total.

Top
   
PostPosted: Tue Jul 22, 2014 12:33 pm 
Offline
TDC Member
User avatar

Joined: Mon Jun 11, 2012 4:36 pm
Posts: 1225
Location: Andover Hants
That looks lovely Mark, don't forget to fit the exhaust bracket before you fill it with oil.

_________________
Modified Dolomite Sprint MSO 662P VA485 1973 Mimosa Sprint
ImageImageImage
Image


Top
   
PostPosted: Wed Jul 23, 2014 12:08 am 
Offline
Future Club member hopefully!

Joined: Tue Oct 03, 2006 9:45 pm
Posts: 11179
Location: Middlesex
He does clean them nicely....

Jonners

_________________
Note from Admin: sadly Jon passed away in February 2018 but his humour and wealth of knowledge will be fondly remembered by all. RIP Jonners.


Top
   
PostPosted: Wed Jul 23, 2014 12:18 pm 
Offline
Future Club member hopefully!
User avatar

Joined: Sun Oct 21, 2012 11:15 pm
Posts: 822
very shiny indeed!

do you know how he cleans them?

_________________
1980 Dolomite Sprint Track Day Car....KLJ 895W. now redtopiffied :P

viewtopic.php?f=19&t=23031

Volkswagen Golf MK3 Gti....R301UUJ. RIP 22-5-13
Volkswagen Golf MK4 TDGTI 150 MM53VNT Sold 7-8-17
BMW 320d Coupe M-Sport YL08 XBZ with factory fitted Performance Pack - Sold 22/05/21
BMW 330d Touring M-Sport WN63 XPY - best daily ever

Proud TDC Member!


Top
   
PostPosted: Wed Jul 23, 2014 12:22 pm 
Offline
TDC Staffs Area Organiser
User avatar

Joined: Wed Oct 18, 2006 2:08 pm
Posts: 5429
Location: The Old Asylum
No idea how they are cleaned but assume he has access to an industrial dishwasher and perhaps also uses a degree of light blasting. I'm returning in the next few weeks to pick something else up so I will ask then. All I know is that it makes the whole thing so much nicer to handle than it was. The fact the engine leaked like a seive didn't help but these thigns do get dirty very quickly.

_________________
Mark

1961 Chevrolet Corvair Greenbrier Sportswagon
1980 Dolomite Sprint project using brand new shell
2009 Mazda MX5 2.0 Sport
2018 Infiniti Q30


Top
   
PostPosted: Wed Jul 23, 2014 5:23 pm 
Offline
Future Club member hopefully!
User avatar

Joined: Sat Sep 04, 2010 10:42 am
Posts: 980
Marks gearbox was probably shot blasted with a product called Honite or glass bead media. When I worked for Bombardier Transportation Ltd we used this media in a small blast cabinet to clean the brass brush boxes on D.C electric motors. The brush boxes were like new after they were cleaned. I had my inlet manifold cleaned the same way by Wrexham Metal Finishing it came up like new.

http://www.google.co.uk/imgres?imgurl=h ... =0&ndsp=19

Regards
Paul

_________________
Image


Top
   
Display posts from previous:  Sort by  
Post new topic  Reply to topic  [ 357 posts ]  Go to page Previous 111 12 13 14 1524 Next

All times are UTC+01:00


Who is online

Users browsing this forum: Bing and 17 guests


You cannot post new topics in this forum
You cannot reply to topics in this forum
You cannot edit your posts in this forum
You cannot delete your posts in this forum
You cannot post attachments in this forum

Search for:
Jump to:  
Powered by phpBB® Forum Software © phpBB Limited