The Triumph Dolomite Club - Discussion Forum

The Number One Club for owners of Triumph's range of small saloons from the 1960s and 1970s.
It is currently Tue Apr 23, 2024 11:31 am

All times are UTC+01:00


Post new topic  Reply to topic  [ 178 posts ]  Go to page Previous 1 2 3 4 512 Next
Author Message
PostPosted: Sat May 31, 2014 3:20 pm 
SHIMS! Thats the word I was trying to remember. Thanks for that Toledo Man :)
I was rummaging through bits in my lockup the other day and found the old ball joints, SHIMS and associated parts all separated and labelled into nearside and offside. Glad I had the sense to identify everything. Old age is creeping up on me these days so it makes things SO much easier now when it comes to the reassembly. Yes it felt good to be bolting the shiny powdercoated subframe back on with new bushes and bolts. An incentive to get stuck in!!


Top
   
PostPosted: Sat May 31, 2014 3:29 pm 
Offline
TDC Member
User avatar

Joined: Tue Oct 03, 2006 5:48 pm
Posts: 8460
Location: Winscombe, North Somerset, England
There should be the same amount of shims on both sides, usually two.

_________________
Sprintless for the first time in 35+ years. :boggle2: ... Still Sprintless.

Engines, Gearboxes, Overdrives etc. rebuilt. PM me.


1997 TVR Chimaera 450


Image


Top
   
PostPosted: Sat May 31, 2014 3:34 pm 
?? Ok I'll have another look in case I've missed one. If I cant find it I'm sure I can make a new one of equal dimensions.

Cheers Guys.


Top
   
PostPosted: Sun Jun 01, 2014 12:06 am 
Offline
Future Club member hopefully!
User avatar

Joined: Tue Oct 03, 2006 5:52 pm
Posts: 7562
Location: Halifax, West Yorkshire
If it helps, the part number for the shim is 145083.

Martin, you are right. My post-76 parts catalogue specifies 4 shims (2 per side) that go between the mounting bracket and the subframe.

Are we going to see any photos? Believe me, it is very ease once you know what you're doing. If you can use this forum, you can get photos onto this thread.

_________________
Toledo Man

West Yorkshire Area Organiser & forum moderator
Meetings take place on the first Wednesday of the month at 8.00pm at The Old Brickworks, Wakefield Road, Drighlington, Bradford, BD11 1EA

1972 Dolomite 1850 auto (NYE 751L - Now for sale)
2003 Volvo XC90 D5 SE (PX53 OVZ - The daily driver)
2009 Mercedes-Benz W204 C200 CDI Sport (BJ58 NCV - The 2nd car)
1991 Toyota Celica GT (J481 ONB - another project car)
Former stable of SAY 414M (1974 Toledo), GRH 244D (1966 1300fwd), CDB 324L (1973 1500fwd), GGN 573J (1971 1500fwd), DCP 625S (1977 Dolomite 1300) & LCG 367N (1975 Dolomite Sprint) plus 5 Acclaims and that's just the Triumphs!

Check my blog at http://triumphtoledo.blogspot.com
My YouTube Channel with a bit of Dolomite content.

"There is only one way to avoid criticsm: Do nothing, say nothing and BE nothing." Aristotle


Top
   
PostPosted: Sun Jun 01, 2014 5:07 pm 
I dont have a computer at home. We have a laptop which i have older photos of the Sprint on but as yet I have not got round to getting internet but we are definitely planning on it. I've also got photos on my phone so I guess I can try to sort pictures via that? My Ford pal will show me how to post stuff and set up a photobucket account( in exchange for welding his car!).

David


Top
   
PostPosted: Tue Jun 03, 2014 7:53 pm 
Regarding the front suspension shims, I do indeed have two on either side but where I was confused about having an odd number on one side is because in addition to the four factory fitted shims I seem to have an extra one on the O/S (making 3 in total) which is approximately equal in thickness to two of the original shims.
On closer inspection the thicker shim appears to be a home-made job. The dilema I now find myself with is ; why has someone went to the trouble of making and fitting this extra thick shim? And should I refit it?
Taking on board what Martin said about two shims originally being fitted at the factory I'm inclined to rebuild it as per original spec.

Would this be the right thing to do??
Also, my nylon washers arrived from Rimmers today so looks like I'll have several things to keep me busy when I finish my shift in the morning :)


Top
   
PostPosted: Wed Jun 11, 2014 10:21 pm 
My spare time this last week didnt exactly turn out to be all mine! Got sidelined by other commitments.
Front suspension was assembled and rebuilt, ready to be bolted onto the car when i noticed a component on either side that was not cleaned to my standard so I dissassembled the lot to tidy up things then rebuilt it all for a 2nd time (nothing had been torqued up by this time )and fitted it onto the subframe. This week I will finish that off and (try) refit the front anti roll bar, which I'm expecting to put up a fight!
Any handy hints on how to make this process any easier would be appreciated. Once the ARB is refitted I can fit the steering rack then move to the rear and refit the axle/trailing arms etc.
My plan to be out of the unit by the end of June is looking unlikely. Although when i finish my shift in the morning I am off on annual leave til end of June and would love to spend the whole time with the Sprint the Mrs wont let that happen :( But rest assured this time next week the old girl will be back on her yokohamas! ( thats the car, not the girlfriend!)

David


Top
   
PostPosted: Thu Jun 12, 2014 7:46 am 
Offline
Future Club member hopefully!
User avatar

Joined: Tue Oct 03, 2006 5:52 pm
Posts: 7562
Location: Halifax, West Yorkshire
Did you rebush the suspension? I used a mixture of Super Flex and rubber when I rebuilt my front suspension. I made the mistake of using black Hammerite smooth and it looks terrible now. I might even get it all repainted at some point.

_________________
Toledo Man

West Yorkshire Area Organiser & forum moderator
Meetings take place on the first Wednesday of the month at 8.00pm at The Old Brickworks, Wakefield Road, Drighlington, Bradford, BD11 1EA

1972 Dolomite 1850 auto (NYE 751L - Now for sale)
2003 Volvo XC90 D5 SE (PX53 OVZ - The daily driver)
2009 Mercedes-Benz W204 C200 CDI Sport (BJ58 NCV - The 2nd car)
1991 Toyota Celica GT (J481 ONB - another project car)
Former stable of SAY 414M (1974 Toledo), GRH 244D (1966 1300fwd), CDB 324L (1973 1500fwd), GGN 573J (1971 1500fwd), DCP 625S (1977 Dolomite 1300) & LCG 367N (1975 Dolomite Sprint) plus 5 Acclaims and that's just the Triumphs!

Check my blog at http://triumphtoledo.blogspot.com
My YouTube Channel with a bit of Dolomite content.

"There is only one way to avoid criticsm: Do nothing, say nothing and BE nothing." Aristotle


Top
   
PostPosted: Thu Jun 12, 2014 10:05 am 
Offline
TDC Member
User avatar

Joined: Mon Nov 07, 2011 9:57 am
Posts: 713
Location: Dorset
Quote:
I made the mistake of using black Hammerite smooth and it looks terrible now. I might even get it all repainted at some point.
+1, would have looked better if I'd wrapped it in a bin bag! :P

S


Top
   
PostPosted: Thu Jun 12, 2014 12:25 pm 
Yes its been completely rebushed both front and rear with new nuts,bolts and washers all round. Every metal component of the suspension, except the axle has been shotblasted and powder coated black. It does look nice. It would have worked out just as much to buy enough paint I think. I have been taking photos so hopefully I'll get some posted soon.


Top
   
PostPosted: Thu Jun 12, 2014 2:12 pm 
Offline
Future Club member hopefully!

Joined: Tue Oct 03, 2006 9:45 pm
Posts: 11179
Location: Middlesex
To refit the front arb....

Do it last when the car is sittiing on its wheels or arrange the jacks so the lower wishbone is taking most of the weight like it was standing on its wheels IYSWIM...

Then connect the arb to each front drag strut....loosely so the bolt is in the tube and will pick up on the nyloc nut
underneath. Do it up a few turns so its loose but cant come out.

Then push the bar up and wiggle the bolts through from the subframe side. You can use a screwdiver or slave bolt from outside to line the holes up. Tighten the bolts when you have all four in place and then the links. Again wait til its all
on the wheels before the final tighten. With practice its a 20 minute job. With no practice its a nightmare....usually cos only 1 side is disconnected and the bar is twisted all out of sorts by sitting unevenly.

Jonners

_________________
Note from Admin: sadly Jon passed away in February 2018 but his humour and wealth of knowledge will be fondly remembered by all. RIP Jonners.


Top
   
PostPosted: Thu Jun 12, 2014 5:45 pm 
Cheers for that Jonners. I was expecting it to be a nightmare bcos I remember doing it to my pals RS2000 some years ago. Thought about using small cargo straps to help pull the bar into position while its under tension. Didn't get up to the sprint today because I was volunteered by my girlfriend to do dig at her mums house!!
Doesn't she realise I'm on holiday now? :roll:
Will let you know how it goes.....


Top
   
PostPosted: Thu Jun 12, 2014 5:47 pm 
That should read DIY at her mums house!


Top
   
PostPosted: Thu Jun 12, 2014 7:30 pm 
I think matt of the vivas came up with an excellent solution to getting the arb refitted:
Quote:
This was how i did it on mine, when i changed all the bushes.
Bolt Antiroll bar to subframe first on one side only. Then remove the bolt that holds the drag link to the lower arm on that side, loosen the large nut that holds the drag strut to the subframe and you will be able to fit the anti roll bar link to the drag strut easily on that side. Refit the drag strut to the lower arm on that side - should still be easy as there is not much tension yet.
Next refit the anti roll bar clamp to the subframe on the other side and repeat the process of removing the lower arm to drag strut bolt and loosening the large nut, so the drag stut can be connected to the anti roll bar link with ease. Now the difficult part - pulling the drag stut with anti roll bar link attached back into the correct place so it can be bolted back to the lower arm. This is the solution:

Image

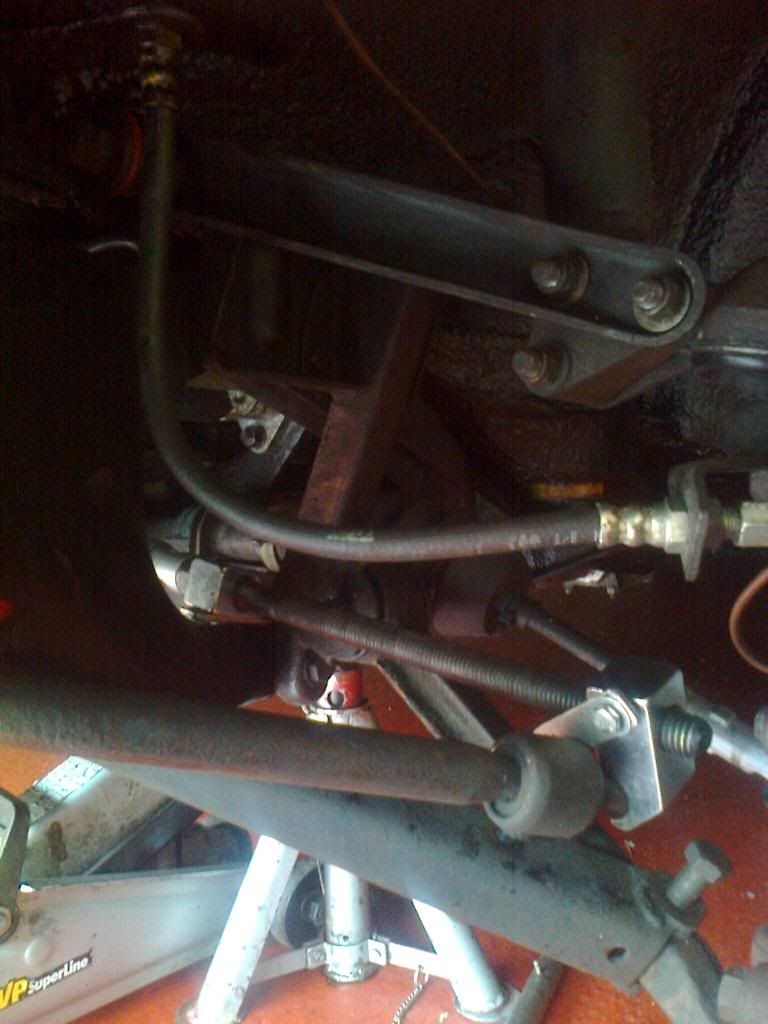
This is an ordinary spring compressor, hooked round the subframe and anti roll bar link. It can be tensioned perfectly so it pulls the drag strut into just the right position to simply drop the bolt into the lower arm. This all sounds a faff, but honestly its easy, and does not involve straining or levering. Once i had figured it out, it took me about ten minutes to refit the anti roll bar, which up until that point had defeated me for most of a morning...
Good luck
Matt.


Top
   
PostPosted: Thu Jun 12, 2014 10:18 pm 
Thanks for that input also Alan. That might be worth a try since my struts and wheels are in a different garage. I don't have a spring compressor but maybe my ratchet idea could work in place? Using a spring compressor might damage my powder coated subframe? Food for thought. I appreciate the suggestions cos otherwise I would use brute strength and ignorance!


Top
   
Display posts from previous:  Sort by  
Post new topic  Reply to topic  [ 178 posts ]  Go to page Previous 1 2 3 4 512 Next

All times are UTC+01:00


Who is online

Users browsing this forum: No registered users and 57 guests


You cannot post new topics in this forum
You cannot reply to topics in this forum
You cannot edit your posts in this forum
You cannot delete your posts in this forum
You cannot post attachments in this forum

Search for:
Jump to:  
Powered by phpBB® Forum Software © phpBB Limited