The Triumph Dolomite Club - Discussion Forum

The Number One Club for owners of Triumph's range of small saloons from the 1960s and 1970s.
It is currently Tue Apr 16, 2024 8:07 pm

All times are UTC+01:00


Post new topic  Reply to topic  [ 102 posts ]  Go to page Previous 1 2 3 4 57 Next
Author Message
PostPosted: Tue Jul 24, 2012 11:41 am 
Offline
Future Club member hopefully!
User avatar

Joined: Thu Oct 06, 2011 1:13 am
Posts: 3173
Location: The continent
This casting was not drilled to deep cilinder wise. Most engine blocks have the cilinders drilled into the treaded holes of the main bearing cap bolts. Then you have a big chance of the breakage in the other pictures when having more power than std. So this was a very good casting and very suitable for this project. I can make some pictures next week or the other of the waterhole and post. It's only enlarged. I use a TR7 EFI waterpumpcover. These have not the inlet what goes into the thermostathousing. So no distubance of the waterflow because it's all smooth in the inside.

Jeroen
Quote:
Good solid sound engineering Jeroen 8)
I have to beat a wild MX5 sometime i have heard so no alternative. :mrgreen:

_________________
Classic Kabelboom Company. For all your wiring needs. http://www.classickabelboomcompany.com


Top
   
PostPosted: Wed Aug 01, 2012 9:46 pm 
Offline
Future Club member hopefully!
User avatar

Joined: Thu Oct 06, 2011 1:13 am
Posts: 3173
Location: The continent
Wensday 8 i'm on a short holiday so the pics have to wait after that. Little progress. The middle mainbearing cap is going to be machined this week. There will be a recess in it to have and extra pair of axial bearings in it. There will be more load on it by the expected acceleration figures :woohoo: but the main reason is the uprated clutch. I alway's did find it a kut construction and this gives me piece in mind.

Jeroen

BTW the forum does take dutch bad language i just discovered.

_________________
Classic Kabelboom Company. For all your wiring needs. http://www.classickabelboomcompany.com


Top
   
PostPosted: Wed Aug 01, 2012 11:46 pm 
Just thinking about this, I wonder how effective this will be, thinking of the fact that the bearing cap is designed to take only forces in the direction of the fasteners.
Now it have to take side way forces as well.
Is there already a solution how to prevent them from turning around in this circular grove ?

Hans


Top
   
PostPosted: Thu Aug 02, 2012 7:36 am 
Offline
Future Club member hopefully!
User avatar

Joined: Thu Oct 06, 2011 1:13 am
Posts: 3173
Location: The continent
Hello Hans,

In the mainbearingcap at the flat face are two bulges that will stop rotating the bearings. The upper bearings in the caps are a bit shorter than the std length in the engineblock.

Jeroen

_________________
Classic Kabelboom Company. For all your wiring needs. http://www.classickabelboomcompany.com


Top
   
PostPosted: Thu Aug 02, 2012 9:09 am 
Offline
Future Club member hopefully!
User avatar

Joined: Tue Oct 03, 2006 5:42 pm
Posts: 3936
Location: Forest of Dean
Could you put the bearings in the block? Much more difficult machining job but at least there'd be no side load on the cap bolts. It's so long since I built a Sprint engine I can't remember which half the standard thrust bearings are in :( They're in the block on an ohv.

I guess it's a trade off between the side load and weakening the block around the cap bolts.

_________________
1978 Pageant Sprint - the rustomite, 1972 Spitfire IV - sprintfire project, 1968 Valencia GT6 II - little Blue, 1980 Vermillion 1500HL - resting. 1974 Sienna 1500TC, Mrs Weevils big brown.


Top
   
PostPosted: Thu Aug 02, 2012 11:56 am 
Offline
Future Club member hopefully!
User avatar

Joined: Thu Oct 06, 2011 1:13 am
Posts: 3173
Location: The continent
Originally they are in the block and i would like to have more surface so another extra set in the cap. I had a discussion with hans this morning and have to think about. There is a possibility that the cap is lifted up minimal when there's load on it and then a slightly uneven wear on the main bearing. My machine shop can fit dowels so the cap cannot move but that's not what i like because when tightening the cap it has to centrate in the block and not on the dowels.

The main load will still be at the block axial bearings and at normal driving they will wear less because of the extra surface. I have to ask this question to tuner/modifier but he's on holiday so be continued.

Jeroen

_________________
Classic Kabelboom Company. For all your wiring needs. http://www.classickabelboomcompany.com


Top
   
PostPosted: Thu Aug 02, 2012 12:54 pm 
Offline
Future Club member hopefully!
User avatar

Joined: Tue Oct 03, 2006 5:42 pm
Posts: 3936
Location: Forest of Dean
Ah they're in the middle bearing block side as standard on a sprint. I was thinking they'd be in the rear bearing but that my memory failing, they're in the rear bearing on an ohv. Therefore I was assuming you'd already established there's enough meat in the crank for a 2nd set of bearing surfaces.

So to flip it around, is there meat in the crank and the block for a 2nd set in a different bearing? I think I can guess the answer. Obviously getting them both on load from day 1 is a pretty unachievable goal of machining but the 2nd set would share the load once one set begins to wear a bit.

_________________
1978 Pageant Sprint - the rustomite, 1972 Spitfire IV - sprintfire project, 1968 Valencia GT6 II - little Blue, 1980 Vermillion 1500HL - resting. 1974 Sienna 1500TC, Mrs Weevils big brown.


Top
   
PostPosted: Thu Aug 02, 2012 11:33 pm 
Offline
Future Club member hopefully!
User avatar

Joined: Thu Oct 06, 2011 1:13 am
Posts: 3173
Location: The continent
That's not an option i think. I also think they never will share load complete because of the cranck expanding at various temps.

Hans, the next thing:

Tonight i was driving home and had a think about it. I can dig up in Oom Wims garden an engineblock with a cranck in it. I know there are a few hiding in the grass somewhere.
When i fit a flywheel and clutch to it, an 1850 bellhouse with clutch hydrolics and a magnetic stand and micro dail gauge, i can do some measurements.

When i take out the axial bearings and fit one loose between the cranck and the middle mainbearingcap i could measure if the cap is moving when declutch. At my work we have a portable pressure device to measure the pedal force as for the MOT you have to push the brake pedal at 700n to see if there are any leaks in a brake system. I can measure what the max pedal pressure is when the clutch diafragma spring is flipping over and see if the cap moves. If it doesn't move, i can take out the clutch and flywheel and fit a longer release bearing sleeve of a sprint, extra lenght because of the sprint's engine/gearbox adapter.

Then i can push directly on the cranckshaft and see when the cap starts moving and see how much pedal force it is. If it's close to a cluch cover spring force or way more. If it's way more when the cap starts moving, there's no need to worry i think. If the cap doesn't move at all it's even possible to do a test with the cap torqued down at half torque and see what happens. It is feasable to have a setup fixed and use my dolomite as test car, only have to fit a new pipe from the clutch master to outside the car to the setup. This test should be a representation of a real situation and the results should be usefull in the futere i think. Or is this setup showing nothing????

Jeroen

_________________
Classic Kabelboom Company. For all your wiring needs. http://www.classickabelboomcompany.com


Top
   
PostPosted: Fri Aug 03, 2012 7:15 am 
Looks great,
I'm glad I made you thinking deeper, will hear the results.

Hans


Top
   
PostPosted: Mon Aug 06, 2012 10:07 pm 
Offline
Future Club member hopefully!
User avatar

Joined: Thu Oct 06, 2011 1:13 am
Posts: 3173
Location: The continent
Tonight made a set up. Found a rusty old engine with cranck in the garden with my metal detector. Fitted a backplate and isolated a bellhousing from a gearbox with working :shock: clutch slave cylinder. When i have time and the wish tomorrow i will have a testrun and add some pictures this week and publice the results.

Hope you all can sleep tonight.

Jeroen

_________________
Classic Kabelboom Company. For all your wiring needs. http://www.classickabelboomcompany.com


Top
   
PostPosted: Tue Aug 07, 2012 11:22 pm 
Offline
Future Club member hopefully!
User avatar

Joined: Thu Oct 06, 2011 1:13 am
Posts: 3173
Location: The continent
Ok tested and all fine. Main bearing cap does not move when declutch.

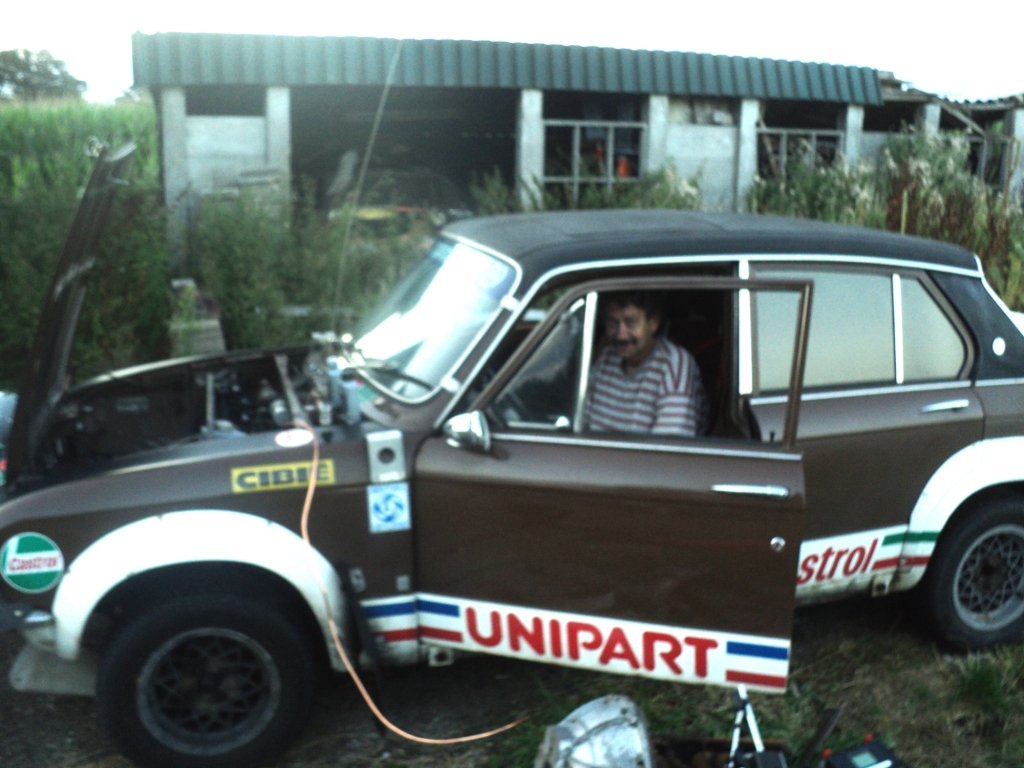
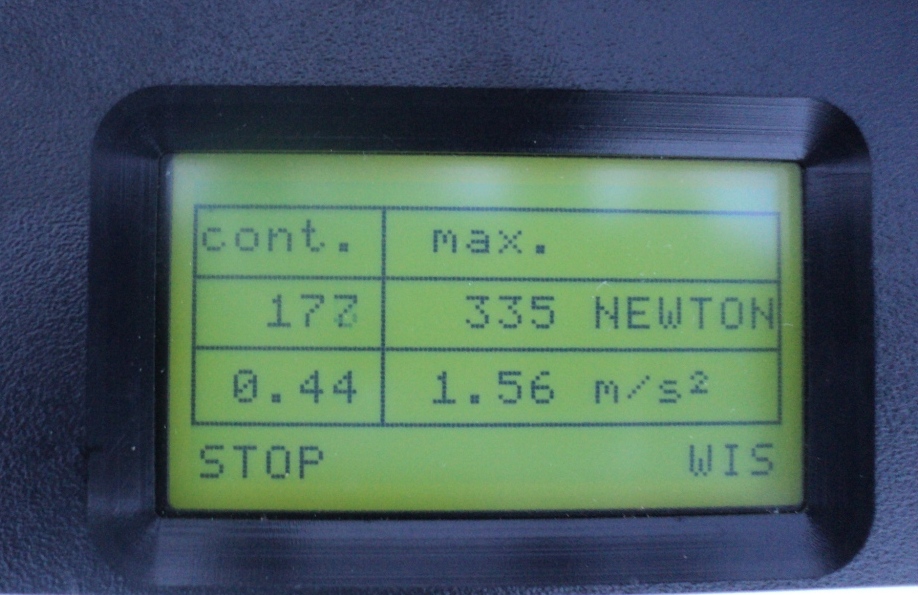
Made the setup and the cranckshaft was moving freely. I took out the axial bearings and had a feelergauge between the cranckshaft and main bearing cap. This to have all the pressure at the top of the bearing cap. In real situ the force is going to be equally devided on the total cap area but i thought to test on the most weak spot and to have the most momentum as possible to have a max extreme test effect. When declutch the max pedal force is about 300N average at different tests and to hold the clutch a force of 180N is needed. Hurray for the diafragma clutch.

There was zero movement of the cap.

When taking off the clutch/flywheel and replaced the releasebearing by a sprint one i could have the force directly at the cranckshaft. At 200N pedalforce the gauge began to move. At about 700N there was a movement of the cap of 0,06mm. The max movement to achieve was 0,10mm.

There wasn't time enough to measure the real forces on the cranckshaft because it was getting dark.

I'm going to proceed the mod because the cap will never move when the total axial force is at the original bearing and the new upper one. As the bearing cap isn't pushed away the bearing is going to work as an actual extra axial bearing.

Jeroen
Attachment:
setup.JPG
setup.JPG [ 386.18 KiB | Viewed 3263 times ]
Attachment:
the helping foot.JPG
the helping foot.JPG [ 478.85 KiB | Viewed 3262 times ]
Attachment:
pressure clutch.JPG
pressure clutch.JPG [ 240.49 KiB | Viewed 3260 times ]

_________________
Classic Kabelboom Company. For all your wiring needs. http://www.classickabelboomcompany.com


Top
   
PostPosted: Tue Aug 07, 2012 11:23 pm 
Offline
Future Club member hopefully!
User avatar

Joined: Thu Oct 06, 2011 1:13 am
Posts: 3173
Location: The continent
.
Attachment:
zero movement.JPG
zero movement.JPG [ 384.08 KiB | Viewed 3263 times ]
Attachment:
cranck direct.JPG
cranck direct.JPG [ 218.52 KiB | Viewed 3263 times ]
Attachment:
0.06 movement.JPG
0.06 movement.JPG [ 395.96 KiB | Viewed 3262 times ]

_________________
Classic Kabelboom Company. For all your wiring needs. http://www.classickabelboomcompany.com


Top
   
PostPosted: Tue Aug 07, 2012 11:59 pm 
Well done !, it does look good. :nodding: :nodding:

BTW the assistant is not just coming from prison, it's uncle Wim, also a Dolomite enthusiast. :D :D

Hans


Top
   
PostPosted: Tue Aug 28, 2012 6:19 pm 
Offline
Future Club member hopefully!
User avatar

Joined: Thu Oct 06, 2011 1:13 am
Posts: 3173
Location: The continent
Here a pic of the middle main cap. It's machined exactly so the same size bearings can be used as upper and lower. The slots are not very high tech. My machine shop adviced to have locating pins in it but i do not like drilling in the cap near the mounting holes or have some loose pins in the bearingcap. So a low temp weld was the solution. No distortion or weakening but very functional but it looks a bit flintstones.
Attachment:
motor7.jpg
motor7.jpg [ 117.18 KiB | Viewed 3072 times ]
The other pictures are from try fitting. I have to make some brackets to hav it pasivated with some more stuff. Waterhole pic is for Zombeh.

_________________
Classic Kabelboom Company. For all your wiring needs. http://www.classickabelboomcompany.com


Top
   
PostPosted: Tue Aug 28, 2012 6:20 pm 
Offline
Future Club member hopefully!
User avatar

Joined: Thu Oct 06, 2011 1:13 am
Posts: 3173
Location: The continent
.
Attachment:
motor1.jpg
motor1.jpg [ 119.44 KiB | Viewed 3074 times ]
.
Attachment:
motor2.jpg
motor2.jpg [ 139.31 KiB | Viewed 3072 times ]
Attachment:
motor3.jpg
motor3.jpg [ 143.69 KiB | Viewed 3071 times ]

_________________
Classic Kabelboom Company. For all your wiring needs. http://www.classickabelboomcompany.com


Top
   
Display posts from previous:  Sort by  
Post new topic  Reply to topic  [ 102 posts ]  Go to page Previous 1 2 3 4 57 Next

All times are UTC+01:00


Who is online

Users browsing this forum: No registered users and 5 guests


You cannot post new topics in this forum
You cannot reply to topics in this forum
You cannot edit your posts in this forum
You cannot delete your posts in this forum
You cannot post attachments in this forum

Search for:
Jump to:  
Powered by phpBB® Forum Software © phpBB Limited