The Triumph Dolomite Club - Discussion Forum

The Number One Club for owners of Triumph's range of small saloons from the 1960s and 1970s.
It is currently Sat Apr 27, 2024 11:45 am

All times are UTC+01:00


Post new topic  Reply to topic  [ 11 posts ] 
Author Message
PostPosted: Sun Apr 30, 2023 8:24 am 
Offline
TDC Member

Joined: Thu Apr 06, 2023 6:27 am
Posts: 69
I could feel the metal framework of my seats through the disintegrating foam of the backrests, so decided to do something about it.
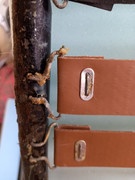
After stripping the cover off and removing the disintegrated foam, it was obvious that it was mainly the pirelli webbing straps that had lost all the stretch, and replacements were unavailable. I bought on Ebay a couple of metres of 1 1/2 inch webbing and set about re making the straps. I carefully bent up the ends of the staples on the old straps and removed the staples and plates so I could remove the bent wire hooks. All were retained for re use.
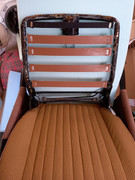
One end of the new webbing was wrapped over around a wire clip and fastened using the old plates and staples, a sharp bradawl was used to make holes in the webbing for the staples to pass through. The finished end was then clipped onto the seat frame and pulled lightly across to the other side so I could mark off the length required, remembering to allow for the wrap over and the wire clip. Aim to have about 15mm of stretch to get the clip in the holes on the frame so the webbing ends up stretched across the frame. You soon get the hang of how much to allow for this. On my seat there was a 2" strap at the bottom and a 1" strap at the top. For the bottom I simply used a piece of 1 1/2" webbing, although 2" webbing is available. I was able to salvage one of the original straps for the top, just cutting it down with a stanley knife to 1" wide. I had to do this because I had run out of new webbing, to replace all the straps you need2m of 1 1/2", 0.5m of 2", and either 0.5m of 1" or another half metre of 1 1/2" to cut down as the 1" wide webbing doesn`t seem to be readily available.

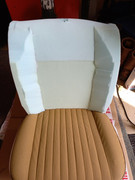
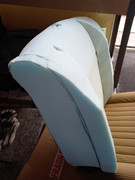
After the webbing was finished I used 2" thick high density foam, glued to a hessian backing as per the original for the lower part of the backrest to give a bit of Lumbar support, and 2 layers of 1" medium density for the top section as it was easier to wrap over the seat top frame than a solid lump of 2" , holes being made for the headrest tube as I progressed.
This was then sculpted at the sides to match the seat frame using an electric carving knife (£10 off ebay).
2 Pieces of 1" were shaped to fit each side and glued in place to cover the frame and the edge of the backrest foam.
Finally 2 pieces of 2" were tapered to make side bolsters and these were glued in place and sculpted with the carving knife to blend in to the top roll and at the bottom to taper into the backrest. Hopefully studying the photos will make it clear what I mean.
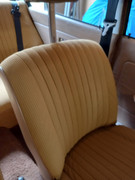
The covers were then persuaded with a lot of tugging and heaving back into place.
I am happy with the result, which is practically indistinguishable from factory, and comfortable too.
Hope you agree.
Ralph
Image

Image

Image

Image

Image


Top
   
PostPosted: Sun Apr 30, 2023 9:51 am 
Offline
TDC Member

Joined: Mon Dec 12, 2016 9:53 pm
Posts: 1710
Location: Harrow Middlesex
Nice write up :thumbsup:


Top
   
PostPosted: Sun Apr 30, 2023 2:00 pm 
Offline
TDC West Mids Area Organiser
User avatar

Joined: Thu Sep 28, 2006 1:13 pm
Posts: 13341
Location: Over here...can't you see me?
^ what he said.

You should send it to the magazine editor so that it reaches all members:

stevew451@outlook.com


Top
   
PostPosted: Mon May 01, 2023 9:55 pm 
Offline
TDC Member

Joined: Wed Aug 24, 2011 8:09 pm
Posts: 306
Location: West Yorks
Great to meet up with you today Ralph at crow nest.
As we discussed this is something definitely on my to do list and this serves well to support the activity.
Well done

_________________
Trevor

75 Sprint in Magenta called GunGaDiN GGD944N
2017 Jaguar XE R-sport


Top
   
PostPosted: Mon Jun 26, 2023 8:50 pm 
Offline
TDC Member
User avatar

Joined: Mon Jun 05, 2023 11:51 am
Posts: 88
Location: Northumberland
Having recently aquired a 1980 1500 SE my wife complains that she can feel the head rest tube digging into her back on the passenger seat so I'm going to have to do what you have done. So thank you for posting the guide and pictures. It will make things far easier knowing what needs to be done.

_________________
1979 Dolomite SE (Black Obviously)
2000 Saab 'Viggen' Convertible in 'Lightening Blue'

Dave


Top
   
PostPosted: Thu Jun 29, 2023 9:30 am 
Offline
TDC Member

Joined: Thu Apr 06, 2023 6:27 am
Posts: 69
Quote:
Having recently aquired a 1980 1500 SE my wife complains that she can feel the head rest tube digging into her back on the passenger seat so I'm going to have to do what you have done. So thank you for posting the guide and pictures. It will make things far easier knowing what needs to be done.
It is a very messy job taking the cover off and removing the de composed foam, but looking at the remains of the foam gave me an appreciation of what I was aiming for. Be aware of the 2 metal clips attached to the cardboard side stifferners that clip into the seat frame at the bottom edges, I wondered why the seat cover would not pull off and it was these 2 holding it. You may find as I did that it was mainly the pirelli webbing that had lost all it`s stretch.
Spray cans of carpet adhesive are all you need glue wise.
Good luck,
Ralph


Top
   
PostPosted: Thu Jun 29, 2023 10:58 am 
Offline
TDC Member
User avatar

Joined: Mon Jun 05, 2023 11:51 am
Posts: 88
Location: Northumberland
Quote:
It is a very messy job taking the cover off and removing the de composed foam, but looking at the remains of the foam gave me an appreciation of what I was aiming for. Be aware of the 2 metal clips attached to the cardboard side stifferners that clip into the seat frame at the bottom edges, I wondered why the seat cover would not pull off and it was these 2 holding it. You may find as I did that it was mainly the pirelli webbing that had lost all it`s stretch.
Spray cans of carpet adhesive are all you need glue wise.
Good luck,
Ralph
Thanks, I saw a video on yTube for a TR6 seat recover https://www.youtube.com/watch?v=LaQ-6q-GA-w (4 parts) which showed the cardboard collars at the bottom of the sides and how to 'struggle' with them. I have some proper high temp (120c) trim adhesive as I learn't the hard way on a previous car where the glue I used simply softened when the car was in the sunshine for any length of time. I will feedback how I get on but it may not be for a while.

_________________
1979 Dolomite SE (Black Obviously)
2000 Saab 'Viggen' Convertible in 'Lightening Blue'

Dave


Top
   
PostPosted: Sun Jul 02, 2023 8:03 pm 
Offline
TDC Member
User avatar

Joined: Mon Jun 05, 2023 11:51 am
Posts: 88
Location: Northumberland
Quote:
You may find as I did that it was mainly the pirelli webbing that had lost all it`s stretch.
Good luck,
Ralph
Took the cover part way off today (left the headrest on, simply pulled the cover up and pulled the foam back) and yes the webbing was 'slack', especially the 1" bit at the top over the headrest bracket so made sure that one was very tight when I replaced them with new straps. The old webbing did have a bit of elasticity, the new I bought doesn't so getting the lengths right was a bit of a challenge as they are all slightly different.

Need to go and get some foam in the morning from the local upholsterers to complete the job.

_________________
1979 Dolomite SE (Black Obviously)
2000 Saab 'Viggen' Convertible in 'Lightening Blue'

Dave


Top
   
PostPosted: Mon Jul 03, 2023 11:51 am 
Offline
TDC Member
User avatar

Joined: Mon Jun 05, 2023 11:51 am
Posts: 88
Location: Northumberland
Quote:
Be aware of the 2 metal clips attached to the cardboard side stifferners that clip into the seat frame at the bottom edges, I wondered why the seat cover would not pull off and it was these 2 holding it.
Those clips came off with a bit of tugging but getting them back on was a challenge, trying to hold the seat and pull the sides down. Managed to do one but had to get my wife to hold the seat whilst I re fitted the side with the backrest lever as it was so tight.

Anyway, I got the foam I needed for 2 seats for £20 from a local upholsterer. Passenger side was completed this morning and tested to my wife's satisfaction....... but the drivers side will have to wait until later in the week when the rain stops so I can get the seat out of the car.

_________________
1979 Dolomite SE (Black Obviously)
2000 Saab 'Viggen' Convertible in 'Lightening Blue'

Dave


Top
   
PostPosted: Tue Sep 05, 2023 6:32 pm 
Offline
TDC Member
User avatar

Joined: Mon Jun 05, 2023 11:51 am
Posts: 88
Location: Northumberland
I finally got to do the drivers seat properly today. Seat out of the car, cover released and pulled up, Pirelli webbing changed, cover back on and seat refitted in just over 2 hours total. The OP's guide did help a lot plus having done the pasenger side already I knew what to expect.

So if your seat back just doesn't 'feel right' or is uncomfortable, don't be afraid to give changing the webbing a go.

_________________
1979 Dolomite SE (Black Obviously)
2000 Saab 'Viggen' Convertible in 'Lightening Blue'

Dave


Top
   
PostPosted: Mon Oct 02, 2023 3:34 pm 
Offline
TDC Member
User avatar

Joined: Mon Jun 05, 2023 11:51 am
Posts: 88
Location: Northumberland
If your headrest has gone soft and floppy, the foam turned to sawdust, then you can buy a replacement foam insert from Classic British Sportscar Trim (Plymouth based) via eBay https://www.ebay.co.uk/itm/285494135541 ... SwAOJktOcZ

Not cheap for what it is but cheaper than a total replacement and it makes a tremendous difference once fitted.

Once you pull the old cover off and cleanup all the broken down foam, fit the new foam piece into the cover, THEN fit it onto the support bracket as i unit. It's easier to do with the seat out of the car as you have to 'staple' the cover to the wooden trim piece inside the metal frame to finish it and that is really awkward with the seat in the car (I tried)

_________________
1979 Dolomite SE (Black Obviously)
2000 Saab 'Viggen' Convertible in 'Lightening Blue'

Dave


Top
   
Display posts from previous:  Sort by  
Post new topic  Reply to topic  [ 11 posts ] 

All times are UTC+01:00


Who is online

Users browsing this forum: Google and 4 guests


You cannot post new topics in this forum
You cannot reply to topics in this forum
You cannot edit your posts in this forum
You cannot delete your posts in this forum
You cannot post attachments in this forum

Search for:
Jump to:  
Powered by phpBB® Forum Software © phpBB Limited