The Triumph Dolomite Club - Discussion Forum

The Number One Club for owners of Triumph's range of small saloons from the 1960s and 1970s.
It is currently Sat May 11, 2024 10:32 pm

All times are UTC+01:00


Post new topic  Reply to topic  [ 14 posts ] 
Author Message
PostPosted: Sat Apr 27, 2024 4:52 pm 
Offline
Future Club member hopefully!

Joined: Sun Apr 21, 2024 9:02 pm
Posts: 7
Hello all, I’ve got my 1500 (picture for your pleasure) out on the driveway and attempting my first ‘big’ bit of work on it - 
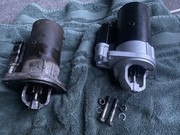
a new starter motor. Surface level, it’s an easy job, but a couple of questions if someone could help me as I’m driving myself mad!

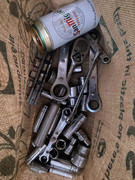
The two bolts to remove seem to be impossibly difficult to remove - I’ve got some penetrating spray down there but it’s veeeeery tough.

1) I’ve only got a metric socket set at the moment - will I simply destroy the bolt if I even try to continue? Seems to be 1/2” so I’ll grab that on order if I’ll be making things worse with 13mm or 14mm.

2) Getting the old starter off is one thing, but getting the new one on? There’s very little wiggle room to even get my torque wrench lined up straight for the top, not even considering the lower one yet. Any tips or advice would be great for this. Am I supposed to remove the heater unit or should it literally be as simple as Haynes suggests?
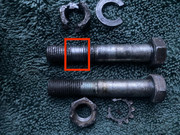
3) Just in case I do end up destroying these bolts - what should I be looking for when I’m grabbing fresh ones? A part number would be ideal if anyone’s able to help!

This is my first proper project and I already feel like I’m in a bit too deep :(

As an aside, I’ve troubleshooted down to a faulty starter motor by doing the following
0. Starter has been hit and miss - hitting with hammer + wood has stopped working now
1. Ignition gives absolute silence - not even a click
2. Battery at 12.68V, awesome
3. Cleaned up terminals on battery, positive and ground
4. Attempted to clean chassis ground but that looks very corroded, might be that simple!
5. Cleaned up all connections to starter
6. This now gives one click but still intermittently - solenoid engaging?

Once I’ve removed the starter, I’ll do a quick test out of the car to see if it’s actually borked, or whether it’s grounding elsewhere in the car.

Happy to post any photos that might be useful for troubleshooting :)

Any thoughts, advice, tips, or snark is all well received!

Cheers,
Alex

Image


Top
   
PostPosted: Sat Apr 27, 2024 4:59 pm 
Offline
TDC Toledo Registrar

Joined: Wed Oct 04, 2006 10:25 pm
Posts: 651
Just done this on my car (1500cc Dolomite) and your post popped up, while I was researching bits to rebuild it, which are getting harder to source. Mine works but is noisy - the end bushes are toast.

The bolts that hold the engine to gearbox are 1/2" (slightly smaller than 13mm)

The nuts and bolts that hold the starter motor on are 9/16 - just borrow/buy the correct tool to avoid wrecking the fixings.

You could start dismantling the motor but if you are not very experienced, buy a replacement motor from the club, which is a fit and forget. They are sold on an exchange basis, so don't strip and run your motor if you do not know what you are doing.

Hope this helps.

R


Top
   
PostPosted: Sat Apr 27, 2024 5:02 pm 
Offline
TDC Toledo Registrar

Joined: Wed Oct 04, 2006 10:25 pm
Posts: 651
Oh and my method is, firstly, disconnect all wiring. Take a pic so you get them all in order later.

Remove the bottom bolts with a long extension. It is a bit fiddly.

Then undo the to mounting but and bolt.

Remove the motor from under the car.

Note how many spacers are fitted.

No need to remove the heater unit.

R


Top
   
PostPosted: Sat Apr 27, 2024 5:46 pm 
Offline
Future Club member hopefully!

Joined: Sun Apr 21, 2024 9:02 pm
Posts: 7
Quote:
The nuts and bolts that hold the starter motor on are 9/16 - just borrow/buy the correct tool to avoid wrecking the fixings.
Absolute superstar thank you - this explains why 14mm was a closer fit! I’ll see what I can find around town but we’ve not got a decent parts store around here in the sticks.

Really appreciate the advice though, I’ve done most of these bits and bobs you’ve recommended too - all good :)

I’ve got myself a new starter here, ready to go in - just waiting on the task of getting this one pulled out, even just to test it! Not planning on dismantling the thing whilst it’s in situ though.

Popped it all back together and I’m in the same place I was this morning!

_________________
28 year old trying to restore a 45 year old shed.

1979 Dolomite 1500 (the brown-mobile)
2010 Alfa Romeo Brera (the broken-mobile)
2020 Vauxhall Corsa (the sad-mobile)


Top
   
PostPosted: Sat Apr 27, 2024 9:18 pm 
Offline
Future Club member hopefully!

Joined: Sun Apr 21, 2024 9:02 pm
Posts: 7
UPDATE:

Should be sorted for sockets now thanks to a very kind local couple who have driven behind (and admired) the Dolomite around town.

More updates to follow in case it’s useful for anybody as dense as I’ve been.
Image

_________________
28 year old trying to restore a 45 year old shed.

1979 Dolomite 1500 (the brown-mobile)
2010 Alfa Romeo Brera (the broken-mobile)
2020 Vauxhall Corsa (the sad-mobile)


Top
   
PostPosted: Sun Apr 28, 2024 3:17 pm 
Offline
TDC Member

Joined: Thu Sep 28, 2006 10:06 pm
Posts: 1183
Location: Bristol
So have you fitted the replacement starter and it still does not turn the engine over?


Top
   
PostPosted: Sun Apr 28, 2024 4:23 pm 
Offline
Future Club member hopefully!

Joined: Sun Apr 21, 2024 9:02 pm
Posts: 7
Quote:
So have you fitted the replacement starter and it still does not turn the engine over?
Nah not just yet, first half the job (taking it off) is proving difficult enough haha! Seized bolts and tight spaces are fighting me at the moment.

Working on the last bolt now so we’ll be testing it very shortly, gonna be a huge cheer when (if) the old one doesn’t turn and I prove myself right for swapping it!

_________________
28 year old trying to restore a 45 year old shed.

1979 Dolomite 1500 (the brown-mobile)
2010 Alfa Romeo Brera (the broken-mobile)
2020 Vauxhall Corsa (the sad-mobile)


Top
   
PostPosted: Mon Apr 29, 2024 8:29 pm 
Offline
Future Club member hopefully!

Joined: Sun Apr 21, 2024 9:02 pm
Posts: 7
It’s finally out and time to test it! An entire weekend of work (trying to unscrew two nuts) has driven me to insanity but here we go…

Image

Image

Red square shows the bolt (lower) who I’d been struggling with - might actually be self inflicted somewhat (righty loosey, lefty tighty) but I’ll go with the story that it’s been kaput from the start.

As you can tell, my last resort was to drill it loose and hammer the bolt through after trying:
1. Endless penetrating spray (beautiful stuff btw)
2. Hold bolt on one end, unscrew the nut from the other (it just span freely)
3. Screwdriver to apply pressure when ratcheting (far too tight for all of them)
4. Pliers and pulling with all my might to get it on the thread
5. Brute force as my last resort, and that was the winner!

Anyways now I’m in the market for a new nut and bolt for the starter mounting haha!

Test process begins now, hopefully we’ll prove the old starter was dead all along (and god help me if it spins)…

Updates to follow (I’m trying to prove that a fool with some tools can do this on the driveway - might be a good reference for someone in the future)

_________________
28 year old trying to restore a 45 year old shed.

1979 Dolomite 1500 (the brown-mobile)
2010 Alfa Romeo Brera (the broken-mobile)
2020 Vauxhall Corsa (the sad-mobile)


Top
   
PostPosted: Tue Apr 30, 2024 12:53 am 
Offline
TDC Shropshire Area Organiser

Joined: Sun Aug 21, 2011 5:12 pm
Posts: 7069
Location: Highley, Shropshire
Test it carefully in the EXACT orientation it is fitted to the car!

I bought an old Nissan station wagon at the auctions and had to bump start it to get it home. Pulled the starter and powered it up, it turned perfect, back on the car, NOTHING! Took it back off, run fine! You know the definition of futility?

Finally got an idea and laid the starter on it's side as fitted to the car and it was dead as a dodo. The end bearing was a bit tired and when on the car, one of the brushes lost contact with the commutator!

Sometimes you can waste a whole lot more time than the money you might have saved.

Steve

_________________
'73 2 door Toledo with Vauxhall Carlton 2.0 8v engine (The Carledo)
'78 Sprint Auto with Vauxhall Omega 2.2 16v engine (The Dolomega)
'72 Triumph 1500FWD in Slate Grey, Now with RWD and Carledo powertrain!

Maverick Triumph, Servicing, Repairs, Electrical, Recomissioning, MOT prep, Trackerjack brake fitting service.
Apprentice served Triumph Specialist for 50 years. PM for more info or quotes.


Top
   
PostPosted: Tue Apr 30, 2024 9:01 am 
Offline
TDC Member
User avatar

Joined: Mon Jun 05, 2023 11:51 am
Posts: 90
Location: Northumberland
Quote:
Sometimes you can waste a whole lot more time than the money you might have saved.

Steve
So, So true Steve. Been there, done it on more than one occasion.

_________________
1979 Dolomite SE (Black Obviously)
2000 Saab 'Viggen' Convertible in 'Lightening Blue'

Dave


Top
   
PostPosted: Tue Apr 30, 2024 10:03 pm 
Offline
Future Club member hopefully!

Joined: Sun Apr 21, 2024 9:02 pm
Posts: 7
Well, well, well…

Old starter came out last night and I tested at lunch time today - intermittently powering, the same as I saw when fitted - solenoid wasn’t activated but the motor did (half-heartedly) spin.

New one went in after work tonight; started first time!

I’ve only got it in tight enough to be stable - not torqued up as per Haynes just yet but it’s good enough to test for a couple minutes. Job for tomorrow night will be getting the torque wrench out and calling it done!
Quote:
Follow up question now it it’s fitted and it works: does the starter mount actually need to be torqued exactly? Or is ‘very tight’ good enough? Seen mixed opinions in other threads but I’d love some thoughts - obviously not gonna hurt to be exact to 38nm (or lb/ft, I’ve not got the book with me)!
Few other little bits I did amongst the chaos of the weekend so I can’t pin it all to the starter as some of these bits may have helped out a bit:
1. Chassis ground was corroded to heck; that’s had a big clean
2. In fact, the whole earth cable (Chassis / Battery / Engine) looked ropey so grabbed a new one
3. Every single connection sanded with 240 wet/dry to remove any chance of corrosion
4. Every single connection going back on is tight as I could muster

But, new starter is in and the brown-mobile fired up on the button!

On to the next bit of work; new exhaust…

_________________
28 year old trying to restore a 45 year old shed.

1979 Dolomite 1500 (the brown-mobile)
2010 Alfa Romeo Brera (the broken-mobile)
2020 Vauxhall Corsa (the sad-mobile)


Top
   
PostPosted: Wed May 01, 2024 12:02 am 
Offline
TDC Shropshire Area Organiser

Joined: Sun Aug 21, 2011 5:12 pm
Posts: 7069
Location: Highley, Shropshire
There's an old motor trade term for how tight things should be, it's called "FT", The translation is obvious!

And no, i've never torqued up a starter motor bolt in more than 50 years of professional spannering.

There will be, somewhere, a torque value applied for the starter bolts, but it's only really used in the factory during the build process. Nobody outside that very narrow application would bother, it's just not that critical.

Head bolts/nuts, YES, crank bearings, of course, diff bearings and certain wheel bearings, definitely. Wheel nuts, sometimes! Depends who is doing them, tyre shops insist their trained monkeys torque wheel nuts for consistency and to avoid comebacks. But after 50 years and countless thousands of wheel nuts, I can feel how tight they need to be!

But I bought my first house from a Maclaren formula1 engine tech. In those days they were using the old Cosworth Ford V8 and he told me they never used torque wrenches at all, doing it all by feel and experience! Even after all these years, i'm not THAT confident, those guys must have had stainless steel cojones!

Steve

_________________
'73 2 door Toledo with Vauxhall Carlton 2.0 8v engine (The Carledo)
'78 Sprint Auto with Vauxhall Omega 2.2 16v engine (The Dolomega)
'72 Triumph 1500FWD in Slate Grey, Now with RWD and Carledo powertrain!

Maverick Triumph, Servicing, Repairs, Electrical, Recomissioning, MOT prep, Trackerjack brake fitting service.
Apprentice served Triumph Specialist for 50 years. PM for more info or quotes.


Top
   
PostPosted: Wed May 01, 2024 12:32 am 
Offline
Future Club member hopefully!

Joined: Sun Apr 21, 2024 9:02 pm
Posts: 7
Quote:
There's an old motor trade term for how tight things should be, it's called "FT", The translation is obvious!

And no, i've never torqued up a starter motor bolt in more than 50 years of professional spannering.

There will be, somewhere, a torque value applied for the starter bolts, but it's only really used in the factory during the build process. Nobody outside that very narrow application would bother, it's just not that critical.

Cheers Steve, sounds like that German ‘guten tight’ method that I’ve read about; thought that should be true in this case - it’s fundamentally a mounting so as long as it’s not wobbly I’d assume we’re good to go!

I’ll throw a little more elbow grease on it tomorrow because like I say, I’ve got it a bit tighter than ‘tight’ at the moment for testing, but it’s not quite FT haha!

_________________
28 year old trying to restore a 45 year old shed.

1979 Dolomite 1500 (the brown-mobile)
2010 Alfa Romeo Brera (the broken-mobile)
2020 Vauxhall Corsa (the sad-mobile)


Top
   
PostPosted: Wed May 01, 2024 7:38 pm 
Offline
TDC Member

Joined: Thu Sep 28, 2006 10:06 pm
Posts: 1183
Location: Bristol
Some tips on fitting a new exhaust.
1. Ensure both the exhaust manifold flange surface and the downpipe flange are flat using a straight edge as this joint is renown for blowing.
2. I always use brass nuts to bolt the flanges together as they do not seize up.
3.There should be a support bracket at the back end of the gearbox or Over Drive. This helps to take the pressure off the manifold / downpipe connection. The correct clamp for the exhaust at this point has to be put on the exhaust pipe before it is fitted as it is not the U type.
4. If you fit a wide tie wrap loosely around each the rubber exhaust mounts they will all last for a lot longer.


Top
   
Display posts from previous:  Sort by  
Post new topic  Reply to topic  [ 14 posts ] 

All times are UTC+01:00


Who is online

Users browsing this forum: AhrefsBot [Bot], Google and 2 guests


You cannot post new topics in this forum
You cannot reply to topics in this forum
You cannot edit your posts in this forum
You cannot delete your posts in this forum
You cannot post attachments in this forum

Search for:
Jump to:  
Powered by phpBB® Forum Software © phpBB Limited