Spring update… more rust repair and deadlines
So, February has came and went and I have still not finished this damned car. This was caused by a number of issues. Firstly the shear amount of rust I discovered over the Christmas holidays. secondly some slight technical issues with the ECU and the tuning software. Thirdly a slight calendar conflict with another project with higher priority. And finally, getting ill at the worst possible time.
So back to the beginning:
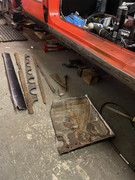
Over the Christmas period, I started tending to the various rust points on some of the more structurally significant parts of the car, starting with the passenger side sill. After cutting the bottom few inches of the whole sill off (see previous pictures), I managed to make and install the lower portions of the inner sill panel, sill reinforcer, outer sill panel, and jacking point reinforcements before I shoved as much rust protection product into the sill as possible. This included;
• Most of a tin of diluted Hammerite paint
• Waxoyl box section/sill protection
• Seam sealer on basically everything
• Stone chip paint
• Waxoyl underseal
The diluted Hammerite was brilliant but amazing messy. I thinned it out loads so that it would seap inbetween the spot welds on the seam, forgetting that means it would flow OUT of the seam and on to the floor… que panic and lots of rags. I still have to finish off the passenger side sill as I have to repair a section of the rear wheel arch that caps the sill off. As of today, I’ve made the patch panel, but not welded it in place. This repair did end up taking around 80 hours to do so far, and that doesn’t include any of the fillers, sanding, and finishing work. It’s no where near perfect at the moment, and I’d probably end up putting 10kg of fillers getting it to the proper shape, but for now, it’s good enough. Next time, I’m going to buy Club outer sill panels.
While sorting out the passenger side sill, I ended up looking at the drivers side sill in the hope that I didn’t need to do anything as it didn’t look too bad.
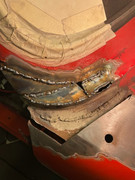
Then, I started digging… and digging… and digging. In total, basically half of the sill needed replacing as the lip above the seam had just gone and you could move the inner reinforcement panel (what was left of it) with your finger. When I cut the outer sill off, the bottom 2 inches of the reinforcement panel was gone. And not that it was weak or crumbly, I mean it wasn’t there at all. I also ended up looking at the join between the sill and the drivers side floor, which was also very rotten. And as the drivers floor had previously been patched to hell, I ended up making a new drivers side floor along with the front 3 feet of sill panels. I also discovered that the front cap for both of the sills were also entirely missing! They were fun to fabricate up.
How much material I had to remove from the drivers side
In total, I’ve added around 6-8 square feet of new metal to the car!!
And I’ve also finally finished off the ‘A’ pillar repairs on both sides. I did have to cut off a bit of the front wings to get to the worst parts, but at least now I don’t have to worry about the structural rigidity of the car too much, I should probably fit a roll cage or something at some point, just in case.
Drivers side A pillar repair:
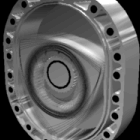
As for my ECU woes, since I had the engine running, I haven’t really done much to the engine apart from take it out and put it back in. The only thing I changed at all was the intake manifold, which I changed the design to use a fully 3D printed manifold instead of a half printed/half Jag manifold. And unfortunately, the laptop I was using to tune the car stopped working so changed laptops and had to fiddle around getting it to connect to the ECU.
And somewhere in the drama of changing laptops, the car wouldn’t run, and I’m trying to get it to run, I blew up the intake manifold 4 times. So each time, I would have to remove it, disassemble it, re-bond it back together, then re-fit it to the car, which made trying to diagnose the issue very time consuming. In all, it took me two weeks to work out it was an incorrect crank offset setting combined with an incorrect injector setting. With those remedied, she runs! just not brilliantly yet, but I haven’t had time to get the tune a good going over as I’ve been busy with the rust repairs.
What I’m up to currently is body work and odd jobs. Now the A pillars are repaired, I’ve filler and sanded them to be pretty well and just about ready for paint. The current aim is to eave the back half of the car the red it currently is and paint forward of the A pillars in primer so I can MOT it and drive it until I nail down a colour I’m happy with. I also need to repair the lower seam between the passenger front wing and the front valance as it’s completely disintegrated. I’ll probably just fibreglass fill it for now, but I’ll probably replace the wings and valence with FRP or something similar in the future.
If you read all of this, thank you. It’s been a long few months but the end is in sight. Well, the first end is anyway. I would post more pictures of what I’ve done but these would just be too many for this post.
Hopefully I’ll get around to meeting some of you at a Dolomite day or a car show soon.