The Triumph Dolomite Club - Discussion Forum

The Number One Club for owners of Triumph's range of small saloons from the 1960s and 1970s.
It is currently Fri Apr 19, 2024 2:10 am

All times are UTC+01:00


Post new topic  Reply to topic  [ 178 posts ]  Go to page Previous 13 4 5 6 712 Next
Author Message
PostPosted: Sun Aug 10, 2014 11:41 pm 
Thanks for that info Carledo. That will give me something to work to.

David


Top
   
PostPosted: Mon Aug 11, 2014 12:18 am 
Offline
Future Club member hopefully!

Joined: Tue Sep 25, 2012 2:08 am
Posts: 387
Location: Christchurch, New Zealand
David

I picked up from somewhere that you have the Haynes manual – in your comments relating to the gearlever connection on the gearbox you have very kindly purchased and are transporting on my behalf.

This website, also mentioned elsewhere on the Forum, http://www.vitessesteve.co.uk/, has copies of the factory workshop manuals. If you feel that you need access to them. The Haynes manual has had a lot of the information from the workshop manuals copied straight across, with some additional information and of course the photos that are often more useful.

I have had a quick look through my copy of the factory workshop manual here this morning in the hope that I might find some technical information relating to setting up the front of the car. In the body area of the manual is comment on using a Churchill jig for setting up all the datum points. There is nothing there though forward of the subframe mounting points. And since you are putting everything back together with the subframe in (the assumption being that it is not distorted in any way) then I think you should, or I would hope, that you do not have too many problems.

I have also checked the General Specification Data sheet at the front of the manual 04-4 and 04-5 and there is nothing there which I think would be of any great help.

However I am attaching a page out of the manual which describes the setting up of the front suspension camber and the adding and or removing of the shims which we have covered before.
Attachment:
20140811Ptw Dolomite camber details.jpg
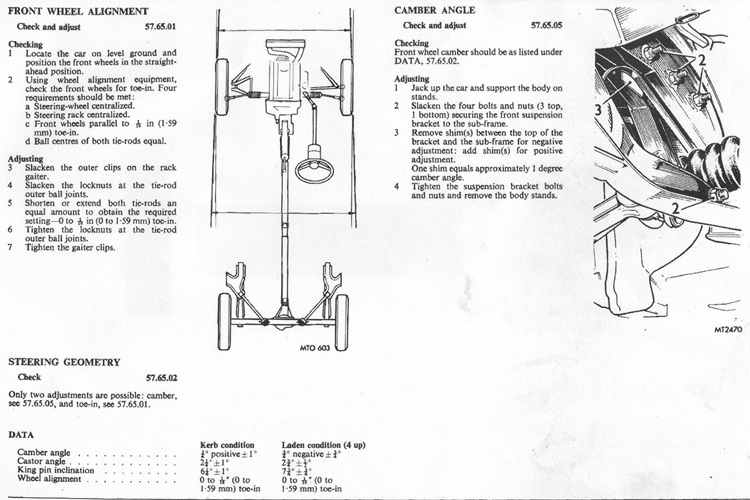
20140811Ptw Dolomite camber details.jpg [ 162.58 KiB | Viewed 161602 times ]
Hope that is of some help.

Robert


Top
   
PostPosted: Mon Aug 11, 2014 10:23 pm 
Thanks Robert. The wealth of information to be found on this forum is overwhelming. I'm sure there are others who will find that a really useful reference too.

David


Top
   
PostPosted: Sat Oct 18, 2014 4:18 pm 
I have not accomplished much on YGD 342S for the last couple of months but this week I was determined to try to get on with refitting the front panel and wings.
I was far from happy with the size of the panel gaps I was achieving but a slight modification seems to have improved things here.
That still leaves me with the alignment of the panels. Since I dont have anything to look at for comparison I was wondering if anybody could perhaps post a few photos of the area where the wing flange meets the landing panel next to the bonnet hinges? Does the wing sit under this panel or on top?
Also where the inner front panel aligns with the edge of the inner wings. I know it looks pretty obvious here but want to be sure before I weld anything!
I have taken diagonal measurements to try to establish that things are sitting square but it is pretty awkward on my own!
I will try to post some photos to show what I have got so far.

Thanks

David


Top
   
PostPosted: Mon Feb 02, 2015 8:16 pm 
Today I removed both rear springs and dampers to replace them with new ones. Only after I had dismantled both shocks I noticed that the upper rear mounting plates seem to have a bias. I'm guessing this has to do with an effect on the camber of the rear suspension? My question is what way round does the mounting bracket sit on top of the strut?
Haynes manual makes no mention of it. Rimmers part no.154118.

Any help would be appreciated

Cheers

David


Top
   
 Post subject: Yes...
PostPosted: Tue Feb 03, 2015 10:18 am 
Offline
TDC Member
User avatar

Joined: Thu Aug 09, 2007 1:22 pm
Posts: 6481
Location: Caithness, Scotland
Davy, the top mounts are indeed angled.
You know when they are correctly orientated because only then will the bottom shocker mounting line up easily with the lower suspension arm.

The shocks are angled with their bottom mounts being further forward than the (centre of the) tops relative to a plumb line.


hope this helps you to figure it out,


Ian.

_________________
TDC Forum moderator
PLEASE help us to maintain a friendly forum,
either PM or use Report Post if you see anything you are unhappy with. Thanks.


Top
   
PostPosted: Tue Feb 03, 2015 11:05 am 
Offline
TDC Member
User avatar

Joined: Mon Jun 11, 2012 4:36 pm
Posts: 1225
Location: Andover Hants
They should slope forwards.

viewtopic.php?f=19&t=25122&start=180

_________________
Modified Dolomite Sprint MSO 662P VA485 1973 Mimosa Sprint
ImageImageImage
Image


Top
   
PostPosted: Tue Feb 03, 2015 12:33 pm 
Thanks guys, I was thinking they might slope outwards? I was going to compare measurements between the top strut positions and the distance between the lower suspension arms, but looking at diagrams I suspected that they should indeed slope forwards.
This was a very subtle difference that I could easily have overlooked had I not stopped to clean some bits of muck and underseal from the mounting flange.

Thanks

David


Top
   
PostPosted: Thu Feb 19, 2015 4:59 pm 
I was away on a course for my work all last week so nothing was accomplished on the Sprint but yesterday, without really meaning to, I ended up refitting the complete rear axle, trailing arms and radius arms. I wasn't sure initially whether to fit the parts individually but ended up bolting the whole thing together on the floor then positioned it underneath and raised it all up on a large trolley jack until I could locate the shocks into the trailing arms to help take some of the weight. Part way through I broke the bulb in my worklight and having to work the dim light of the workshop I had to feel for the location holes for the trailing arms and radius arms.
Now that everything is secure underneath I will turn to replacing the brake pipes with new and recon the calipers. I noticed that that the load sensing valve seems to be leaking. Are overhaul kits available for these? Or replace the complete unit? Although my car is a 1978 model ( registered on 18th January ) it has a single line brake system. Is this unusual? I would have thought being a later production car it would have been fitted with tandem brakes, these being a better/safer option?

David


Top
   
PostPosted: Thu Feb 19, 2015 6:20 pm 
Offline
Future Club member hopefully!
User avatar

Joined: Tue Oct 03, 2006 5:52 pm
Posts: 7568
Location: Halifax, West Yorkshire
Tandem brakes came in towards the end of 1978. The "donor" for my 1850 was a 1978 car and it had single line brakes. Your car was probably built before the Christmas shutdown in 1977.

_________________
Toledo Man

West Yorkshire Area Organiser & forum moderator
Meetings take place on the first Wednesday of the month at 8.00pm at The Old Brickworks, Wakefield Road, Drighlington, Bradford, BD11 1EA

1972 Dolomite 1850 auto (NYE 751L - Now for sale)
2003 Volvo XC90 D5 SE (PX53 OVZ - The daily driver)
2009 Mercedes-Benz W204 C200 CDI Sport (BJ58 NCV - The 2nd car)
1991 Toyota Celica GT (J481 ONB - another project car)
Former stable of SAY 414M (1974 Toledo), GRH 244D (1966 1300fwd), CDB 324L (1973 1500fwd), GGN 573J (1971 1500fwd), DCP 625S (1977 Dolomite 1300) & LCG 367N (1975 Dolomite Sprint) plus 5 Acclaims and that's just the Triumphs!

Check my blog at http://triumphtoledo.blogspot.com
My YouTube Channel with a bit of Dolomite content.

"There is only one way to avoid criticsm: Do nothing, say nothing and BE nothing." Aristotle


Top
   
PostPosted: Thu Feb 19, 2015 10:33 pm 
Offline
Future Club member hopefully!

Joined: Tue Sep 25, 2012 2:08 am
Posts: 387
Location: Christchurch, New Zealand
David

I am delighted to read that you have been able to find the time to spend a little time on your project. And I am sure you are aware that if I was any closer I would be there like a shot to hold the work light, hand you the spanners and generally give whatever encouragement needed to see this project through to completion.

I would also be handing you the keys to my car and saying go for a drive in it and remind yourself what it really feels like.

Load sensing valve, the Club has got seal kits in stock for just a few pennies. (You don’t have pennies in the UK any more do you)?

Single versus Tandem braking systems. I am hoping that someone smarter than me will answer this. I prefer the single line brake system for it is my belief that tandem systems were introduced for 99% of all car owners never bother to check anything under the bonnet at any stage and would never bother for instance to check if the brake fluid is low. If my now failing memory serves me correctly air bags were only fitted to cars originally, for the residents of the USA used to argue that the compulsory wearing of seat belts was against their constitutional rights. And the car manufacturers had to find other ways of limiting legal actions from disgruntled USA car owners who hurt themselves in car accidents. My somewhat cynical view on life suggests that tandem braking systems came into being for similar reasons.

I am not denying though that race and rally drivers derive huge benefit from tandem braking systems where they can fiddle with the balance.

Somebody else will give you “the good oil” on the better safer option, one or the other, but you being a handy man – and a man who goes out of his way to help others – I would be recommending that you stay with your single line brakes and simply check the fluid level on a regular basis.

I have a spare tandem brake unit here. It has your name on it if you need it, and in return for favours granted in the past, no cost. I would have to deliver it personally though but then I am sure that you and I would get into a bit of mischief before we fitted it. What a thought!

Robert


Top
   
PostPosted: Fri Feb 20, 2015 4:51 pm 
I do believe my car was probably built towards the end of '77 and I am quite happy for it to remain with single line brakes. I will get in touch with Alun regarding the overhaul kit.
Robert, so good to hear from you again, I hope everything is well in NZ? I will try to get some photos posted so you can all see my progress. Despite still restoring my friends MK2 3.0 litre Capri I am confident my sprint will be finished this year. I won't hazard a guess at exactly when as my plans never go to schedule!
I have annual leave coming up in a few weeks so I plan to complete as much as possible which will only leave the refitting of the front panel and wings.

David


Top
   
PostPosted: Sat Feb 21, 2015 9:52 pm 
Offline
Future Club member hopefully!

Joined: Tue Oct 03, 2006 9:45 pm
Posts: 11179
Location: Middlesex
I would stay with a single system if it has one....and go to silicon dot 5 fluid and change all the seals and hoses.

I do have a newly resealed master here though if you need one....but sadly they are not cheap.
PM me if you need one.

Jonners

_________________
Note from Admin: sadly Jon passed away in February 2018 but his humour and wealth of knowledge will be fondly remembered by all. RIP Jonners.


Top
   
PostPosted: Sat Feb 21, 2015 10:29 pm 
Thanks Jonners, is there any great difficulty in stripping and rebuilding the master cylinder? it's not something I've done before but I certainly wouldn't leave it to chance, given how long the car has been laid up.

David


Top
   
PostPosted: Sun Feb 22, 2015 9:39 pm 
Offline
Future Club member hopefully!

Joined: Tue Oct 03, 2006 9:45 pm
Posts: 11179
Location: Middlesex
You just need to take reasonable note of the seal direction and the order of washers springs and pistons etc.

Take a picture of your pistons as they come out so you can refer later maybe?

There is a diagram in the seal kit but its not that brilliant.

You need some needle nose pliers to get the retaining pin out for the second piston from the hole under the rear
reservoir seal too. Be careful as you prise the reservoir off.....prise it out of the seals and then get the seals out
after. It will be stiff but it does yield to brute force.

Jonners

_________________
Note from Admin: sadly Jon passed away in February 2018 but his humour and wealth of knowledge will be fondly remembered by all. RIP Jonners.


Top
   
Display posts from previous:  Sort by  
Post new topic  Reply to topic  [ 178 posts ]  Go to page Previous 13 4 5 6 712 Next

All times are UTC+01:00


Who is online

Users browsing this forum: No registered users and 65 guests


You cannot post new topics in this forum
You cannot reply to topics in this forum
You cannot edit your posts in this forum
You cannot delete your posts in this forum
You cannot post attachments in this forum

Search for:
Jump to:  
Powered by phpBB® Forum Software © phpBB Limited