The Triumph Dolomite Club - Discussion Forum

The Number One Club for owners of Triumph's range of small saloons from the 1960s and 1970s.
It is currently Fri Apr 19, 2024 7:44 pm

All times are UTC+01:00


Post new topic  Reply to topic  [ 196 posts ]  Go to page Previous 110 11 12 13 14 Next
Author Message
 Post subject: Standing the engine up
PostPosted: Sun Dec 22, 2013 10:47 pm 
Offline
Future Club member hopefully!

Joined: Tue Sep 25, 2012 2:08 am
Posts: 387
Location: Christchurch, New Zealand
Thanks Neil

I shall pass your comments about what you have done onto Mike.

Robert


Top
   
PostPosted: Sun Dec 22, 2013 10:56 pm 
Offline
Future Club member hopefully!

Joined: Tue Sep 25, 2012 2:08 am
Posts: 387
Location: Christchurch, New Zealand
One of the problems with undertaking a restoration over such a long period as I have done is that you “forget” what the original set up was for items like the camber settings on the front suspension. Last week I discovered the camber on the right front wheel was out of specification.

The steering on this car has always felt slightly vague from the moment that I first drove it after putting it back on the road. I put it down to the fact that I had reused the original rack mount bushes. So when I removed the subframe and engine assembly back in May to investigate what turned out to be a broken valve spring I replaced the rack mount bushes with poly bushes.

There was no improvement. It took my mechanic son this week to spot the problem with me wiggling the steering wheel and him looking and feeling for the problem. It was the lower steering column joint. The new rubbers which I fitted some years ago to the joint, and which sat unused on the shelf before I refitted it are clearly not up to the task. A quick search on the various threads on this forum showed that the alternative is to fit poly bushes or to replace the coupling with a proper “Hookes” type universal joint.

I have managed to locate some poly bushes here in New Zealand.
Attachment:
210131214-4555Ptw Dolomite lower steering coupling.jpg
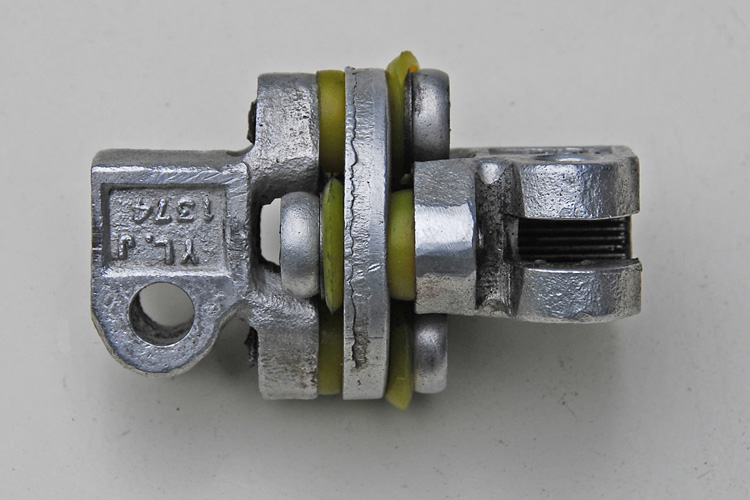
210131214-4555Ptw Dolomite lower steering coupling.jpg [ 133.14 KiB | Viewed 2399 times ]
The Auckland Lotus service agent carries them for they are also used on some Lotuses. They are a little thicker than those which I replaced and a couple have distorted when I tightened the screws which hold them.

I noticed a very slight feathering of the outer edge of the front left tyre so I had the car front suspension checked by an alignment specialist. It took some time for Stuart at Mag and Tyre Direct here in Christchurch to locate the set up information for the Dolomite range – it was not on his computer database. He went to the website http://www.vitessesteve.co.uk/PDF/Dolomite_Sprint.pdf where he found a copy of the factory workshop manual and the information he required. It was interesting to note that the information he downloaded was more comprehensive than the issue (1) I have of the brown covered factory Dolomite Sprint workshop manual.

He carried out a detailed examination of the car and we finished up fitting one extra shim pack to the right front wheel. This has brought the wheel camber measurement back within the nominated tolerance.

I was impressed by his thorough and patient manner and I can report that the outcome is very satisfactory. His measurements showed that when Brian had joined the two halves of the car together he had done an excellent job.

The car tracks straight and true and the fitting of the poly bushes to the lower coupling has transformed the steering. It feels as good as any modern/new car now.

I changed the engine oil at 4,000 miles. It was changed at the 700 mile mark when I stripped the engine down to check two of the pistons and to replace the broken valve spring. The factory recommendation is to change at the 6,000 mile reading and I will do so from now on, changing at the 6,000 mile mark and then at every multiple of 6,000 miles. The oil was remarkably clean but I had another excuse. We had a wind storm here in September which felled a number of trees on the property and I am running low on chain bar lube for the chainsaws. Good clean, but used, engine oil will suit the chainsaws just fine.

I changed the oil filter too and struck a problem. The sealing ring supplied was too small and the oil filter canister would not seal properly. I have not struck this problem before and I must have changed many oil filters over the years. I checked the sealing ring against several other spare filters I hold in stock and while it was deep enough it was not wide (thick) enough. Perhaps it is time to upgrade to the more modern style of filters.

My dipstick did not have a sealing ring where it sits on the dipstick tube and I notice that oil has been creeping up the dipstick and dropping onto the ground. I have fitted one of those and hopefully there will be even less oil on the garage floor from now on.

This time last year I was contemplating completing the restoration and having the car running by Christmas. I missed doing so but since I have overcome the problems which plagued me through to the middle of this year, I have been well satisfied. On the last fill of fuel I calculated that the car is now doing just under 33 miles to the gallon.

I must have got something right. And I have a smile on my face which was not there this time last year.


Top
   
PostPosted: Mon Dec 23, 2013 11:48 pm 
Offline
TDC Shropshire Area Organiser

Joined: Sun Aug 21, 2011 5:12 pm
Posts: 7042
Location: Highley, Shropshire
That smile is what the whole thing is all about! And the bit where you look at it and think "I did that!"

Steve

_________________
'73 2 door Toledo with Vauxhall Carlton 2.0 8v engine (The Carledo)
'78 Sprint Auto with Vauxhall Omega 2.2 16v engine (The Dolomega)
'72 Triumph 1500FWD in Slate Grey, Now with RWD and Carledo powertrain!

Maverick Triumph, Servicing, Repairs, Electrical, Recomissioning, MOT prep, Trackerjack brake fitting service.
Apprentice served Triumph Specialist for 50 years. PM for more info or quotes.


Top
   
PostPosted: Sun Jan 26, 2014 8:59 pm 
Offline
Future Club member hopefully!

Joined: Tue Sep 25, 2012 2:08 am
Posts: 387
Location: Christchurch, New Zealand
The world is full of wits who will tell you that all British cars leak oil. Perhaps they are right but the oil leaks which have plagued me since I restored this car were more than oil leaks. At times I thought they were gushing oil – for they seem to be all but filling the drip trays in the garage.

Right from the outset of the completion of this restoration there has been a substantial oil leak in the vicinity of the gearbox. I now have my fingers crossed that I have eliminated it. In fixing the major leak I unmasked two more. All of which have now been fixed. And for the first time ever I have been able to go out to the garage, roll the car back and see a clean floor.

In this first photograph I have highlighted two of the three oil leaks. It was taken in the car.
Attachment:
20140112-0506Ptw Oil leaks on the gearbox.jpg
20140112-0506Ptw Oil leaks on the gearbox.jpg [ 134.96 KiB | Viewed 2316 times ]
The yellow arrows show the drops of oil forming below where the gearbox selector rods come out through the back of the gearbox top cover. In desperation, after taking this photograph I fitted a spare four speed cover to the gearbox (no overdrive switch to allow overdrive on 3rd and 4th gears). Earlier I had tried changing the o-ring oil seals which sit behind the seal cover plate and which is highlighted by the blue arrow. Changing those o-rings was not successful. The fitting of the four speed cover eliminated those oil leaks but it did not stop the flow of oil onto my garage floor.

I discovered two more leaks. One was coming from behind the copper washer which is visible behind the red arrow (marked in the photo above) and the other leaks – there were six of them, were coming from the bolts holding the inspection plate on the bottom of the overdrive unit, one of which is marked in this second photograph.
Attachment:
20140115-0521Ptw Gearbox oil leak front overdrive.jpg
20140115-0521Ptw Gearbox oil leak front overdrive.jpg [ 130.77 KiB | Viewed 2316 times ]
I had taken the gearbox top cover off the gearbox a number of times as I have changed the selector rod seals and I have obviously disturbed the seal formed behind that red arrow. That has now been sealed with ThreeBond gasket sealer as have the six bolts on the overdrive inspection plate.

I should have realized that these six bolts on the inspection plate were a likely source of an oil leak for although I fitted a new gasket to that plate after I had cleaned the filters in the overdrive, those six bolts pass through into the filter chamber and are held captive by little star washers – which provide no sealing whatsoever. The bolts of course sit at the very bottom of the gearbox.

I have cleaned the bottom (and the top and sides) of the gearbox since that second photo was taken and have been checking regularly to ensure that I have eliminated all the oil leaks.

I have now replaced the four speed cover I fitted as a temporary measure with yet another four speed cover with the necessary overdrive switch fitted and it seems to be oil tight.

I had assumed all along that all the oil was coming from those leaking selector rod seals. This exercise has reminded me, once again, that it is often a process of elimination and that some patience is required to fix these various problems. Patience which has been amply demonstrated by the trials and tribulations that Howard81 and MikeyB have exhibited elsewhere in their restoration threads.

I shall put up another thread on the process of removing the gearbox top cover and replacing the selector rod o-rings for the Christchurch mechanic who supplied me with a replacement gearbox four speed and overdrive top cover and who has been servicing Triumphs for 40 or more years, tells me that he has had to fix this problem on a number of occasions. It is, in his words, a relatively common problem!

Robert


Top
   
PostPosted: Mon Jan 27, 2014 9:45 am 
Offline
TDC Staffs Area Organiser
User avatar

Joined: Wed Oct 18, 2006 2:08 pm
Posts: 5429
Location: The Old Asylum
As a general rule on old British cars - if they don't leak oil then then must have run out of oil! We take it for granted how little a modern car leaks.

_________________
Mark

1961 Chevrolet Corvair Greenbrier Sportswagon
1980 Dolomite Sprint project using brand new shell
2009 Mazda MX5 2.0 Sport
2018 Infiniti Q30


Top
   
 Post subject: Restoration finished!
PostPosted: Mon Aug 18, 2014 11:19 am 
Offline
Future Club member hopefully!

Joined: Tue Sep 25, 2012 2:08 am
Posts: 387
Location: Christchurch, New Zealand
In the 8 months since my last posting on this thread the car has covered another 5,000 miles and shortly it will read, 10,000 since I finished the restoration. This posting then will be the last on this restoration thread for what is likely to follow, if there are any noteworthy comments, will be comments which might more correctly be related to routine repairs and maintenance and which in fairness to the moderators, and you the readers, should sit elsewhere on this website.

I can report that while the car is certainly not oil tight, there are a couple of drips on the floor each time it is parked up, it is much better than what it was immediately after the completion of the restoration. I will continue to try and reduce the amount of oil being spilled and if successful will post the results up on a new thread. Oil pressure has remained at a very constant 35 psi and I am agreeably surprised at how quickly the oil pump primes and builds up to pressure upon starting. I have re-torqued the head down twice now and intend to leave it be. I have also re-torqued the sump bolts up to the nominated 8.5 ftlbs on two occasions and I was quite surprised to find that it was possible to tweak up each individual bolt by a small but significant amount each time. Clearly that thick paper sump gasket does compress over time.

The gearbox is not 100% oil tight either and that was one part of the car on which I thought I could eliminate all the oil leaks. Those leaks can be described now as a minor irritation.

There have been a multitude of other little jobs carried out along with two routine engine oil changes. I have attempted to rehang the doors in order to reduce the wind noise through the door seals and to ensure that they sit evenly within the door openings. When I am satisfied that I have got it about right then I will fit the silver striping down the flanks of the car.

The handbrake warning light has now been wired up to also act as an “overdrive on” light. Some will argue that it seems unnecessary but on a number of occasions I have forgotten to either engage the overdrive once the car is up to cruising speed and or forgotten to disengage it upon changing down through the gears. I have not had to modify the existing wiring at all so I can remove that feature if and when I desire to do so. I have a Rimmers Stainless Sport exhaust fitted. It is pleasantly quiet. Overall the car too, is quiet but then I fitted new or retained practically all the original specification rubber mounts and bushings and added some additional sound deadening in behind various panels.

I have added a Screen-smart intermittent wipe package. Not overly expensive at £36.00 (delivered from the UK to my doorstep) and very simple to fit. It works a real treat. A quick flash on the intermittent wipe switch and then a second flash somewhere between 3 and 30 seconds later sets the time delay and the unit will continue to wipe using that delay until you manually flick the wipe switch again and it will turn off.

I dropped in to see my upholster today who made and fitted the vinyl roof so that he could admire the finished car. He was very complimentary and felt that my installation of the headlining was as professional as any job he had seen. So at this point I think I can call the restoration complete.

I have no more scenic photographs with which to tease Ian, certainly none yet with the car sitting in some spot which might have you all wanting to visit this country. This photo though was taken earlier this week on a fine early spring morning.
Attachment:
20140817-4875Pw Dolomite Sprint.jpg
20140817-4875Pw Dolomite Sprint.jpg [ 161.15 KiB | Viewed 2155 times ]
It has been a pleasure to write this and I hope that those of you still part way through your restorations, or are about to start might find something both here and elsewhere on this forum which will help and encourage you. There will be moments when you will wonder why you started, and whether you will ever finish the project. But let me assure you the pleasure which follows when you drive the completed car is sublime.

So enjoy your projects and the driving which follows.

Robert


Last edited by Robert 352 on Tue Aug 19, 2014 12:35 am, edited 1 time in total.

Top
   
PostPosted: Mon Aug 18, 2014 12:50 pm 
Offline
Future Club member hopefully!
User avatar

Joined: Tue Oct 03, 2006 5:52 pm
Posts: 7568
Location: Halifax, West Yorkshire
Beleive me, they are never finished as there's always something that needs doing even if it is routine maintenance. You can keep on posting updates on this thread. Any specific questions can be posted in the "Dolomite related" section.

Glad to hear it is still going strong.

_________________
Toledo Man

West Yorkshire Area Organiser & forum moderator
Meetings take place on the first Wednesday of the month at 8.00pm at The Old Brickworks, Wakefield Road, Drighlington, Bradford, BD11 1EA

1972 Dolomite 1850 auto (NYE 751L - Now for sale)
2003 Volvo XC90 D5 SE (PX53 OVZ - The daily driver)
2009 Mercedes-Benz W204 C200 CDI Sport (BJ58 NCV - The 2nd car)
1991 Toyota Celica GT (J481 ONB - another project car)
Former stable of SAY 414M (1974 Toledo), GRH 244D (1966 1300fwd), CDB 324L (1973 1500fwd), GGN 573J (1971 1500fwd), DCP 625S (1977 Dolomite 1300) & LCG 367N (1975 Dolomite Sprint) plus 5 Acclaims and that's just the Triumphs!

Check my blog at http://triumphtoledo.blogspot.com
My YouTube Channel with a bit of Dolomite content.

"There is only one way to avoid criticsm: Do nothing, say nothing and BE nothing." Aristotle


Top
   
 Post subject: Robert....
PostPosted: Mon Aug 18, 2014 8:41 pm 
Offline
TDC Member
User avatar

Joined: Thu Aug 09, 2007 1:22 pm
Posts: 6481
Location: Caithness, Scotland
Quote:
I have no more scenic photographs with which to tease Ian,
:D I am sure you do!


Please send that photograph to Dolly Mixture.........a front cover if I ever saw one?


To those of us who simply run old cars your thread has been aspirational, a real credit to your efforts Robert.
You'll need to get started on the 1850 now..........


Ian.

_________________
TDC Forum moderator
PLEASE help us to maintain a friendly forum,
either PM or use Report Post if you see anything you are unhappy with. Thanks.


Top
   
PostPosted: Mon Aug 18, 2014 9:09 pm 
Offline
Future Club member hopefully!
User avatar

Joined: Sun Oct 21, 2012 11:15 pm
Posts: 822
beautiful words, picture and above all, car.

To think that it actually started out as two different shells is incredible, in some ways I can't believe it and i would love to see the finished article.

I am also of the belief that these cars are never finished so it seems prudent to keep updating this thread (in my opinion of course)

if you choose to start another one then this one will last forever after all.

Either way, very many congratulations on the 'completion' and heres to the routine maintenance!

Pete

_________________
1980 Dolomite Sprint Track Day Car....KLJ 895W. now redtopiffied :P

viewtopic.php?f=19&t=23031

Volkswagen Golf MK3 Gti....R301UUJ. RIP 22-5-13
Volkswagen Golf MK4 TDGTI 150 MM53VNT Sold 7-8-17
BMW 320d Coupe M-Sport YL08 XBZ with factory fitted Performance Pack - Sold 22/05/21
BMW 330d Touring M-Sport WN63 XPY - best daily ever

Proud TDC Member!


Top
   
PostPosted: Mon Aug 18, 2014 9:29 pm 
Offline
Future Club member hopefully!
User avatar

Joined: Sat Sep 04, 2010 10:42 am
Posts: 980
Quote:
I shall put up another thread on the process of removing the gearbox top cover and replacing the selector rod o-rings for the Christchurch mechanic who supplied me with a replacement gearbox four speed and overdrive top cover and who has been servicing Triumphs for 40 or more years, tells me that he has had to fix this problem on a number of occasions. It is, in his words, a relatively common problem! Robert
Robert
please do - this is my next work activity as mine is leaking too.

Paul.

_________________
Image


Top
   
PostPosted: Tue Aug 19, 2014 9:23 am 
well done and congratulations Robert, a fine job and comprehensive restoration report. My own battles now involve building a shed so I can re-weld the clutch lever to the cross shaft in some comfort. Shed is 80% complete.

Keep posting up the running reports though, little snippets jog my memory or suggest better ways of doing things.

stu


Top
   
PostPosted: Tue Aug 19, 2014 9:46 am 
Offline
Future Club member hopefully!

Joined: Tue Oct 03, 2006 9:45 pm
Posts: 11179
Location: Middlesex
I echo the sentiments about the fine standard of workmanship and perseverance on this thread.

Its also great to have the knowledge shared, and it is what this forum is all about and a credit to it.

I too would like to see this remain in the resto section with the occasional running update to keep us all reminded
and give good visibility to new comers.

Its inspiring and I too hope one day to see this car in the flesh.

Jonners

_________________
Note from Admin: sadly Jon passed away in February 2018 but his humour and wealth of knowledge will be fondly remembered by all. RIP Jonners.


Top
   
PostPosted: Mon Jul 06, 2015 11:02 pm 
Offline
Future Club member hopefully!

Joined: Tue Sep 25, 2012 2:08 am
Posts: 387
Location: Christchurch, New Zealand
When I acknowledged the completion of my restoration on my Sprint, HU 5000, and wrote that the thread would now be considered complete I had no idea then that the thread would be accorded the privilege of being listed under the restoration grouping on this Forum. It makes sense therefore to start a new thread where I might occasionally dwell on the driving and the maintenance which has followed. A running report as Jon Tilson has suggested

There have been lots of little issues to attend to and no doubt there will be more in the future and it’s the overcoming of the issues/little problems that keeps us all coming back to this Forum. I myself seem to spend a good deal of time reading the new posts, bookmarking the odd one which I know will be useful in the future and sending off the occasional PM to those who are battling with little problems, problems which I too have had to overcome.

So if you are interested, find the thread headed Running Report for HU 5000, a Dolomite Sprint in New Zealand.

Robert


Top
   
PostPosted: Tue Jul 07, 2015 7:39 am 
Offline
Future Club member hopefully!
User avatar

Joined: Tue Oct 03, 2006 5:52 pm
Posts: 7568
Location: Halifax, West Yorkshire
You should just keep on adding to this thread rather than starting another thread in the "Dolomite related" section. It makes sense to have it all in one place. The car is never really "finished" for as long as you own it and there is always something that will need doing even if it is just routine servicing. Is your Sprint subject to the WoF (NZ MoT for those that don't know) like modern cars or are the rules different for classic cars?

_________________
Toledo Man

West Yorkshire Area Organiser & forum moderator
Meetings take place on the first Wednesday of the month at 8.00pm at The Old Brickworks, Wakefield Road, Drighlington, Bradford, BD11 1EA

1972 Dolomite 1850 auto (NYE 751L - Now for sale)
2003 Volvo XC90 D5 SE (PX53 OVZ - The daily driver)
2009 Mercedes-Benz W204 C200 CDI Sport (BJ58 NCV - The 2nd car)
1991 Toyota Celica GT (J481 ONB - another project car)
Former stable of SAY 414M (1974 Toledo), GRH 244D (1966 1300fwd), CDB 324L (1973 1500fwd), GGN 573J (1971 1500fwd), DCP 625S (1977 Dolomite 1300) & LCG 367N (1975 Dolomite Sprint) plus 5 Acclaims and that's just the Triumphs!

Check my blog at http://triumphtoledo.blogspot.com
My YouTube Channel with a bit of Dolomite content.

"There is only one way to avoid criticsm: Do nothing, say nothing and BE nothing." Aristotle


Top
   
PostPosted: Tue Jul 07, 2015 10:09 am 
Offline
Future Club member hopefully!

Joined: Tue Oct 03, 2006 9:45 pm
Posts: 11179
Location: Middlesex
I tend to agree that the reports should be added here or a new forum section...
Ordinary threads do tend to get burried and need a bit more effort to find...

The result is a lot of us answer the same queries to newer members over again....
Not that I mind....but after a while its hard not to let a tone of "I already posted this" sarcasm creep in...

Anything that keeps authors like Robert (and Stu) in the public eye...

Jonners

_________________
Note from Admin: sadly Jon passed away in February 2018 but his humour and wealth of knowledge will be fondly remembered by all. RIP Jonners.


Top
   
Display posts from previous:  Sort by  
Post new topic  Reply to topic  [ 196 posts ]  Go to page Previous 110 11 12 13 14 Next

All times are UTC+01:00


Who is online

Users browsing this forum: No registered users and 55 guests


You cannot post new topics in this forum
You cannot reply to topics in this forum
You cannot edit your posts in this forum
You cannot delete your posts in this forum
You cannot post attachments in this forum

Search for:
Jump to:  
Powered by phpBB® Forum Software © phpBB Limited