The Triumph Dolomite Club - Discussion Forum

The Number One Club for owners of Triumph's range of small saloons from the 1960s and 1970s.
It is currently Tue Apr 16, 2024 10:03 am

All times are UTC+01:00


Post new topic  Reply to topic  [ 96 posts ]  Go to page Previous 13 4 5 6 7 Next
Author Message
PostPosted: Mon Feb 14, 2022 5:10 pm 
Offline
TDC Member

Joined: Mon Apr 29, 2019 10:31 pm
Posts: 152
Location: Oxfordshire
I reckon it's the only way, seemed quite stubborn the other way round, I guess you are fighting the "suspension triangle" if you bolt up the radius arms first!

Cheers Dave.

_________________
1973 2-door honeysuckle Triumph Toledo 1300 Thread here


Top
   
PostPosted: Mon Mar 07, 2022 1:45 pm 
Offline
TDC Member

Joined: Mon Apr 29, 2019 10:31 pm
Posts: 152
Location: Oxfordshire
No work done since my last post, but thought I should stick a couple of pics on here as I drove the car around for a bit this weekend and got some snaps of it. Maybe only interesting to me as a hobbyist photographer, but I've got a bit of a collection of old Lenses that I use on a modern (ish) digital camera (and occasionally my film cameras) - these pics were taken on a Tokina 28mm lens which is a similar age to the car.

Image
Image
Image

Still need to get the car tracked as it doesn't steer properly and visibly toes out, but will leave that to someone who knows what they're doing. Otherwise, the car feels a million times less wallowy round corners, now it feels like it sticks to the road really nicely. The new bushes on the rear axle are marginally noisier, but all add to the character of the car I think. No squeaking at least, I used plenty of the included grease.

Other than that a couple of bits and pieces still to do such as the thermo fan wiring which I still haven't done, as well as installing the new solid state voltage stabiliser, but otherwise ready for summer!

_________________
1973 2-door honeysuckle Triumph Toledo 1300 Thread here


Top
   
PostPosted: Sun Apr 24, 2022 8:27 pm 
Offline
TDC Member

Joined: Mon Apr 29, 2019 10:31 pm
Posts: 152
Location: Oxfordshire
Car now tracked - was 2 degrees off on both sides! now close to 0 (parallel) and feels a lot better to drive. Also had flickering oil pressure light which could be a combination of old oil + duff sensor + low oil level. Changed sensor, filter and replaced oil and haven't seen it since. Engine doesn't sound rattly, quite the opposite to be honest, so don't think it was a bearing gone bad.

For reference here's the sensor. Replacement looked slightly different but I think the one on there may have been factory!

Image

After tracking:
Image

Still not done the thermo fan etc. but did have some good news, some 'rust' on the firewall turned out to be oil splattering and just needed a clean off! There are a couple of blistered bits but nothing major - will sort out when I have access to power and have some time to sort my mig welder out.

_________________
1973 2-door honeysuckle Triumph Toledo 1300 Thread here


Top
   
PostPosted: Wed Jun 01, 2022 11:22 pm 
Offline
TDC Member

Joined: Mon Apr 29, 2019 10:31 pm
Posts: 152
Location: Oxfordshire
Have been meaning to do this since driving the car home for the first time - the gear linkage has always had quite a bit of side-to-side slop in it so on my day off today I decided to attempt to sort it out with the rebuild kit I bought a while ago.

Firstly, removed the parcel shelf

Image

Then the front carpets + tunnel. Noticed a bit of rust that is forming so need to get on with sorting that out as well soon before it turns into a hole. I think so far it's just where the tunnel seal sits as well as some on the double skinned in the footwells.
Image

4 nuts later I took the remote shifter unit off, as well as the little spring and cup, leaving me with this:
Image

Turned it round and had a quick look, very grubby, but was immediately obvious that the bush connecting the gear lever to the linkage was completely disintegrated.


Image


Here's a pic of the whole lot cleaned up and disassembled. In case you are reading this and wanting to do the same to your <insert vehicle with 3-rail gearbox here> this video is particularly helpful: https://www.youtube.com/watch?v=8d6me3C4Ozc

Image

Back in the car again, looking a bit less black

Image

Having a removable tunnel made this job fairly easy! I may have gone for a cheeky drive after putting the linkage back on before bolting up the tunnel to see what the propshaft looked like when driving :D The shifter still has a bit of play but I think that might be the gearbox itself to be honest, though still substantially better than before. The single rail box I had in my dolly 1300 felt a lot more precise than this one, but it is newer tech, so maybe I am comparing too harshly.

Also swapped out the voltage regulator for a solid state unit rather than the bimetallic strip thing that was in there, as well as test fitted my alley cat wheels. I'm not a huge fan, might just stick with the sprint wheels to be honest!

Hoping to at least get the fan sorted out soon, found there is a nice plug I can use under the parcel shelf for power to the speeduino so might start there. Recently I have just been driving the car around as I lost a bit of confidence to drive it on long journeys etc. just because I hadn't used it for ages. Here's a pic of the old girl alongside its mates at the Standard Triumph picnic in Warwickshire, was a nice day out!


Image

_________________
1973 2-door honeysuckle Triumph Toledo 1300 Thread here


Top
   
PostPosted: Sun Oct 09, 2022 2:34 pm 
Offline
TDC Member

Joined: Mon Apr 29, 2019 10:31 pm
Posts: 152
Location: Oxfordshire
had a really nice time at the TDCIR this year, so nice to see everyone and their cars. here is the old girl there!


Image

had a slight issue with the radiator before the show after a nice day out driving, in that for some reason the overflow nipple had crushed, maybe under too much tension from the hose? or perhaps just heat stress, who knows. I wasn't running a fan as i've been meaning to fit my ebay special e-fan but haven't got round to it yet. it had created a pinhole for water to escape out of at the joint, which unfortunately meant the car wet itself slightly :( managed to make it home then it started leaking, so was grateful the car didn't leave me at the side of the road!

Image

two blowtorches and some thick core solder i managed to get it bodged for the show:

Image

I have a spare rad that could do with being re-cored that i'd like to swap in the current one's place, any recommendations for recoring? not sure if the club do it?

this is a fairly good kick up the arse to get the e-fan on and temp sensor installed so will do that soon. i don't really trust the factory temp sender and gauge as the engine got quite hot but was still showing cold on the gauge despite the thermostat housing being rather toasty so I might bin it off in favour of a "space-age" 16x2 LCD being driven by a microcontroller (code here for any other geeks who like that sort of thing).

sorry, not much of an update, just thought I'd ask about the re-coring!

Cheers

_________________
1973 2-door honeysuckle Triumph Toledo 1300 Thread here


Top
   
PostPosted: Tue May 16, 2023 10:42 pm 
Offline
TDC Member

Joined: Mon Apr 29, 2019 10:31 pm
Posts: 152
Location: Oxfordshire
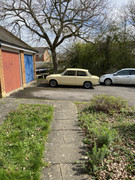
A lot has happened since my last post - I bought my first house with my partner, and we now have a dog :D

Said house has a garage (with power!) so I now have a really nice space to work on the Toledo. It's spent nearly 2 years in a dusty old lockup so probably deserves it!

Image

Forgot how much I love the look of this little thing.

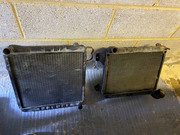
Following on from my last post I decided it'd be best for the car if I replaced the radiator. I managed to source a 1500HL rad as I'd heard they are a drop-in replacement of the smaller 1300 radiator.

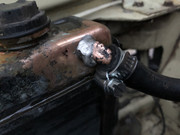
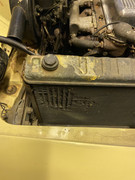
Here you can see the old rad. It's covered in flux from the soldering, and the core itself was missing quite a few fins.

Image

1300 tolly rad vs the larger 1500 one
Image

I thought it'd be fairly easy as essentially its some hoses and 4 bolts which mount to the body. Then I managed to strip one of the bolts, which would not come out even with easy outs etc. so ended up getting drilled. I did then manage to re-tap it so the thread is OK now.

Image

Along the way, I had to wreck some of the jubilee clips which had gone completely rotten. Just like the thermostat housing!

Image

Image

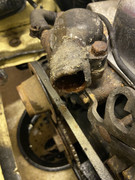
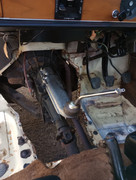
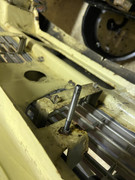
After trying to pull the thermostat housing off, I also managed to snap one of the bolts holding it on. As well as this, the surface which the thermostat actually sat in was very corroded and had pitted badly to the point where i'm surprised it ever actually sealed. I decided the best thing to do was just pull off the water pump housing/assembly and replace it all. I managed to find one from a spitfire which is exactly the same so decided to clean it up and wire brush the mating surfaces, not realising the old (red) gasket material may well have been asbestos... whoops. Hoping I'm wrong about that. My Dad who's done the same many times on his Marinas over the years said it'd be unlikely and that asbestos gaskets were used more on extreme heat applications like head gaskets, exhaust gaskets etc. - hoping he is correct.

Image

Image

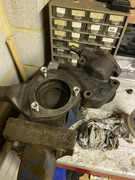
All re-assembled. I re-used the water pump because it didn't have any play in and looked somewhat new. If it goes again it's also only three nuts to undo, so not a big job at all.

Image

Image

Also cleaned up and sprayed the radiator brackets as they had surface rust, thought I might as well if the radiator is in such good condition. My partner (surprisingly) wasn't overly keen on me using the washing line to hang them so I could spray them!
Image

Image

Image

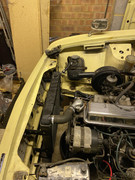
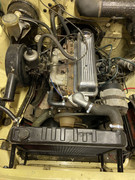
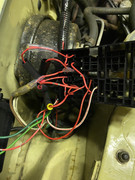
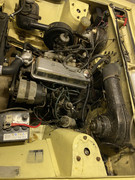
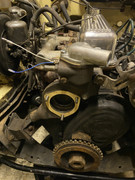
Now waiting on a 1500 lower hose which is on its way as it's obviously slightly longer than a 1300 one as the overall height of the radiator is much larger. You might also see in the picture above that I have fitted a 2-wire temperature sensor which will be wired into my ECU to control a thermostatic fan which i'm part way through fitting.

I have a slight dilemma as the distance between the water pulley and radiator is pretty small and my fan is just too thick to fit straight behind it. I am toying with either mounting it lower down which may potentially get in the way of the crank sensor, or just mounting it on the other side and using it as a "push" style fan as there's lots of room in front. I have seen some cars do this before, but I think the general idea is to mount it behind the radiator.

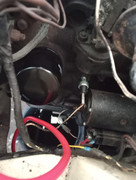
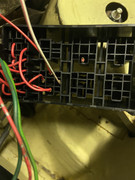
Also slightly closer with the electronic ignition wiring. Here is the "smart" coil ie coil with a built-in igniter module. I had some HT leads for a shogun which will work OK I think, as the coil has the other type of HT crimp on the end of it. This type of coil needs to be grounded on the engine ideally so I'm going to try and make a bracket up for it which mounts using a couple of the bellhousing bolts. The distributor will then get blanked off.
Image

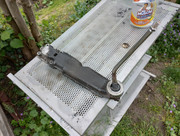
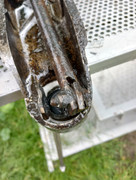
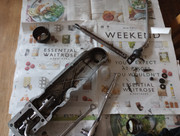
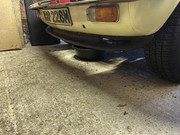
Also managed to score a cheap ish dolly sprint splitter on ebay, though the fittings for it looked like they'd been for a swim in the atlantic. I got them out and devised a way of mounting them with some m4(i think?) allen bolts and nuts. The end studs/bolts had completely rusted and had made big holes in the plastic, so I had to "create" some washers using assorted coins! Any excuse to use the pillar drill really.... Also i'm not sure if it's technically legal to drill holes in coins so for the purpose of this post they were definitely not real coins.

Image

Image

More to follow soon!

_________________
1973 2-door honeysuckle Triumph Toledo 1300 Thread here


Top
   
PostPosted: Wed May 17, 2023 8:53 am 
Offline
TDC Member
User avatar

Joined: Wed Nov 15, 2017 3:35 pm
Posts: 957
Location: Filey, North Yorkshire
Great to see the car progressing!

_________________
Image


Top
   
PostPosted: Tue May 23, 2023 10:00 pm 
Offline
TDC Member

Joined: Mon Apr 29, 2019 10:31 pm
Posts: 152
Location: Oxfordshire
Image

All back together now. Ran for a bit, and it only leaks a bit from the upper radiator hose which is flaring slightly:


Image

I think it might be rotated slightly wrong so need to turn it round a bit to see if that helps, as it doesn't match the angle of the thermostat housing. Am reusing the old 1300 radiator hose, but I think they are the same?

Got a bit told off as I ran the car with a bit of choke and didn't realise I had accidentally done this to the mrs car parked behind mine :D whoops

Image

Heard a weird buzzing noise after i'd run it for a bit, coming from this hole in the radiator cap. Not sure if this was just because there were little drops of water on it boiling off or not or if it's intended behaviour!

Image

_________________
1973 2-door honeysuckle Triumph Toledo 1300 Thread here


Top
   
PostPosted: Thu May 25, 2023 3:28 pm 
Offline
TDC Shropshire Area Organiser

Joined: Sun Aug 21, 2011 5:12 pm
Posts: 7036
Location: Highley, Shropshire
The easy solution to the fan problem is just rig it as a "pusher" I've done this on the Dolomega, keeping the fan to the L/H (hottest side) of the rad which let me move the large Saab rad a bit further back, which in turn let it be a tad higher. It works fine and never gets too hot, even sat in traffic for long periods.

But have you considered maybe shortening and redrilling the rad mounts to get it further FORWARDS so you can mount the fan on the back if that's what you really want?

Steve

_________________
'73 2 door Toledo with Vauxhall Carlton 2.0 8v engine (The Carledo)
'78 Sprint Auto with Vauxhall Omega 2.2 16v engine (The Dolomega)
'72 Triumph 1500FWD in Slate Grey, Now with RWD and Carledo powertrain!

Maverick Triumph, Servicing, Repairs, Electrical, Recomissioning, MOT prep, Trackerjack brake fitting service.
Apprentice served Triumph Specialist for 50 years. PM for more info or quotes.


Top
   
PostPosted: Wed May 31, 2023 8:45 am 
Offline
TDC Member

Joined: Mon Apr 29, 2019 10:31 pm
Posts: 152
Location: Oxfordshire
Getting told off by the other half for spending too much time in the garage lately...

I did indeed go for a pusher - here it is mounted up on the new radiator:

Image

I don't think it's too visible from the front which is good. It's only a small motor so not sure what CFM it'll push, but we'll see. My guess is it'll never really need it as it never got that hot anyway, and now has a bigger radiator. Might also add a manual override, should be easy enough to do while i'm wiring it all up.

Image

Reminds me, i need to trim the bolts holding the splitter on!

I also managed to finish off my ECU and plumb in the coolant temp sensor, so now reading that:

Image

Image

Have decided against using my individual fuse and relay holders in favour of a fuse (and relay) box to actually control the thermo fan (and coil eventually) as I can then use a common ground which will make things look neater! I might switch over the existing glass style ones for the 2 fuses that are in the car as well as it makes sense to just have one place with them in I think.

_________________
1973 2-door honeysuckle Triumph Toledo 1300 Thread here


Top
   
PostPosted: Thu Jun 08, 2023 9:18 am 
Offline
TDC Member

Joined: Mon Apr 29, 2019 10:31 pm
Posts: 152
Location: Oxfordshire
Bit more progress on the wiring side of things. Nearly ready to wire up the fan now!

First off I cut off the spade terminals on the fan and crimped an AMP weather sealed connector as I don't want them shorting/falling out. These are really easy to crimp up, and provide weather sealing on both the wire end as well as the plug itself.

Image

Now to replace the old fuse box (if you can call it that!) with a new style one that takes blade style fuses. this unit was about £10 on ebay and fits 6 fuses and 5 5-pin relays. I plan on using all 6 just for the ignition stuff (sans fuel injection) so may need to replace with a bigger unit at some point.

Image

here are the crimps you use for the fuse holders, standard spade connectors with barbs for the relays.

Image

Basically I didn't want to modify the original wiring harness, so i put spade connectors on the in-side of the fuse and the outs. This isn't really good practice as there are now another set of failure points, but I don't really want to modify the standard harness if I can avoid it. There were 2 17A fuses in the car with the glass style fuses, one is basically always live for lights and stuff that isn't switched by the ignition switch. the other one is only live when the ignition switch is on. each of the fuses feed 2 spade terminals which go off to various connections ie. fan, coil etc. so I decided to fuse by terminal and have 2 10A fuses for each of the bullet connectors. this means I have gone from 2 17A fuses to 4 10A fuses. Here they are before heat shrinking the terminals together so they can't move and slide off:

Image

Image

Not the tidiest job just yet, but will heat shrink and cover in some sort of conduit before i'm done. still need to actually wire up the thermo fan relay properly as well as the ignition coil relay. The ECU is being powered off the unregulated feed to the voltage regulator, as it has an onboard 7-20V regulator. This is the double terminal that the dark green wire goes to - light green is regulated 10V. I need to keep the voltage regulator unless i'm going to try and pass the value of the fuel level sensor into my ECU - may do this at some point. I'm also going to need to use some sort of digital potentiometer if I want the original gauges to work again.

Coincidentally, I find it a bit weird that the main ignition coil feed isn't actually fused at all in our cars.. seems like a recipe for disaster but there we go. maybe the ballast resistor would blow first?

The fan I have is 80W, which means it should pull (80W/12V)=6.7A at full chat, so I am going to use a 7.5A fuse for it which occupies the 5th slot of the fuse holder. the 6th will be my new coil.

Have stuck my ECU behind the passenger side of the parcel shelf and fed the wires through the grommet that's just below the washer bottle - this goes straight through so really easy to pass things through to the passenger cabin! Also means that the ECU is in a perfect place for my mrs to hold a laptop logging the coolant temperature until i make myself a nice gauge :lol:


Starting to look very untidy, will tidy up the loom when i'm certain it's all in the right place.

Image

need to do the trigger wires and ground to the fan now, then should be all ready. After that i'll try and figure out how to mount the hall sensor and the coil. it needs to be grounded, so I might try and use the turret or utilise one of the bellhousing bolts. hmmmm....

finally, we took the car out without the fan to see what temperatures do, and it basically sits at 82 degrees (thermostat opening temp!) for the whole journey and creeps up to 90-92 when stationary for a while. I suspect that with the bigger radiator the thermo fan won't really ever switch on unless we're actually stuck in traffic!

Here she is behind my Dad's (new!) Morris Marina 1.8 Super.

Image

_________________
1973 2-door honeysuckle Triumph Toledo 1300 Thread here


Top
   
PostPosted: Thu Jun 08, 2023 3:22 pm 
Offline
TDC Oxfordshire Area Organiser

Joined: Sun Oct 08, 2006 4:32 pm
Posts: 472
Great update Jack - really clever stuff!

Dad's Marina looks really nice too - a good convoy there!

BW
MC

_________________
Matt Cotton

TDC Oxfordshire Area Organiser.
TDC/TSSC group meeting - 3rd Tuesday of the month


1980 1500HL - OPD
1976 Sprint - SWU


Top
   
PostPosted: Sun Jun 11, 2023 8:49 am 
Offline
TDC Member

Joined: Mon Apr 29, 2019 10:31 pm
Posts: 152
Location: Oxfordshire
Cheers Matt. hopefully be down to the local meet with both cars soon!

My thermo fan is (nearly) all finshed now. I crimped up the thermo fan so it's given 12v from the relay and grounds at the usual point on the passenger side turret.

Image


here is the fuse and relay box all finished (ignore the cut terminal - need to de-pin that!

Image

Image


https://www.youtube.com/watch?v=TVYlJgZtuYY

vid of thermo fan finally working. I've tried to tidy up some of the wires with some conduit from old looms i've stripped which makes it blend in a bit more I think. I'm not going to properly tape these up until the coil and hall sensor are wired in, but that'll come later. next job is to fabricate brackets for both of these items!

Image


Finally, I think I have managed to blow a transistor on the board for powering the fan - need to investigate more as it may be an issue in the code that runs on the ECU which I haven't had time to try and debug yet. I have a few spares so just need to desolder and solder another ULN2003A on the board if I have blown it up!

_________________
1973 2-door honeysuckle Triumph Toledo 1300 Thread here


Top
   
PostPosted: Wed Jun 21, 2023 11:02 am 
Offline
TDC Member

Joined: Mon Apr 29, 2019 10:31 pm
Posts: 152
Location: Oxfordshire
ULN2003A darlington array was in fact blown - my fault really as i'd wired the relay slightly incorrectly which meant the board was being kept alive by the flyback diodes (sometimes desirable if you want to keep the fan on if your key is in the accessory position)

Soldered the bad one off, then decided in case this happens again i'd just put an IC socket on to make for easier replacement of the ULN:


Image


I also wired up the relay so that the trigger can only make a connection when the ignition is on, as I don't really care about leaving the fan running when the car's off - feels like potential for parasitic drain to me.

After a quick test I also heat shrunk the spade terminals so they can't pull off on their own. I also wired in another ignition fuse as my new coil will need one!

Image

It's now all working, but I have decided that the molex 24 pin is just a rubbish solution as
A) it's not weather proof in case some moisture tries to seep up the loom
B) the crimps are just very loose, probably by design, but it just doesn't feel professional. there also isn't really any form of build in strain relief.

I have decided i'm going to use some nice Deutsch DT 12 pin connectors (only using 11 pins anyway for the ignition-only part of this) instead, so next job is to cut off the molex connectors, re design the case (found a 3d printable one I might try) and crimp the pins for the new connectors on.

I also routed the loom under the brake master cylinder to hide it away a bit. The temp sensor wire in this pic looks like its under strain but I've since moved it around slightly so it's not being pulled!

Image

In the meantime waiting for the crimps and connectors to arrive I might try and mount the hall sensor. I found this picture http://auskellian.com/paul/spitfire_pho ... ion.html#3 which shows a nice way of mounting a bracket for it to the engine mount bracket, which might be better than just using one of the timing chain cover holes.

_________________
1973 2-door honeysuckle Triumph Toledo 1300 Thread here


Top
   
PostPosted: Wed Jun 21, 2023 3:14 pm 
Offline
TDC Member

Joined: Mon Dec 12, 2016 9:53 pm
Posts: 1709
Location: Harrow Middlesex
What ECU are you using ? how is the setup programme (easy to use ? ) did the ECU come with a basic setup to get the car started ?

Dave


Top
   
Display posts from previous:  Sort by  
Post new topic  Reply to topic  [ 96 posts ]  Go to page Previous 13 4 5 6 7 Next

All times are UTC+01:00


Who is online

Users browsing this forum: No registered users and 19 guests


You cannot post new topics in this forum
You cannot reply to topics in this forum
You cannot edit your posts in this forum
You cannot delete your posts in this forum
You cannot post attachments in this forum

Search for:
Jump to:  
Powered by phpBB® Forum Software © phpBB Limited