Quote:
Since you already have the curved dash, there is not much spare space available for auxiliary instruments.
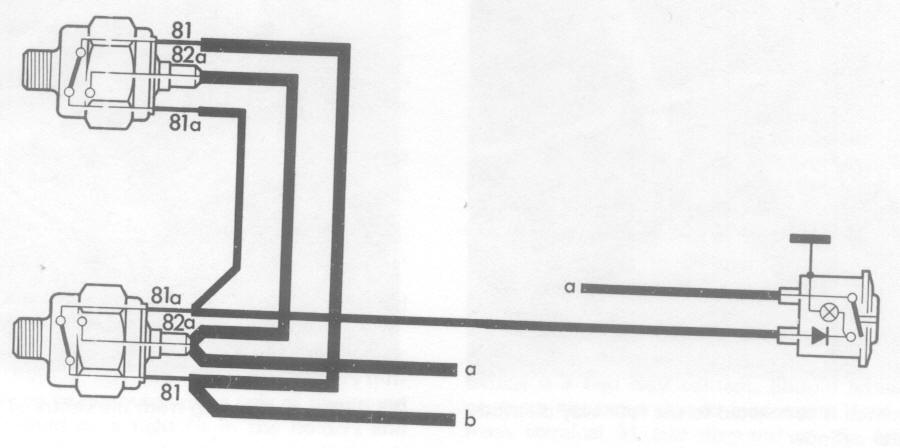
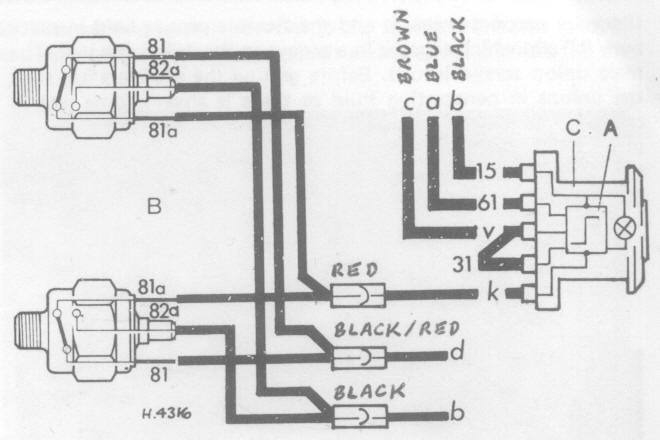
Since I first started thinking about incorporating five additional gauges and an extra warning-light cluster into my Toledo's "four-headlamp" Dolomite dashboard, I have had some further thoughts about the optimal layout of gauges and warning-light clusters. I have also since acquired another 100 mm diameter, three-gauge housing (complete with integral fuel gauge, water-temperature gauge and ammeter) and 60 mm diameter, Lucas 6WL 8-segment warning-light cluster, originating from a Triumph 1300.
Before removing the dashboard, to then remove the heater unit, sound-insulation foam and other components, to repair significant rust-holes in the bulkhead and the front windscreen pillars, I wanted to complete my trials to determine what if any modifications would be needed behind the dashboard, in order to accommodate the substitute instrument panel and instruments, to avoid possible clearance problems and the safety hazards of chafing.
I also need to determine where it might be necessary or desirable to drill any additional holes in the bulkhead, to facilitate optimal routing for the oil-pressure-gauge pipe/hose connection, inlet-manifold-vacuum-gauge pipe/hose connection, engine-tachometer flexible-drive cable, repositioned choke cable and possible revisions to the wiring loom, into which I intend to incorporate several relays and a revised fuse box.
Quote:
I haven’t made a firm decision about the selection and location of instrumentation, which is something I am still investigating; including the possibility of using instruments originally intended for other vehicle marques & models that utilised Smiths, Jaeger or AC instruments of the same or similar style; my 1974 Triumph Toledo’s original factory-fitted speedometer being an AC instrument.
Ideally, the main walnut-veneered plywood instrument-binnacle should be slightly wider and deeper (i.e. circa 30 mm wider & circa 10~15 mm deeper; especially at the outboard end, close to the circular, cold-air ventilation outlet, which would necessitate a completely different dashboard, but that is not a practical option) to comfortably accommodate my desired instrumentation, including sets of two 2-inch or 2•125-inch gauges arranged vertically.
However, using a full-size paper mock-up of the plywood instrument-binnacle with 104 mm & 56 mm diameter cardboard discs to represent the instrument gauges, I have determined that it might just be practical, to create a new instrument-binnacle, incorporating three 104 mm instruments (i.e. speedometer, tachometer & triple-gauge cluster) and four 56 mm instruments (vertically aligned in groups of two), but there would only be about 5 mm separation, between adjacent instrument bezels. Having this many instruments would be constrained to the following arrangement:
| 1 x 104 mm | 2 x 56 mm | 1 x 104 mm | 2 x 56 mm | 1 x 104 mm |
With this arrangement, the 60 mm diameter, 8-segment warning light cluster would need to be relocated (probably in the time-clock aperture) and there would be little if any room to spare, to incorporate switches or individual warning lights, which would also need to be relocated (in a central console above the gearbox-tunnel or in a supplementary bracket or panel beneath the dashboard, or possibly in the time-clock panel).
Noting that the FWD Triumph 1300 & 1500 and Triumph 2000 featured a four-inch diameter, triple-gauge cluster for coolant temperature, fuel level and either an ammeter or voltmeter, this is one option which might be considered. There also exists a Smiths triple-gauge cluster, which includes an oil-pressure gauge.

I am aware that the FWD Triumph 1300’s ammeter has only a -30~0~30A range, but I envisage that this should be more than adequate for monitoring battery charge & discharge rates; not including starter-motor use. In principle, one could change the ammeter’s range, by substituting a different current-shunt resistor, as covered in GCE “O” Level Physics textbooks. . . .
Using several duplicate double-thickness corrugated-cardboard instrument-panel templates, I have further investigated possible instrument positions, to find the best compromise between the ergonomics of seeing, reading and interpreting the various gauges & warning lights, subject to the physical constraints imposed by possible routes for flexible-drive-cables and electrical cables, plus interference and/or chafing with fixed and moveable components (e.g. heater-lever linkages & windscreen-wiper linkages).
To investigate potential problems with clearances behind the instrument panel and individual instruments, together with the routing of electrical-wiring, hoses and/or pipes and flexible-drive cables, I fabricated several trial instrument-panel mock-up sections of varying heights, from ¼-inch thick MDF off-cuts, accommodating either a single 100 mm diameter instrument or two 52 mm diameter gauges or a single 60 mm diameter warning-light cluster.
Being able to see and feel behind and around individual instruments, positioned in various trial locations, confirmed my original suspicion that the heater unit and right-hand heater-lever linkage would pose the main clearance problem and that instruments would also need to be carefully positioned relative to the two tubular-steel steering-column supports.
The right-hand heater-lever linkage (operates the valve for the hot-water supply to the heater matrix and the damper to divert incoming fresh air through the heater matrix), marked HOT, WARM & COLD on the black-plastic trim, is one of the major sources of potential interference with the gauges and their electrical-wiring, mechanical pipe or hose connections and retainer brackets. This dictates that the only instrumentation that can be used in front of it, are a 60 mm diameter 8-segment warning-light cluster, a pair of 52 mm diameter gauges and/or the 100 mm diameter triple-gauge housing with ammeter. There would be insufficient clearance for either the 100 mm diameter speedometer or 100 mm diameter tachometer (i.e. engine rev counter).
From an ergonomic perspective, it makes sense to locate the two 60 mm diameter 8-segment warning-light clusters as close together as possible; for which the most practical solution is to mount them on either side of the three heater-control levers. Similarly, it would be beneficial to group all of the main gauges together, grouping related functions as closely as possible, as follows:
v Oil-temperature gauge beside water-temperature gauge
v Oil-temperature gauge above oil-pressure gauge
v Voltmeter beside ammeter
v Voltmeter above inlet-manifold vacuum gauge
It would also be beneficial to group together those gauges which are constantly used for the process of driving the car; namely the speedometer, tachometer and inlet-manifold vacuum gauge, such that:
v Inlet-manifold vacuum gauge beside speedometer
v Tachometer beside speedometer
To simultaneously satisfy these ideals, would result in the following arrangement of instruments and warning-light clusters, from left to right for a RHD vehicle; assuming the various physical constraints don’t preclude it:
| 1 x 60 mm | Levers | 1 x 60 mm | 2 x 52 mm | 1 x 100 mm | 2 x 52 mm | 1 x 100 mm | 1 x 100 mm |
· 60 mm Lucas 6WL 8-segment warning-light cluster [in existing clock-aperture]
· THREE HEATER CONTROL LEVERS
· 60 mm Lucas 6WL 8-segment warning-light cluster
· 52 mm oil-temperature gauge (top) – [in close proximity to the water-temperature gauge];
· 52 mm oil-pressure gauge (bottom);
· 100 mm circular housing with triple-gauge cluster, incorporating water-temperature gauge (top left) – [in close proximity to the 52 mm oil-temperature gauge], fuel gauge (bottom), and ammeter (top right) – [in close proximity to the 52 mm voltmeter];
· 52 mm voltmeter (top) – [in close proximity to the ammeter];
· 52 mm inlet-manifold vacuum gauge (bottom);
· 100 mm Triumph Toledo dual-scale speedometer, with three integral warning lights for generator (65A alternator), oil-pressure & headlamp main beam;
· 100 mm Triumph Dolomite, Spitfire or GT6 tachometer, possibly with up to two integral warning lights [approximately in the location, previously occupied by the cold-air outlet].
By positioning both the 100 mm diameter speedometer and 100 mm diameter tachometer on the far right-hand side, routing of flexible drive-cables to one or both of the instruments can be readily accommodated without incurring interference problems or the need for small-radius bends. The two tubular-steel steering-column supports, plus the bracketry and linkages associated with the windscreen wipers, impose the main constraints.
The desired position of the oil-temperature & oil-pressure gauges, requires some modification of right-hand heater-lever linkage. This will involve shortening the horizontal rod by about 5 mm, between the lever at one end and the crank at the other, and rotating the crank relative to the lever by about 45 degrees, so that the crank is aligned vertically downward, when the lever is in the lowest COLD position.
This can be most readily achieved by removing a circa 5 mm long section from the horizontal rod and reconnecting the two pieces using a cylindrical collar with two grub-screws; enabling one to fine-tune both the length and the degree of relative rotation. Shortening the rod and rotating the crank, will then require a thin connection link to the damper spindle, to be shortened and reshaped.
It will also be necessary to fabricate a custom retaining bracket for the oil-pressure gauge, shortening the oil-pressure gauge’s ultra-long instrument-illumination bulb-holder spigot and use of a right-angled elbow for the oil-pressure gauge’s pipe or hose connection.
The inlet-manifold vacuum gauge, on the right-hand side of the 100 mm diameter circular housing with triple-gauge cluster, would be in close proximity to the tubular steering-column support bracket, which will necessitate shortening the inlet-manifold vacuum gauge’s ultra-long instrument-illumination bulb-holder spigot and use of a right-angled elbow for the inlet-manifold vacuum gauge’s pipe or hose connection.
This instrument layout, provides little space for anything else in the concave instrument panel, but I should be able to fit two Triumph-pattern, individual rectangular warning-light units, above & below the 60 mm diameter, 8-segment warning-light cluster. These would normally be for the hydraulic brake-circuit failure warning and a reminder to fasten seat belts; the latter of which I would regard as unnecessary.
I hope to fit a similar Triumph-pattern, individual rectangular warning-light unit above the 60 mm diameter, 8-segment warning-light cluster in the former clock aperture, to the left of the heater-control levers and possibly mount the hazard-warning light switch below the 8-segment cluster, but I have yet to confirm whether the latter will be practical. I would prefer to site the hazard-warning light switch there, because it would be easily visible and accessible to both the driver and front-seat passenger in the event of an emergency.
Noting that neither of the two 8-segment warning-light clusters, will be in one’s zone of acute forward vision, I think it might be useful to retro-fit either one or two flashing warning lights, between the 100 mm diameter speedometer and engine-tachometer, which would flash when any one of the vital warning lights (NOT tell-tale lights | e.g. low oil-pressure, generator voltage, brake-circuit failure, low hydraulic fluid, overheating coolant, etc) are illuminated.
The original “four-headlamp” Triumph Dolomite concave instrument panel [10 mm thick | 550 mm long | 135 mm LHS height | 118 mm RHS height | radiused corners of different radii] was made from some form of laminated plywood with a walnut veneer facing, into which all of the instruments were recessed, so that none of the bezels are proud of the instrument panel’s front face.
I have yet to decide how I am going to fabricate the substitute concave instrument panel, into which these instruments will be fitted. There are probably various ways of fabricating an instrument panel and materials that could be used, but the main complication is likely to be the concave shape. Ideally, if practical, I would like to have a matching walnut veneer that would preserve the original Triumph dashboard style, which imparts an air of luxury that set it apart from most other mass-produced cars.
I have been told that it is possible to steam-bend plywood, but I have yet to obtain complete details of how to do this and whether there might only be particular varieties of plywood (e.g. ply thickness, overall thickness and inter-ply glue type) for which this technique is suitable.
It also remains to be discovered, whether the 52 mm, 60 mm & 100 mm diameter holes with rebated edges for the instrumentation, should be created before or after the panel is steam-bent into the required concave shape. It would be much easier to create the holes before bending, but I envisage a high probability of plywood distortion and breakage during the steam-bending process and I suspect that the plies will shift relative to one another, such that the holes in the individual plies would no longer be concentric.


