Page 1 of 3
Dolomite rear view mirror repairs
Posted: Thu Jul 12, 2012 10:32 am
by matienzo
I've seen lots of threads about "My
mirror mount just broke" etc but I haven't seen any mention of how to make an effective repair or how to pre-empt the problem.
The main problem is that if you try to glue the two halves back together it might work for a while but plastic is a difficult material for adhesive to stick to even if you key it. The end result is yet another broken
mirror mount.
I have to say a big thanks to Mike Barker for the
mirror mount!

So here's my fix for mending the plastic rear view
mirror base that often cracks and then falls in half.
If you see the crack developing remove the
mirror assembly from the roof mounts by undoing the two countersunk screws.
If the mount is already in half clamp it in a vice (with the stalk!!) so its held together during the following operation.
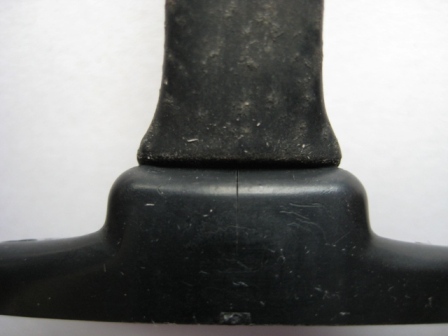
- Crack
- Crack.JPG (51.65 KiB) Viewed 4915 times
Remove the
mirror (single screw at rear)
Get hold of some small diameter screws (I used 1.5 mm diameter brass). Pre drill 4 holes with a slightly reduced diameter than the screws in each corner of the plastic base. You'll note that this is the thickest part of the base so you do not need to drill right through. Just take your time drilling.
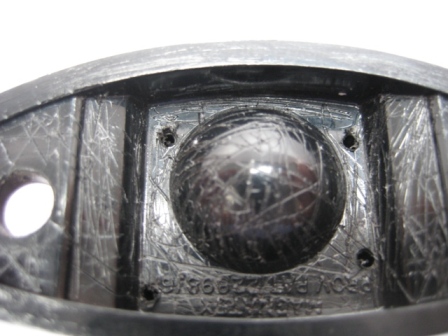
- Pre-drill holes
- Pre-drill holes.JPG (73.95 KiB) Viewed 4915 times
Using a knife or the edge of a screwdriver, key the plastic surface so the adhesive has a key. Clean the surface with a solvent.
Screw in the four screws so that the heads are just below the level of the mount- carefully!

- 4 Screws
- 4screws.JPG (60.07 KiB) Viewed 4915 times
Mix up some adhesive. I used Araldite. Using the spatular make sure that the adhesive is pushed around the screws. Wait for the adhesive to set and either repaint or refit.
I have no idea as to the likely success of this over time but its certainly a means to provide some way for the adhesive to bond (indirectly) to the the base and to prevent twisting. Just don't tighten the mounting screws particularly tight either as this will end up with forces which try to split the mounting base. Also lubricate the swivel at the back of the
mirror as this gets rather stiff over time.
Re: Dolomite rear view mirror repairs
Posted: Thu Jul 12, 2012 11:00 am
by DoloWIGHTY
Looks as though it will work.
I have a couple of spares which are split in the manner shown, so I will have a go at this.
I see you have used wood screws - do they take up okay in the metal stem? If so how many turns would you say you got from them (in other words how deep did you drill into the stem?)
Re: Dolomite rear view mirror repairs
Posted: Thu Jul 12, 2012 11:22 am
by matienzo
Yes they are wood screws but they don't go as far in as the metal stem, just into the plastic. If the screws bite then thats all you need. It's what I had lying about.
I figured trying to drill through the plastic and stem and then self tap was just a step too far.
The stem/stalk is supposed to release in the event of an impact and that may prevent that.
Re: Dolomite rear view mirror repairs
Posted: Thu Jul 12, 2012 3:27 pm
by Jon Tilson
Nice one....
One for the wiki is that.
Jonners
Re: Dolomite rear view mirror repairs
Posted: Thu Jul 12, 2012 4:54 pm
by geeksteve
Nice. I filled mine with epoxy previously without screws, cracked when I tightened the mounting screws up, so probably worth screwing up verrrry gently.
S
Re: Dolomite rear view mirror repairs
Posted: Sat Jun 28, 2014 7:33 am
by wellskint
forgive my stupidity chaps, but what is the purpose of the 4 screws? mine has completely snapped in half, would the previous suggestions still work?
Re: Dolomite rear view mirror repairs
Posted: Sun Jun 29, 2014 12:07 pm
by cleverusername
wellskint wrote:forgive my stupidity chaps, but what is the purpose of the 4 screws? mine has completely snapped in half, would the previous suggestions still work?
Well looking at the photos the obvious solution would be to screw some sort of internal plate inside the mount to hold it together.
Another possibility might be the fablab in Manchester, it is a facility that gives the public access to a 3d printer. In theory you could simply scan your mount, and print a new one.
Re: Dolomite rear view mirror repairs
Posted: Sun Jun 29, 2014 5:00 pm
by xvivalve
The screws give something for the epoxy resin to bond to other than just the plastic, giving it an effective key.
Re: Dolomite rear view mirror repairs
Posted: Sun Jun 29, 2014 5:01 pm
by Richard the old one
This is a very common problem and back in 2011 I reported in edition 143 of Dolly Mixture that I had used the following method to repair a number of rear view mirrors. They have all gone onto give many years of good service without needing any further repairs. I use superglue to stick the two bit together and then fill the inside of the mounting peice with either araldite or car body filler.
Re: Dolomite rear view mirror repairs
Posted: Mon Jun 30, 2014 5:45 pm
by matienzo
The screws are a simple way to increase the strength of the repair.
I tried Richard the old one's method (using araldite) but found that the plate still broke again when the mounting screws were tightened up, even a little. So that didn't work for me. It might work for some.
My post on this was almost two years ago and despite my wife and I needing to reposition the mirror each time we drive, the repaired mount is still fine.
Re: Dolomite rear view mirror repairs
Posted: Mon Jun 30, 2014 8:17 pm
by DoloWIGHTY
Seeing as this topic has risen to the top, I grabbed a spare stem and had a go this evening, this one does look as though an attempt at repair had been made before, I didn't want to disturb it as it felt solid.
Scrubbed the inside with a coarse piece of sandpaper until no longer shiny, four screws inserted - carefully (I cut the very tip of the screws off to stop the point forcing the stem away from the base)

And fill with Araldite:

Leave for a few days to harden and road test (any excuse

)
Re: Dolomite rear view mirror repairs
Posted: Mon Jun 30, 2014 9:14 pm
by geeksteve
Couldn't even find 4 matching screws?
You could work for British Layland

Re: Dolomite rear view mirror repairs
Posted: Tue Jul 01, 2014 7:26 am
by wellskint
thank you very much i'll give it a go today
Re: Dolomite rear view mirror repairs
Posted: Thu Jul 03, 2014 8:08 pm
by matienzo
wellskint wrote:thank you very much i'll give it a go today
How did it go? Repaired?
Re: Dolomite rear view mirror repairs
Posted: Sun Mar 22, 2020 12:23 pm
by GrahamFountain
I followed this method back in Dec. 2016, and it lasted till recently. However, the bulb on the end of the stalk has become progressively slack over the years (and probably about 10-12k miles) and I couldn't use the dip lever without having to readjust the
mirror.
I tried one of these TRIUMPH STAG,TR4A,TR5,TR6, 2000,2500,2.5PI INTERIOR
MIRROR MNT Bkt & ARM
https://www.ebay.co.uk/itm/TRIUMPH-STAG ... SwE4hdq2WC as a replacement, but the arm's too short. So, unless I set the seat forward and lean right beck, I can only see a short distance behind me or the underside of the roof. People who are short in the upper body might be alright, but if your anywhere close to 6ft or above, it's not likely to be a good solution.
I do have a couple of spare Dolomite arms and while looking for a spare Stag mounting I thought I had I came across a TR7 mounting and arm, which has the same spherical hole. So I pulled the arm off that and and the Dolomite stalk fits.
The top side is wrong, as there's a hole in the TR7's headrail for the back of the bulb and the holes are too close together by about 2-3mm. However, with a bit of work with a black glue stick in the hot glue gun and a file to move the holes, it now fits. It's not perfect, the shape does not match the mark on the headlining and you can see the join between the plastic and the hot glue a bit. But it works fine.
However, TR7 ones aren't much more available than Dolomite ones - there's currently just one on eBay in the UK. I just happened to have one at the back of a draw. So it still needs a better option for a replacement.
What would do is a stalk like the Stag one, but about 2" longer.
Graham