The Triumph Dolomite Club - Discussion Forum

The Number One Club for owners of Triumph's range of small saloons from the 1960s and 1970s.
It is currently Tue Apr 16, 2024 12:58 pm

All times are UTC+01:00


Post new topic  Reply to topic  [ 28 posts ]  Go to page 1 2 Next
Author Message
PostPosted: Sun Oct 13, 2013 2:05 pm 
More just getting it roadworthy and keeping it going.
I bought the car in May 2009, and I've eventually been shamed into posting some pictures here.
I did start, but then Webshots went down, so now the shots are with Flickr.

I started out with good intentions of keeping a detailed log, that didn't last long. Then my camera broke and I had to use a phone camera, excuses excuses.
I can tell from my photo's when bits and pieces were done, so pictures will be added to this thread in time order, using the wonders of the edit buttons.

All comments welcome, my aim is to keep the car going as long as possible within my budget and skills restraints. It often has to make a 65 mile journey north to my brother's garage when I'm stumped, sometimes on the back of a trailer!
I'd rather not do anything that keeps the car off the road for extended periods of time, and where my lock-up garage is situated means I can have electrical power by running an extension cable, but I can't push the car in the garage - it would take at least 5 people to do that, it's like a speed bump at the entrance to garage. The garage is rented, not mine to do with what I will.

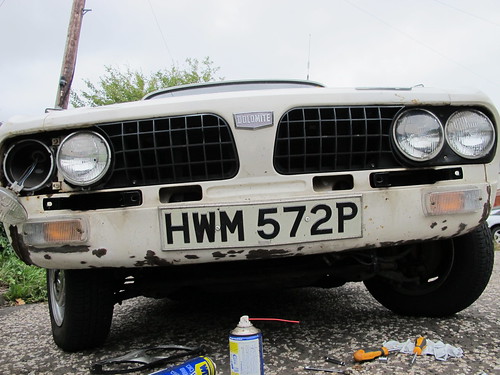
Why did I buy this car?
I had a white 1850 when I was 19, bought at 5 years old for £750. It was scrapped 4 years later in 1984 after adding 50,000 miles to the 25,000 purchase mileage.
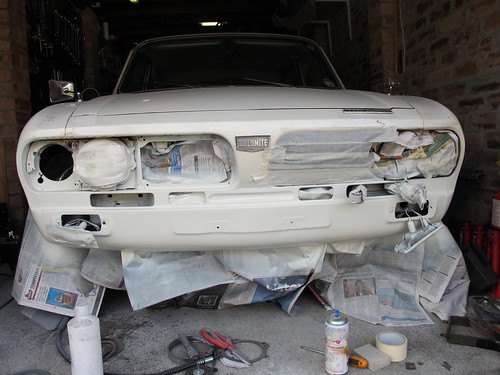
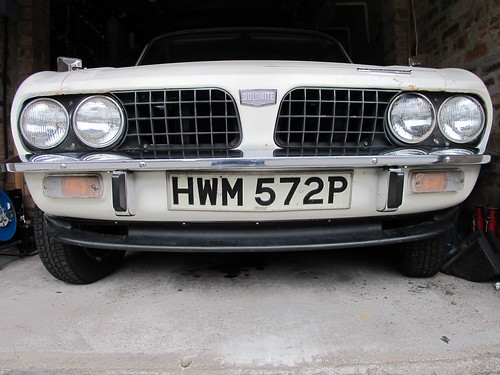
Then this one appeared on ebay, I bought it for £420 unseen from the Chorley area. A blast from the past. I used to tinker with cars due to cost-saving, but I've never really done much work on them, and never done bodywork. Before buying this, the last time I got my hand hands dirty under a car was probably 1978.......

And so it began..

August 2013

In November 2011 the original engine suddenly became very noisy at the bottom end. This was replaced with an engine I had been told was, "quieter than my Lexus".
It was.
Unfortunately it had a blown head gasket, and after 13 miles of my homeward journey my car was recovered back to Edinburgh, and driven into it's lock-up garage.
The head wouldn't come off.
Pre Xmas 2011 the car was trailered to Dundee, and a third engine fitted.
Yes, this also had a head problem, very annoying as this one had been "worked on".
Unfortunately by a chap who rides a horse swinging a rope to catch cattle.
August 2013 the car barely made the journey to Dundee.
No worries, the head was removed and taken to well known local engineering shop in Dundee. The head is basically scrap. They can fix it, they can fix anything, but I can't afford that,

So... the head from the original engine was dug out, looked at, and the valve guides were seen to move. Off it went to England via courier for the works.
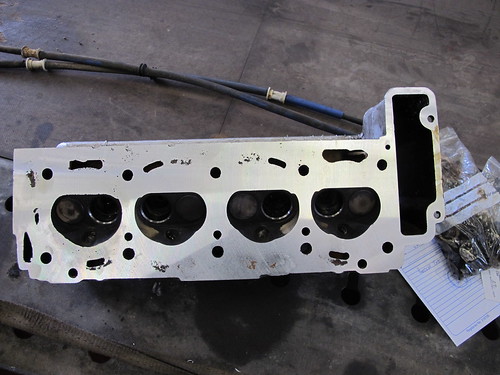
The scrap head:
Image
Block after pressure test and exploratory skim - scrap by edindundee, on Flickr

Image
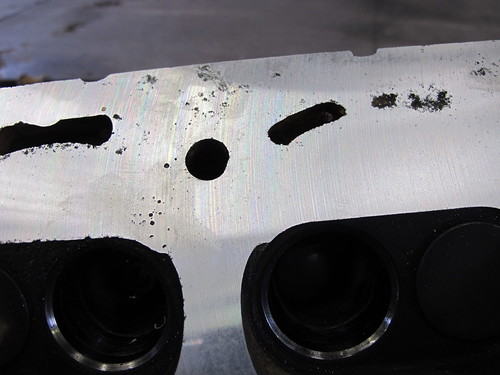
Apparently the holes are previous weld repairs by edindundee, on Flickr


Block Prep - can't quite see the marks where the valves had hit #4 piston in a previous life.
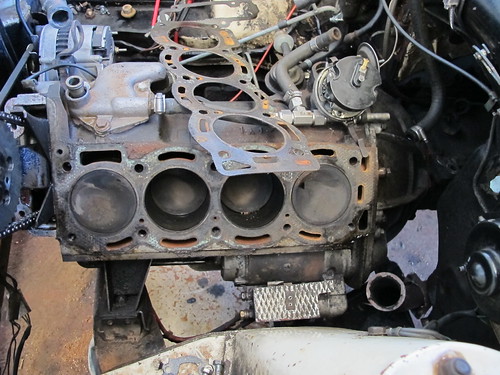
Image
The Block by edindundee, on Flickr

Head back from the shop:
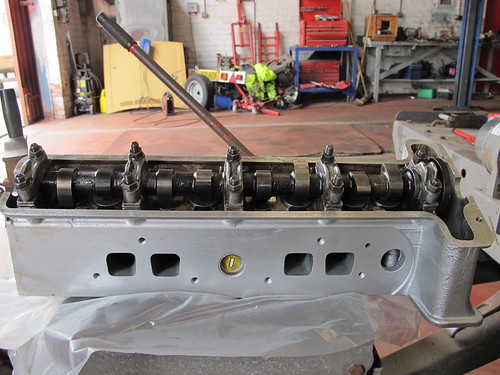
Image
IMG_2609 by edindundee, on Flickr

Fitted:
Image
IMG_2637 by edindundee, on Flickr

Glad to say there are no leaks on this head, no issues at all, and in 100 miles or so it will receive it's final torque and fill with antifreeze.


Last edited by Edin Dundee on Sat Oct 19, 2013 1:06 pm, edited 3 times in total.

Top
   
PostPosted: Sun Oct 13, 2013 2:24 pm 
3/9/13

Travelling back from work, slaphead in a rush behind me ran into the back of the car.
He must have hit the only part of the car with no rust.

Image
IMG_2656 by edindundee, on Flickr

Image
IMG_2660 by edindundee, on Flickr

Image
IMG_2657 by edindundee, on Flickr

Image
IMG_2653 by edindundee, on Flickr


Top
   
PostPosted: Sun Oct 13, 2013 2:40 pm 
21/9/13

The car isn't due to go for repair until 7th October, plent of time to fit the repalcement front bumper I picked up on ebay. It's not new, but it's better than the one on there. Won't take more than an hour.......

Might as well sort this while the bumper is off..


Image
IMG_2666 by edindundee, on Flickr


Image
IMG_2668 by edindundee, on Flickr

Another week goes by...

Image
IMG_2669 by edindundee, on Flickr

Cut out the rust. No metal to fit, so fibreglass it is...

Image
IMG_2670 by edindundee, on Flickr

On, and on......
You can see the two patches let in to what were the number plate fixing holes - I think it's two years since the number plate fell on my head, might have been last year. I didn't bother tarting up the weld up too much, it's hidden by the number plate.
I can't weld, all welding is done for me by my long suffering brother..

Image
IMG_2674 by edindundee, on Flickr

Image
IMG_2675 by edindundee, on Flickr

Image
IMG_2671 by edindundee, on Flickr

Image
IMG_2673 by edindundee, on Flickr

Image
IMG_2678 by edindundee, on Flickr

Image
IMG_2679 by edindundee, on Flickr

Image
IMG_2676 by edindundee, on Flickr

Image
IMG_2677 by edindundee, on Flickr

Image
IMG_2681 by edindundee, on Flickr

Image
IMG_2684 by edindundee, on Flickr

Image
IMG_2685 by edindundee, on Flickr

Image
IMG_2692 by edindundee, on Flickr

There - I wasn't too far out with my estimate of an hour for replacing the front bumper!!
I can drive the car to the bodyshop for the repair to the back end now.


Top
   
PostPosted: Sun Oct 13, 2013 2:43 pm 
11/10/13

Called the body shop to ask how progress is - nothing done!
The insurance company called them to stop any repairs pending a visit by the third party's insurance company engineer. The garage asked if I would mind taking the car away until everything is OK to start (again).
Not happy. :evil:


Top
   
PostPosted: Sun Oct 13, 2013 3:02 pm 
Not long after I had the car up and running, lights on, went over a bump and I swear I could smell electrical nastiness - nothing came of it, so never mind.
Not too long after that the parcel shelf came out to make lots of jobs easier.
After engines (plural) and gearboxes and overdrives (plural) were fitted, I replaced the steering colum bulkhead bush.
That meant the parcel shelf was eventually refitted last weekend, what a difference to the interior. Went for a short spin, the rev counter stopped working.
Hmm.
Back to the house, one of the fuses seemed dodgy - not quite blown, but high resistance under load - how odd.
Hmm.
Replaced the fuse, checked things out - no sidelights.
Hmm.
Poke and prod - found this:

Image
IMG_2698 by edindundee, on Flickr

That wire has been seriously stressed! Not happy with this. I decided to replace the entire length of cable, and I'm glad I did.
The red wire has gotten so hot it stuck itself to some of the larger diameter wires. Luckily only the red wire was damaged, all others are good.
Image
IMG_2699 by edindundee, on Flickr

Pulled the loom through the column, replaced the cable and refitted.

Image
IMG_2700 by edindundee, on Flickr

Image
IMG_2702 by edindundee, on Flickr

This is what I've replaced so far - I still have to replace the cable from that plug/socket to the one behind the dash, then I think I'm good. It looks like the cable damage was confined to those spots, the length of cable from the bulkhead to the sidelights looks undamaged. Of course it's raining now so the car is back in the garage, and I don't have room to work on it in there.

Image
IMG_2701 by edindundee, on Flickr

The original damage to the cable occurred right where the parcel shelf joining bracket fits. It must've been chafing for a while.
I reckon I got lucky there, it could have been much worse. :shock:


Top
   
PostPosted: Sun Oct 13, 2013 3:57 pm 
Offline
Future Club member hopefully!
User avatar

Joined: Tue Oct 03, 2006 5:52 pm
Posts: 7567
Location: Halifax, West Yorkshire
Glad you've decided to do a "resto" thread on here. Mine wasn't really a restoration until I started on the bodywork. My headlight panels are worse that yours.

_________________
Toledo Man

West Yorkshire Area Organiser & forum moderator
Meetings take place on the first Wednesday of the month at 8.00pm at The Old Brickworks, Wakefield Road, Drighlington, Bradford, BD11 1EA

1972 Dolomite 1850 auto (NYE 751L - Now for sale)
2003 Volvo XC90 D5 SE (PX53 OVZ - The daily driver)
2009 Mercedes-Benz W204 C200 CDI Sport (BJ58 NCV - The 2nd car)
1991 Toyota Celica GT (J481 ONB - another project car)
Former stable of SAY 414M (1974 Toledo), GRH 244D (1966 1300fwd), CDB 324L (1973 1500fwd), GGN 573J (1971 1500fwd), DCP 625S (1977 Dolomite 1300) & LCG 367N (1975 Dolomite Sprint) plus 5 Acclaims and that's just the Triumphs!

Check my blog at http://triumphtoledo.blogspot.com
My YouTube Channel with a bit of Dolomite content.

"There is only one way to avoid criticsm: Do nothing, say nothing and BE nothing." Aristotle


Top
   
 Post subject: Hi Bill.....
PostPosted: Sun Oct 13, 2013 4:07 pm 
Offline
TDC Member
User avatar

Joined: Thu Aug 09, 2007 1:22 pm
Posts: 6480
Location: Caithness, Scotland
Many years ago I went with a friend to Evelix near Dornoch to collect an accident damaged Vx Magnum.

Said Magnum belonged to holidaymakers who were shunted in the back and then on their way home the clutch broke up :( .
So they abandoned the car at Evelix garage and went home on the train.

The accident damage was similar to yours but worse. My friend borrowed the necessary equipment and jacked out the damage. Took about 10 minutes :D .
It needed a skim of filler before painting.


Anyway, yours looks a straightforward repair to me.


Ian.

_________________
TDC Forum moderator
PLEASE help us to maintain a friendly forum,
either PM or use Report Post if you see anything you are unhappy with. Thanks.


Top
   
PostPosted: Sat Oct 19, 2013 1:08 pm 
First post updated, see pics above.
Still waiting for the car to be repaired.


Top
   
PostPosted: Sat Oct 19, 2013 3:21 pm 
Quote:
3/9/13

Travelling back from work, slaphead in a rush behind me ran into the back of the car.
He must have hit the only part of the car with no rust.

Image
IMG_2656 by edindundee, on Flickr
I had similar, mine was there when I got the car. Mine was more underneath though;

Image

Was pulled out when I had the body resto done. Sound familiar? ;-)


Top
   
PostPosted: Sun Mar 09, 2014 2:17 pm 
The glovebox was removed to replace the clock - the original looks perfect, but it sounds like the gears have messed up and it doesn't keep time. So I replaced it with a perfectly functioning clock, the bezel has a scratch but no matter. It WAS free!
Refitted the glovebox, it didn't open properly. I found as the door was opened and closed, the veneer around fresh air vent flexed.
Why is there never a simple job?
So off with the panel, the wood had split:
Image
IMG_2883 by edindundee, on Flickr

A repair to this and it was left to set overnight.
But why had the wood split?
I played with the plastic vent, it was stiff - very stiff. This could have caused the wood to split. I found the vent had been superglued, so split the plastic apart and found some of the felt had peeled back. Glued this back, but the vent is still stiff. So the securing lugs have been 'modified' and half of the vent has been siliconed together, the other half will be glued later. It should be just far enough apart to seal, but still allow reasonably free movement of the vent.
Another 5 minute job that takes hours. At least I found out where the radio takes its feed from - the clock illumination wire!
Image
IMG_2882 by edindundee, on Flickr


Top
   
PostPosted: Mon Mar 10, 2014 11:19 am 
Offline
Future Club member hopefully!

Joined: Tue Oct 03, 2006 9:45 pm
Posts: 11179
Location: Middlesex
Good job...very fiddly these little bits...

I'm sorting a Stag electric window today....so I'll be out in sympathy.

Jonners

_________________
Note from Admin: sadly Jon passed away in February 2018 but his humour and wealth of knowledge will be fondly remembered by all. RIP Jonners.


Top
   
PostPosted: Sun Mar 23, 2014 10:21 pm 
Last week this drivers seat runner came out:
Image
IMG_2888 by edindundee, on Flickr

And this went in:
Image
IMG_2887 by edindundee, on Flickr
This broken weld on the base of the drivers seat (front height adjustment):
Image
IMG_2884 by edindundee, on Flickr

Was repaired like so:
Image
IMG_2886 by edindundee, on Flickr
The fitter in the work took about 2 minutes to do this. Awesome to watch.
He looked at the job, selected the Tig welder, set it to arc, fiddled with some settings and used a dis-similar metal welding stick.
Job done.


Top
   
PostPosted: Wed Mar 26, 2014 1:00 pm 
Offline
Future Club member hopefully!

Joined: Tue Oct 03, 2006 9:45 pm
Posts: 11179
Location: Middlesex
After umpteen years of dolomiteing I still cant work out the optimum way of fitting front seats....

but a good fix.

How did you do it? Locating those peg bolts is a right PITA.

Jonners

_________________
Note from Admin: sadly Jon passed away in February 2018 but his humour and wealth of knowledge will be fondly remembered by all. RIP Jonners.


Top
   
PostPosted: Thu Mar 27, 2014 6:55 pm 
Aha!!

This was my umpteenth attempt also, but the refitting went well.
Put the runners in, ENSURE :roll: the bolts used are low profile enough (or the runners have deep enough recesses - they're not all the same) so they don't foul the runners at both extremes. If using hex head bolts ensure the heads are aligned with the runners, again so they don't foul the runners at both extremes. On a 40 year old car the torque settings for these are meaningless. Tight enough so the seat is secure and will not come undone!! Too tight and you risk pulling apart the captive nuts on the bottom of the floorpan. Then once they are good and tight, just a wee bit more to align the heads.
Definitely clear the threads first with a tap.
Ensure the runner will slide reasonably easily to front and rear extension.

The seat - Place in position on top of the runners, then tilt it back so that it rests nicely against the back seat.
This gives you clear access and view for the rear peg bolts. Align the seat and put the peg bolts in and hand tighten.
Now tilt the seat down to its proper place and pop the front peg bolts in, tighten then tighten the back bolts.

The first few times I did this was very frustrating!


Top
   
PostPosted: Fri Mar 28, 2014 10:37 am 
Offline
Future Club member hopefully!

Joined: Tue Oct 03, 2006 9:45 pm
Posts: 11179
Location: Middlesex
Aha leaning against the back seat is the USP or Eureka trick....

You forgot the mention the thick spacer washers under the runners - presumably to save the carpet.....
I put copsalip on the runner bolts and keep the runner well greased too. You need the seats out every so often to do a "Spring" clean...
Its one of Triumpsh most annoying features putting carpets under bolted in seat runners. Its even more batty of the spitfirem which is bound to get
damp occasionally being a ragtop.

I find the springs keep falling out of the adjusting gubbins.

Jonners

_________________
Note from Admin: sadly Jon passed away in February 2018 but his humour and wealth of knowledge will be fondly remembered by all. RIP Jonners.


Top
   
Display posts from previous:  Sort by  
Post new topic  Reply to topic  [ 28 posts ]  Go to page 1 2 Next

All times are UTC+01:00


Who is online

Users browsing this forum: No registered users and 19 guests


You cannot post new topics in this forum
You cannot reply to topics in this forum
You cannot edit your posts in this forum
You cannot delete your posts in this forum
You cannot post attachments in this forum

Search for:
Jump to:  
Powered by phpBB® Forum Software © phpBB Limited