Operation Orange - 1980 Sprint restoration
-
SprintMWU773V

- TDC Staffs Area Organiser
- Posts: 5429
- Joined: Wed Oct 18, 2006 2:08 pm
- Location: The Old Asylum
Re: Operation Orange - 1980 Sprint restoration
I don't know what Paul used i'm afraid but if PPG make seam sealer he'll have used that as everything else was PPG! It's basically whatever VW/Audi use as PF Autos is an approved bodyshop for them. Wiping in is more a method than a type, think how you use bathroom sealant.
Mark
1961 Chevrolet Corvair Greenbrier Sportswagon
1980 Dolomite Sprint project using brand new shell
2009 Mazda MX5 2.0 Sport
2018 Infiniti Q30
1961 Chevrolet Corvair Greenbrier Sportswagon
1980 Dolomite Sprint project using brand new shell
2009 Mazda MX5 2.0 Sport
2018 Infiniti Q30
-
lazeruspete

- Guest contributor

- Posts: 822
- Joined: Sun Oct 21, 2012 11:15 pm
Re: Operation Orange - 1980 Sprint restoration
impressive!
looking forward to seeing it
i am still undecided on painting for mine.
looking forward to seeing it
i am still undecided on painting for mine.
1980 Dolomite Sprint Track Day Car....KLJ 895W. now redtopiffied 
viewtopic.php?f=19&t=23031
Volkswagen Golf MK3 Gti....R301UUJ. RIP 22-5-13
Volkswagen Golf MK4 TDGTI 150 MM53VNT Sold 7-8-17
BMW 320d Coupe M-Sport YL08 XBZ with factory fitted Performance Pack - Sold 22/05/21
BMW 330d Touring M-Sport WN63 XPY - best daily ever
Proud TDC Member!
viewtopic.php?f=19&t=23031
Volkswagen Golf MK3 Gti....R301UUJ. RIP 22-5-13
Volkswagen Golf MK4 TDGTI 150 MM53VNT Sold 7-8-17
BMW 320d Coupe M-Sport YL08 XBZ with factory fitted Performance Pack - Sold 22/05/21
BMW 330d Touring M-Sport WN63 XPY - best daily ever
Proud TDC Member!

Re: Operation Orange - 1980 Sprint restoration
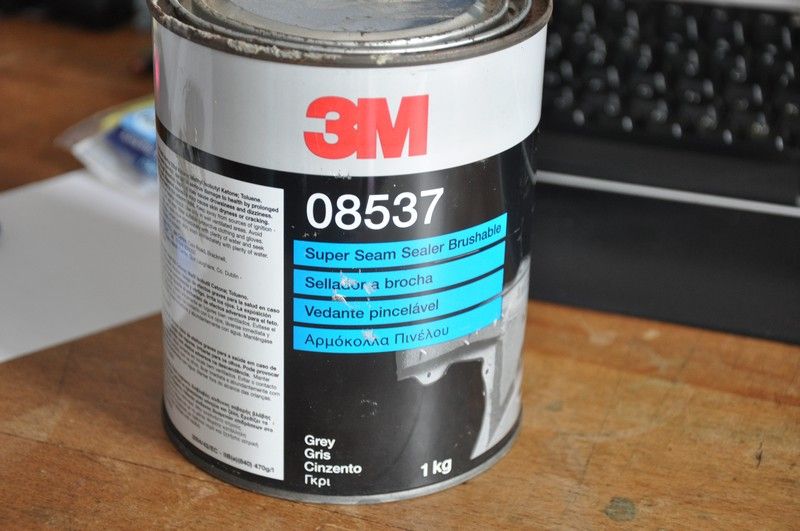
DF wrote:Have you any idea what the wipe in seam sealer is called as I need too do my shell soon ?
Or any of the seam sealer they have used as im sure its good stuff and would like to use the same.
1978 Pageant Sprint - the rustomite, 1972 Spitfire IV - sprintfire project, 1968 Valencia GT6 II - little Blue, 1980 Vermillion 1500HL - resting. 1974 Sienna 1500TC, Mrs Weevils big brown.

Re: Operation Orange - 1980 Sprint restoration
Saw your car yesterday, absolutely gorgeous.
Excellent paint job, looks like it was dipped in Vermillion. Good luck Mark - it will be better than ours (unfortunately).
Not a bad cup of tea either
Excellent paint job, looks like it was dipped in Vermillion. Good luck Mark - it will be better than ours (unfortunately).
Not a bad cup of tea either
It isn't Orange!!!!!!
The other one wasn't Purple either!!!
One of the new ones will probably be green, very green.
Another new one is green too but not as green as the previous one. Still pretty green. No, now it's Blue.
The other new one will be white with stripes. Actually it might not. No, it will be.
BUT, that one is definitely Yellow :=}
-
SprintMWU773V
- TDC Staffs Area Organiser
- Posts: 5429
- Joined: Wed Oct 18, 2006 2:08 pm
- Location: The Old Asylum
Re: Operation Orange - 1980 Sprint restoration
And thank you once again for the loan of your engine crane! I'm glad you liked the car, positive feedback is always welcome.
Weather permitting I should have an update on the engine and gearbox removal after the weekend.
Weather permitting I should have an update on the engine and gearbox removal after the weekend.
Mark
1961 Chevrolet Corvair Greenbrier Sportswagon
1980 Dolomite Sprint project using brand new shell
2009 Mazda MX5 2.0 Sport
2018 Infiniti Q30
1961 Chevrolet Corvair Greenbrier Sportswagon
1980 Dolomite Sprint project using brand new shell
2009 Mazda MX5 2.0 Sport
2018 Infiniti Q30
-
SprintMWU773V
- TDC Staffs Area Organiser
- Posts: 5429
- Joined: Wed Oct 18, 2006 2:08 pm
- Location: The Old Asylum
Re: Operation Orange - 1980 Sprint restoration
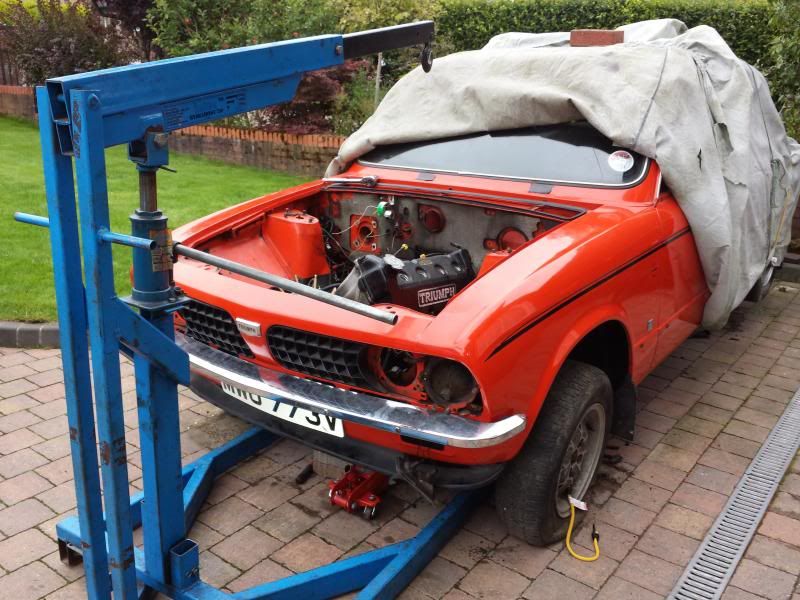
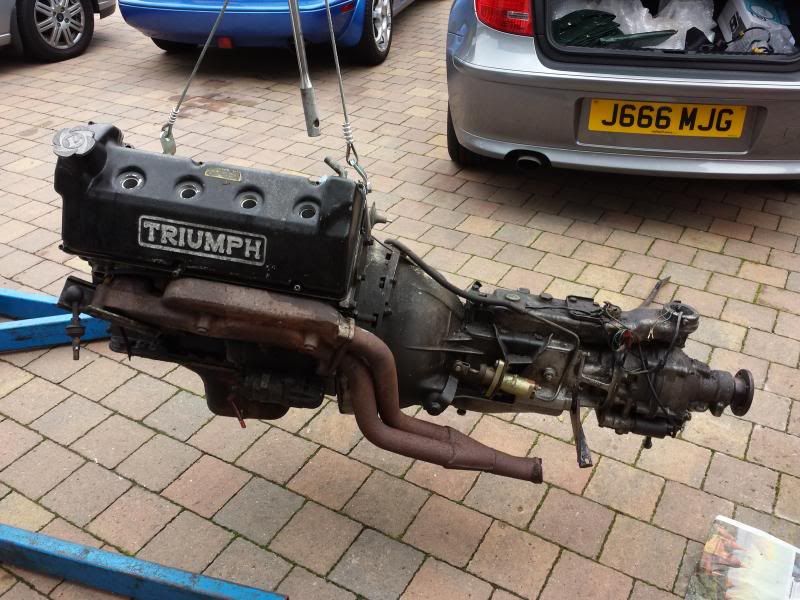
This weekend I have mostly been removing my engine and gearbox from my donor car. My original plan was to remove the complete engine, gearbox and front subframe underneath. On reflection I decided this might be awkward so decided to come out the top instead.
I'd already spent some time undoing things to make the lift easier. This time was well spent as it saved a lot of time. I was unable to reach the awkward downpipe to manifold bolt so seeing as the down pipe had a hole in I decided to take by exhaust cutter to it.
This was the first time I'd removed and engine, although my Dad who helped has quite a bit of experience.
With the aid of a borrowed engine crane (thanks Paul and Polly) we opted to use a load tilter thinking it would make life easier (actually if I did it again I probably wouldn't as you lose a lot of height).
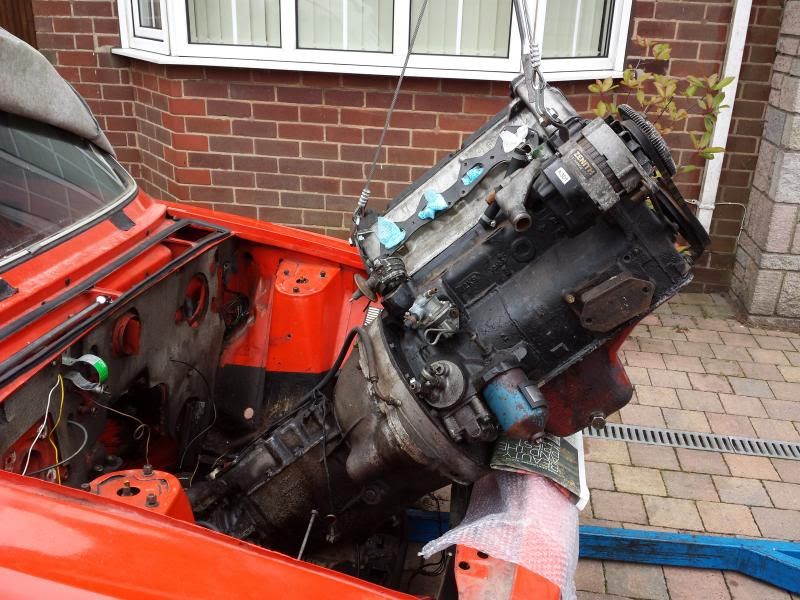
We slowly start to ease it out. We found that it moved very easily but that we had to go back in as we did not have quite enough height, fortunately it went back in very easily and I was able to adjust the reach and therefore height of the crane.
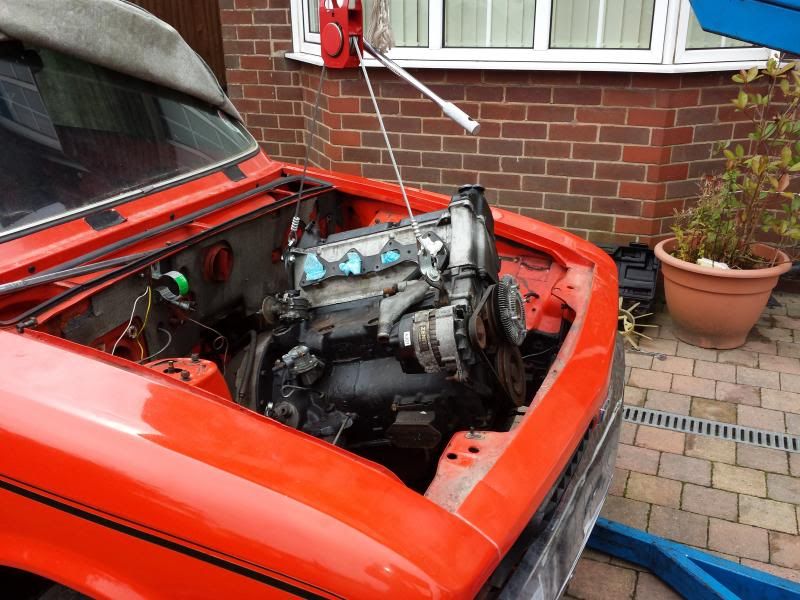
As I said the height lost with the leveller meant dropping the front right down in order to clear the front panel. I had to remove the front wheels and rest the front subframe on some block paving bricks, not ideal and certainly wouldn't do it like that when I come to putting it back in. Fortunately disaster was averted and only a slight graze was inflicted on the front panel which was actually caused by me climbing into the engine bay and knocking the bell housing onto the panel!
Obligatory 'silly angle' shot
All out, note my Mother hiding in the background.

Now there's a big hole in the car.

I later removed the downpipe
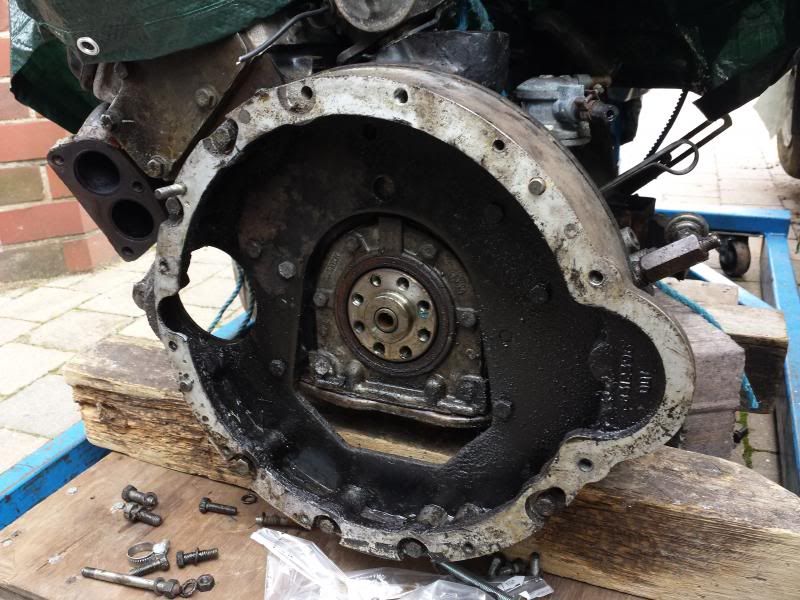
Gearbox removed along with heavy things like clutch, flywheel, starter and alternator
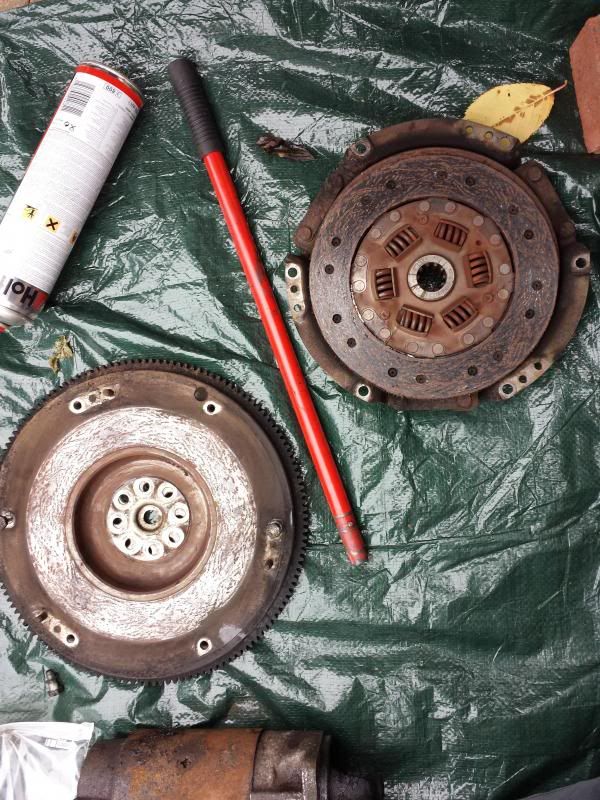
One dirty gearbox
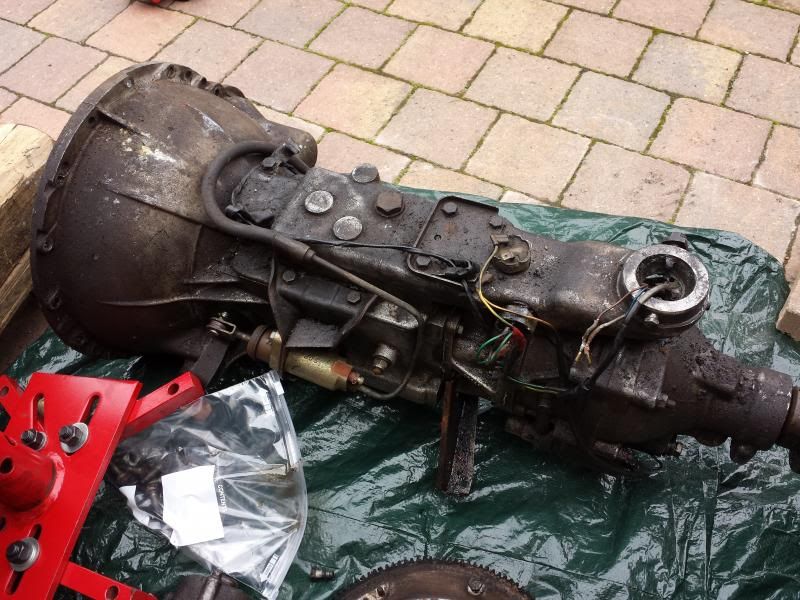
Rear view, evidence of some leakage from the rear seal
I later took off the rear adapter plates and have now mounted the engine on an engine stand. My next task is to begin taking it apart before I send it off for cleaning and analysis. Quite what I will need to do is yet unclear. The machining will be carried out by a specialist but I intend to put the engine back together myself if I can.
I'd already spent some time undoing things to make the lift easier. This time was well spent as it saved a lot of time. I was unable to reach the awkward downpipe to manifold bolt so seeing as the down pipe had a hole in I decided to take by exhaust cutter to it.
This was the first time I'd removed and engine, although my Dad who helped has quite a bit of experience.
With the aid of a borrowed engine crane (thanks Paul and Polly) we opted to use a load tilter thinking it would make life easier (actually if I did it again I probably wouldn't as you lose a lot of height).

We slowly start to ease it out. We found that it moved very easily but that we had to go back in as we did not have quite enough height, fortunately it went back in very easily and I was able to adjust the reach and therefore height of the crane.

As I said the height lost with the leveller meant dropping the front right down in order to clear the front panel. I had to remove the front wheels and rest the front subframe on some block paving bricks, not ideal and certainly wouldn't do it like that when I come to putting it back in. Fortunately disaster was averted and only a slight graze was inflicted on the front panel which was actually caused by me climbing into the engine bay and knocking the bell housing onto the panel!
Obligatory 'silly angle' shot

All out, note my Mother hiding in the background.

Now there's a big hole in the car.

I later removed the downpipe

Gearbox removed along with heavy things like clutch, flywheel, starter and alternator

One dirty gearbox

Rear view, evidence of some leakage from the rear seal

I later took off the rear adapter plates and have now mounted the engine on an engine stand. My next task is to begin taking it apart before I send it off for cleaning and analysis. Quite what I will need to do is yet unclear. The machining will be carried out by a specialist but I intend to put the engine back together myself if I can.
Last edited by SprintMWU773V on Wed Jul 26, 2017 2:14 pm, edited 1 time in total.
Mark
1961 Chevrolet Corvair Greenbrier Sportswagon
1980 Dolomite Sprint project using brand new shell
2009 Mazda MX5 2.0 Sport
2018 Infiniti Q30
1961 Chevrolet Corvair Greenbrier Sportswagon
1980 Dolomite Sprint project using brand new shell
2009 Mazda MX5 2.0 Sport
2018 Infiniti Q30
Re: Operation Orange - 1980 Sprint restoration
All sees to be going well Mark - - - -Good luck and keep us informed. 
It isn't Orange!!!!!!
The other one wasn't Purple either!!!
One of the new ones will probably be green, very green.
Another new one is green too but not as green as the previous one. Still pretty green. No, now it's Blue.
The other new one will be white with stripes. Actually it might not. No, it will be.
BUT, that one is definitely Yellow :=}
The other one wasn't Purple either!!!
One of the new ones will probably be green, very green.
Another new one is green too but not as green as the previous one. Still pretty green. No, now it's Blue.
The other new one will be white with stripes. Actually it might not. No, it will be.
BUT, that one is definitely Yellow :=}
-
SprintMWU773V
- TDC Staffs Area Organiser
- Posts: 5429
- Joined: Wed Oct 18, 2006 2:08 pm
- Location: The Old Asylum
Re: Operation Orange - 1980 Sprint restoration
After some initial problems I have managed to remove the head off of the engine. Still not sure what the issue was but nevermind.
I wasn't expected to find too many horror stories once inside. The engine ran very well prior to being paid up back in 2008, though it did leak a fair bit and of course I did not know much about the history of it, though it did apparantly have new rings. My biggest concern was whether or not moisture had got into the bores during storage and caused problems.
My first job was to give the head a brief inspection. The head was 'refurbed' no that long before I had it. The face seemed good with no evidence of pitting or significant damage to the waterways.
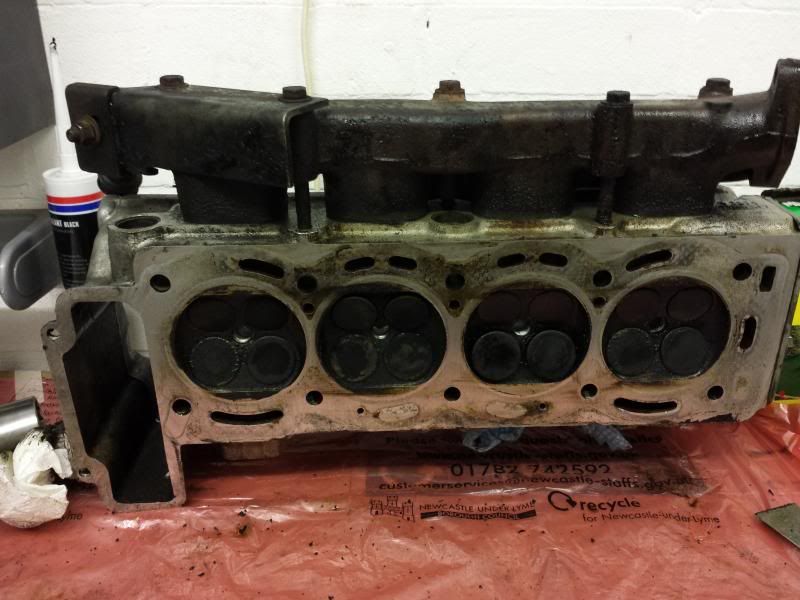
I believe the head has had at least 1 skim before so only proper measurement will tell. All the valves though grubby with carbon appear to be in good order. I'd already had a look at the camshaft lobes. One or two have some pitting on them and there is definately evidence of wear to all of the lobes.
Looking at the block again the mating face seems good and doesn't look like it's been attacked by someone with a pry bar.
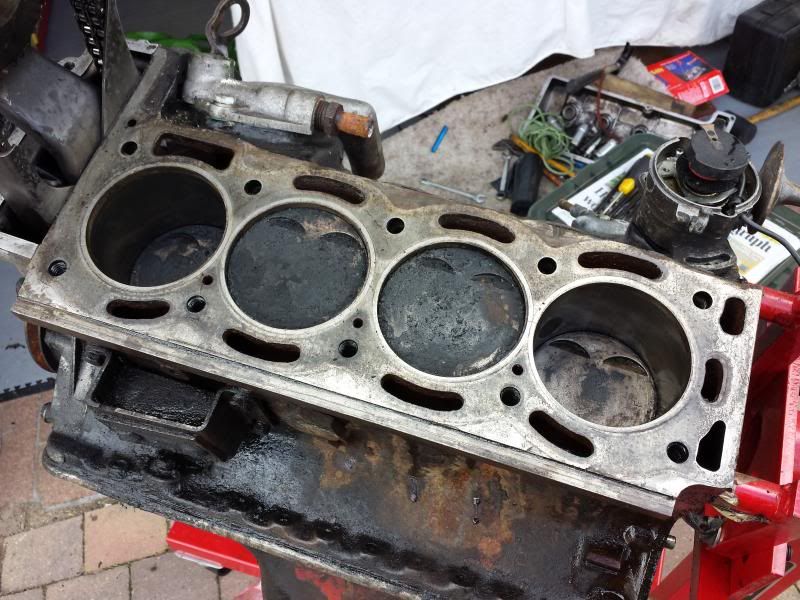
All the pistons were quite thick with carbon but I did give one of them a quick clean off to see what I could see. The one I cleaned definately says F on it along with the marking 17/0 plus the usual arrow and a little pitting. I'm not too sure what the 17/0 means, probably nothing. I have not found any other marks on the pistons which might suggest they are standard size? Looking more closely I think all pistons are a grade F but have not checked the block markings to compare.

Most of the bores are not deeply scored or ridged. Number one has a definate vertical line in it.
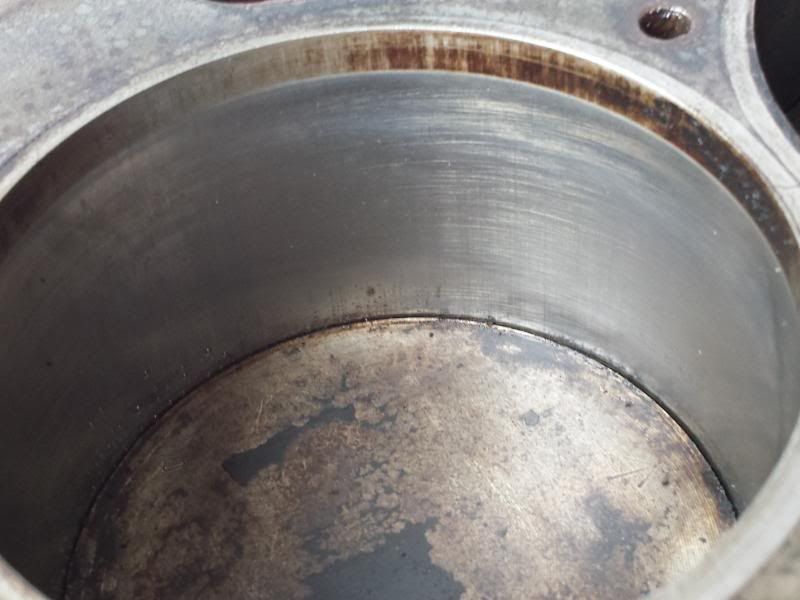
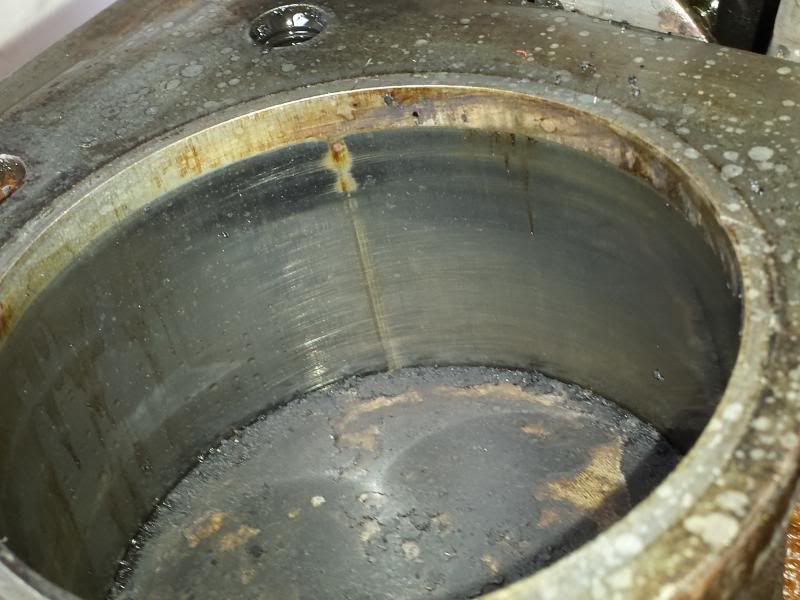
I wonder if it's actually got liners in it. You can't make it out very well from the photos, the one below shows this best but there is a definate band visible that is a different colour to the wider band you see.
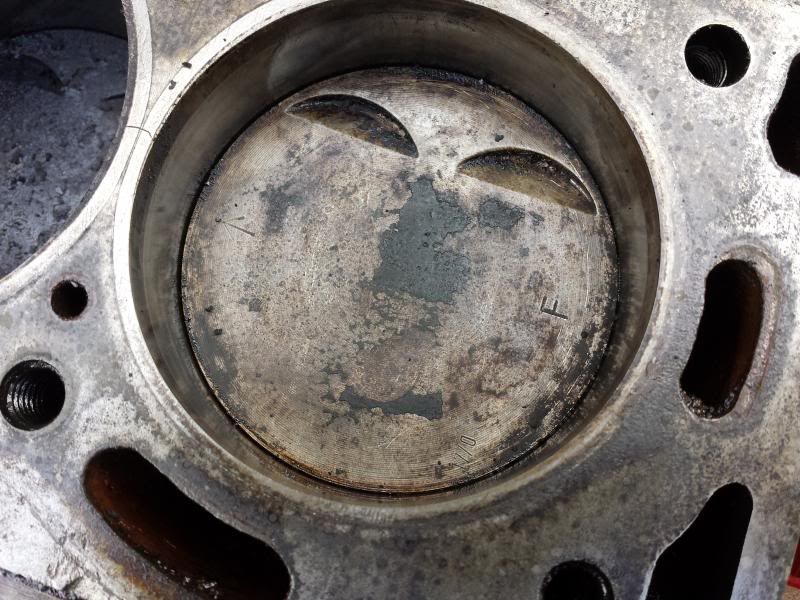
The car has at least 122k miles on it and I believe it is the original engine. I would have expected more wear so wonder given the cost of repalcement oversized pistons whether it has had liners at some point. Not being an engine expert I'm not sure.
Next up, a tidy up, a few other jobs and onto sump removal to commence removing the pistons for closer inspection. The engine place is currently closed for a few weeks so it'll be a while before it gets over to them for proper cleaning and measuring.
Last edited by SprintMWU773V on Wed Jul 26, 2017 2:15 pm, edited 1 time in total.
Mark
1961 Chevrolet Corvair Greenbrier Sportswagon
1980 Dolomite Sprint project using brand new shell
2009 Mazda MX5 2.0 Sport
2018 Infiniti Q30
1961 Chevrolet Corvair Greenbrier Sportswagon
1980 Dolomite Sprint project using brand new shell
2009 Mazda MX5 2.0 Sport
2018 Infiniti Q30
-
SprintMWU773V
- TDC Staffs Area Organiser
- Posts: 5429
- Joined: Wed Oct 18, 2006 2:08 pm
- Location: The Old Asylum
Re: Operation Orange - 1980 Sprint restoration
The engine strip down continues. I only had time to remove the head during the week so today I've focused on dropping the sump and removing the pistons and big ends caps. As the head is already off I put a bag over the top of the block before I rotated it so as to avoid any residual oil falling over the floor.
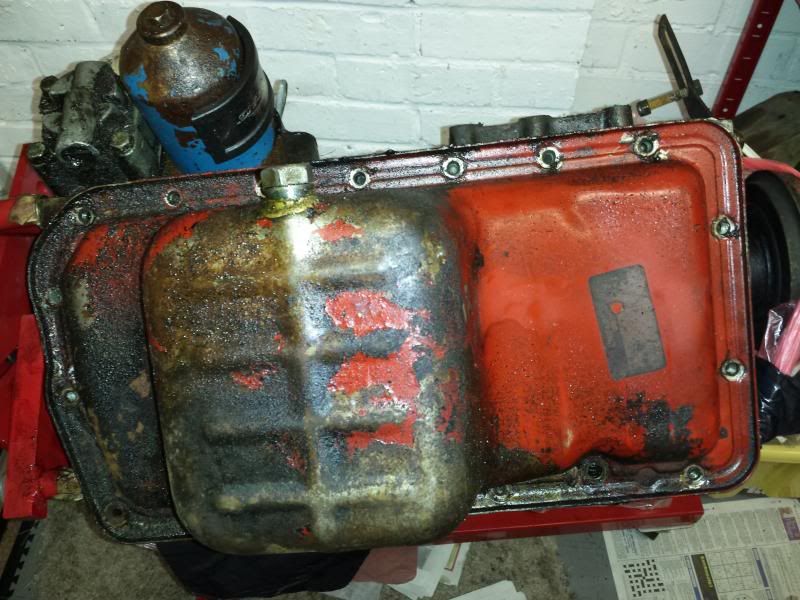
Interestingly my sump appears to be red/orange and sports a Unipart sticker on it.
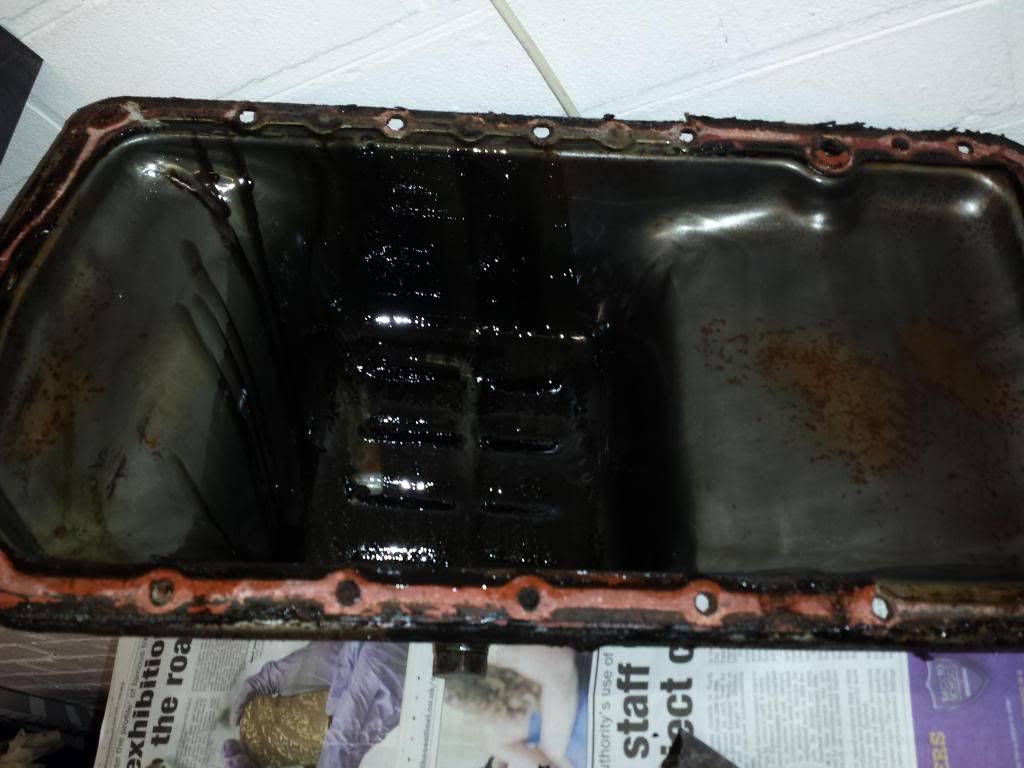
With the sump removed I was pleased to ee it wasn't full of metal or sludge either in the sump itself or clogging the pick up.
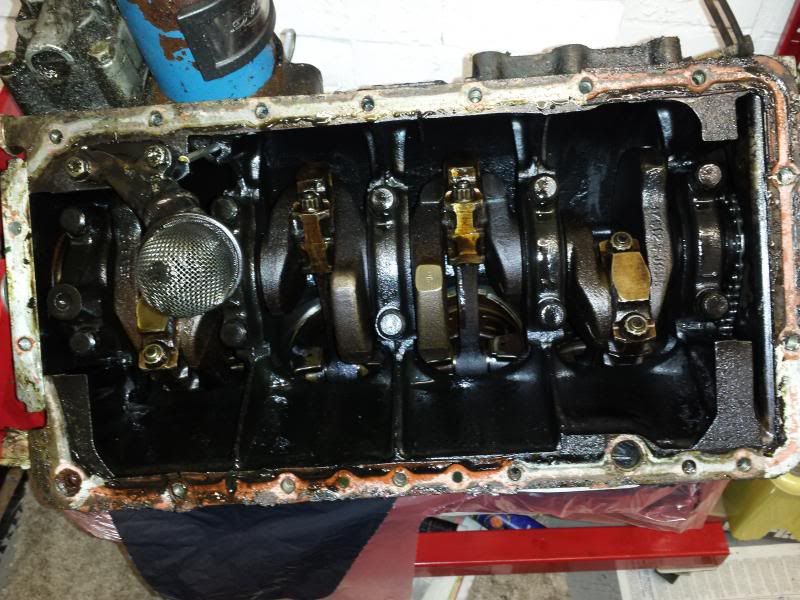
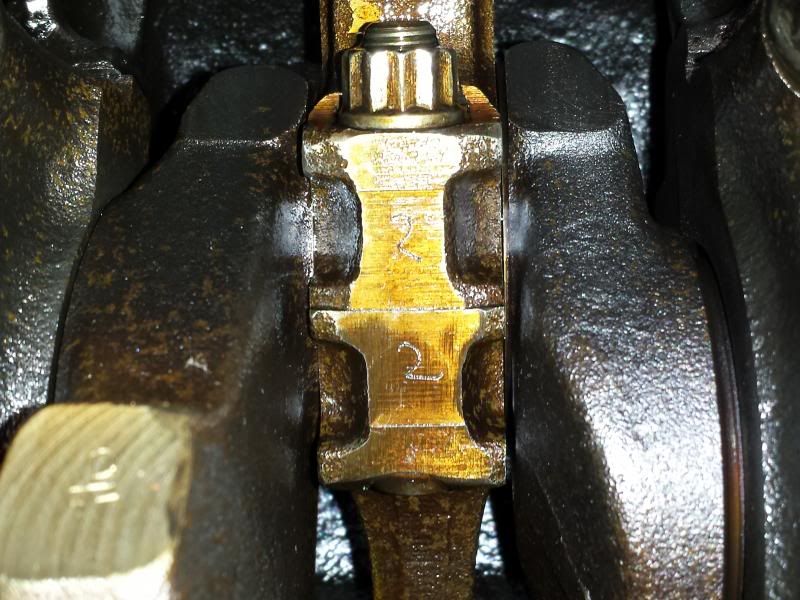
Looks like someone has been here before and numbered the big end shells
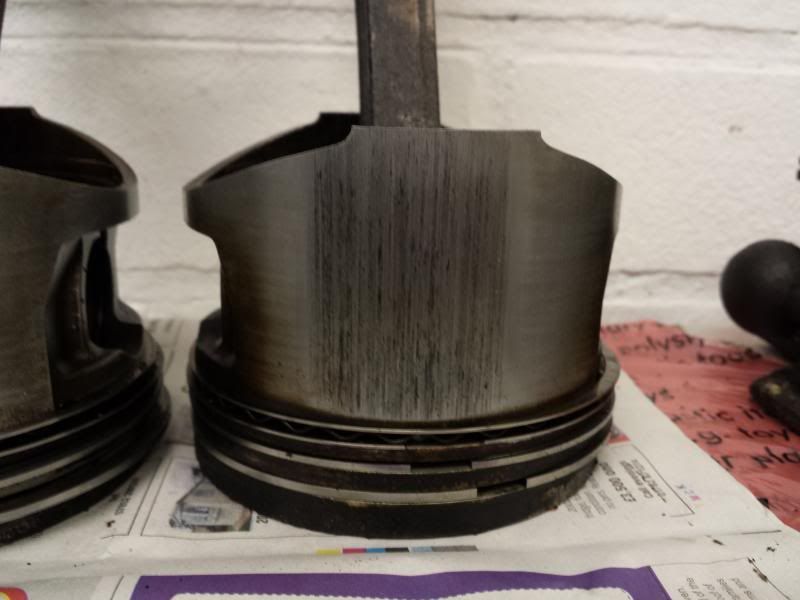
The pistons were all removed, number 4 is on the left and along with 3 and 1 has noticeable scoring on one side, oddly 2 is fine.
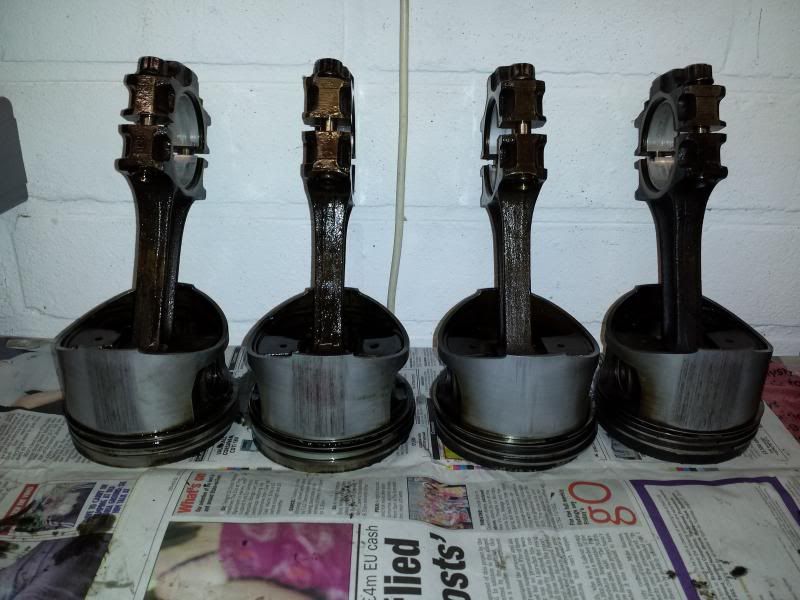
Close up
I inspected all the big end bearings. Some exhibited slight pitting but number 3 has quite a big score line in it. The bearings were marked AE, STD so one assumes that they have been replaced at some point but that a re-grind was not carried out/or necessary?
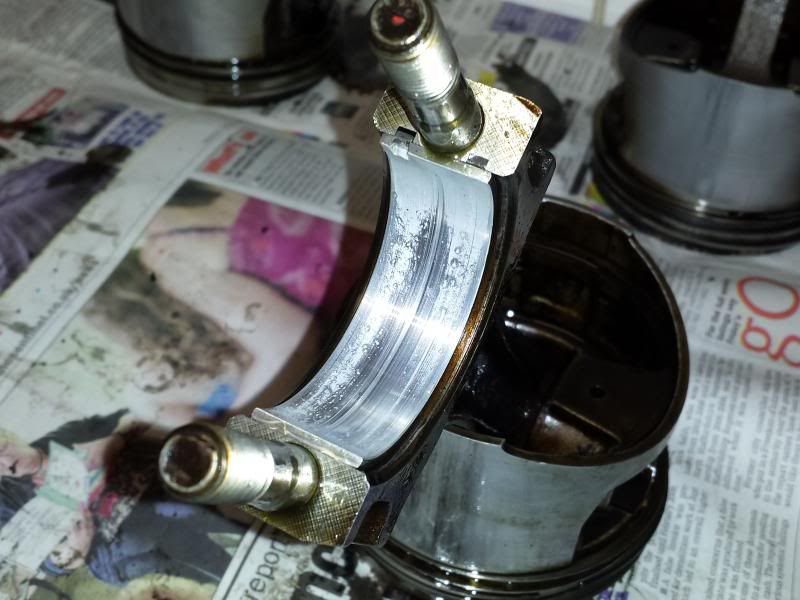
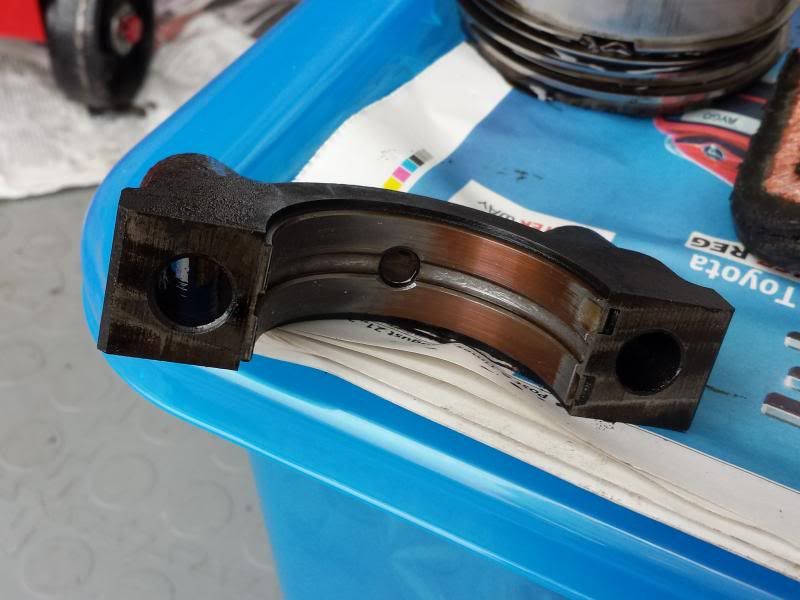
Next up a look at the main bearings. All came off quite easily. The crank itself doesn't look too bad with no significant scoring or wear marks. The bearings though are all down to the copper indicting that a rebuild is well timed.
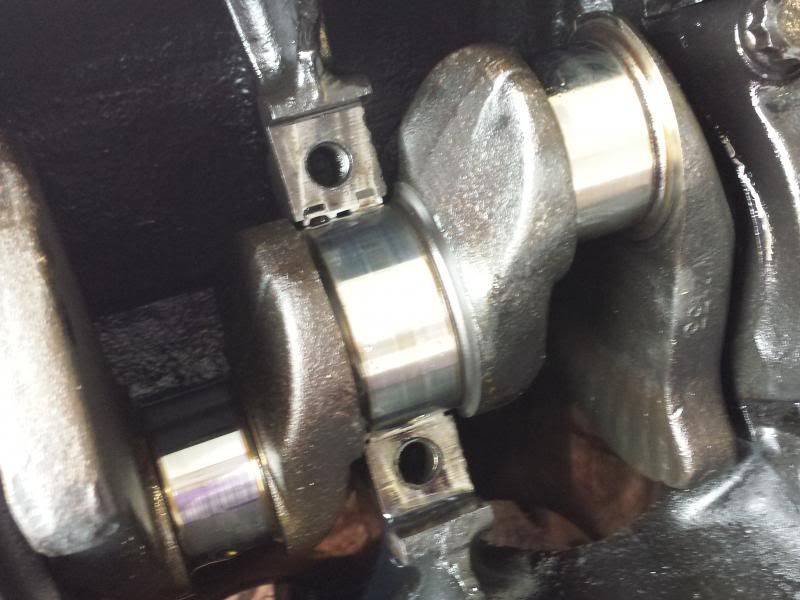
Again I popped the bearings out for inspection. There is no obvious branding on them (not sure what I am looking for) and also no indication that they are anything other than originals and standard size.
I'll need to get everything measured up when the engine goes off to the engine shop but I'm reckoning it'll definitely require a crank regrind and a set of pistons to go with new big end and main bearings.
I haven't yet removed the crank as though I was able to get the crank pulley bolt off I cannot yet budge the pulley itself. Haynes says it slides off but this is a lie. I think I might need some kind of puller and some patience. All other ancillaries such as the oil pump have been removed though so not long and it'll all be in bits.
Interestingly my sump appears to be red/orange and sports a Unipart sticker on it.

With the sump removed I was pleased to ee it wasn't full of metal or sludge either in the sump itself or clogging the pick up.


Looks like someone has been here before and numbered the big end shells

The pistons were all removed, number 4 is on the left and along with 3 and 1 has noticeable scoring on one side, oddly 2 is fine.

Close up

I inspected all the big end bearings. Some exhibited slight pitting but number 3 has quite a big score line in it. The bearings were marked AE, STD so one assumes that they have been replaced at some point but that a re-grind was not carried out/or necessary?

Next up a look at the main bearings. All came off quite easily. The crank itself doesn't look too bad with no significant scoring or wear marks. The bearings though are all down to the copper indicting that a rebuild is well timed.

Again I popped the bearings out for inspection. There is no obvious branding on them (not sure what I am looking for) and also no indication that they are anything other than originals and standard size.

I'll need to get everything measured up when the engine goes off to the engine shop but I'm reckoning it'll definitely require a crank regrind and a set of pistons to go with new big end and main bearings.
I haven't yet removed the crank as though I was able to get the crank pulley bolt off I cannot yet budge the pulley itself. Haynes says it slides off but this is a lie. I think I might need some kind of puller and some patience. All other ancillaries such as the oil pump have been removed though so not long and it'll all be in bits.
Last edited by SprintMWU773V on Wed Jul 26, 2017 2:15 pm, edited 1 time in total.
Mark
1961 Chevrolet Corvair Greenbrier Sportswagon
1980 Dolomite Sprint project using brand new shell
2009 Mazda MX5 2.0 Sport
2018 Infiniti Q30
1961 Chevrolet Corvair Greenbrier Sportswagon
1980 Dolomite Sprint project using brand new shell
2009 Mazda MX5 2.0 Sport
2018 Infiniti Q30
-
DazasDolly
- Guest contributor
- Posts: 1162
- Joined: Sun Mar 14, 2010 7:44 pm
- Location: Colchester, ESSEX
Re: Operation Orange - 1980 Sprint restoration
Mark
Just stripped my 1500 engine (I know different engine) but I couldn't get my crank out and it was the cam follower thingies holding it in. Once I gently knocked them through the top of the block the crank pulled straight out..
Project orange is looking awesome well done Mark
Darren
P.s Mark sorry it's late as I never read that right my pulley did slip straight of tho.
Just stripped my 1500 engine (I know different engine) but I couldn't get my crank out and it was the cam follower thingies holding it in. Once I gently knocked them through the top of the block the crank pulled straight out..
Project orange is looking awesome well done Mark
Darren
P.s Mark sorry it's late as I never read that right
1974 Triumph 1500TC In Maple Brown, (MABLE) GGN 647N
1968 Triumph Vitesse Saloon 2L MK2 Not for the faint hearted, mega restoration
1973 Triumph Spitfire In Mimosa
1968 Triumph Vitesse Saloon 2L MK2 Not for the faint hearted, mega restoration
1973 Triumph Spitfire In Mimosa

Aye......
Indeed you can use a three legged pulley, refit the bolt but don't screw iy completely in, then use the puller until the pulley stops against the bolt.SprintMWU773V wrote:I haven't yet removed the crank as though I was able to get the crank pulley bolt off I cannot yet budge the pulley itself. Haynes says it slides off but this is a lie. I think I might need some kind of puller and some patience.
Remove bolt and the pulley should now slide off. If it doesn't, fit bolt again and pull some more.......
Ian.
TDC Forum moderator
PLEASE help us to maintain a friendly forum,
either PM or use Report Post if you see anything you are unhappy with. Thanks.
PLEASE help us to maintain a friendly forum,
either PM or use Report Post if you see anything you are unhappy with. Thanks.
-
SprintMWU773V
- TDC Staffs Area Organiser
- Posts: 5429
- Joined: Wed Oct 18, 2006 2:08 pm
- Location: The Old Asylum
Re: Operation Orange - 1980 Sprint restoration
I did wonder if it had been lined. I suppose it could in theory be re-lined if necessary. I think until I know more I will have to put my piston hunt on ice else it could get expensive buying the wrong ones! Unfortunately the engine place is on shutdown till next week so may be a while before i know. I'm keen to keep the original engine if at all possible.
In the meantime I have plenty of things to do. This week my focus is on stripping the final items from the shell prior to it 'going' before too long.
In the meantime I have plenty of things to do. This week my focus is on stripping the final items from the shell prior to it 'going' before too long.
Mark
1961 Chevrolet Corvair Greenbrier Sportswagon
1980 Dolomite Sprint project using brand new shell
2009 Mazda MX5 2.0 Sport
2018 Infiniti Q30
1961 Chevrolet Corvair Greenbrier Sportswagon
1980 Dolomite Sprint project using brand new shell
2009 Mazda MX5 2.0 Sport
2018 Infiniti Q30
-
mwu773vforever!
Re: Operation Orange - 1980 Sprint restoration
Hi again Mark,
nice to see the update and engine pics. It was a while ago and can't quite remember what was done to it now but you have all the bills so you should be able to glean info from those. Knowing how I work though it would have had new shells, rings, thrust washers and water pump kit as a matter of course. The bore would have been de glazed at the very minimum, don't recall a rebore being required. If it has indeed been lined that was not done by me so must have been a previous owner. The head was skimmed a few times while I had it but I seem to recall it is still capable of another one or two if needed. The oil and filter were changed religiously every 6000 miles. The only times I was concerned about overheating was on runs down the motorway on hot summer days. It would get hot (temp needle going past the half way mark) and I would have to ease off and then the temp would work it's way back to normal. Always kept quality anti freeze in it all year round and that expansion tank topped up.
Yes, those numbered caps were like that when I opened it up first and think it was just standard practice.
The sump? Had some inspection cover somehow come lose (or it was out of the hole already) and impact the underneath of the car. Did not hole the sump from what I remember but it made a mess of it otherwise and hence the red unipart replacement. There still should be hole in the g.b bell housing as testimony too (and I think some damage to front passenger footwell).
Not much more I can tell you. By the way, regarding my last post, please don't be put off posting more photos or horror stories about the old shell. I for one would love to see how the shell has faired over the years and I am sure other club members would too. So keep em coming!
All the best, Paul.
PS: Seeing the pics of the engine removal and the engine in bits certainly brings it all back.......
-
SprintMWU773V
- TDC Staffs Area Organiser
- Posts: 5429
- Joined: Wed Oct 18, 2006 2:08 pm
- Location: The Old Asylum
Re: Operation Orange - 1980 Sprint restoration
Hi Paul, certainly not put me off!
As I say I was generally impressed with the condition of the engine, certainly the big ends were pretty good. I'll definately have a look at the bills and see what and when it was done. Considering the mileage it's pretty evident that the motor was well cared for so i'll look forward to seeing what the engine people make of it. I'm still unsure if it is lined, the gasket does leave quite significant marks in the block so it's hard to tell what's what.
I'm glad you've explained the sump and that mysterious hole. I'll probably leave the hole in the bell housing, firstly it's character and secondly when the rear seal starts to leak you'll know about it sooner rather than later!
Regarding the temperature back in 2005/6 I replaced the radiator and voltage stabiliser and it made a dramatic difference to the temperature. I remember the first 'long' run I took the car on was to County Durham for my sister in law's wedding. I left on the morning of the wedding and recall fondly driving along the M62 with one eye on the road and one on the temp gauge.
You probably wouldn't want too see the shell now. It's now pretty much bare. I've loosened the front and rear assemblies so they are ready to remove, stripped the interior, removed all the brake and fuel pipes, brackets etc and also removed the wiring loom. I've even finally removed the number plates as there's not enough still attached for it to be considered a car. All I need to do now is remove the last few pieces of trim, make some notes and then the shell will be away. All being well some parts of the 'original' MWU 773V will live on so it will not be wasted.
Mark
1961 Chevrolet Corvair Greenbrier Sportswagon
1980 Dolomite Sprint project using brand new shell
2009 Mazda MX5 2.0 Sport
2018 Infiniti Q30
1961 Chevrolet Corvair Greenbrier Sportswagon
1980 Dolomite Sprint project using brand new shell
2009 Mazda MX5 2.0 Sport
2018 Infiniti Q30
-
SprintMWU773V
- TDC Staffs Area Organiser
- Posts: 5429
- Joined: Wed Oct 18, 2006 2:08 pm
- Location: The Old Asylum
Re: Operation Orange - 1980 Sprint restoration
Finally got my engine to the shop this week and today was told that it was looking pretty good for age/miles.
The bores are good, just out of STD so will need to go first oversize on those. Crank is also pretty good. Mains need to go first undersize but Big Ends will polish and remain standard.
I'll need to source some pistons (see wanted). I should be picking up some Vandervell Big End bearings in Texas next week when I visit which I picked up for about £18 so will just need some quality mains.
Shop will get on with the crank whilst I await pistons which may take a while. I can get forged pistons if necessary for pretty much the same cost as JE cast ones, otherwise my choices are rather limited.
Mark
1961 Chevrolet Corvair Greenbrier Sportswagon
1980 Dolomite Sprint project using brand new shell
2009 Mazda MX5 2.0 Sport
2018 Infiniti Q30
1961 Chevrolet Corvair Greenbrier Sportswagon
1980 Dolomite Sprint project using brand new shell
2009 Mazda MX5 2.0 Sport
2018 Infiniti Q30