Page 10 of 16
Re: my track sprint project
Posted: Sun May 09, 2010 11:00 pm
by DavePoth
As was the way with Ford, there was lots of standardisation across the range. I think all Capris have one (ratio may change though) although I guess an LSD was an option.
Re: my track sprint project
Posted: Mon May 10, 2010 9:05 am
by zombeh
newguy wrote:What Year/Model Capri?
Cheers for the Info Neil Sorry to Hijack
2.8i, no idea what year but I doubt it matters, any atlas from any capri would be roughly the same. Early small engined ones had english axles which aren't as strong as a sprint. A 2.8i axle is just what was available at the time with an lsd and I think had a fairly sensible ratio for the intended use at the time. The car has got a lot less sensible since then though and it's likely to get a different crown wheel and pinion for much shorter gearing. I think it's 3.9 at the moment.
Re: my track sprint project
Posted: Mon May 10, 2010 2:08 pm
by SPRINTER34
Hi neil,
i was surfing the old Ebay and came across this
http://cgi.ebay.co.uk/TRIUMPH-DOLOMITE- ... 19bc27074c
If its any good,even for a source of parts then it must be worth a look..
anyways all the best with the build.
lee
Re: my track sprint project
Posted: Tue May 18, 2010 10:27 pm
by Neil907
A small update, unfortunately stuff keeps getting in the way at the minute so progress has slowed again:(

Have added a few lightening holes in the boot and roof as-well removing some unnecessary brackets and inserts. have also bare metalled, prepped and primed the boot.

Re: my track sprint project
Posted: Thu Jul 29, 2010 11:01 pm
by Neil907
Time for another small update
Have decided to finish all the little bits on the inside and prep and prime it before fitting the cage as doing it all afterwards will be a pain.
All prepped and treated ready for painting.


And all primed


Re: my track sprint project
Posted: Thu Jul 29, 2010 11:38 pm
by JPB
That's looking great.
See those bits of tube you've added behind the seat "humps", I assume they're to support the rear of some race seats, well I just thought that they'd be an excellent mod for bog-stock road cars too, specifically those driven by "larger"

drivers who are on their second set of seat runners after their originals bent. Those things are the perfect solution!
So cheers for that bit of inspiration and keep up the good work.

Re: my track sprint project
Posted: Fri Jul 30, 2010 12:45 am
by DF
looking good Neil

Have you decided on a colour yet ?
I will update my build eventually ,
Im in fabricating heaven at the min LoL
Here is one picky i have
intercooler rad and fans in
and where the air filter will sit which is a lot bigger than the one in this picky
im a little happier now i can tell its all going to fit
The intercooler has 3" id pipes and is 24 " wide bit of a squeeze to say the least

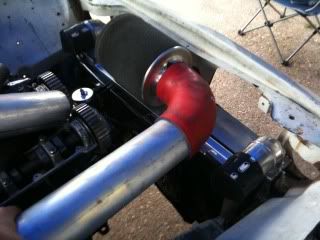
Any way keep the updates comming
Re: my track sprint project
Posted: Fri Jul 30, 2010 8:56 am
by matienzo
Every time I see a stripped out shell I am reminded just how little protection for the occupants there was in cars of this era.
Climbing over a roll cage at Tescos might have been a bit annoying though!
Great project Neil.
Re: my track sprint project
Posted: Fri Jul 30, 2010 3:03 pm
by Neil907
JPB wrote:That's looking great.
See those bits of tube you've added behind the seat "humps", I assume they're to support the rear of some race seats, well I just thought that they'd be an excellent mod for bog-stock road cars too, specifically those driven by "larger"
drivers who are on their second set of seat runners after their originals bent. Those things are the perfect solution!
So cheers for that bit of inspiration and keep up the good work.
They are indeed for that purpose, I suspect there is a pic earlier in the thread of them bolted in, though its hard to see in that pic, there are actually threaded bosses in the braces to take the seat bolts. The normal problem with Dollys is the floor cracking around the rear seat mounts.
DF wrote:looking good Neil
Have you decided on a colour yet ?
Cheers Daren, as for colour, not sure yet will probably be based on the works pattern with different colours, I fancy some black. Good to here yours is still progressing will look forward to seeing the build pics later.
matienzo wrote:Every time I see a stripped out shell I am reminded just how little protection for the occupants there was in cars of this era.
Climbing over a roll cage at Tescos might have been a bit annoying though!
Great project Neil.
I don't think there that bad really, obviously new cars are stronger, have you seen the makeup of the screen pillars?, quite impressive really for what they are.
Cheers for the good comments.
Re: my track sprint project
Posted: Fri Jul 30, 2010 3:13 pm
by Oli_88
matienzo wrote:Every time I see a stripped out shell I am reminded just how little protection for the occupants there was in cars of this era.
Climbing over a roll cage at Tescos might have been a bit annoying though!
Great project Neil.
Having shunted one quite hard, they're better than you think. I saw another car "parked" exactly where I did mine, the front end had virtually fallen off.
Glad to see you're still doing this one Neil, your pictures have been very useful to me too with t front end repairs.
Re: my track sprint project
Posted: Wed Dec 22, 2010 9:44 am
by Neil907
Time for an update.
Have made a fair amount of progress lately doing lots of prep and fettling to fit the cage, also the drivers side rear wheel arch has been fitted as well now.

Seats trial fitted to check clearances to the cage and them selves, as you can see they are quite a squeeze.


The old roof with hole for Webasto roof cut off and roof frame braced.

New roof tried on and cage adjusted to get clearances correct

Front bulkhead cut out for front triangle to go to the turrets. The holes have been cut large to allow the cage to be slid for and aft so that we can get access to weld all the tubes. These holes will be plated in after the cage is fully welded.


By joining the two hoes together this allowed us to take the front triangle and A tube out and weld on the bench.
Note the plate for the inner bulkhead all ready fitted over the tube.

I am getting a mate to weld the cage in as he will do a neater job than me. here he is hard at work welding the front half of the cage together. The lack of roof has made welding the cage in much easier. You are supposed to cut holes in the floor to lower the cage through to gain welding access to the top tubes and then plate them back up afterwards.
Next is to sort out how to fit the electric power steering and pedal box into quite a small space. Then the rest of the cage can be welded in.
Re: my track sprint project
Posted: Thu Dec 23, 2010 9:00 am
by DoloWIGHTY
Stunning work, I bet even the guys at ST in Abingdon would have been drooling over this.
Sounds as though you've now reached the stage of building up rather than making good Neil?
Re: my track sprint project
Posted: Thu Dec 23, 2010 11:54 am
by mbellinger
Those seats look huge Neil!
Re: my track sprint project
Posted: Thu Dec 23, 2010 2:53 pm
by zombeh
The seats (cobra sebring I think) are the only ones we could find with the head protection (smacking your head on a cage didn't seem like much fun) that are small enough to fit in a Dolomite. Modern cars it seems are a lot wider inside

They certainly don't seem very big when you're sat in them
Re: my track sprint project
Posted: Mon Dec 27, 2010 11:19 am
by DF
Nice work Neil ,
Was the roof a pain to get off ??
I have found a place about what we talked about just got to get some prices :-&
Keep the updates coming,
Your making me Jealous