Page 10 of 40
Re: NWL – Project Carmine Sprint
Posted: Sun Feb 15, 2015 11:27 am
by Toledo Man
The flat part of the bushes needs to go against the washers. I rebushed the rear suspension on my Dolomite 1300 with the orange Polybushes and they never gave me a moment's bother since so I recommend them heartily. The only others I will recommend over Polybush are Super Flex. They cost more but it is money well spent.
The method I used to fit the inner tie bars was to fit them to the body first, fit everything as far as the first bush and offer the axle up. If you fit the other bush and the remaining washers, you can't get the nut started on the thread. To get round this, remove the washers and screw the nut on. This will compress the bushes enough to be able to get the nut started on the thread with the washers fitted. Do the nut up until you can get the R clip in the hole and the job is done!
Re: NWL – Project Carmine Sprint
Posted: Sun Feb 15, 2015 1:53 pm
by soe8m
That is wrong. The round part of the bush sits to the round part of the washer. It's fitted this way a sort of sliding part when the suspension moves. The round bush face can twist/turn/slide over the round face of the washer.
Jeroen
Re: NWL – Project Carmine Sprint
Posted: Sun Feb 15, 2015 5:01 pm
by James467
For the sake of argument they have gone on as described in the the manual (1980 edition) as follows:
Dished washer (Dished bit facing towards the body mount or bushed eye)
Rubber bush (Flat bit towards the axle mount)
Through the axle bracket
Nylon washer
Rubber Bush (Flat bit towards the axle mount & nylon washer)
Dished washer (Dished bit facing away from the bush or towards the back of the car)
Large plain washer
Nut
Pin

Re: NWL – Project Carmine Sprint
Posted: Mon Feb 16, 2015 7:58 am
by Toledo Man
Jeroen, you are indeed correct. It has been a long time since I did the rebushing job on my Dolomite 1300 (about 9 years ago!). I stand by everything else though having done a few axle swaps. I've not touched the 1850's rear suspension apart from replacing the rear spings and dampers so it has been a long time since I got intimate with the tie bars.
Sorry!

Re: NWL – Project Carmine Sprint
Posted: Tue Mar 24, 2015 12:21 pm
by James467
I finally have an update! Not a lot has been happening for the past month or so due to various childcare commitments and the flu. I have stripped down the steering column for cleaning, that will be reassembled shortly. More importantly I collected these from down the road last night....

Cleaned and honed with new small ends

Rebored and ready for cleaning and painting, didn't need a face as it was nice and flat

Balanced and journals polished

Clutch and flywheel balanced

I need to pick up some Graphogen and I have a couple of things bike related to finish before I can get on with cleaning, painting and building up the bottom end.
The head should be ready to collect at the end of April.
Re: NWL – Project Carmine Sprint
Posted: Mon Apr 13, 2015 10:08 pm
by James467
Re: NWL – Project Carmine Sprint
Posted: Tue Apr 14, 2015 7:53 pm
by James467
Having a problem getting this baby out...

Have tried the hydraulic pressure method with grease as suggested by John in his Wiki but it doesn't seem to be working, anyone have any ideas?
Re: NWL – Project Carmine Sprint
Posted: Tue Apr 14, 2015 9:17 pm
by shaunroche
Re: NWL – Project Carmine Sprint
Posted: Wed Apr 15, 2015 11:02 am
by James467
Thanks Shaun, I wasn't referring to the brass cage though, I'm having trouble removing the bush.
Re: NWL – Project Carmine Sprint
Posted: Wed Apr 15, 2015 12:38 pm
by tony g
Re the bush removal I have a set of expanding collets that attach to a slide hammer. I used it on mine and worked well. It wont be too tight once you get it moving. The grease method has worked over the years for me too. Thicker grease the better and a close fitting bar, dont be afraid to hit it. Keep repacking the grease to take up the slack.
Tony
Re: NWL – Project Carmine Sprint
Posted: Wed Apr 15, 2015 3:54 pm
by James467
Top man Tony, I forgot about the blind bush extractors, two minutes later the bush came straight out!!
Unfortunately, sometimes even using the right equipment (hydraulic press) things don't go to plan.

Chipped a tooth on the shaft at the same time so I'll just have to replace the whole thing, looks like the impeller was a bit too far gone anyway.
Time for a beer I think!
Re: NWL – Project Carmine Sprint
Posted: Wed Apr 15, 2015 4:30 pm
by tony g
Glad you sorted it

I broke my impeller too. I think heat gun is going to make it easier in the future.
Tony
Re: NWL – Project Carmine Sprint
Posted: Wed Apr 15, 2015 4:31 pm
by tony g
Block looks ace by the way

Tony
Re: NWL – Project Carmine Sprint
Posted: Thu Apr 16, 2015 8:35 pm
by James467
Thanks Tony!!

I decided to move away from the engine before I broke something else and deal with a more pressing issue. My garage roof is due to be replaced on the bank holiday weekend (when I say replaced, I mean new joists, deck and felt) and currently the Sprint is sitting on axle stands with no means of moving it. I wouldn't normally do this but I have re mounted the subframe and rear axle just so I can move the shell around. It also means that I can check that everything still fits and there are no glaringly obvious problems.
It's a bit dark at the moment so I'll post some pics of everything fitted tomorrow in the daylight.
Something interesting did happen when fitting the new front springs to the dampers, the springs were a bit twisted.
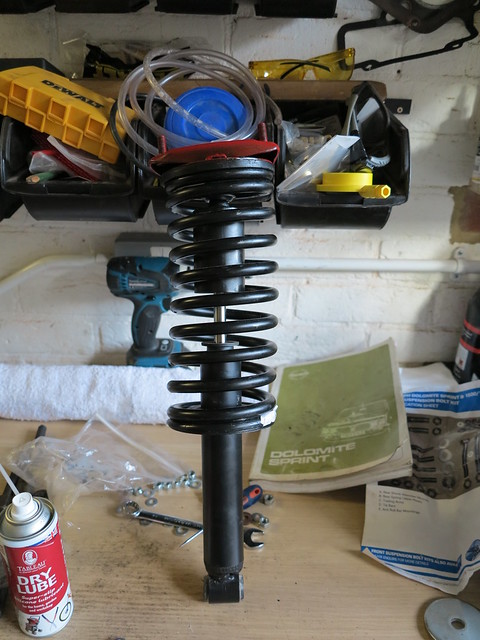
Once on the car they seemed to be fine so I am just putting it down to them just needing to settle and bed in.
I know some people have had problems with Rimmers springs fitting but mine fit inside the top cups fine, I have used the old isolating rubbers though as they were in excellent condition and the new ones aren't tapered.


You can see the difference between old and new


Re: NWL – Project Carmine Sprint
Posted: Fri Apr 17, 2015 8:07 pm
by James467


