Page 2 of 3
Re: My Dolly Resto, I'm new to the board and have some pictures
Posted: Tue May 31, 2011 11:51 pm
by JPB
Re the fitting of that sill:
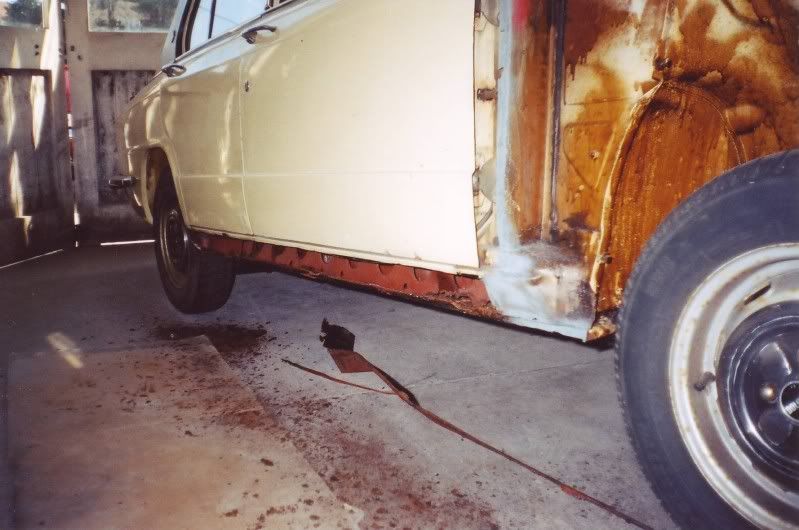
In the picture pasted below, you've placed the top edge of the sill over the doorstep, so it's having to bend to meet the areas beyond that flange, which is, in turn, causing it to appear too short as it has too far to reach.
Before you continue, I'd advise fitting a door, or both, to give you some idea how far out the upper edge of the sill is, you may find that, by cutting that flange back and welding the sill flush with the edge of the original door step, it'll relax enough to make up the gap.

Re: My Dolly Resto, I'm new to the board and have some pictures
Posted: Fri Jun 03, 2011 12:54 pm
by TSwede
Hi - Update is they are a dreadful fit - my friend has taken a look and thinks they are the worst he's seen! I'm glad it's not just me..-
I have made enquiries about ordering a full sill, I will call the club back about the dodgy outers. I guess ultimately a full sill is a better job anyway, the welded seam won't be there and the front end of the sill where it is behind the outer wing is a more complete repair.
Re: My Dolly Resto, I'm new to the board and have some pictures
Posted: Fri Jun 03, 2011 1:41 pm
by SprintMWU773V
Full sill, good luck. Worth searching the forum for details about 'full sills' available from parts suppliers. They are at best a hotch potch of badly patched pieces of metal baring little resemblence to a Dolomite sill.
I can't speak for the club sills but I thought they fitted OK. Certainly seen quite a few cars and resto threads on here with them and they have no problems. Any pattern part is going to be a challenge to fit but there must be a reason why you're so far out. Don't give up though, it'll be worth it in the end.
Re: My Dolly Resto, I'm new to the board and have some pictures
Posted: Fri Jun 03, 2011 2:19 pm
by JPB
SprintMWU773V wrote:there must be a reason why you're so far out.
All of the outer skins that I've seen/fitted have been welded flush, below the original step section, so on a vertical surface where the offset
can't be wrong, or,
and this way requires more care, flush to the bottom of the first fold after the tread plate area.
The fact that this one is sitting on top of the existing step will obviously throw it out of alignment and it'll stick out when the doors are fitted if it's left there.
The difference is easily enough to make the ends that far from their intended locations as the sill must have been rolled inwards to meet the arch. Weld it flush, having cut just below the step, and it'll line up a treat.
Whereabouts are you, Tswede? If you were within, say 100 or so miles of me I'd come and sort that for you - for only cups of tea and decent biscuits - if only to show why and how the problem is happening.
Re: My Dolly Resto, I'm new to the board and have some pictures
Posted: Fri Jun 03, 2011 9:06 pm
by TSwede
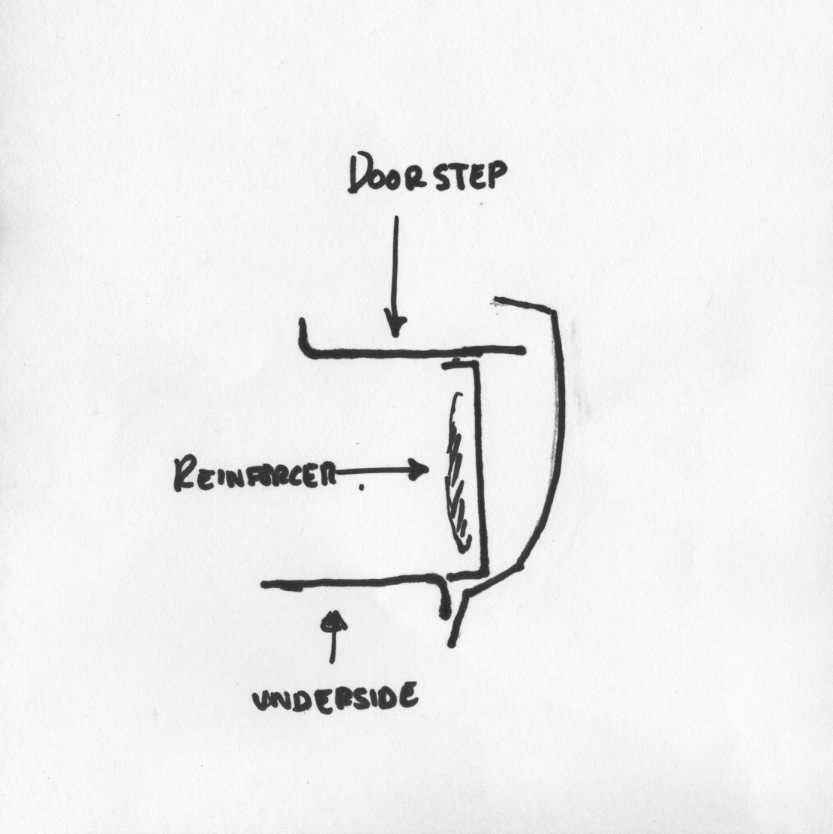
Hi - Thanks for the offer - I have since offered the sill up to the reinforcer and the bottom seam of the floorpan/sill - in the 90deg bit.. and the top then sat nearly an inch in places above the top sill lip.. neither me or my friend could resolve it last night, we concluded that part of the problem is that the folds in the sill that are 90 deg on the other side (passenger side) are much more obtuse on the pattern part, but that wasn't the whole problem. I will try to draw a picture and post it.
Anyways - I called about a bit today and have located an original factory full sill - so that should be pretty good I reckon and closer to the mark... more like I'm used to working to.
I tried to ring the club parts number today - Alun - got no tone so I don't know what's gong on there but I can try later, I would like to discuss it with him.
OK - Here is a picture - and not really exaggerated. It looks like if the folds at the bottom of the sill were more acute and the curve was more pronounced then it might be close - but I have neither the facilities or the will to do a good job of this and feel it would never be quite right. It feels as though this sill were at the bottom of a far too big pile of other sills and got kind of flattened out or something! See what you think.. and although I've now ordered the new sill the brew offer always stands!! (or a can of Fosters!) - I'm in Preston BTW...
- sill.jpeg (115.26 KiB) Viewed 3544 times
Re: My Dolly Resto, I'm new to the board and have some pictures
Posted: Sat Jun 04, 2011 12:32 am
by blacksprint
JPB wrote:Re the fitting of that sill:
In the picture pasted below, you've placed the top edge of the sill over the doorstep, so it's having to bend to meet the areas beyond that flange, which is, in turn, causing it to appear too short as it has too far to reach.
Before you continue, I'd advise fitting a door, or both, to give you some idea how far out the upper edge of the sill is, you may find that, by cutting that flange back and welding the sill flush with the edge of the original door step, it'll relax enough to make up the gap.
If you look at the picture you've tried to fit a left hand sill to the right hand side, its bound to be a dreadful fit. 
Re: My Dolly Resto, I'm new to the board and have some pictures
Posted: Sat Jun 04, 2011 12:35 am
by blacksprint
the club sills do fit well
Re: My Dolly Resto, I'm new to the board and have some pictures
Posted: Sat Jun 04, 2011 10:32 am
by TSwede
The wrong way!
It may look that way but it isn't - it's just that I've unfolded the lip that becomes part of the rear arch - there is a lip on the other side (which goes at the front of the car as per the picture below (bottom of the page)) but it is much smaller - I've left that as it is.
If I had put the wrong sill on it would stick out a mile at the front - anyways, what difference would this make to the profile of the sill??? it is only that the ends would come up at different sides.
I don't know who posted that comment - I mean as a person - so can't tell if he (she?) was joking!!! But I hope so....

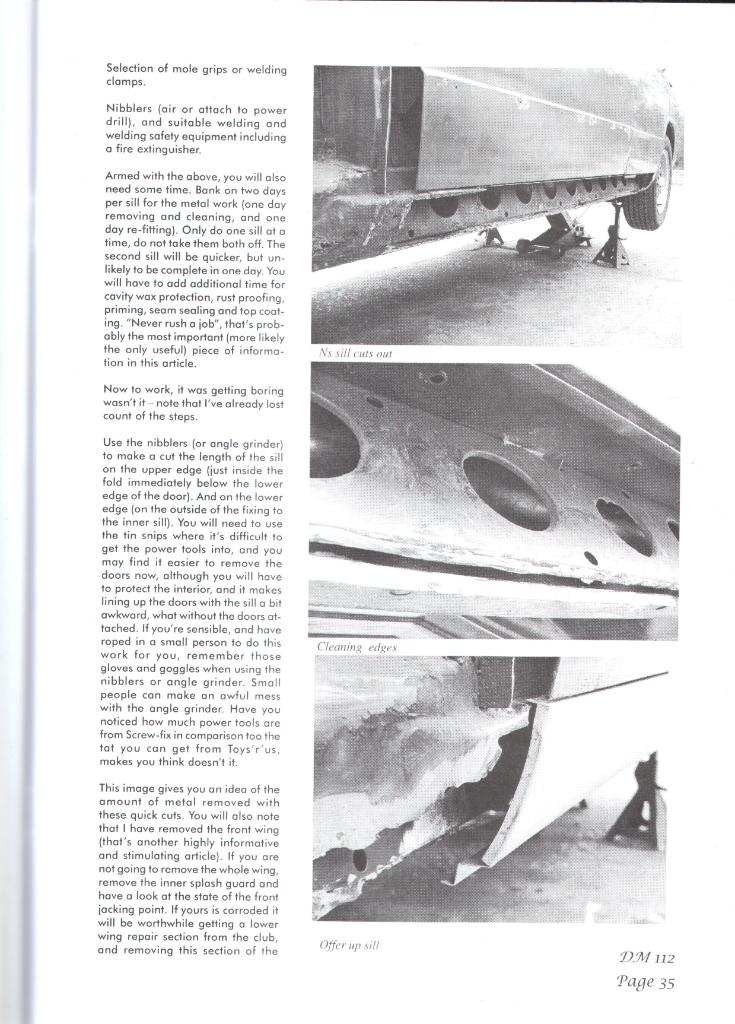
- DM112page35.jpg (123.28 KiB) Viewed 3453 times
Re: My Dolly Resto, I'm new to the board and have some pictures
Posted: Sat Jun 04, 2011 3:01 pm
by TSwede
I wish you were a bit closer JBP - but sadly not.. I'm going to fit the factory sill I ordered on this side now that it is paid for, but will try again with the other cover sill when I come to doing the other side...
Could you let me know where you would cut the old one off? I have possibly taken more off that you would....
Ta
Re: My Dolly Resto, I'm new to the board and have some pictures
Posted: Sat Jun 04, 2011 4:51 pm
by JPB
It would depend upon the condition of the remaining part of the sill structure, but ordinarily, when fitting a skin sill to a car (any car which I was fitting with a similar repair panel, not uniquely Dolomites), I'd aim to join it just below the edge of the doorstep, and cut the lip off the skin sill to facilitate a butt joint.
The centre point of the sill trim strip would be roughly where I'd make that seam since any less than perfect grinder work would be concealed under the trim, (not that I'm advocating leaving blobs of weld all over the place, but you get the idea).


Alan
(Stanpart) had skin sills fitted on his car during the first phase of its restoration, ISTR. Alan, if you're watching this would you mind please; a) confirming my recollection of this and b) show us the pics of where you made the join on the step sections of your original sills, my memory might be playing tricks but I'm
almost sure that yours were welded along the vertical surface, just below the steps. I'm hoping that I have remembered this correctly because those pictures would be ideal to illustrate the way in which I'm advocating they be fitted.
I've only ever heard good things said about the fit and quality of club repair sections but haven't used these myself. That's because I've been fortunate enough to own two Dolomites whose original sill structures have been very well preserved. I am, alas, old enough (just!) to remember having fitted Hadrian skin sills to customers' Dolomites back when I made my living in garages (poor efforts, those were. Very thin steel although not too bad a fit) and, occasionally, full sills, from Express Factors (BL's dealership trade counter chain) that included the end that goes behind the wing, the door steps and the little stiffening flutes along the bottom edge between the outer fold and the flange.
With care and a "measure three times, cut once" policy, skin sills will be indistinguishable from original panels once they've been fitted, the welds ground flat and the paint applied.
Re: My Dolly Resto, I'm new to the board and have some pictures
Posted: Sat Jun 04, 2011 5:25 pm
by Purplebargeken
I fitted an Alunpanel sill to my previous TC. The fit was just lovely. Not sure if I can find the piccies though, sorry.
I am a bit shocked about the probs you are having as everything that I have had via the club has been spot on.
I hope you get it all sorted. Well done on the resto by the way.
Cheers
Ken
Re: My Dolly Resto, I'm new to the board and have some pictures
Posted: Sat Jun 04, 2011 5:26 pm
by DoloWIGHTY
JPB wrote:
Alan
(Stanpart) had skin sills fitted on his car during the first phase of its restoration, ISTR. Alan, if you're watching this would you mind please; a) confirming my recollection of this and b) show us the pics of where you made the join on the step sections of your original sills, my memory might be playing tricks but I'm
almost sure that yours were welded along the vertical surface, just below the steps. I'm hoping that I have remembered this correctly because those pictures would be ideal to illustrate the way in which I'm advocating they be fitted.
..that'll be me then?

Yes this picture shows how mine was done;
Once the cut edge had been straightened up, this (along with the cover sill - cost £8) was joggled to produce a step, the cover sill had been pre-drilled to take plug welds, then once old and new fitted together and ground back a light skim of filler hides the join between the two. The bottom of the cover was welded to the car in the traditional manner.
Hope this helps?
Re: My Dolly Resto, I'm new to the board and have some pictures
Posted: Sat Jun 04, 2011 5:33 pm
by Purplebargeken
Have a look under Project Lemondrop in this very section and check out pages 6 & 7. Not great detail but it might help in some way.
Cheers
Ken
Re: My Dolly Resto, I'm new to the board and have some pictures
Posted: Sat Jun 04, 2011 5:56 pm
by JPB
Alan, that's great. Only thing I can add is that, since you're making a seam where there used to be one complete panel, any weld made should (by law) be continuous. Saying that; how many MOT testers would even know that the join had been made? And plug welds every Inch or so would reduce the likelihood of distortion, though really the spaces between the plug welds should be filled with weld, not filler.

Re: My Dolly Resto, I'm new to the board and have some pictures
Posted: Sat Jun 04, 2011 6:49 pm
by DoloWIGHTY
JPB wrote:Alan, that's great. Only thing I can add is that, since you're making a seam where there used to be one complete panel, any weld made should (by law) be continuous. Saying that; how many MOT testers would even know that the join had been made? And plug welds every Inch or so would reduce the likelihood of distortion, though really the spaces between the plug welds should be filled with weld, not filler.
I wasn't there when the work was done, it was over 10 years agonow, so, my memory being what it is, what you are saying John could have been how it was indeed done.
