That looks really rather very good indeed...
A tip-top little Triumph!
Project Little Green Dolly
-
Purplebargeken
Re: Project Little Green Dolly
She'll need a bit of weldage underneath but I doubt it'll be anything worse than I have seen before.
She looks straight enough otherwise. The engine bay needs some love and attention but that is just cosmetic.
She'll be here some time on Thursday
She looks straight enough otherwise. The engine bay needs some love and attention but that is just cosmetic.
She'll be here some time on Thursday
-
Purplebargeken
Re: Project Little Green Dolly
Rather spiffing service from a breaker on ebay. Set of brown vinyl seats from a 1500TC.
Paid yesterday and they arrived today. Ace service
Paid yesterday and they arrived today. Ace service
-
Purplebargeken
Re: Project Little Green Dolly
The LGD has been collected by the transport chap from its temporary resting place in Wigan and should arrive at PBK Towers around 1pm.
Photos and more detailed info to follow.
Photos and more detailed info to follow.
-
Purplebargeken
Re: Project Little Green Dolly
The Toledo was driven out of the lock up this morning, given a quick wash and then left to dry in the sunshine. Garage swept and put into some kind of order (this will not last).
The Dolly eventually turned up a bit later than planned but such is life. Phil the driver seemed like a very nice bloke. Dolomite was taken off the beavertail and the Toledo was winched on, secured and after only a few minutes whisked away. There was a car waiting patiently to come into the yard so there was no time to get a piccie and no time for me to suddenly remember to load the two remaining doors onto the truck. Doh!
So, first impressions.
Underneath: it needs a patch on the N/S chassis leg, a patch on the N/S footwell. There are some patches here and there, seems reasonable and just in need of a tidy up. Sills have been patched to MOT standards. Black shite applied. Yuck. All of the bottom door skins have had stone chip applied and then painted green. Same on the front valance. Looks sound enough, just a bit weird looking.
The rear bumper end caps are knackered and will be replaced. Main section of the rear bumper is sound, as is the front bumper. Grilles look ok just a bit faded. The side lights are in need of a good clean. I struggled getting the N/S one off as the screws were rusty and worn, the lens was bent in the middle. Never seen that before. The O/S remains in place as the screws were knackered. I will deal with that next week. Headlights look ok. Rears look dirty but intact.
The screen was replaced a couple of years ago and had a new rubber and insert which is ace. I had to change the wiper blades as they were knackered.
The paint was fairly oxidised but test patches have responded very well to a light application of cutting compound and polish. The treated bits gleam. The bonnet is decent and the boot lid is great. There was a light smattering of rust by the 3 vents above the rear screen. Nothing major.
Interior: the headlining is in good condition but has the usual light brown patches. Carpet mostly looks ok apart from both front footwell mats. The front seats are very saggy. I had a quick feel under the seat and both rubber diaphragms have let go. Hence the 'no foam effect'. There is a tear in the passenger seat.
Dash is fine, annoyingly the spring has gone on the wiper/washer stalk, although the wipe bit works fine there is no washer action.
Engine bay:
Some con artist seems to have persuaded the previous owner that an in-line fuel briquette was the way to go. This will be removed very shortly. utter shite.
The engine bay is very grubby and a prolonged leak from the rocker cover gasket has drenched the engine in old oil. To be cleaned and a new cork gasket fitted.
Brake fluid looks a bit dark and dingy.
So, a general service and fluid change will be done after a bloody good clean. No evidence of any rust on the inner wings as they look perfect under the grime.
Overall verdict: some cosmetic issues, some welding underneath and general tidying. A good basic service and see what happens.
Oh, the tyres although in possession of decent tread are perished.
Exhaust seems ok.
Some photos to follow.
-
lazeruspete

- Guest contributor

- Posts: 822
- Joined: Sun Oct 21, 2012 11:15 pm
Re: Project Little Green Dolly
looking forward to seeing the pics
1980 Dolomite Sprint Track Day Car....KLJ 895W. now redtopiffied 
viewtopic.php?f=19&t=23031
Volkswagen Golf MK3 Gti....R301UUJ. RIP 22-5-13
Volkswagen Golf MK4 TDGTI 150 MM53VNT Sold 7-8-17
BMW 320d Coupe M-Sport YL08 XBZ with factory fitted Performance Pack - Sold 22/05/21
BMW 330d Touring M-Sport WN63 XPY - best daily ever
Proud TDC Member!
viewtopic.php?f=19&t=23031
Volkswagen Golf MK3 Gti....R301UUJ. RIP 22-5-13
Volkswagen Golf MK4 TDGTI 150 MM53VNT Sold 7-8-17
BMW 320d Coupe M-Sport YL08 XBZ with factory fitted Performance Pack - Sold 22/05/21
BMW 330d Touring M-Sport WN63 XPY - best daily ever
Proud TDC Member!
-
Purplebargeken
Re: Project Little Green Dolly
Piccies as promised:
I started to see how the paintwork cleaned up with the use of a clay bar, some instant detailer and cutting compound.


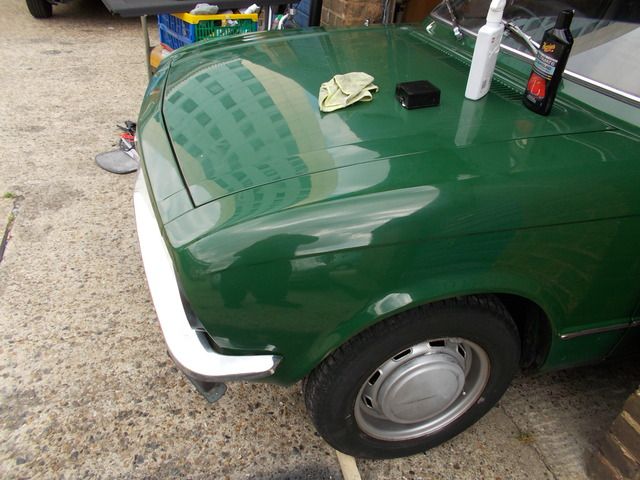


I hope you can see the difference between the treated paint and the tarnished stuff.
The engine bay is pretty dire. It looks like it hasn't been touched for years!


Under the grot the inner wings and turrets look sound with only minor blebs here and there. Much cleaning will ensue and then a bit of a service.
I am hoping to fit the brown vinyl seats on Monday.
I started to see how the paintwork cleaned up with the use of a clay bar, some instant detailer and cutting compound.


I hope you can see the difference between the treated paint and the tarnished stuff.
The engine bay is pretty dire. It looks like it hasn't been touched for years!


Under the grot the inner wings and turrets look sound with only minor blebs here and there. Much cleaning will ensue and then a bit of a service.
I am hoping to fit the brown vinyl seats on Monday.
Re: Project Little Green Dolly
Your elbow grease has revealed some lovely paintwork!
-
Purplebargeken
Re: Project Little Green Dolly
Thank you
Now have to figure a way to get the O/S sidelight unit off.
The screws are rusty and rounded off so nothing happy happened with the variety of screwdrivers I had to hand.
Any suggestions?
Now have to figure a way to get the O/S sidelight unit off.
The screws are rusty and rounded off so nothing happy happened with the variety of screwdrivers I had to hand.
Any suggestions?
-
DaltonBarham
Re: Project Little Green Dolly
Personally I'd try something like this, I have one or two that worked great until I lost them 
http://www.screwfix.com/p/screw-extract ... AiZr8P8HAQ
http://www.screwfix.com/p/screw-extract ... AiZr8P8HAQ
-
Purplebargeken
Re: Project Little Green Dolly
As soon as you buy a new set you will find the ones that you lost. Always works for me.
Thanks for that, I have ordered a set for collection on Monday
Thanks for that, I have ordered a set for collection on Monday
-
Purplebargeken
Re: Project Little Green Dolly
I picked up those easy outs from Screwfix this morning and will give them a go later in the week. Thanks for the heads up
I spent an hour or so with the Dolomite this morning, cleaned up some of the bodywork in the engone bay before running out of cleaning materials
The engine bay is in good order, just filthy. I cleaned off most of the grungy oil around the rocker cover and on the carb. I can actually see the carb components now, springs, screws and so on. The thing was encrusted with dirt and oil.
I have unbolted the thermostat housing, cleaned the bolts with the drill mounted wire brush, slopped on some copaslip and put it all back together for now.
I also unbolted the drivers side radiator mounting bolts in preparation for the radiator removal. I never seem to have any joy with them, one always snaps but so far so good after a soaking with some Duck Oil. The air filter alloy mount was all tarnished so that has been partially cleaned up. I will unbolt it to do the rest.
I will carry on tomorrow and take some pictures.
I will have to replace almost every hose in the engine bay as they are showing varying degrees of perishing
Better safe than sorry.
Once she is cleaned up and serviced I will arrange with my mate to tackle the welding. I think I will eventually replace the sill outer panels as they have been fixed already but not very well aligned.
-
Purplebargeken
Re: Project Little Green Dolly
Couple of hours spent Dolly cleaning, well Dolly engine bay cleaning at least.
Cleaning stuff was liberally sprayed everywhere and I mean everywhere. Grease, oil and dust have coated the engine bay and the components like you wouldn't believe. Horrible sticky gooey mess
A couple of old toothbrushes have died so that the engine bay can shine again. We salute you.
I undid the 8 small bolts that hold the radiator in place and took half of them out one at a time and used the 'lecky drill wire thing to clean them up. These bloody things are as fussy as hell when being re-inserted and are a pain to replace. Hence my caution. I refitted them after coating with copper grease in preparation for the rad removal at a later stage. I am frankly stunned that none of them snapped, this is a first!
The two earthing points were cleaned up and refastened.
Each fastener will be cleaned and re-used if possible.
The two suspension turrets are in fantastic shape and need no work, the bulkhead is also solid. The only crusty bits were on the side where the battery is. There are several holes that are not used and it is these that have rusted. Nothing major but it just looks unsightly. I will tackle these once everything else is sorted.
The plan for tomorrow will hopefully be:
Moar cleanings
Open up the fuel pump and clean out any crap.
Remove the useless fuel briquette thing and bin.
Replace fuel hoses.
Remove the knackered seats if possible.
Take some photos
On a happy note the original carpets look ace including the footwell ones. Yay
-
Toledo Man

- Guest contributor
- Posts: 7542
- Joined: Tue Oct 03, 2006 5:52 pm
- Location: Halifax, West Yorkshire
- Contact:
Re: Project Little Green Dolly
Good to see it getting your treatment. You've got a better car to start from than the LWT. Keep the updates coming.
Toledo Man
West Yorkshire Area Organiser
Meetings take place on the first Wednesday of the month at 8.00pm at The Railway, 1 Birstall Lane, Drighlington, Bradford, BD11 1JJ
2003 Volvo XC90 D5 SE (PX53 OVZ - The daily driver)
2009 Mercedes-Benz W204 C200 CDI Sport (BJ58 NCV - The 2nd car)
1991 Toyota Celica GT (J481 ONB - a project car)
Former stable of SAY 414M (1974 Toledo), GRH 244D (1966 1300fwd), CDB 324L (1973 1500fwd), GGN 573J (1971 1500fwd), DCP 625S (1977 Dolomite 1300) & LCG 367N (1975 Dolomite Sprint), NYE 751L (1972 Dolomite 1850 auto) plus 5 Acclaims and that's just the Triumphs!
Check my blog at http://triumphtoledo.blogspot.com
My YouTube Channel with a bit of Dolomite content.
"There is only one way to avoid criticsm: Do nothing, say nothing and BE nothing." Aristotle
-
Purplebargeken
Re: Project Little Green Dolly
LWT was a good little car but obviously needed a paint job which is beyond me now. Such is life.
The Dolly engine bay is nearly ready, just a small amount of cleaning to do.
I have fitted new fuel hosing as the stuff that was on there was horribly perished. Filter fitted as well.
Just have to fit the new plugs, fan belt and thermostat. I have to clean and repaint the air filter lid and the battery clamp then job done re: engine bay.