Be interested in how well or not that exhaust down pipe fits,thats the only bit on my exhaust that ive not changed
Dave
VYK The Russet 78 Sprint
-
new to this
- TDC Member
- Posts: 1792
- Joined: Mon Dec 12, 2016 9:53 pm
- Location: Harrow Middlesex
Re: VYK The Russet
I’ll let you know Dave. The angle of the end that meets the middle section looks wrong to me but we will see. Got a few jobs to do before I get to that stage though. Got to dust the welder off....
-
new to this
- TDC Member
- Posts: 1792
- Joined: Mon Dec 12, 2016 9:53 pm
- Location: Harrow Middlesex
Re: VYK The Russet
Last weekend i was repairing mine on that end angle,if you havent got rid of your old down pipe yet save it for me
thanks Dave
Re: VYK The Russet
I’ll hang on to it for you.
Re: VYK The Russet
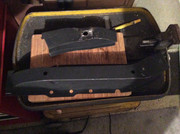
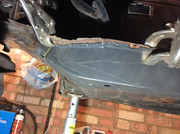
It’s a bit tight in here!
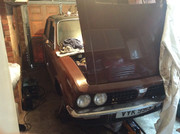
It all looks a bit broken at the minute but I’m getting there slowly........

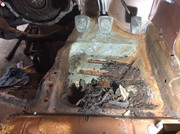
Closer inspection of the drivers floor pan reveals that I don’t need to replace it. Once I had scrapped the bitumin soundproofing stuff off I found that it’s not as bad as I originally thought. I can treat it with a rust killer, and it’s good enough to take a weld when I fit the new chassis leg. Next job is to order the chassis leg from the club and get on with it.
Good news is the the rear subframe mounting bolts came out easily and the subframe drops just enough to give clearance to cut out the old, and fit the new leg. It’s going to be a bit of a squash and a squeeze but I think it’s possible.
The welder is dusted off and ready to go..............
It all looks a bit broken at the minute but I’m getting there slowly........
Closer inspection of the drivers floor pan reveals that I don’t need to replace it. Once I had scrapped the bitumin soundproofing stuff off I found that it’s not as bad as I originally thought. I can treat it with a rust killer, and it’s good enough to take a weld when I fit the new chassis leg. Next job is to order the chassis leg from the club and get on with it.
Good news is the the rear subframe mounting bolts came out easily and the subframe drops just enough to give clearance to cut out the old, and fit the new leg. It’s going to be a bit of a squash and a squeeze but I think it’s possible.
The welder is dusted off and ready to go..............
Re: VYK The Russet
Small victory was had today.
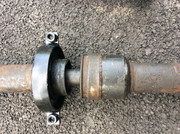
I changed the centre bearing on the propshaft with help of the following thread;
viewtopic.php?f=4&t=10078&p=109558&hili ... re#p109558
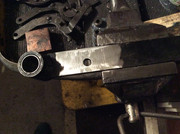
I got the bearing from Dave Mac propshafts in Coventry. It’s a pretty simple job to split the joint. All you need are some simple tools and a decent sized vice. Though I had a bit of trouble getting the old bearing off. My favourite tool ( propane burner ) came to the rescue yet again providing the heat to break the seal of bearing to shaft, and it then drifted off easily. The rubber boot on mine was in perfect condition so I left it on. If you need to replace the boot I can advise that a boot from a Austin mini inner cv / pot joint, looks like it will fit.
Old
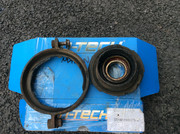
New
Im now waiting for the chassis leg to arrive from Alun and I can get cracking with the welder.
I changed the centre bearing on the propshaft with help of the following thread;
viewtopic.php?f=4&t=10078&p=109558&hili ... re#p109558
I got the bearing from Dave Mac propshafts in Coventry. It’s a pretty simple job to split the joint. All you need are some simple tools and a decent sized vice. Though I had a bit of trouble getting the old bearing off. My favourite tool ( propane burner ) came to the rescue yet again providing the heat to break the seal of bearing to shaft, and it then drifted off easily. The rubber boot on mine was in perfect condition so I left it on. If you need to replace the boot I can advise that a boot from a Austin mini inner cv / pot joint, looks like it will fit.
Old
New
Im now waiting for the chassis leg to arrive from Alun and I can get cracking with the welder.
Re: VYK The Russet
If there was a prize for the most boring photo on the forum, then this should surely win it?
The photo reflects perfectly, how boring it is drilling spot welds! I’m going to take myself out into the garden and give myself six of the best for buying yet another car that needs weld repairs...............
The photo reflects perfectly, how boring it is drilling spot welds! I’m going to take myself out into the garden and give myself six of the best for buying yet another car that needs weld repairs...............
Re: VYK The Russet
Some progress has been made - slower than anticipated - but progress all the same. I’ve been snatching the odd hour here and there to work on VYK, but apart from time I’ve found that space to work in has been my biggest challenge.
So the idea was to replace the chassis leg with engine in situ and the rear of the subframe dropped. The plan being, to drill out the old spot welds and cut around the old subframe bolt sleeve from underneath, thus removing the leg but leaving the sleeve in place. Cut the new bolt sleeve off of the new leg and then marry the two together. Old sleeve - new leg. Simple!
I soon found that drilling and cutting the front portion of the chassis leg was pretty much impossible with the engine in place because I just couldn’t get access with the spotweld drill or angle grinder. I think that it could be done if you have smaller air powered tools, but my trusty angle grinder and drill bodies are just too big to fit in the limited space.
Fortunately, only the rear portion of my chassis leg was rotten, with the front portion still in good condition. So, a plan was hatched to splice a portion of the new leg to old...........
As so the new leg was cut to size, zinc primered and drilled for plug welding...
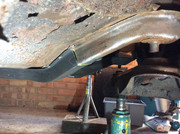

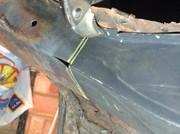
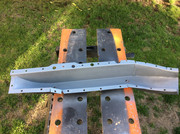
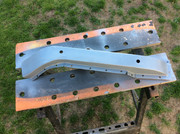
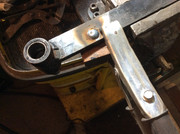
The profile of the new club supplied leg is slightly different but I’m pretty pleased with how it lined up. You can see how I have had to snip the old leg to splay it a little on one corner to get it to line up nicely.
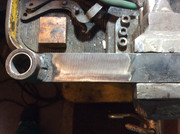
Then it was on to tacks and plugs....

Because I’m limited to the height of the car on axle stands it’s a bit tight under there to get a good welding position but it’s do able, it just slows things down having to rearrange things all the time but I’m getting there ...........
So the idea was to replace the chassis leg with engine in situ and the rear of the subframe dropped. The plan being, to drill out the old spot welds and cut around the old subframe bolt sleeve from underneath, thus removing the leg but leaving the sleeve in place. Cut the new bolt sleeve off of the new leg and then marry the two together. Old sleeve - new leg. Simple!
I soon found that drilling and cutting the front portion of the chassis leg was pretty much impossible with the engine in place because I just couldn’t get access with the spotweld drill or angle grinder. I think that it could be done if you have smaller air powered tools, but my trusty angle grinder and drill bodies are just too big to fit in the limited space.
Fortunately, only the rear portion of my chassis leg was rotten, with the front portion still in good condition. So, a plan was hatched to splice a portion of the new leg to old...........
As so the new leg was cut to size, zinc primered and drilled for plug welding...
The profile of the new club supplied leg is slightly different but I’m pretty pleased with how it lined up. You can see how I have had to snip the old leg to splay it a little on one corner to get it to line up nicely.
Then it was on to tacks and plugs....
Because I’m limited to the height of the car on axle stands it’s a bit tight under there to get a good welding position but it’s do able, it just slows things down having to rearrange things all the time but I’m getting there ...........


Re: VYK The Russet
It's coming along nicely, keep the good work up 
Re: VYK The Russet
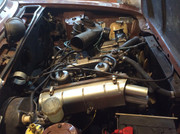
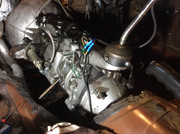
Chassis leg is all welded and under sealed so time to move on to the gearbox.
The plan being to clean it up and replace the overdrive sump gasket and front bearing seal as they’re both leaking and fit a new release bearing as part of the clutch replacement.
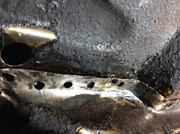
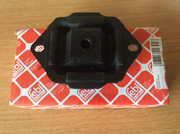
What I also found was a rotten gearbox mount. Yuck!
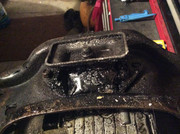
Not only was it rotten as a pear but it only had one bolt holding it to the frame. So with the help of the forum once again, thanks to Galileo, I’ve replaced said rotter with a nice new Volvo mount. See the thread here: viewtopic.php?f=4&t=29990&start=15
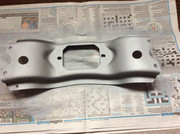
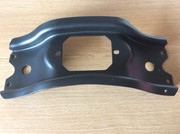
That’s after giving the frame a good clean up and paint.

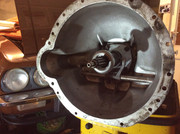
Unfortunately I was a bit heavy handed with the fitting of the front bearing seal and cracked the carrier!

Geoff at Wins came up with a replacement and it’s all bolted back together. All I need to do is re-fit the clutch release bits n bobs and new clutch and the box can go back in.
Steady progress......
The plan being to clean it up and replace the overdrive sump gasket and front bearing seal as they’re both leaking and fit a new release bearing as part of the clutch replacement.
What I also found was a rotten gearbox mount. Yuck!
Not only was it rotten as a pear but it only had one bolt holding it to the frame. So with the help of the forum once again, thanks to Galileo, I’ve replaced said rotter with a nice new Volvo mount. See the thread here: viewtopic.php?f=4&t=29990&start=15
That’s after giving the frame a good clean up and paint.
Unfortunately I was a bit heavy handed with the fitting of the front bearing seal and cracked the carrier!
Geoff at Wins came up with a replacement and it’s all bolted back together. All I need to do is re-fit the clutch release bits n bobs and new clutch and the box can go back in.
Steady progress......
Re: VYK The Russet
Next little problem. These Dolomites really like to fight you don’t they!?
Cross shaft bolt sheared as expected.

Soaked in plus gas overnight it then drifted out easily enough.

So at last the gearbox is cleaned up with new gaskets and seals. New clutch is all bolted up and ready to go. Clutch operating mechanism is good to go also, with the new front bearing seal end cover and new release bearing. Didn’t manage to break anything this time
Hoping to get the gearbox in this weekend. The steering column is now out also to enable me to change the column bush for a nice superpro poly one. Don’t know why I didn’t do that in the first place really because it gives better accesss to the gearbox from inside the car. It was only when it was out of the way that I realised how much I had been struggling around it. Learning all the way.............
Cross shaft bolt sheared as expected.
Soaked in plus gas overnight it then drifted out easily enough.
So at last the gearbox is cleaned up with new gaskets and seals. New clutch is all bolted up and ready to go. Clutch operating mechanism is good to go also, with the new front bearing seal end cover and new release bearing. Didn’t manage to break anything this time
Hoping to get the gearbox in this weekend. The steering column is now out also to enable me to change the column bush for a nice superpro poly one. Don’t know why I didn’t do that in the first place really because it gives better accesss to the gearbox from inside the car. It was only when it was out of the way that I realised how much I had been struggling around it. Learning all the way.............
Re: VYK The Russet
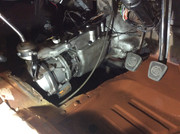
Well the gearbox is back where it belongs at last. Lick of paint on the floor pan and the steering column is back in too.
I’ve been going through the hydraulics and have rebuilt the LSV, brake and clutch masters, and clutch slave.
Thanks to Mart and James there are a couple of excellent threads on the forum which helped with the LSV. Plus a seal kit from the club.
https://forum.triumphdolomite.co.uk/vie ... 3&start=75
https://forum.triumphdolomite.co.uk/vie ... &start=285
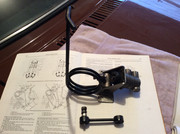
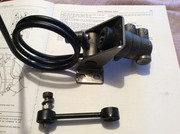
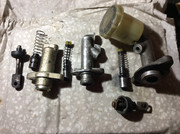

The clutch master had the usual problem with the fork hole being elongated
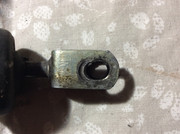
I was ready to weld a washer on to repair it as I have done in the past but spotted this in Mick Dolphins list.
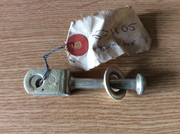
A nice nos fork for £5.95 delivered to my door. Thanks Mick!
I’m now moving on to the brake and clutch lines. I’ve replaced a few of the copper hard lines as neccesssary, and used one of Aluns excellent clutch master cylinder pipes as mine was totally seized solid. I’ve got a set of Goodridge braided hoses for the brakes and clutch.
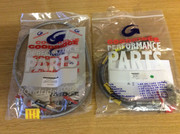
Also I’ve just had a large package from Jon turn up in the post. Looking forward to fitting the trackerjack front brakes next............
I’ve been going through the hydraulics and have rebuilt the LSV, brake and clutch masters, and clutch slave.
Thanks to Mart and James there are a couple of excellent threads on the forum which helped with the LSV. Plus a seal kit from the club.
https://forum.triumphdolomite.co.uk/vie ... 3&start=75
https://forum.triumphdolomite.co.uk/vie ... &start=285
The clutch master had the usual problem with the fork hole being elongated
I was ready to weld a washer on to repair it as I have done in the past but spotted this in Mick Dolphins list.
A nice nos fork for £5.95 delivered to my door. Thanks Mick!
I’m now moving on to the brake and clutch lines. I’ve replaced a few of the copper hard lines as neccesssary, and used one of Aluns excellent clutch master cylinder pipes as mine was totally seized solid. I’ve got a set of Goodridge braided hoses for the brakes and clutch.
Also I’ve just had a large package from Jon turn up in the post. Looking forward to fitting the trackerjack front brakes next............
Re: VYK The Russet 78 Sprint
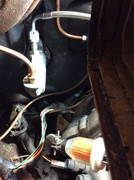
I’ve fitted the braided clutch pipe but ran into a couple of issues;
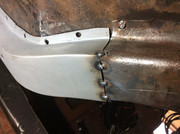
The copper crush washers supplied with the Goodridge hose are 12mm inner diameter and therefore leak like a sieve. If you fit one of these be sure to use 11mm - 7/16 inner diameter washers to get a decent seal!
To allow the pipe to be fitted at the master cylinder end the sound deadening needs to be trimmed from the bulkhead. Apologies for the poor photo but it does just about show where the bulkhead material is trimmed.
I had read that bleeding the clutch on triumphs is a bit of a pig, and found information on the forum about good results from reverse bleeding. I found this YouTube video which explains the process perfectly.
https://m.youtube.com/watch?v=lW770mbruM4
I now have a decent air free clutch, but it could be better. I’ve found that the pin hole in the pedal is ovaled, so next job will be to weld it up and re drilll...........
Re: VYK The Russet 78 Sprint
Not much to report as I’ve been busy working on the house. But, I’ve sorted that ovaled hole on the clutch pedal at least. For some reason I didn’t get a pick of the dodgy hole but the process is shown. Plenty of cutting fluid and a decent quality drill bit is needed to re drill the hole as the weld itself is bloody hard material!
Now there will be no play at the pedal end of the clutch, I’m hoping to get more travel from the slave cylinder. We shall see..........
Now there will be no play at the pedal end of the clutch, I’m hoping to get more travel from the slave cylinder. We shall see..........
Re: VYK The Russet 78 Sprint
Clutch now works a treat
Floorpan hasn’t turned out too bad. Not the greatest paint job but it will be covered with carpet anyway.
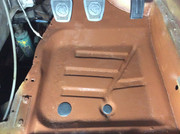
Attention turned to the overdrive electrics which had been butchered in the past. I also found that the switch was shot, so a new one and a bit of fiddling later and all seems to work well. I’m sure I can hear the solenoid click in. Shame I had to use two crimp connectors on the gearstick wiring but it’s a new item which came with the wrong connectors on it I may change that actually to bullet connectors. Just didn’t have any in stock at the time and wanted to test the switch.

Still plenty to do.......
Floorpan hasn’t turned out too bad. Not the greatest paint job but it will be covered with carpet anyway.
Attention turned to the overdrive electrics which had been butchered in the past. I also found that the switch was shot, so a new one and a bit of fiddling later and all seems to work well. I’m sure I can hear the solenoid click in. Shame I had to use two crimp connectors on the gearstick wiring but it’s a new item which came with the wrong connectors on it
Still plenty to do.......