Amazing work James as per usual. Can't remember you tackling rust on the lower rear screen area before. These cars certainly do rust for England!
Cheers
Keith
VA 276, Mimosa Sprint
-
Awaiting Repair
- TDC Member
- Posts: 192
- Joined: Thu May 10, 2012 8:08 pm

Re: VA 276, Mimosa Sprint
Thanks everyone!
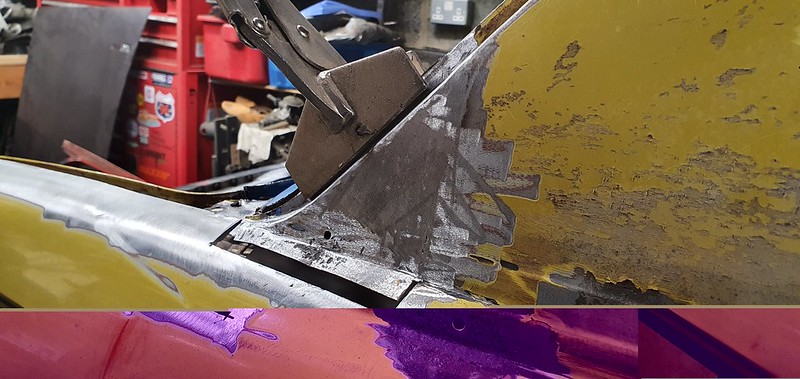
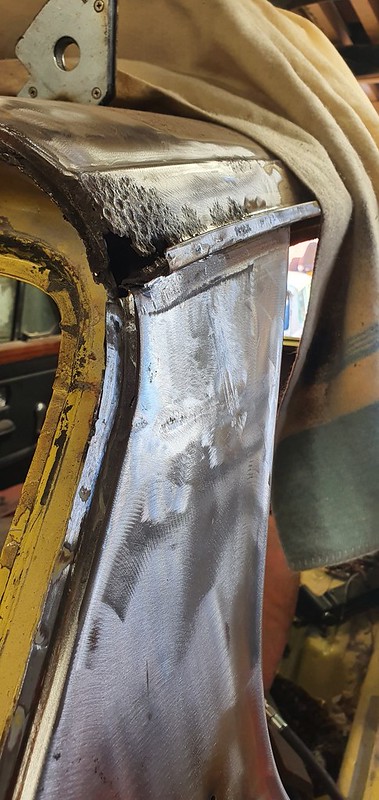
This week I have mainly been tackling the rear screen surround and wing tops. The wing tops in particular are a bit of a pain, they aren't a flat fold, they have a very slight curve to them. So after repairing the C post trailing edge I was able to set about fabricating a repair section.
Looking at the wing section that was removed you can see that it has a slight curve to it.

So it was out with the shrinker/stretcher!

After some fettling I had a perfect repair section.

I had to repair a section of the channel which I forgot to photo, then I got into the welding zone (panel is really thin so you have to go slow with an air gun to cool the welds.) and got the repair section on there so forgot to photo the pre-lininshing weld as well!
Anyway, this is what I ended up with!
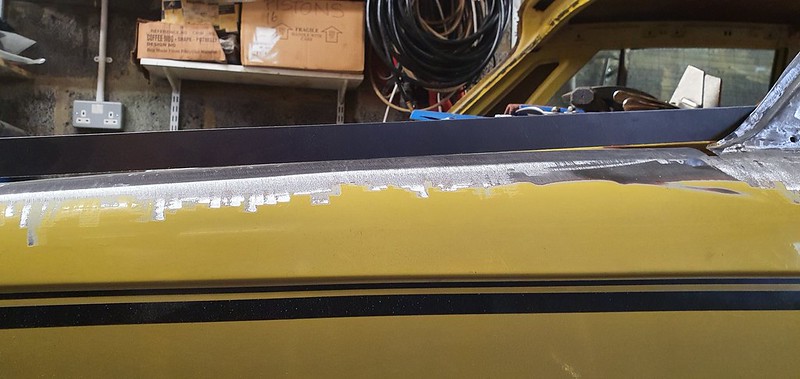

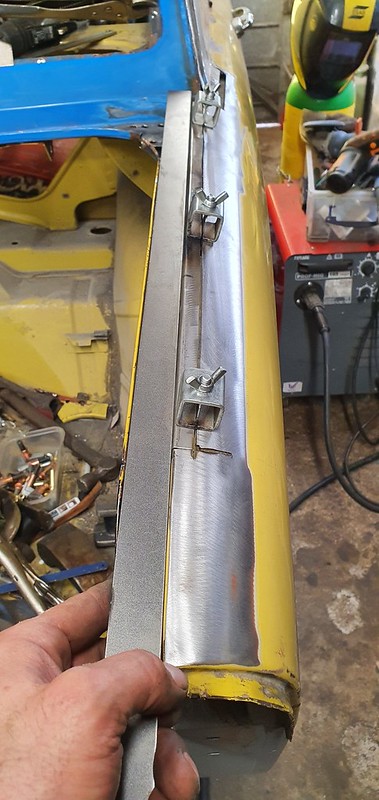
I test fitted the boot lid, well placed it on and first impressions are excellent, I will finish the gaps and spot weld the channel when the boot hinges are back on.
On to the other side!
This week I have mainly been tackling the rear screen surround and wing tops. The wing tops in particular are a bit of a pain, they aren't a flat fold, they have a very slight curve to them. So after repairing the C post trailing edge I was able to set about fabricating a repair section.
Looking at the wing section that was removed you can see that it has a slight curve to it.
So it was out with the shrinker/stretcher!
After some fettling I had a perfect repair section.
I had to repair a section of the channel which I forgot to photo, then I got into the welding zone (panel is really thin so you have to go slow with an air gun to cool the welds.) and got the repair section on there so forgot to photo the pre-lininshing weld as well!
Anyway, this is what I ended up with!
I test fitted the boot lid, well placed it on and first impressions are excellent, I will finish the gaps and spot weld the channel when the boot hinges are back on.
On to the other side!
Re: VA 276, Mimosa Sprint
What work there must have been in that piece, well done for getting it done in one piece too - it's a phenomenal bit of work. I'm sure most would have done it in a few pieces.
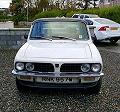
Triumph Dolomite Sprint (RNK 957W)
Automatic, porcelain white - 52,820, genuine mileage (warranted).
Built 26/6/1980, 3 previous owners (2 within the same family).
Supplied by Lavender Hill Garage Ltd, Enfield, London, by garage owner Jimmy Metcalfe on 30th September 1980 to Geoffrey Robinson, Enfield, London.
Club Membership No: 2017092
Re: VA 276, Mimosa Sprint
Had to do it in two pieces Murdo, it has a seam but you cant see it!
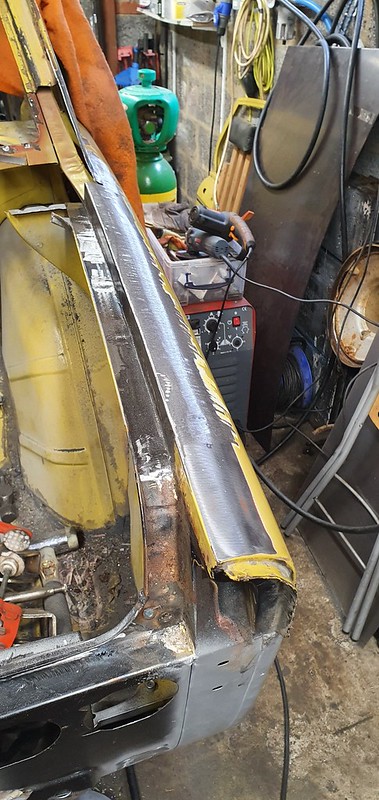
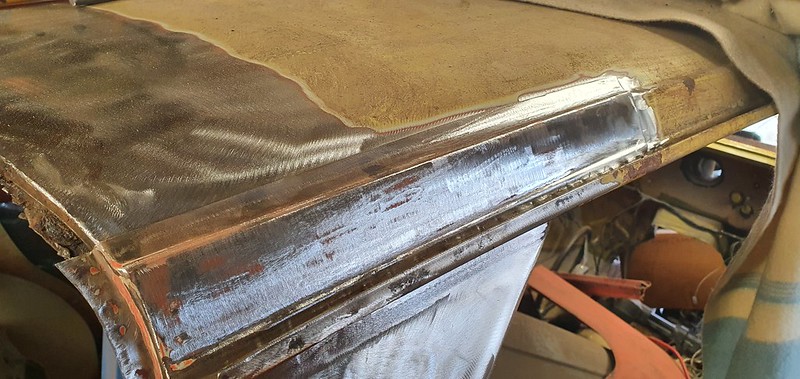
On to the other side and the surround. On the other side I had to make a new channel, this turned out to be a pain in the backside as there is a small strip folded over which contacts the boot lid seal, recreating this accurately proved a challenge.


All on and set in place. The placement of this is critical for the alignment of the rear wing, rear panel and thus boot lid otherwise the gaps wont line up.


The next job before I finish the rear wing is to repair the rear screen surround, once this is in place everything lines up much better! It also adds reinforcement for the boot surround which makes alignment easier.
Only the outer panel had rotted through in the corners, the supporting structure, boot hinge brackets and inner surround had survived well, all they needed was a de-rust and a couple of coats of UPols finest Zinc Weld through primer.

I haven't repaired the NS C post yet as I need it for alignment.
I made this!
Well, ok I didn't make it entirely, the right corner is a replacement section, the left corner I have fabricated.
Test fitted and it fits perfectly, this is what I mean about getting alignment correct.

I then just tack welded it in.

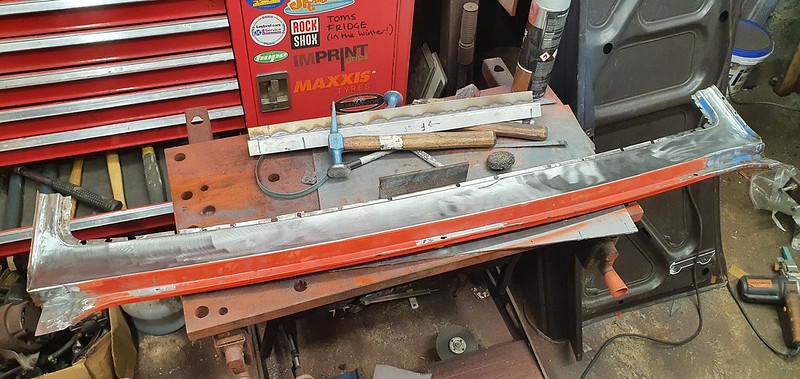
With that in I could turn my attention to the rear wing repair. It was fabricated in the same way as the OS, two sections, contoured to match the original. Matched and then tacked in at 1" intervals (Yes I really did mark 1" intervals! It makes it easier to tack in!)
I will deal with the rust repair later.
Yep, straight!

Perfect boot gaps!


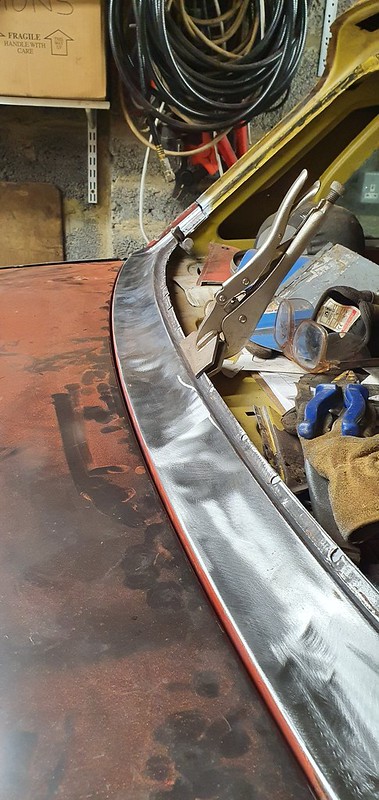
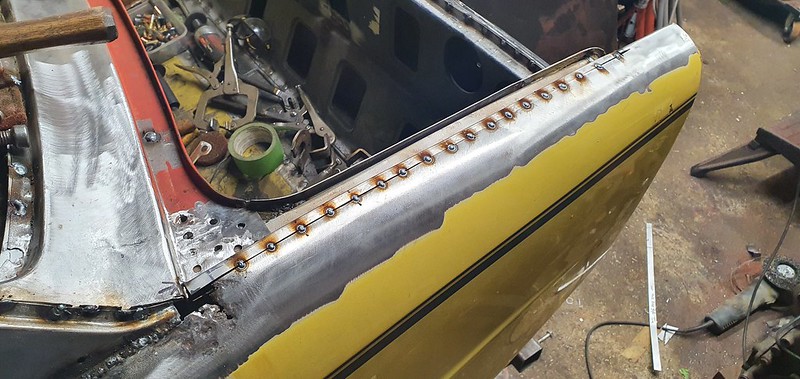
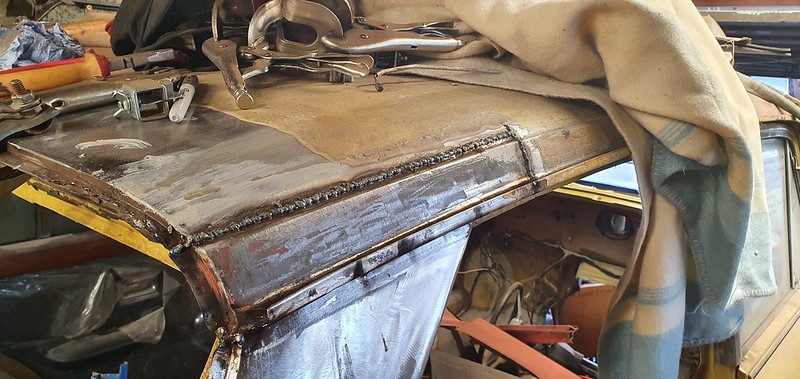
I promised a wip photo! So here we are, the panel is very thin, 0.8mm so it is tacked in and an air line is used to keep the panel cool. It doesn't look pretty but the panel hasn't been damaged by heat. The flange has been both plug and spot welded for strength and the corner where it joins the screen surround has a small seam as per the original.


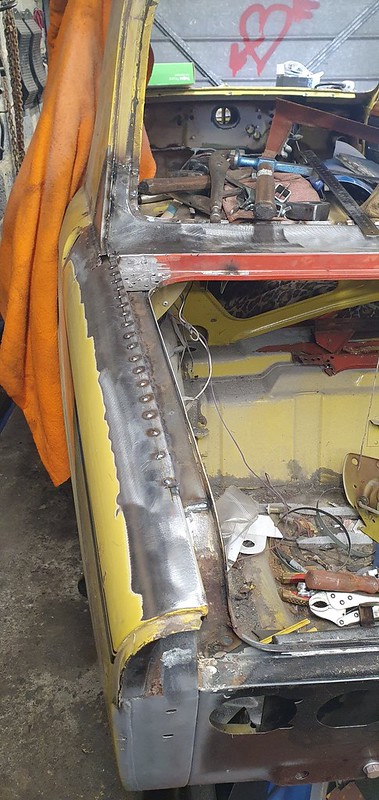
I also repaired the trailing edge of the C post then linished the welds, top and bottom. I use a 40 grit flap disc to knock the tops off, then a 120 grit to get everything flush finishing off with the DA.


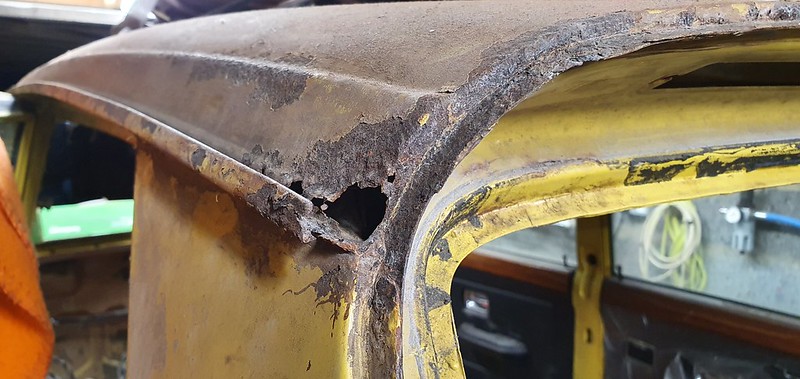
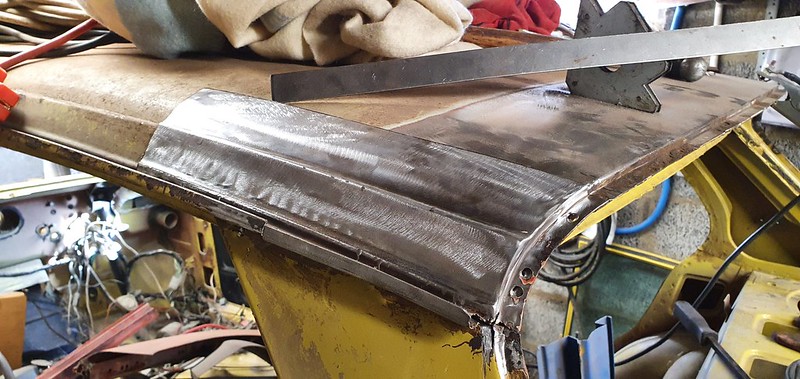
Repaired the rust hole to finish off the wing.


There is some brazing and more linishing to be done around the rear corner but I'll do all of that together later on. I'll move on to the roof and some small patches on the C post next.

Not looking forward to this!
On to the other side and the surround. On the other side I had to make a new channel, this turned out to be a pain in the backside as there is a small strip folded over which contacts the boot lid seal, recreating this accurately proved a challenge.
All on and set in place. The placement of this is critical for the alignment of the rear wing, rear panel and thus boot lid otherwise the gaps wont line up.
The next job before I finish the rear wing is to repair the rear screen surround, once this is in place everything lines up much better! It also adds reinforcement for the boot surround which makes alignment easier.
Only the outer panel had rotted through in the corners, the supporting structure, boot hinge brackets and inner surround had survived well, all they needed was a de-rust and a couple of coats of UPols finest Zinc Weld through primer.
I haven't repaired the NS C post yet as I need it for alignment.
I made this!
Well, ok I didn't make it entirely, the right corner is a replacement section, the left corner I have fabricated.
Test fitted and it fits perfectly, this is what I mean about getting alignment correct.
I then just tack welded it in.
With that in I could turn my attention to the rear wing repair. It was fabricated in the same way as the OS, two sections, contoured to match the original. Matched and then tacked in at 1" intervals (Yes I really did mark 1" intervals! It makes it easier to tack in!)
I will deal with the rust repair later.
Yep, straight!
Perfect boot gaps!
I promised a wip photo! So here we are, the panel is very thin, 0.8mm so it is tacked in and an air line is used to keep the panel cool. It doesn't look pretty but the panel hasn't been damaged by heat. The flange has been both plug and spot welded for strength and the corner where it joins the screen surround has a small seam as per the original.
I also repaired the trailing edge of the C post then linished the welds, top and bottom. I use a 40 grit flap disc to knock the tops off, then a 120 grit to get everything flush finishing off with the DA.
Repaired the rust hole to finish off the wing.
There is some brazing and more linishing to be done around the rear corner but I'll do all of that together later on. I'll move on to the roof and some small patches on the C post next.
Not looking forward to this!


Re: VA 276, Mimosa Sprint
That is some serious craft there, lovely to see.
1978 Pageant Sprint - the rustomite, 1972 Spitfire IV - sprintfire project, 1968 Valencia GT6 II - little Blue, 1980 Vermillion 1500HL - resting. 1974 Sienna 1500TC, Mrs Weevils big brown.

Re: VA 276, Mimosa Sprint
Nice, I may have some usable bits of gutter if you need them for that roof repair.
Modified Dolomite Sprint MSO 662P VA485 1973 Mimosa Sprint


Re: VA 276, Mimosa Sprint
Thanks Tony, Lee gave me a roof so I'll use some gutter sections from that if I need them. Looking at the gutter I think I can fabricate a repair section.
First job will be to remove all of the paint from the rear of the roof.
First job will be to remove all of the paint from the rear of the roof.
-
Carledo
- TDC Shropshire Area Organiser
- Posts: 7242
- Joined: Sun Aug 21, 2011 5:12 pm
- Location: Highley, Shropshire
Re: VA 276, Mimosa Sprint
A bit late now, but if you'd published the need earlier, I could have supplied you with rear wing top/boot gutter sections!
Lovely work though, as usual!
Steve
Lovely work though, as usual!
Steve
'73 2 door Toledo with Vauxhall Carlton 2.0 8v engine (The Carledo)
'78 Sprint Auto with Vauxhall Omega 2.2 16v engine (The Dolomega)
'72 Triumph 1500FWD in Slate Grey, Now with RWD and Carledo powertrain!
Maverick Triumph, Servicing, Repairs, Electrical, Recomissioning, MOT prep, Trackerjack brake fitting service.
Apprentice served Triumph Specialist for 50 years. PM for more info or quotes.
Re: VA 276, Mimosa Sprint
Thanks Steve, I have some as well but to be honest with the rear wing tops it worked better to make some.
Re: VA 276, Mimosa Sprint
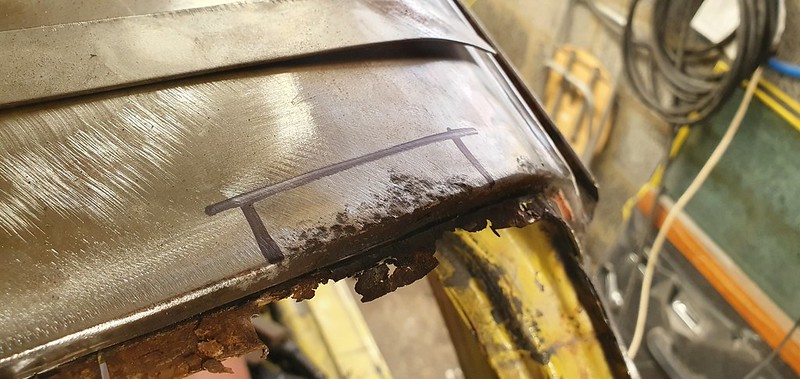
I can't put it off any longer, I have to deal with the roof! Roofs can be a pain, you have to be very careful with them. The metal is thin and they seem to have a lot of tension in them, they move when you get too much heat on them.
So OS first, this is what I started with.

Upon further inspection, it was just the outer panels that were rust ridden, the gutter itself was fine.
I forgot to take some wip photos of the C pillar repair, it was pretty easy, the repair section I had I wasn't happy with so I just ended up fabricating my own.
I removed the rust and paint from the roof panel until I got good metal again, then just cut out a section.

As you can see, the gutter is fine, the rust is mainly from the roof.
I then cut a repair section from a spare roof....
and trimmed it to fit...

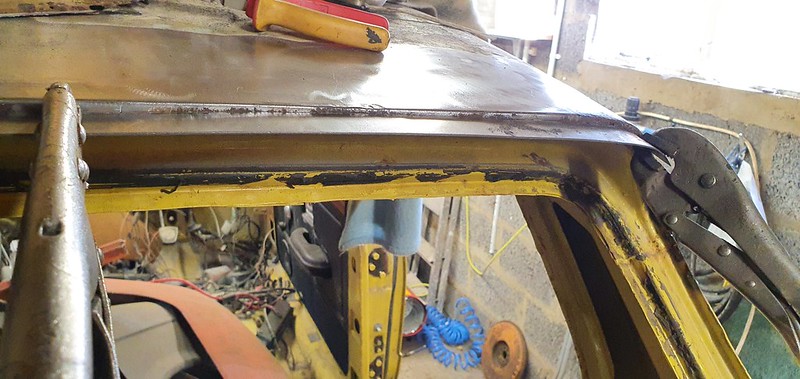
The clay like substance surrounding the repair is Cold Front, it removes heat from the panel. That plus the air line should ensure that the roof doesn't get hot and move around.
Like the wing top, it was a case of tacking it in carefully, it doesn't look pretty but it's straight with no warping. Incidentally, the way that the roof is joined to the trailing edge of the gutter is how the factory did it, I copied it from the other roof I have!
A careful linish and we are done this side!

After not looking forward to it and putting it off I am really happy with the way that it has come out. I'll do the other side on Wednesday, that side the gutter has gone a bit as well, then I'll have a look at the roofs trailing edge seam. I still need to linish the under side and check for pinholes, I will do this together with the other checking when everything else has been done.
So OS first, this is what I started with.
Upon further inspection, it was just the outer panels that were rust ridden, the gutter itself was fine.
I forgot to take some wip photos of the C pillar repair, it was pretty easy, the repair section I had I wasn't happy with so I just ended up fabricating my own.
I removed the rust and paint from the roof panel until I got good metal again, then just cut out a section.
As you can see, the gutter is fine, the rust is mainly from the roof.
I then cut a repair section from a spare roof....
and trimmed it to fit...
The clay like substance surrounding the repair is Cold Front, it removes heat from the panel. That plus the air line should ensure that the roof doesn't get hot and move around.
Like the wing top, it was a case of tacking it in carefully, it doesn't look pretty but it's straight with no warping. Incidentally, the way that the roof is joined to the trailing edge of the gutter is how the factory did it, I copied it from the other roof I have!
A careful linish and we are done this side!
After not looking forward to it and putting it off I am really happy with the way that it has come out. I'll do the other side on Wednesday, that side the gutter has gone a bit as well, then I'll have a look at the roofs trailing edge seam. I still need to linish the under side and check for pinholes, I will do this together with the other checking when everything else has been done.
Re: VA 276, Mimosa Sprint
On to the other side

After poking around a bi I discovered that it wasn't as bad as it looked, just the roof skin and gutter were damaged. It was pretty much the same process as the other side, except I took the gutter off. The top of the C pillar was very good and needed no repairs at all. This photo gives you an idea of how the gutter and roof are assembled to the C pillar. The black line was put in after by the way, I was thinking about cutting more off but decided against it.

Using the spare roof I have I cut off the outer skin and a section of gutter, that was a right pain in the backside! Trying to do it without damaging the panels too much!
I ended up with a good repair panel and section of gutter, I always cut out more than I need then trim to size.

I plug welded the gutter to the top of the C pillar and reinforcing panel, then welded the two sections together.
It all looks good and aligned, compared to the other side.


Then like the other side I carefully let the repair panel in using the swage lines as alignment points.

It looks messy when done this way but it's sound and straight and will linish nicely, both repairs won't be seen when finished. I ran out of time this morning so I'll finish on Friday as well as finishing the screen surround and trailing edge of the roof.
After poking around a bi I discovered that it wasn't as bad as it looked, just the roof skin and gutter were damaged. It was pretty much the same process as the other side, except I took the gutter off. The top of the C pillar was very good and needed no repairs at all. This photo gives you an idea of how the gutter and roof are assembled to the C pillar. The black line was put in after by the way, I was thinking about cutting more off but decided against it.
Using the spare roof I have I cut off the outer skin and a section of gutter, that was a right pain in the backside! Trying to do it without damaging the panels too much!
I ended up with a good repair panel and section of gutter, I always cut out more than I need then trim to size.
I plug welded the gutter to the top of the C pillar and reinforcing panel, then welded the two sections together.
It all looks good and aligned, compared to the other side.
Then like the other side I carefully let the repair panel in using the swage lines as alignment points.
It looks messy when done this way but it's sound and straight and will linish nicely, both repairs won't be seen when finished. I ran out of time this morning so I'll finish on Friday as well as finishing the screen surround and trailing edge of the roof.
-
Awaiting Repair
- TDC Member
- Posts: 192
- Joined: Thu May 10, 2012 8:08 pm
Re: VA 276, Mimosa Sprint
Excellent work James. Love your updates, please keep them coming!
Keith
Keith
-
Matt Cotton
- TDC Oxfordshire Area Organiser
- Posts: 493
- Joined: Sun Oct 08, 2006 4:32 pm
Re: VA 276, Mimosa Sprint
Really interesting as usual James. The cold front putty is good and I used this too on my wheelarches... Bit of reassurance I guess.
Don't rush this.. We've got 4 weeks of lock down to endure.. These updates will keep us entertained!
Best wishes Matt.
Don't rush this.. We've got 4 weeks of lock down to endure.. These updates will keep us entertained!
Best wishes Matt.
Matt Cotton
TDC Oxfordshire Area Organiser.
TDC/TSSC group meeting - 3rd Tuesday of the month
1980 1500HL - OPD
1976 Sprint - SWU
TDC Oxfordshire Area Organiser.
TDC/TSSC group meeting - 3rd Tuesday of the month
1980 1500HL - OPD
1976 Sprint - SWU
Re: VA 276, Mimosa Sprint
Thanks everyone! I'll take my time then Matt!
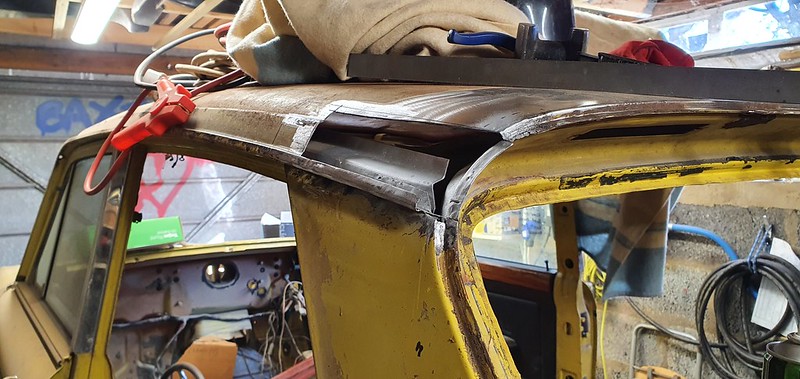
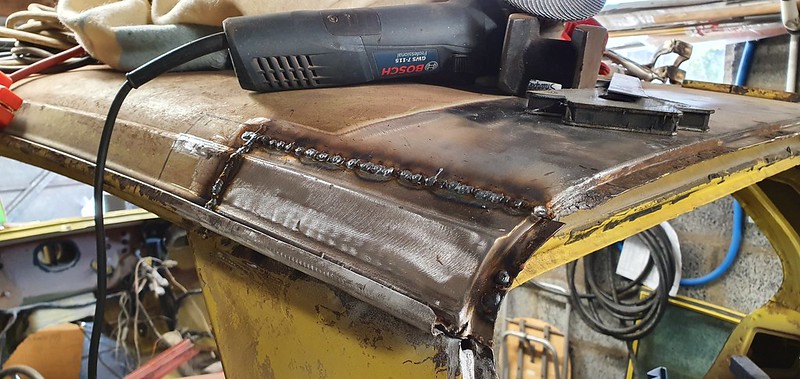
On to the rear trailing edge of the roof, a usual rust area where the trim clips sit.
It was mainly the roof seam that needed replacing, bar a couple of holes the rear vent panel was ok. For the amount of repairs needed its easier to just make some repair patches.
This was the worst, I made a repair section for that.


For the seams I bent a section to the correct profile for the roof seam, then I was able to remove sections and replace where necessary.


One side done...


The other half is a bit worse and will require both seams replacing, not difficult though, I'll just do the same again.


On to the rear trailing edge of the roof, a usual rust area where the trim clips sit.
It was mainly the roof seam that needed replacing, bar a couple of holes the rear vent panel was ok. For the amount of repairs needed its easier to just make some repair patches.
This was the worst, I made a repair section for that.
For the seams I bent a section to the correct profile for the roof seam, then I was able to remove sections and replace where necessary.
One side done...
The other half is a bit worse and will require both seams replacing, not difficult though, I'll just do the same again.
-
dollyman
- TDC Cheshire Area Organiser
- Posts: 1410
- Joined: Wed May 17, 2017 6:28 pm
- Location: NANTWICH.
Re: VA 276, Mimosa Sprint
The skill you have there James, should be recognised as an art form..... 

Tony
Tony
NOW A CLUB MEMBER 2017057 