Page 2 of 5
Re: Project PFJ is baaack….
Posted: Fri Jan 07, 2022 12:51 pm
by lazeruspete
USSprinter wrote: ↑Fri Jan 07, 2022 12:28 pm
Carledo - Thank you for your most helpful reply. Back in California, my son and I had concluded we had a significant water pump problem when PFJ sent a veritable waterfall out the relief slot whenever revved beyond 2500 rpm. So when I got the car back to South Carolina, I jumped into ordering a new 12-vane pump. When I pulled the old pump out and found that I could barely rotate the cage about the shaft by hand, well, maybe I had a fundamental problem — duhhh.
lazaruspete - Thanks for your interest. Yes, the San Francisco Bay Area has a benign climate, especially with the drought over the past couple of years. So PFJ had a “mostly peaceful sleep” over the previous six+ years. The only significant corrosion to pop up was a 2-inchish long strip of the inner lip of the right rear fender (as we say here) on which the filler (ahem) and the paint popped off the metal to reveal the old tin worm still at work. And several pimples have popped up on the front apron around the license plate area. Plus some spots of the vinyl covering on the C-pillars have gone loosie-goosie. One mechanical issue that popped up was an inoperable clutch hydraulic system. My son and I quickly took care of that by totally replacing that system (new clutch master cylinder, slave cylinder, and stainless steel hydraulic flex line), so that PFJ was at least driveable onto the car transporter for her trip back to South Carolina. Now, as for that #@$&ing water pump……
good news indeed

it doesn't seem like the water pump cage is the problem?
Re: Project PFJ is baaack….
Posted: Fri Jan 07, 2022 2:09 pm
by USSprinter
Another water pump install question:
The water pump cover has a threaded pipe fitting that enters the side of the pump cover, to which the heater hose connects. My new 12-vane cover came with a nicely threaded (vacant) hole into which this fitting should be installed. I thought that I would just transfer this fitting from my old pump cover to the new pump cover, but after rusting in place in the old pump cover for 47 years, this fitting just does not budge.
I could not find this fitting in the Dolomite Parts Catalogue. Does anyone know what the part number for this pump cover/ heater hose connector fitting? That would give me a clue as to what to search for, new or used.
Thanks!
Re: Project PFJ is baaack….
Posted: Fri Jan 07, 2022 6:57 pm
by new to this
USSprinter wrote: ↑Fri Jan 07, 2022 2:09 pm
Another water pump install question:
The water pump cover has a threaded pipe fitting that enters the side of the pump cover, to which the heater hose connects. My new 12-vane cover came with a nicely threaded (vacant) hole into which this fitting should be installed. I thought that I would just transfer this fitting from my old pump cover to the new pump cover, but after rusting in place in the old pump cover for 47 years, this fitting just does not budge.
I could not find this fitting in the Dolomite Parts Catalogue. Does anyone know what the part number for this pump cover/ heater hose connector fitting? That would give me a clue as to what to search for, new or used.
Thanks!
I think the thread size is 1/2 BSP
Dave
Re: Project PFJ is baaack….
Posted: Fri Jan 07, 2022 7:40 pm
by USSprinter
Dave - thanks for the tip that the fitting is 1/2” BSP. Merciful heavens, that means I need to search plumbing supply stores rather than Triumph parts sources. Even worse the almost-close 1/2” NPT (National Pipe Thread) standard here in the US is just different enough from BSP to be unusable for this application, so I would need a British plumbing supply. (No wonder the Dolomite Parts Catalogue remains silent on this part.) I might just be reduced to the really long wrench, plus the big hammer and the propane torch, plus my supply of Great Ozzie Adjectives, in order to make another go of extracting the old fitting from the old 6-vane pump cover for reuse.
Re: Project PFJ is baaack….
Posted: Sat Jan 08, 2022 8:54 pm
by Carledo
The hose fitting is part number 138810, not that I expect you'll find a new one. It IS in the parts catalogue but i'm not surprised you didn't find it as it's half a book away from the pump housing it screws into! On the same page as the H pipe under the inlet manifold.
Steve
Re: Project PFJ is baaack….
Posted: Sun Jan 09, 2022 12:23 am
by USSprinter
Carledo wrote: ↑Sat Jan 08, 2022 8:54 pm
The hose fitting is part number 138810, not that I expect you'll find a new one. It IS in the parts catalogue but i'm not surprised you didn't find it as it's half a book away from the pump housing it screws into! On the same page as the H pipe under the inlet manifold.
Steve
Hi Steve,
Many thanks for the mystery part ID!!!! I had leafed through the parts catalogue endlessly and never found it. It turns out that St. Rimmers has the part in stock for about $US7. Problem solved!!!
Mike
Re: Project PFJ is baaack….
Posted: Mon Jan 10, 2022 2:04 pm
by USSprinter
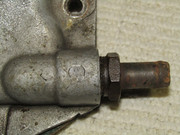
To further confuse matters, I sent Rimmer a close-up photo of the old heater hose adaptor fitting on my old water pump cover. Their reply was that, no, it is UKC1802 that is really more like what I have now than the 138810 part. They had both parts in stock. Hmmm....
What's confusing is that my copy of the 1976-onwards Triumph-published Parts Catalogue shows the 138810 part for the Sprint on page 1M08, while the UKC1802 part does NOT even appear in the Catalogue’s part numbers index. Since my Sprint is a 1974 model prior to the 1976 changes, perhaps the UKC1802 was replaced by 138810? Anyone have a pre-1976 Parts Catalogue to see if UKC1802 appears there?
Usefully, Rimmer provides photos of the two parts. The two parts look similar in the threaded portion that screws into the pump cover, but the external pipe section that the heater hose fits over is quite different. UKC1802 has a smooth pipe with a ridge on the end, while 138810 has a stepped barb for the pipe. I have to agree with Rimmer that UKC1802 looks more like my old part.
Some photos. My old part:
Rimmer's offerings:
https://rimmerbros.com/Item--i-138810
https://rimmerbros.com/Item--i-UKC1802
Any opinions?
Re: Project PFJ is baaack….
Posted: Mon Jan 10, 2022 6:38 pm
by Mad Mart
I have a 1974 parts catalogue...
Part no. 138530
Re: Project PFJ is baaack….
Posted: Mon Jan 10, 2022 7:48 pm
by USSprinter
Mad Mart wrote: ↑Mon Jan 10, 2022 6:38 pm
I have a 1974 parts catalogue...
Part no. 138530
Eureka, thanks Mad Mart! This looks EXACTLY like what I have now, minus all the grunge and corruption. And Rimmer has it in stock. So I placed an immediate online order for the part. Their earlier recommended UKC1802 popped up NLA when I went online to order it (so why recommend it? I must have been dreaming when I looked it up yesterday and thought it was in stock). It seems like I am taking longer to replace PFJ's water pump than you did to carry out her entire engine rebuild. I am slooow.

Re: Project PFJ is baaack….
Posted: Mon Jan 10, 2022 8:27 pm
by Carledo
I found the 138810 in my post 76 (RTC 9822) parts catalogue and thought no more of it, not being aware how old the car is. 138810 is matched to the modified and enlarged metal H pipe that is used on later Sprints. I also have a 75 Sprint only catalogue which shows the same plate as Mart provided with the smaller, early H pipe. With the 138530 part number. Who'd have thought they'd change that hose neck during that swap? No need for it at all!
I'm quite sure i've swapped water pump covers between early and late style engines (including the hose neck, as you pointed out, it's near impossible to get out after a few years use) with total abandon and without a second thought of the possibilty of the hose neck not matching up, seem to have got away with it so far! Of my half dozen or so spare water pump covers, I couldn't possibly say which ones came from which sort of engine. My ONLY criteria is 6 or 12 vane pump.
I would imagine the UKC 1802 is a superseded part number, or possibly a "one size fits all" replacement for both the other numbers.
Whatever, it's sorted now so relief all round!
However i'd recommend you buy yourself a copy of the earlier catalogue, the Sprint only one (RTC9006) which is the correct one for your model. It might avoid more conflicts of this nature.
Steve
Re: Project PFJ is baaack….
Posted: Mon Jan 10, 2022 9:01 pm
by USSprinter
Steve - thanks for the very good advice for me to get the CORRECT parts catalogue for the 1974 Sprint. It has been a confusing two days for this neophyte wandering through the fields of part numbers! Only problem is that after doing a quick search for RTC9006, I fear that this will be like looking for the Book of Unicorns. But I will certainly keep looking.
Mike
Re: Project PFJ is baaack….
Posted: Mon Jan 10, 2022 9:38 pm
by Carledo
USSprinter wrote: ↑Mon Jan 10, 2022 9:01 pm
Steve - thanks for the very good advice for me to get the CORRECT parts catalogue for the 1974 Sprint. It has been a confusing two days for this neophyte wandering through the fields of part numbers! Only problem is that after doing a quick search for RTC9006, I fear that this will be like looking for the Book of Unicorns. But I will certainly keep looking.
Mike
There are at least 2 reprints out there, so there is the original RTC 9006 printed 73, RTC9006A printed 74 (I think) this is probably the one Mart has, and my own RTC 9006B printed Sept 75 which includes some parts for the elusive series II cars.
But in any case, it may be worth searching "Dolomite Sprint Parts list" (or catalogue) then zooming the picture, to read the part number which is in the upper right corner of the front cover page. Alternatively, someone on here may be able to help you, if you put an ad in the wanted section!
Steve
Re: Project PFJ is baaack….
Posted: Wed Jan 12, 2022 3:10 pm
by USSprinter
How to install/refit a new Sprint water pump?
As a first-timer, I am trying to anticipate/understand how to correctly insert/seat a brand new water pump unit into the block. The Repair Operation Manual is a bit vague (26.50.01, Step Eight): “Turn the pump centre bolt anti-clockwise to check correct seating”, plus a stern warning about the use of force. Jon Tilson's excellent water pump guide only discusses the seating of a partially assembled (rebuilt) water pump, where the absence of the impeller allows you to actually see how you are seating the brass cage and the rest of the pump. In my case I have a fully assembled pump with the impeller in place and blocking any view below it while inserting the pump into the block.
My removal of the old water pump went very easily: just gave the centre bolt a small, sharpish clockwise turn with the 3/4” spanner, and the intact old pump just popped out of the block. I don't imagine the installation of the new pump will be that simple, so I am seeking guidance from those who have done this task many times.
Some beginner's questions:
1. Is it appropriate to rub a film of motor oil on the two o-rings on the cage to ease the insertion of the cage? (Sort of like pre-oiling the rubber gasket on a spin-on oil filter.)
2. Is the anti-clockwise turning of the pump centre bolt enough to properly/fully seat the pump gear onto the jack-shaft gear?
3. Or is some “gentle” hammering required on the centre bolt (I have a rubber headed mallet) while simultaneously doing Step 2. above?
4. How do you tell that you have fully seated the pump spindle into the block bush? Is the inability to further turn the centre bolt assurance that the pump is properly/fully seated?
One more question. I will be applying engine assembly lube to the bottom of the spindle, plus both the pump and jack-shaft gears to mitigate the “dry” start. Are there any other areas where I should apply the assembly lube (top of the centre bolt, top and perimeter of the pump vanes' machined areas, the bottom underside lip of the impeller)?
Any other answers to questions that I didn't know enough to have asked?
Thanks in advance!
Re: Project PFJ is baaack….
Posted: Wed Jan 12, 2022 8:06 pm
by new to this
You said youve removed the pump,have you also removed the brass cage as well
dave
Re: Project PFJ is baaack….
Posted: Wed Jan 12, 2022 9:30 pm
by USSprinter
new to this wrote: ↑Wed Jan 12, 2022 8:06 pm
You said youve removed the pump,have you also removed the brass cage as well
dave
Dave,
Yes, my old pump came out as the complete unit, leaving the opening in the block with only the bush and jack-drive gear visible at the bottom of the "well". So my next step is to install the complete new 12-vane pump into the "well" previously occupied by the old 6-vane pump. Hence my most recent set of questions.
Mike