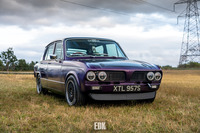
my track sprint project
-
Neil907
Re: my track sprint project
Thought I should do at least one update a year.
I have decided to with electric cut off and electric fire extinguisher, a bit more expensive but I can’t be doing with sticky cables.

Holes cut to flush mount them.

Fitted and spaced to suit mock up labels.
Started looking into the engine and what needs to be, toyed long and hard hard with changing tack and going with a modern engine, decided that a Renault lump would be best value for money but then changed my mind again and will be going with a sprint lump.
Thought it was about time I took the block out of its box and gave it a look over.


The above pic shows how small the water ways are on an early block compared to a late block below.


These two pics show a mocked up exhaust manifold using copper pipe and pipe lagging. It is all sized to my calculations, only time will tell if I am somewhere near. The only way to cram it in there and keep the lengths correct was to go up with 2&3 and down with 1&4.


This pic shows the adaptor to join the Vauxhall column to the sprint rack.

This one shows the bulkhead shroud complete with notch to allow the sub-frame to be removed should it be required.

I have purchased some Jenvy throttle bodies, again not the cheapest route but the simplest. I have also made some strut brace mounts and fitted the strut brace from the rx7 with a few tweeks.


A pic from underneath checking clearances are good.

I have made a new gearbox mount picking up off the other mounting holes on the gearbox as I had left no where to run the exhaust.

Pic showing it fitted and my first mounts which have since been cut off.

The steering column mounted to the cage c/w new wheel and quick release boss.

I have decided to keep a heater but have gone for an aftermarket one as they are considerably smaller and lighter.

I have made a quick shift to fit the standard box, feels much better, may end up make a sligthly quicker one depending how this feels one the car is going.


I am replacing the standard tunnel with an aluminium one to cope with the different position of the leaver and create a little extra room for the exhaust, I have also shrunk it a bit in places to give more room for the driver. This is a mock up in cardboard, will make the proper one later once I am sure nothing else will change.


I have fitted a rad from a diesel fiesta which fits snugly between the chassis rails, I will knock up some ally wind deflectors at a later date.

I have further modified the inner valence to give a cleaner air flow through the extra holes I added in the outer valance.

You can see how much more rad you can see through the front panel, I have also started making a cold iar feed from the inner head lamp.

I have modified the front subframe yet further as I am going too go dry sump, this will give the clearance to mount the pump down low. New one on the left and a standard 1850 one on the right.

It is a tight squeeze and should fit snugly below the rad and above the front spoiler. I will need to fabricate new brackets for the anti-roll bar once I have finalised the position of the sump pump.

I am fitting a crank damper from a BMW in place of the dolomite one, as you can see this is much larger and has a trigger wheel built in.

It clears the subframe with enough room for the pump drive to go on the end and still clear the fan.

I have knocked up a rough prototype sump to make sure everything will fit before order the pump. The rear needs tapering off to clear the steering rack and I will probably move the channel slightly more central if the pump position allows.

Because of the restrictions of room in the engine bay the dry sump tank will be being fitted in the boot, because of this I am also going to fit the oil cooler in the boot in what used to be the fuel tank well.
Not shown in the pics but I have also made a dashboard mould plug, mocked up the centre console, relocated the wiper motor to the passenger side and fitted a smaller and lighter motor from an RX7. I have also knocked up a temporary pedal box to make sure it all fits and works.
I have decided to with electric cut off and electric fire extinguisher, a bit more expensive but I can’t be doing with sticky cables.
Holes cut to flush mount them.
Fitted and spaced to suit mock up labels.
Started looking into the engine and what needs to be, toyed long and hard hard with changing tack and going with a modern engine, decided that a Renault lump would be best value for money but then changed my mind again and will be going with a sprint lump.
Thought it was about time I took the block out of its box and gave it a look over.
The above pic shows how small the water ways are on an early block compared to a late block below.
These two pics show a mocked up exhaust manifold using copper pipe and pipe lagging. It is all sized to my calculations, only time will tell if I am somewhere near. The only way to cram it in there and keep the lengths correct was to go up with 2&3 and down with 1&4.
This pic shows the adaptor to join the Vauxhall column to the sprint rack.
This one shows the bulkhead shroud complete with notch to allow the sub-frame to be removed should it be required.
I have purchased some Jenvy throttle bodies, again not the cheapest route but the simplest. I have also made some strut brace mounts and fitted the strut brace from the rx7 with a few tweeks.
A pic from underneath checking clearances are good.
I have made a new gearbox mount picking up off the other mounting holes on the gearbox as I had left no where to run the exhaust.
Pic showing it fitted and my first mounts which have since been cut off.
The steering column mounted to the cage c/w new wheel and quick release boss.
I have decided to keep a heater but have gone for an aftermarket one as they are considerably smaller and lighter.
I have made a quick shift to fit the standard box, feels much better, may end up make a sligthly quicker one depending how this feels one the car is going.
I am replacing the standard tunnel with an aluminium one to cope with the different position of the leaver and create a little extra room for the exhaust, I have also shrunk it a bit in places to give more room for the driver. This is a mock up in cardboard, will make the proper one later once I am sure nothing else will change.
I have fitted a rad from a diesel fiesta which fits snugly between the chassis rails, I will knock up some ally wind deflectors at a later date.
I have further modified the inner valence to give a cleaner air flow through the extra holes I added in the outer valance.
You can see how much more rad you can see through the front panel, I have also started making a cold iar feed from the inner head lamp.
I have modified the front subframe yet further as I am going too go dry sump, this will give the clearance to mount the pump down low. New one on the left and a standard 1850 one on the right.
It is a tight squeeze and should fit snugly below the rad and above the front spoiler. I will need to fabricate new brackets for the anti-roll bar once I have finalised the position of the sump pump.
I am fitting a crank damper from a BMW in place of the dolomite one, as you can see this is much larger and has a trigger wheel built in.
It clears the subframe with enough room for the pump drive to go on the end and still clear the fan.
I have knocked up a rough prototype sump to make sure everything will fit before order the pump. The rear needs tapering off to clear the steering rack and I will probably move the channel slightly more central if the pump position allows.
Because of the restrictions of room in the engine bay the dry sump tank will be being fitted in the boot, because of this I am also going to fit the oil cooler in the boot in what used to be the fuel tank well.
Not shown in the pics but I have also made a dashboard mould plug, mocked up the centre console, relocated the wiper motor to the passenger side and fitted a smaller and lighter motor from an RX7. I have also knocked up a temporary pedal box to make sure it all fits and works.
Last edited by Neil907 on Fri Sep 19, 2014 5:22 pm, edited 1 time in total.
-
Neil907
Re: my track sprint project
Found a few more pictures that I missed out on the last update

Brackets to mount the steering column, I had to machine to funny shaped inserts to go in place of vauxhals stupid plastic ones, these were then welded to the column.

fitted with a temporary steering wheel.

I have made a dash plug to make a mold from to make a GRP one, it is basically a shortened standard dash with the speaker holes and the heater controls removed.

This shows the heater fitted in properly with the hose routing, you can also see the trial wiper motor bracket and linkage which have since been replaced with ally items.
In addition the dry sump stuff has been ordered today.
I should also be picking up a carbon-fibre roof next weekend from Daz.
Brackets to mount the steering column, I had to machine to funny shaped inserts to go in place of vauxhals stupid plastic ones, these were then welded to the column.
fitted with a temporary steering wheel.
I have made a dash plug to make a mold from to make a GRP one, it is basically a shortened standard dash with the speaker holes and the heater controls removed.
This shows the heater fitted in properly with the hose routing, you can also see the trial wiper motor bracket and linkage which have since been replaced with ally items.
In addition the dry sump stuff has been ordered today.
I should also be picking up a carbon-fibre roof next weekend from Daz.
-
Neil907
Re: my track sprint project
Time for yet another update.
Have decided to cut some of the tunnel out in order to make removal of the gearbox easier as moving it back 2" had made it near impossible.

In order to retain the strength in a smaller space I have welded in some box section.

Then plated the holes up.

Clearance around top of selector to allow rearward movement.

Hole cut for oil cooler.

Finally got round to finishing off plating in around the cage on this side.
Met Daz at the weekend to pick up a carbon fibre roof.
Was nice to meet you, have to say you seemed a little less mad than I expected

The fit is pretty impressive and I'm sure with a little fettling will fit perfectly.

Also picked up a front spoiler at the same time, one of his rejects but will be perfectly good for me.
He also had one of his doors there, nice and impressively light. Top work.
Have decided to cut some of the tunnel out in order to make removal of the gearbox easier as moving it back 2" had made it near impossible.
In order to retain the strength in a smaller space I have welded in some box section.
Then plated the holes up.
Clearance around top of selector to allow rearward movement.
Hole cut for oil cooler.
Finally got round to finishing off plating in around the cage on this side.
Met Daz at the weekend to pick up a carbon fibre roof.
Was nice to meet you, have to say you seemed a little less mad than I expected
The fit is pretty impressive and I'm sure with a little fettling will fit perfectly.
Also picked up a front spoiler at the same time, one of his rejects but will be perfectly good for me.
He also had one of his doors there, nice and impressively light. Top work.
Last edited by Neil907 on Fri Sep 19, 2014 5:23 pm, edited 2 times in total.
-
DF
Re: my track sprint project
Nice to meet u and your brother ,
I'm glad the roof is a good fit ,
I have a few more molds to make
Before I start on the spares package
Cars looking good ,
Atb Daz.
I'm glad the roof is a good fit ,
I have a few more molds to make
Before I start on the spares package
Cars looking good ,
Atb Daz.
-
Neil907
Re: my track sprint project
Dry sump pump, tank, pulleys, remote filter and a few other bits turned up earlier in the week.

Now just to try and make them all fit.
Now just to try and make them all fit.
Last edited by Neil907 on Fri Sep 19, 2014 5:23 pm, edited 1 time in total.
-
Neil907
Re: my track sprint project
Small update from me.

Finally got round to making the proper pedal box.

Aluminum panel to seal off between the bulkheads.

Light weight flywheel and concentric clutch slave arrived yesterday from rob.
Finally got round to making the proper pedal box.
Aluminum panel to seal off between the bulkheads.
Light weight flywheel and concentric clutch slave arrived yesterday from rob.
Last edited by Neil907 on Fri Sep 19, 2014 5:23 pm, edited 1 time in total.
-
Jon Tilson
- Guest contributor

- Posts: 11179
- Joined: Tue Oct 03, 2006 9:45 pm
- Location: Middlesex
Re: my track sprint project
Just an fyi the pics are taking an inorodinate amount of time to load....
Can you host them some other way?
Jonners
Can you host them some other way?
Jonners
Note from Admin: sadly Jon passed away in February 2018 but his humour and wealth of knowledge will be fondly remembered by all. RIP Jonners.
-
Carledo
- TDC Shropshire Area Organiser
- Posts: 7253
- Joined: Sun Aug 21, 2011 5:12 pm
- Location: Highley, Shropshire
Re: my track sprint project
Must be you Jon, they load almost instantly for me!Jon Tilson wrote:Just an fyi the pics are taking an inorodinate amount of time to load....
Can you host them some other way?
Jonners
Steve
'73 2 door Toledo with Vauxhall Carlton 2.0 8v engine (The Carledo)
'78 Sprint Auto with Vauxhall Omega 2.2 16v engine (The Dolomega)
'72 Triumph 1500FWD in Slate Grey, Now with RWD and Carledo powertrain!
Maverick Triumph, Servicing, Repairs, Electrical, Recomissioning, MOT prep, Trackerjack brake fitting service.
Apprentice served Triumph Specialist for 50 years. PM for more info or quotes.
-
Dolly-Nut
Re: my track sprint project
It depends on your internet speed and whether you've viewed the page before, first time it may take 10 seconds or so.
Re: my track sprint project
Even on my 0.3 mbps connection it didn't take that long to load the first time...
1978 Twilight Purple Dolomite 1850HL The Lolomite.
It's 106 miles to Chicago, we've got a full tank of gas, half a pack of cigarettes, it's dark, and we're wearing sunglasses.
Hit it.
It's 106 miles to Chicago, we've got a full tank of gas, half a pack of cigarettes, it's dark, and we're wearing sunglasses.
Hit it.
Re: my track sprint project
TaJon Tilson wrote:Just an fyi the pics are taking an inorodinate amount of time to load....
-
Jon Tilson
- Guest contributor
- Posts: 11179
- Joined: Tue Oct 03, 2006 9:45 pm
- Location: Middlesex
Re: my track sprint project
Its back to normal as of Saturday lunchtime...
Jonners
Jonners
Note from Admin: sadly Jon passed away in February 2018 but his humour and wealth of knowledge will be fondly remembered by all. RIP Jonners.
-
Neil907
Re: my track sprint project
Because progress was going so well I thought I would slow it down by deciding to lower the passenger floor by 1/2" to give a little extra clearance to the roll cage.

Panel cut out.

Extra part cut out to allow better fitment of rear seat rail and new panel fabricated and fitted.

Rear seat rail remade and new floor panel fabricated and held in place with jig to get everything level and square.

Panels all welded in c/w seat spreader plates for the front mounts


roof diagonal now tacked in place after having to remake as the original did not fit as well as I would like, Thanks to Rod for bending it.

Now with enough room to clear the passenger comfortably, bearing in mind the Steve is not the tallest bloke.

Finally modified the seat rails to be more like the proper mounts and no longer cover up the seat belt opening.

Panel cut out.
Extra part cut out to allow better fitment of rear seat rail and new panel fabricated and fitted.
Rear seat rail remade and new floor panel fabricated and held in place with jig to get everything level and square.
Panels all welded in c/w seat spreader plates for the front mounts
roof diagonal now tacked in place after having to remake as the original did not fit as well as I would like, Thanks to Rod for bending it.
Now with enough room to clear the passenger comfortably, bearing in mind the Steve is not the tallest bloke.
Finally modified the seat rails to be more like the proper mounts and no longer cover up the seat belt opening.
Last edited by Neil907 on Fri Sep 19, 2014 5:24 pm, edited 1 time in total.