Page 20 of 24
Re: Operation Orange - 1980 Sprint restoration
Posted: Thu Aug 03, 2017 2:17 pm
by SprintMWU773V
Yes it is indeed a Spal fan. Great quality fans, well regarded. It provides good CFM which is what you want. Normal driving along the viscous units are not too bad but get stuck in traffic say at a car show on a hot day then it just fans hot air all over your rad with zero shrouding. At least with this it'll suck through a decent amount of cool air. As it's a single row of aluminium tubes the air will be drawn just over one row rather than 3 in the standard rad, by the time you draw air over the last row it's getting pretty hot. Should be significantly better in these situations.
My plan is maybe install an override switch but since you don't have these on a modern car why should I fit one to this? If everything does its job then it shouldn't be necessary.
Yes..
Posted: Thu Aug 03, 2017 2:39 pm
by sprint95m
SprintMWU773V wrote: ↑Thu Aug 03, 2017 2:17 pm
My plan is maybe install an override switch but since you don't have these on a modern car why should I fit one to this? If everything does its job then it shouldn't be necessary.
That is a good question.
I am thinking that a test of the fan will give an answer.
Some (smaller) fans will prevent the engine getting any hotter but struggle to get it down in temperature,
so when first stuck in traffic is the time to manually switch the fan on.
I ran a 280mm Revotec slimline fan on an 1850 and as far as I could tell it never did come on (it is very quiet). Later I fitted
a warning light which simply confirmed what I thought.
My guess is that you won't need an over ride switch (or warning light).
Ian.
Re: Operation Orange - 1980 Sprint restoration
Posted: Thu Aug 03, 2017 3:01 pm
by Mahesh
Looks fantastic

Re: Operation Orange - 1980 Sprint restoration
Posted: Thu Aug 03, 2017 7:23 pm
by Pippin
The alignment of your panels is perfection! Far better then any Dolly came out of the factory.
Re: Operation Orange - 1980 Sprint restoration
Posted: Fri Aug 04, 2017 7:10 am
by Toledo Man
I've just been through this thread and I've fixed the Photobucket links with the "~original" workaround so they should all work.
Edit: Most of them had already been done by Mark but there were a few left so I did them. Sorry for any confusion!
Re: Operation Orange - 1980 Sprint restoration
Posted: Fri Aug 04, 2017 9:17 am
by SprintMWU773V
Toledo Man wrote: ↑Fri Aug 04, 2017 7:10 am
I've just been through this thread and I've fixed the Photobucket links with the "~original" workaround so they should all work.
Err thanks but I did it last week
Re: Operation Orange - 1980 Sprint restoration
Posted: Fri Aug 04, 2017 9:25 am
by James467
SprintMWU773V wrote: ↑Fri Aug 04, 2017 9:17 am
Toledo Man wrote: ↑Fri Aug 04, 2017 7:10 am
I've just been through this thread and I've fixed the Photobucket links with the "~original" workaround so they should all work.
Err thanks but I did it last week
Handbags!!

Re: Operation Orange - 1980 Sprint restoration
Posted: Fri Aug 04, 2017 9:28 am
by James467
Pippin wrote: ↑Thu Aug 03, 2017 7:23 pm
The alignment of your panels is perfection! Far better then any Dolly came out of the factory.
When you see it in the flesh it's jaw dropping, just gorgeous, the paintwork is flawless!
Re: Operation Orange - 1980 Sprint restoration
Posted: Fri Aug 04, 2017 10:06 am
by GTS290N
Mark when this is finished I will attend it's first show just to see the thing, and of course to congratulate you on the hard work. Come on, get it finshed.

Re: Operation Orange - 1980 Sprint restoration
Posted: Fri Aug 04, 2017 12:24 pm
by oily66
Have you ordered the glass case for it.
Stunning Mark.
Re: Operation Orange - 1980 Sprint restoration
Posted: Sun Aug 13, 2017 8:07 pm
by SprintMWU773V
This weekend I've mostly been making up the wiring to run my electric fan which is quite easy to do. What takes the time is doing a nice job of the wires including heat shrinking the ends and routing the cables to where you want them. More of this at a later date.
Meanwhile I've also made a new exhaust heat shield. The original one was very worn and the asbestos board didn't look to good or healthy so I decided to replace it.

Using my damaged original as a template I cut out the front from a sheet of aluminium and replicated the same shape in aluminium heat shield material.
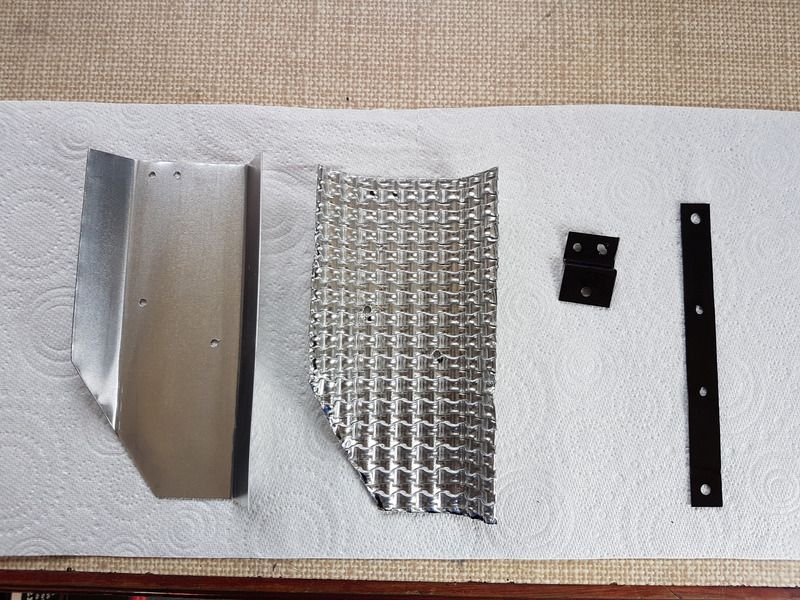
This material is similar to what is used on modern cars and race cars. the design allows air to move between the layers and the area you are trying to reduce heat soak to to work better and more safely than asbestos. I straightened and repainted the brackets before bolting and then riveting the parts together.
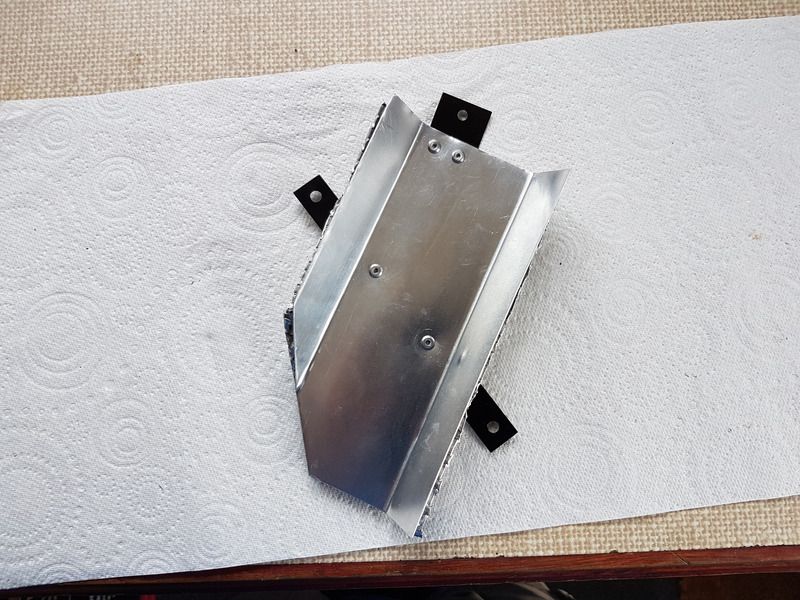
I'm very pleased with the end result. It's not original but will not really be seen anyway.
Re: Operation Orange - 1980 Sprint restoration
Posted: Sun Aug 13, 2017 9:43 pm
by Carledo
A word to the wise, be like Robert 352 and SCREW the finished part to the car rather than riveting as original. Then in the unpleasant eventuality of having to remove the exhaust downpipe, you can easily remove the heatshield and give yourself more wiggle room!
Steve
Re: Operation Orange - 1980 Sprint restoration
Posted: Mon Aug 14, 2017 9:20 am
by SprintMWU773V
Definitely going to screw it, it's much easier and as you say it can easily be removed. I'm sure there should be another heat shield but I didn't remove one from the car. I might add something myself though unless anyone has one to copy.
Re: Operation Orange - 1980 Sprint restoration
Posted: Mon Aug 14, 2017 12:29 pm
by oily66
The other is attached to the underside of the gearbox cover.
I'm just in the middle of refurbishing mine, I have drilled out the rivets to remove it.

Re: Operation Orange - 1980 Sprint restoration
Posted: Mon Aug 14, 2017 12:51 pm
by SprintMWU773V
Definitely didn't have one of those. Looks easy to produce though. Might be one of those parts that's easier to make once the exhaust is in then I can work out exactly where it needs to go or whether further improvements can be made. I had given some thought to the gearbox tunnel and how easy it would be to deck it out with some shielding.
In case you were interested the aluminium stuff I used is called Nimbus G2, they also do a Cirrus G3 which is similar but 3 layers and steel based with an aluminium foil. The G3 is even better as a heat shield but figured as I wanted to keep an original look where I could, using the aluminium front sheet would negate the need for the G3. For less heat sensitive areas they also do a Nimbus G1 which is a single layer of the aluminium, often used above exhaust silencers.


