Page 4 of 6
Re: JGU - 'Nina' 1975 Honeysuckle Dolomite (Pre 1850)
Posted: Sat May 09, 2020 2:21 pm
by Awaiting Repair
Amazing work James! These cars rust for England but this one is rusting for the UK, you have your work cut out there!
How does it rank it terms of body shell rust compared to all of the others that you have tackled?
Keith
Re: JGU - 'Nina' 1975 Honeysuckle Dolomite (Pre 1850)
Posted: Sat May 09, 2020 2:57 pm
by new to this
James
nice work, was that rust on the windscreen area because a leaky windscreen ?
Dave
Re: JGU - 'Nina' 1975 Honeysuckle Dolomite (Pre 1850)
Posted: Sat May 09, 2020 3:36 pm
by James467
Awaiting Repair wrote: ↑Sat May 09, 2020 2:21 pm
Amazing work James! These cars rust for England but this one is rusting for the UK, you have your work cut out there!
How does it rank it terms of body shell rust compared to all of the others that you have tackled?
Keith
THanks Keith, pretty standard Dolomite levels of rust to be honest!
new to this wrote:
James
nice work, was that rust on the windscreen area because a leaky windscreen ?
Dave
Water does tend to sit in this area when wet, if there is anything wrong with the paint, chip, scratch from fitting a windscreen, leaky seal etc... water just sits, then when it rusts through it will sit on the inside panel as this side it has nowhere to go, the other side isn't so bad as there are a couple of holes where water will drain away. If the wiper spindles leak as well it can let water into this panel where it can sit.

You can see where the water has just sat in the windscreen seal and the gutter area.
It goes without saying that when I am done the inside of this box section will receive a thorough coating of Bilt Hamber!!
dollyman wrote:
Superb work as usual James, nothing is ever simple. Is that a little space heater under the car James? Is it gas or electric and is it any good?
Tony.
Sorry Tony, I wasnt ignoring you! Yes, the space heater is gas, it is superb, noisy though!
I just had a bit of a tidy and test fitted the new front panels before I did the NS Scuttle/windscreen surround, the main panel gaps are correct, they are held on with Tek screws for now and need some final adjustments before being bonded on.


Re: JGU - 'Nina' 1975 Honeysuckle Dolomite (Pre 1850)
Posted: Sun May 10, 2020 10:36 am
by tinweevil
Very nice as always James. I have been missing your updates.
Why do you use the L section to join the cill reinforcer to the floor of the cill? If I'm recalling correctly originally the 3 layers of cill were spot welded together, is that difficult to replicate?
Re: JGU - 'Nina' 1975 Honeysuckle Dolomite (Pre 1850)
Posted: Sun May 10, 2020 10:48 am
by dollyman
Thanks for the note about the heater Jame's, i did have a gas one but as you say very noisy. Agree with Tinweevil, we have been missing your updates

Carry on with the good work

Tony.
Re: JGU - 'Nina' 1975 Honeysuckle Dolomite (Pre 1850)
Posted: Sun May 10, 2020 2:04 pm
by James467
tinweevil wrote: ↑Sun May 10, 2020 10:36 am
Very nice as always James. I have been missing your updates.
Why do you use the L section to join the cill reinforcer to the floor of the cill? If I'm recalling correctly originally the 3 layers of cill were spot welded together, is that difficult to replicate?
It's a combination of having good metal to weld to which then retains the original strength of the box section once it is back together, access and a bit of future proofing in that I am using zintec steel everywhere.
Hello children, it's time for one of uncle James' dodgy drawings!!!


On the left is the original sill structure, the blue being the inner sill, red bring the diaphragm, and the green being the outer sill, welds are illustrated with black dots. You will notice that the original sills have a lip/channel on the base then a flat section which the original diaphragm is spot welded to. When you remove an original outer sill you tend to have to cut this lower folded section of the diaphragm off (it's normally rusty!).
On the right hand side shows my club sill fitting, you'll notice that they don't have the lip/channel, Alun will correct me if I am wrong but I believe this is due to the costs and relative complexity of adding it in. This does mean that the whole sill sits about 6mm lower (if you want the profile to look correct), this is not an issue. As the inner sill is almost always rotted at the ends so I cut this off and replace it with a club inner sill repair panel (panel F on the spares list), illustrated in pink on the drawing, this can be seam welded to the inner sill. This also gives you a good clean seam to plug weld the lower section of the outer sill to. As you have cut off the original diaphragm lip a new one will need to be welded on, I use a single length of strip press braked to just over 90 degrees, plug welded on to the base of the inner sill (as you won't have access to weld it to the base of the outer sill) then seam welded and plug welded onto the diaphragm (light green in the diagram). The club outer sill (purple) can now be fitted by seam welding along the top and plug welding to the inner sill repair panel. I haven't illustrated the jacking point's or the seatbelt mounting reinforcement, they will need to be either replaced or extended to meet the new inner sill, I would recommend seam welding these in place.
If you need to replace a section of the diaphragm, use a club one as they line up correctly, you can cut the original diaphragm off half way and either but or lap weld the new club one on, you will still need to cut off the lip and use a folded section as per above to retain the correct profile on the sill.
If your welds are good then you won't have altered the structural integrity of the vehicle by doing this.
Re: JGU - 'Nina' 1975 Honeysuckle Dolomite (Pre 1850)
Posted: Sun May 10, 2020 3:46 pm
by Carledo
Brilliant explanation James, as usual!
I'd just like to add one thing, It seems likely to me that the diaphragm and outer sill were joined together at the factory BEFORE the 2 assembled parts were fitted to the cars, it's the only way it would work!
Very few people actually USE the complete diaphragm panel as it means also having a factory "full" outer sill which includes the footstep sections. These are expensive and hard to source, so only the most dedicated concours builders will bother.
So what James is recommending here is the accepted compromise, as it works just as well to maintain structural integrity. It's not so much that the lip isn't there to attach the outer sill to the bottom of the diaphragm, it's just that there's no practical way of welding them together on the car! As a little thought whilst studying James' excellent drawings will prove!
Steve
Re: JGU - 'Nina' 1975 Honeysuckle Dolomite (Pre 1850)
Posted: Sun May 10, 2020 9:09 pm
by Matt Cotton
Great updates and progress James. Does 'home schooling' include metalwork in the afternoons?
Re: JGU - 'Nina' 1975 Honeysuckle Dolomite (Pre 1850)
Posted: Mon May 11, 2020 12:05 pm
by markas
Hi James,
Only just found this thread. You mention replacing the front seats as they're non-hl items.
I bought the originals from Kyle a few years back, they were completely shot but I wanted them for the vinyl and diaphragms. I may have a very good front set though (not completely sure as I'm in France, my cars & spares are in a warehouse in the UK) I bought a complete interior in chestnut from an early Sprint for my 1500 base as I needed a back seat that hadn't rotted away. If you're interested pm me to discuss further.
Re: JGU - 'Nina' 1975 Honeysuckle Dolomite (Pre 1850)
Posted: Mon May 11, 2020 1:25 pm
by tinweevil
Thank you James. So basically no, I'm not recalling correctly!
Cheers
Re: JGU - 'Nina' 1975 Honeysuckle Dolomite (Pre 1850)
Posted: Tue May 12, 2020 11:24 am
by James467
tinweevil wrote: ↑Mon May 11, 2020 1:25 pm
Thank you James. So basically no, I'm not recalling correctly!
Cheers
Sorry Julian, that wasn't a lecture directed at you, just a general how I fit club sills!

Aye,....
Posted: Tue May 12, 2020 4:13 pm
by sprint95m
to expand on the sill structure discussion, if I may,
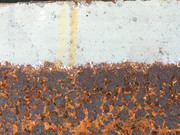
the sills can and do rust from the inside. The lower joins are a rust trap, moisture gathers and rot commences..
Above is a photo showing how rust advances upwards inside an outer sill.
On new structures it is quite preventable by the application of a cavity wax.
Handily access holes are in the top of the inner sills, however accessing the outer
is not too good from here, so what I do is bore holes in the outer for access,
said holes then being covered by the tread plates.
It is extremely important that the middle sill is sound.
A simple test is to jack the car up in each corner, one at a time and try opening/closing the doors.
If all is well you observe no difference......
Ian.
Re: JGU - 'Nina' 1975 Honeysuckle Dolomite (Pre 1850)
Posted: Tue May 12, 2020 6:30 pm
by tinweevil
James467 wrote: ↑Tue May 12, 2020 11:24 am
tinweevil wrote: ↑Mon May 11, 2020 1:25 pm
Thank you James. So basically no, I'm not recalling correctly!
Cheers
Sorry Julian, that wasn't a lecture directed at you, just a general how I fit club sills!
No worries James, my comment was a pop at my own bloody awful memory.
Re: JGU - 'Nina' 1975 Honeysuckle Dolomite (Pre 1850)
Posted: Wed May 13, 2020 12:19 pm
by James467
markas wrote: ↑Mon May 11, 2020 12:05 pm
Hi James,
Only just found this thread. You mention replacing the front seats as they're non-hl items.
I bought the originals from Kyle a few years back, they were completely shot but I wanted them for the vinyl and diaphragms. I may have a very good front set though (not completely sure as I'm in France, my cars & spares are in a warehouse in the UK) I bought a complete interior in chestnut from an early Sprint for my 1500 base as I needed a back seat that hadn't rotted away. If you're interested pm me to discuss further.
Thanks Mark, I have a complete chestnut HL Seat set in the loft thanks (actually thinking about it thats if the mice havent got to them first!
). The drivers base does have a rip but my trimmer is confident that he can use some of the material from the old seats to repair them.
Re: JGU - 'Nina' 1975 Honeysuckle Dolomite (Pre 1850)
Posted: Wed May 13, 2020 12:32 pm
by James467
I am waiting for my rotisserie to arrive to do the chassis legs, seam seal, de-rust and spray the bottom of the car with a coat of Gravitex. So in preparation I removed the engine and subframe, just dropped it out of the bottom of the car and the rear axle. Kyle, the right engine mount was toast! It just fell apart as I removed it!
As usual the subframe bolts are seized into the chassis, a bit of heat will get them out!
Painting may be an issue, at the moment I am looking for someone else to do it but the suspension is all stripped and ready to go to the powder coaters and have new bushes fitted so I can coat the bottom of the car, refit the suspension then when ready I can send it off to be painted.