Sprint Restoration in South Australia (pic heavy)

Restoring your car? Tell us about it here!
Message
Author
User avatar
Mad Mart
TDC Member
Posts: 8529
Joined: Tue Oct 03, 2006 5:48 pm
Location: Winscombe, North Somerset, England
Contact:

Re: Sprint Restoration in South Australia (pic heavy)

#346 Post by Mad Mart »

Looking good Stu. :D

The filler cap always looks like it won't fit under the bonnet, it will, beleive me.

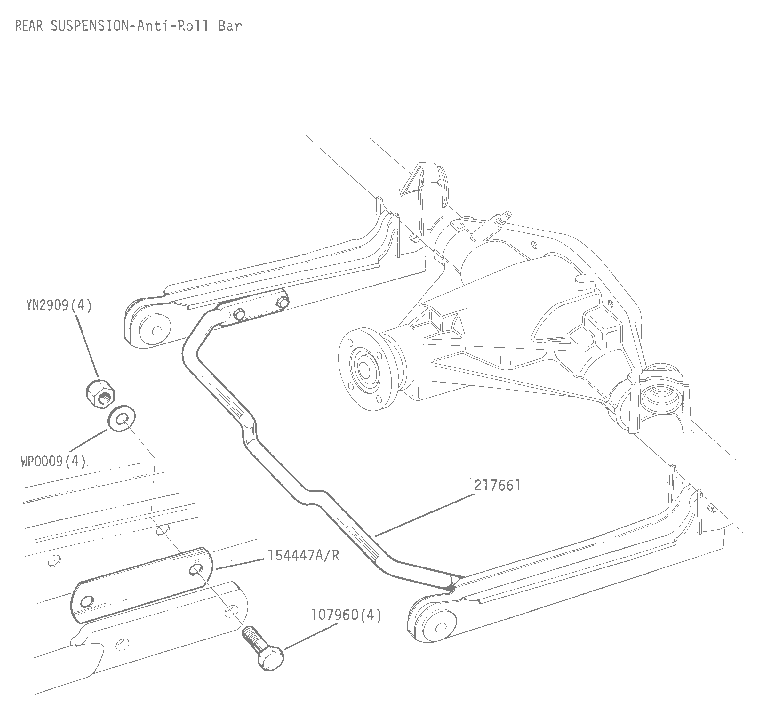
The rear ARB should point to the front like so :-
Image

Well spotted Stu.
Sprintless for the first time in 35+ years. :boggle2: ... Still Sprintless.

Engines, Gearboxes, Overdrives etc. rebuilt. PM me.


2012 Porsche Boxster 981 S


Image
straylight

Re: Sprint Restoration in South Australia (pic heavy)

#347 Post by straylight »

thanks mart, it fitted so well the wrong way around, and I figured it would be logical to keep the ends of the swing arms parallel, where it would do the most good ! I wuz wrong.

thanks for the encouragement on the filler cap. One of those extra niggling doubts !

wondering whether to go full tilt at the interior now, or build up to an engine start, confirm that side works, then tackle the interior.

Waiting on headlight parts as well.

walk into the shed tomorrow and have a good hard look at what is the next logical step :D

stu
User avatar
zombeh
Guest contributor
Guest contributor
Posts: 699
Joined: Tue Dec 26, 2006 12:36 am
Location: Isle of Wight

Re: Sprint Restoration in South Australia (pic heavy)

#348 Post by zombeh »

straylight wrote:thanks for the encouragement on the filler cap. One of those extra niggling doubts !
If it does hit the bonnet adjust the engine steady bar a bit. The engine mounts will sag a bit anyway so if you leave putting the bonnet on til the end it should clear nicely.
DOLLY76

Re: Sprint Restoration in South Australia (pic heavy)

#349 Post by DOLLY76 »

Good on ya stu!

I'm looking forward to seeing the old girl in person :P Pitty I have so much to occupy me for the end of year hols :mrgreen:
User avatar
sprint95m
TDC Member
Posts: 6502
Joined: Thu Aug 09, 2007 1:22 pm
Location: Caithness, Scotland

That is...........

#350 Post by sprint95m »

:thumbsup: Looking good indeed, Stu.


If it was my decision........
straylight wrote:wondering whether to go full tilt at the interior now, or build up to an engine start, confirm that side works, then tackle the interior.
I'd take option 2 and leave the interior 'til last, but is six and two threes really :D .


On the road for the Christmas holiday.........?
TDC Forum moderator
PLEASE help us to maintain a friendly forum,
either PM or use Report Post if you see anything you are unhappy with. Thanks.
DOLLY76

Re: Sprint Restoration in South Australia (pic heavy)

#351 Post by DOLLY76 »

If I get mine done soon enough I'll drop around and give you a hand mate :mrgreen:

6 and two threes? is that like 6 of one, half a dozen of the other?
straylight

Re: Sprint Restoration in South Australia (pic heavy)

#352 Post by straylight »

thanks ian, ended up sorting lots of little jobs today. Oh, and thanks Zombeh for the tip on the filler cap. I'm guessing the carbs and manifold will weigh it down a bit further as well :D

Got the windscreen washer bottle and bracket/pump all cleaned up, made new strap for the bottle out of black webbing and velcro.
More sound insulation on the back doors.
Wired up the blade type fusebox. Got seperate circuits for each of the purple wires and each of the green wires, spread some of that 35 amp load love around into smaller fuses. I'll get busy with the multimeter and work out exactly which parts of the purple and green circuit do what later. For now I can just put in 25 amp fuses.
Cleaned up the winscreen washer jets (I'll probably end up going with your idea on getting decent jets ian, but that will be later) and they'll be primed tomorrow after the rust primer has set in.
Resprayed the air box dove grey
Cleaned up and refitted the alternator. 15ACR. I'll keep my eyes peeled for the a127 or R100 types, should be possible to get them here.
removed the exhaust manifold so I can get the hole drilled in the proper place. I hadn't forgotten what a pain getting the manifold off was, but it was at least unobstructed.

You'd be close to exams yeah Aaron ? My own students do the gauntlet this week and I head up to adelaide for marking. Enjoy the trip but I hate the actual marking part. Good to catch up with all the subject boffins.

stu
DOLLY76

Re: Sprint Restoration in South Australia (pic heavy)

#353 Post by DOLLY76 »

Actually Stu, I'm home in 16 days, that's when the real fun begins. I'll give you a call when DOLY76 is done, will definately be keen to come for a run in her up to your place to get the sprint going. Listen for a Dixieland air horn LOL!!! :mrgreen:
User avatar
tinweevil
Guest contributor
Guest contributor
Posts: 3936
Joined: Tue Oct 03, 2006 5:42 pm
Location: Forest of Dean

Re: Sprint Restoration in South Australia (pic heavy)

#354 Post by tinweevil »

straylight wrote:Got seperate circuits for each of the purple wires and each of the green wires, spread some of that 35 amp load love around into smaller fuses. I'll get busy with the multimeter and work out exactly which parts of the purple and green circuit do what later. For now I can just put in 25 amp fuses.
Here's a list to get you started. Corrections & regional variations welcomed.
1978 Pageant Sprint - the rustomite, 1972 Spitfire IV - sprintfire project, 1968 Valencia GT6 II - little Blue, 1980 Vermillion 1500HL - resting. 1974 Sienna 1500TC, Mrs Weevils big brown.
straylight

Re: Sprint Restoration in South Australia (pic heavy)

#355 Post by straylight »

thanks Tin, and because I'm lazy and you've saved me time writing it all down, I'm cutting and pasting it here :D
There are 6 wires on the right side of the box, anybody care to confirm or correct the following? Or add the ratings?

Purple 1:
- Hazard lights 21W x 4 = 84W = 7 Amps
- Cigarette lighter 50W max = 5 Amps (guessing it could be used to power a spotlight !)
- Clock bugger all
- Boot light 2.2 W = 0.18 Amps
- Courtesy light 5W = 0.42 Amps
Total 12.6 Amps

Purple 2:
- Horns ?
- Passing headlight flash 55W x 2 = 110W = 9.2 Amps

Green1:
- Reversing lights 21W x 2 = 42W
- Overdrive ?

Green 2:
- Windscreen wiper park function

Green 3:
- Windscreen wiper
- Windscreen washer
- Heated rear window
- Brake lights 21W x 2
- Blower
- Seatbelt warning
- Tachometer

Green 4:
- Voltage stabiliser which then does:
- Fuel gauge
- Temp gauge

So you could fuse the above groups by just moving wires at the fusebox. Then there is:

Unfused, supplied by a white wire on the left of the fusebox:
- Choke warning
- Handbrake warning
- Fuel warning
- Oil warning
- Brake balance warning
- Voltage gauge
- Ignition circuit

Which could be fused. Other white wire on the left is the feed from the ignition switch. Lastly there is:

Unfused, supplied from the splitter on the positive battery lead:
- All interior illumination
- All headlights
- All side lights
- Number plate illumination

None of my manuals show how fog lights are fed. If you want to break up these groups you need to find the splits in the loom or knit a new one. Draw lots of pictures with dimensions of the runs if you do please.

Tinweevil
I quickly put in a few of the power ratings that I could easily get. Just to get an idea of the max current draw. Forgive my laziness in equating amps to watts, bad practice, but just getting a rough idea.

My green wires bundle into two bunches and I won't break them down further.

The advantage in fusing up the circuits into 4 rather than the standard 2 is that we can at least get a better fault detection system happening. If a fuse blows, half the culprits are elmininated from the search !

Got the exhaust manifold back today. Refit it tomorrow night. I'm a bit peeved I've only got a 15ACR alternator fitted too. No wonder the spots I had back in the 80's drained the battery :(

Just checking, the alterations made to fit Halogen headlights simply involve a relay yeah ? same wiring is used but the switching is done via a relay to stop arcing the headlight and flasher switches ?

many thanks Tin, good link, by coincidence I'm using the exact same fusebox, the exact method of yellow crimp connectors to spread the incoming current to the circuits. Nothing like reinventing the wheel ! 8)

I also picked up some Holden Commodore grommets for routing wire between the doors and the chassis, Second hand, cut them out of an old car at a wreckers. Nice and corrugated, flexible and they go vertically, I'll get some pics up soon. I'll get the dremel on cutting duty to make the holes, at the same time cut out a clutch slave cylinder maintenance hole in the tunnel side now I've measured that up.

stu
straylight

Re: Sprint Restoration in South Australia (pic heavy)

#356 Post by straylight »

just caught up with Raul's OD gearbox problems in madrid...

viewtopic.php?f=4&t=12463

and Jeroen's expert advice:
Hello, take care it is a gl4 you are going to use. A gl5 is for diffs and modern gearboxes. The gl5 is too good for the triumph gearboxes. When you use a gl5 the synchromesh cant' cut the strong oilfilm of the gl5. Your gears can't be synchone speed and that causes lot's of wear. Some gl4 have sulfide in it. Watch out not to use these. The sulfide reacts with the bronze synchro rings and the layshaft trustwashers. These will corrode almost to black. When overhauling a gearbox with black synchro's and washers you did use the wrong oil.

Sometimes people are not sure if there is sulfide in the gl4 and then they use 20w50. This is not the best option but when you are not sure of your gl4 it is better to use 20w50.

Almost all the mineral gl4 gearboxoils of the known populair brands don't have sulfide and can be used. The semi synthetic and full synthetic have most of the time sulfide.

Jeroen
so I'm guessing the Nulon 85W-140 I've used is a bit dumb....

and it is GL5. :(

so another job....find some Nulon 75W-90 and change the 85W-140 out. It is also GL5, but is recommended for the Sprint by Nulon.

thanks Jeroen....

stu
SPRINTPARTS

Re: Sprint Restoration in South Australia (pic heavy)

#357 Post by SPRINTPARTS »

Hi Stu,

We use and HIGHLY recommend using Penrite 10/10ths 75w/90 synthetic gear oil in gearbox and OD. We have been using this for many years in all our race and road gearboxes with great results. It is probably the best thing we have used in the race 'boxes and OD and the OD always works faultlessly under race conditions.

Mark
straylight

Re: Sprint Restoration in South Australia (pic heavy)

#358 Post by straylight »

thanks Mark, I've drained out the 85-145, about to fill it.

I got some 80-85 penrite yesterday, thinking it was closer to the recommended 90, and since it was GL4 and not GL5 I thought it would be better than the 75-90. Can you see any problems with using the 80-85 penrite ?

stu
SPRINTPARTS

Re: Sprint Restoration in South Australia (pic heavy)

#359 Post by SPRINTPARTS »

I am sure that the Penrite 80-85 will work fine.

Mark
straylight

Re: Sprint Restoration in South Australia (pic heavy)

#360 Post by straylight »

thanks mark
Post Reply