Stainless exhaust with a lambda probe (fat chance) pic heavy

Restoring your car? Tell us about it here!
Message
Author
User avatar
tinweevil
Guest contributor
Guest contributor
Posts: 3936
Joined: Tue Oct 03, 2006 5:42 pm
Location: Forest of Dean

Stainless exhaust with a lambda probe (fat chance) pic heavy

#1 Post by tinweevil »

Continuing from this thread on Saturday the last of the clamps I need arrived from Mick Dolphin so yesterday afternoon the exhaust mini-project got underway.
First I retrieved the car from where she has sat since this happened on the M4 in late February:
Image
The rear section has been welded up numerous times both sides of the rear box, not pretty but I've got an easy 30k out of it since the first repair.
Image
She was filthy so most of the afternoon was spent cleaning. Thoroughly depressing it was too, a years idleness has not been kind to the bodywork. NSR and NSF arches, both cills and the front panel are all looking bad as are all doors apart from the OSR which Derek replaced last September. The left side which has been next to damp grass all that time has fared worst rust wise and the right side has been pebble dashed with tar balls. Nor has the local yoof been kind:
Image
Couple of footprints on the top of the front panel too which fortunately will polish out.
After cleaning I got her nice and high:
Image
Image
And got the old exhaust off:
Image
The front joint wasn't playing ball so the centre section got cut. The rear box has totally disintegrated inside, just and empty tin can remains. With the airbox off the downpipe still wouldn't come out so I had the choice of carbs off or bonnet off, I chose the latter as it'll be handy throughout the job. The carbs will come of today anyway as the manifold gaskets don't last so I'll pop a new one in while I'm there.
Last edited by tinweevil on Tue May 17, 2011 9:37 pm, edited 1 time in total.
1978 Pageant Sprint - the rustomite, 1972 Spitfire IV - sprintfire project, 1968 Valencia GT6 II - little Blue, 1980 Vermillion 1500HL - resting. 1974 Sienna 1500TC, Mrs Weevils big brown.
Purplebargeken

Re: Stainless exhaust with a lambda probe (hopefully)

#2 Post by Purplebargeken »

Oooh. Pretty exhaust!
User avatar
Howard81
TDC Member
Posts: 3415
Joined: Fri Jan 11, 2008 9:02 am
Location: London

Re: Stainless exhaust with a lambda probe (hopefully)

#3 Post by Howard81 »

Shiny 8) 8)
1978 Triumph Dolomite Sprint (project thread)
1966 Volkswagen 1300 (project thread)
1962 Austin Mini (project)
1962 MGA 1600 Mark II
1965 Mobylette SP50 (project)
2001 Rover 75 2.5-litre V6
User avatar
tinweevil
Guest contributor
Guest contributor
Posts: 3936
Joined: Tue Oct 03, 2006 5:42 pm
Location: Forest of Dean

Re: Stainless exhaust with a lambda probe (hopefully)

#4 Post by tinweevil »

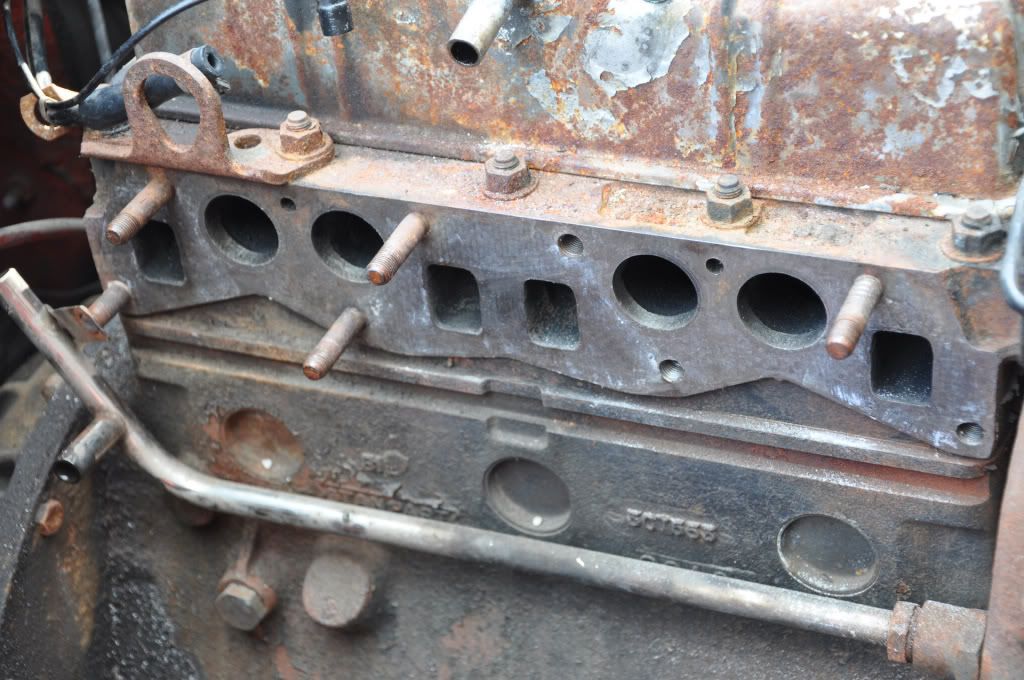
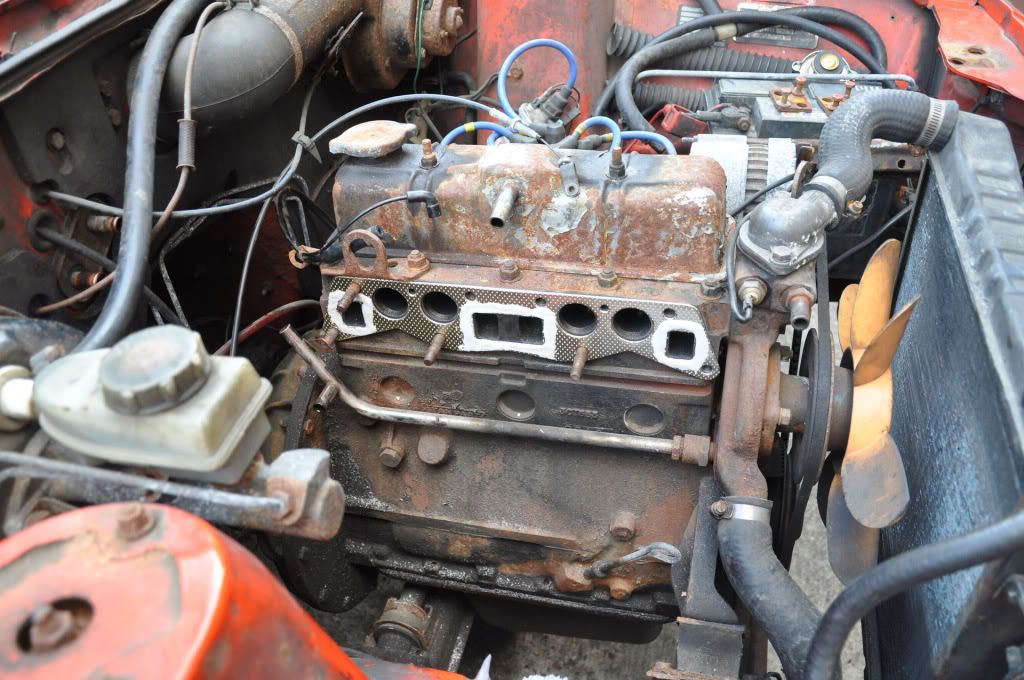
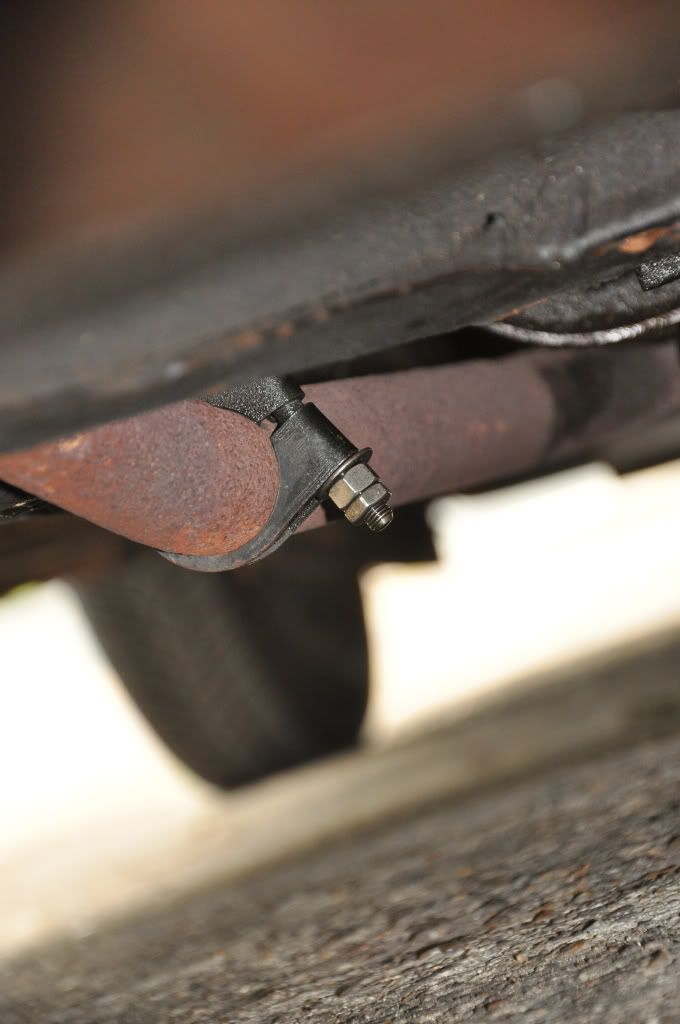
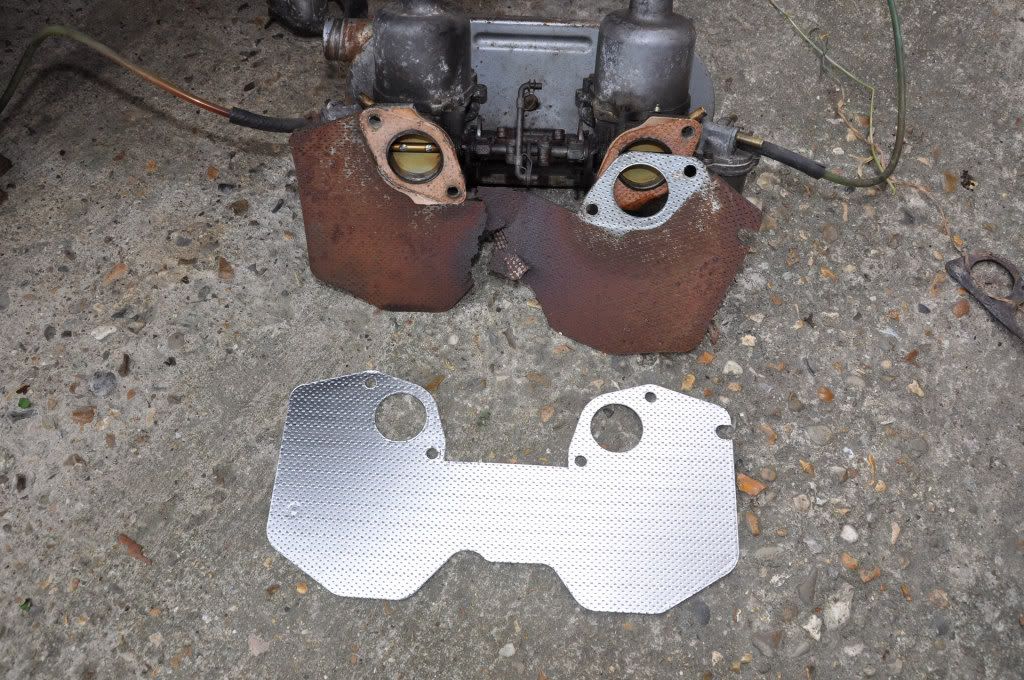
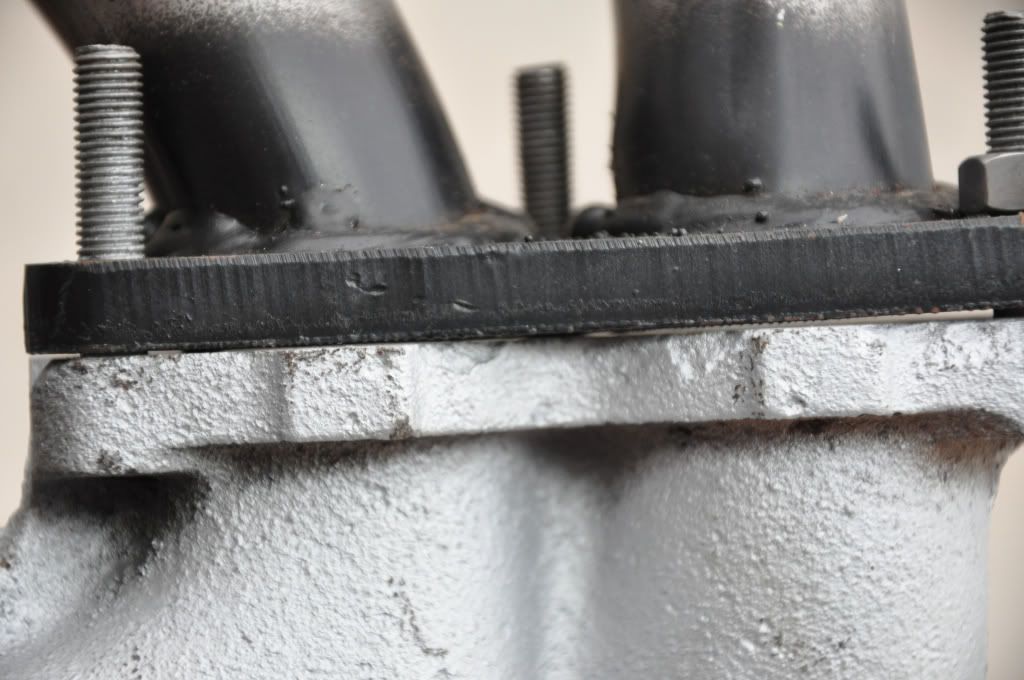
Today started with removing the carbs and manifolds. This time there was absolutely no sign of the manifold gasket starting to fail so a wasted effort maybe? I did find that last time round I'd put a smear of paste on the manifold gasket both sides around the exhaust ports, I'd forgotten that I'd done that. This seems to be good thing to do, this gasket has lasted 16k miles with absolutely no sign of deterioration, the previous one got changed due to total failure at the same milage.
Image
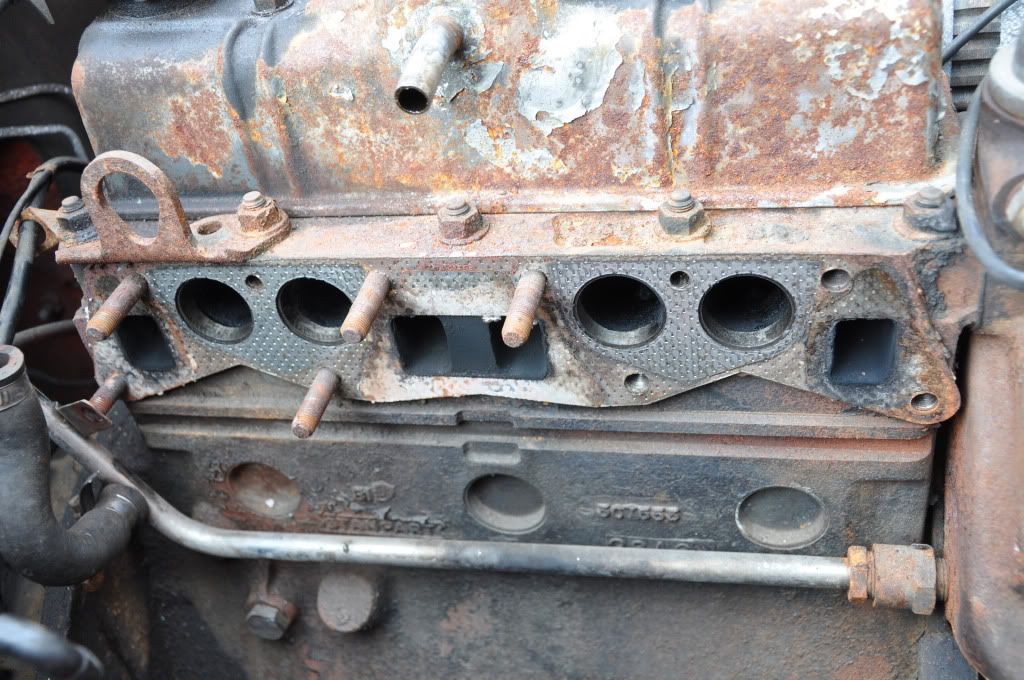
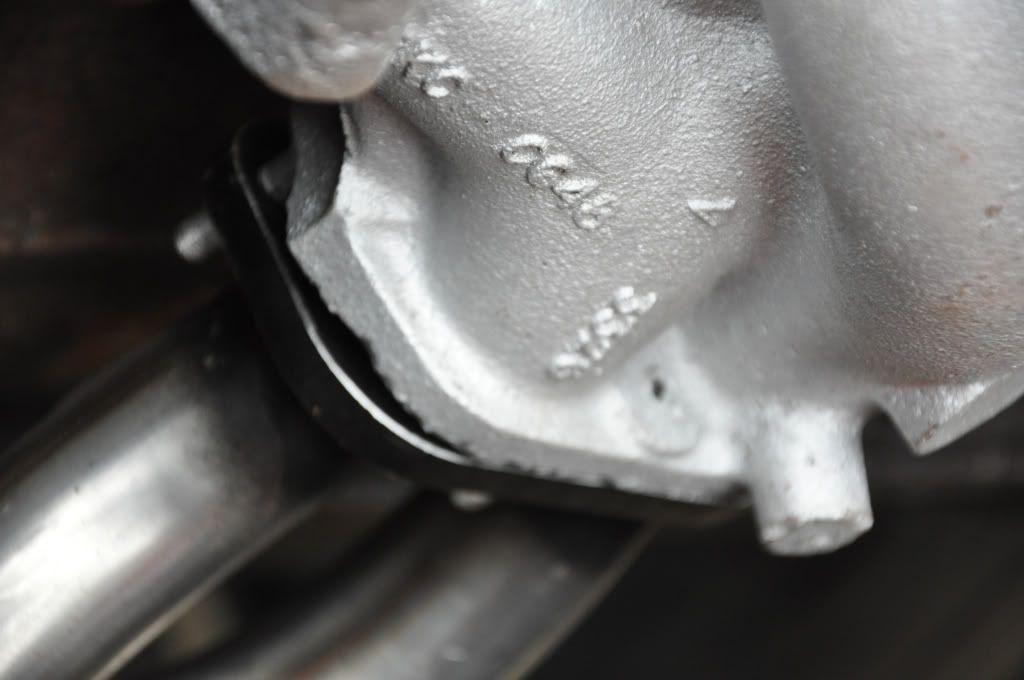
With the manifold off I was able to clean up the faces and stud threads and boy did they need it.
Image
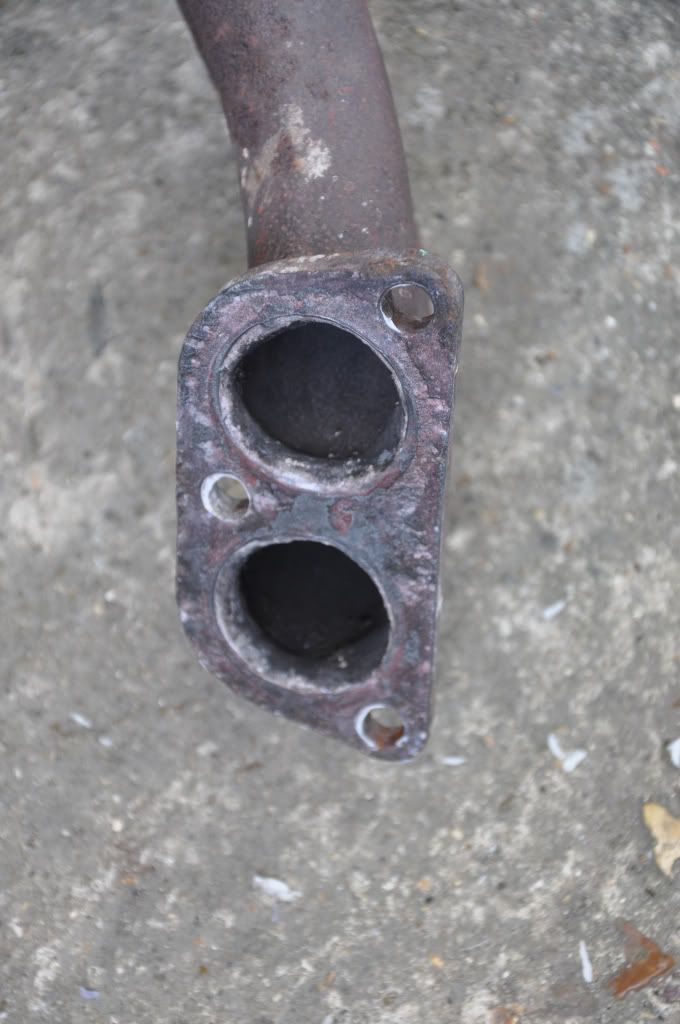
Never been particularly happy with this manifold but is was the only one Winns had in stock the day the previous one died. Further unhappiness came when I trial fitted the downpipe, it wouldn't go all the way on. This is due to the studs not aligning correctly with the holes in the new downpipe.
Image
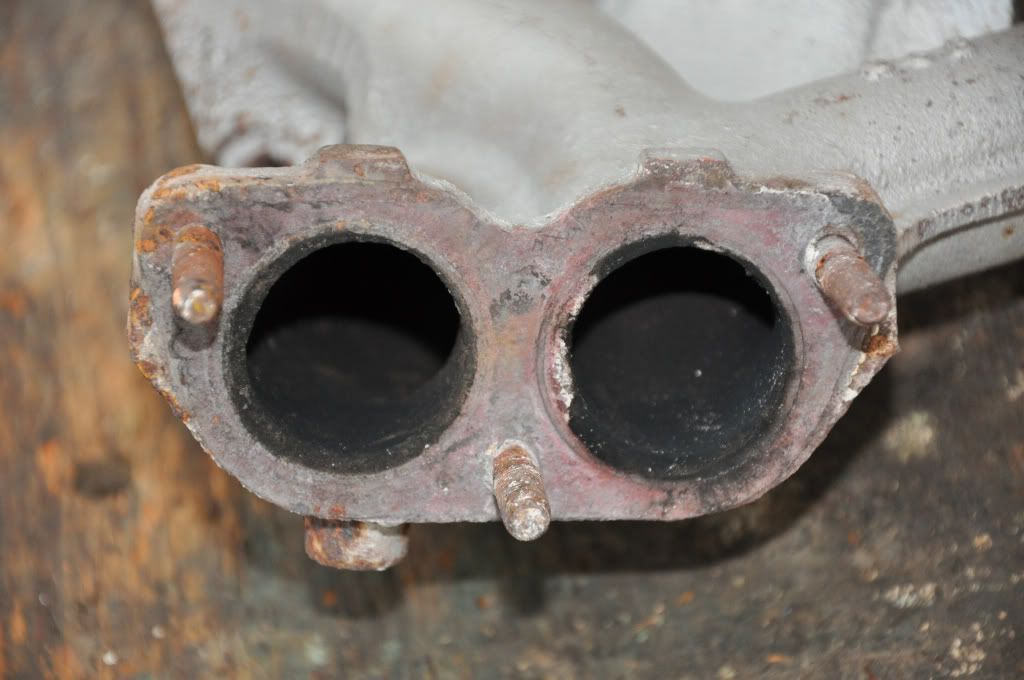
I'd have to push pretty damn hard to get the downpipe to go on to the unthreaded part of the stud. I was just pondering how to open out the holes in the downpipe when I remembered that the old downpipe had the same problem, it too needed to be forced to go all the way on the studs. Both the gaskets I had in stock, one NOS copper and one new style steel match both the downpipes perfectly but not the manifold. Taking the downpipe with me I went off to Winns and got another manifold, this fits the new downpipe fine.
Image
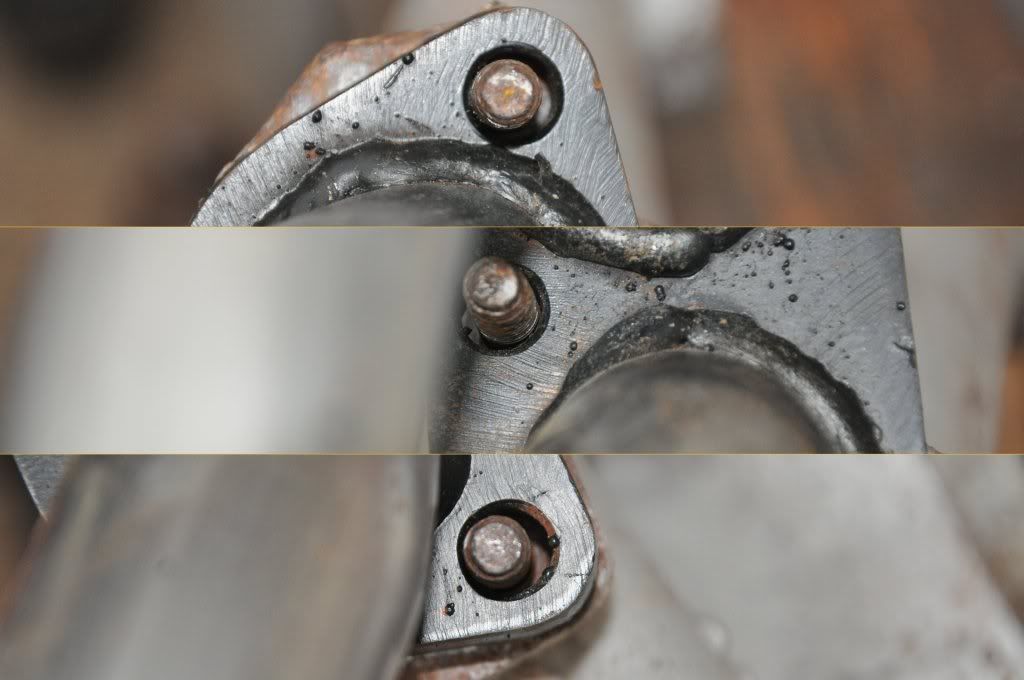
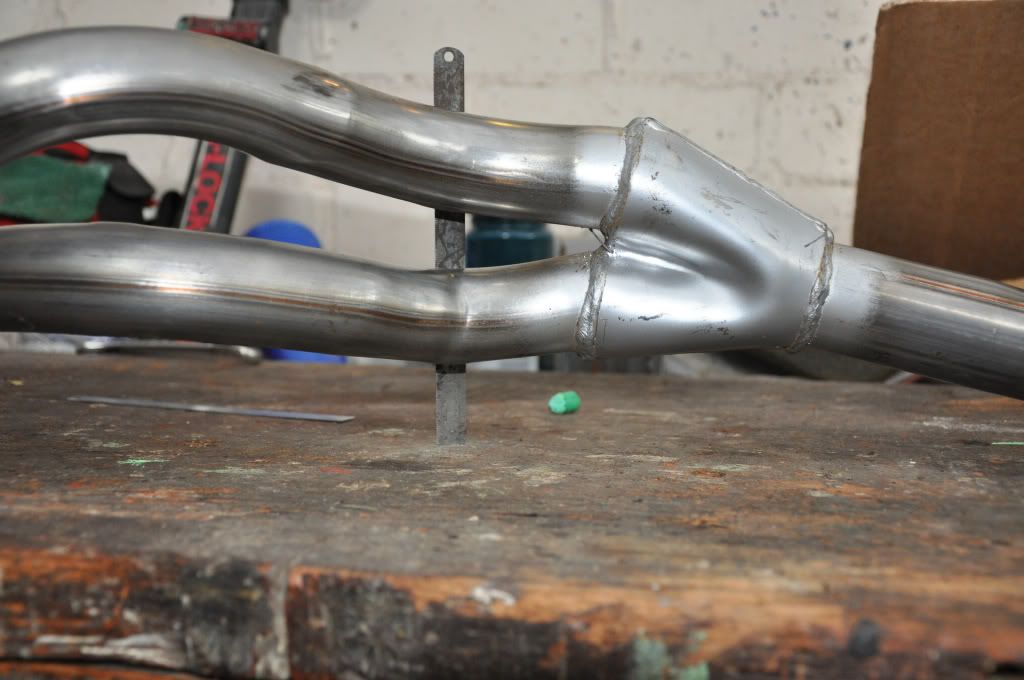
Next job is was to check the flange faces, pretty poor for a first fit.
Image
This was due to some plasma spatter and one protruding pipe end, all quickly cleaned up with the powerfile.
Image
Image
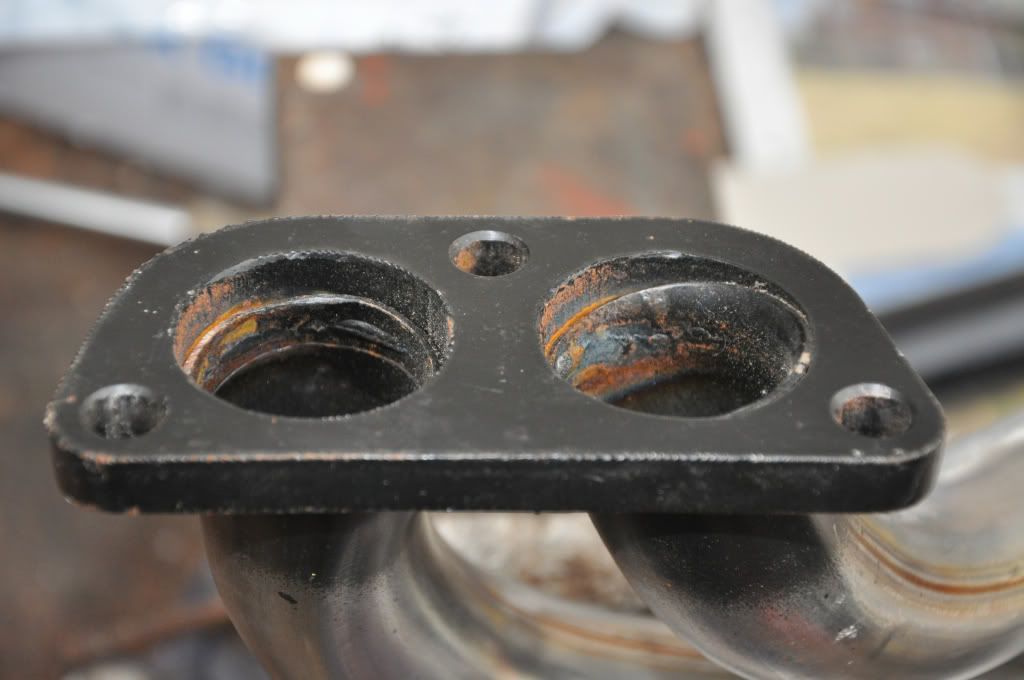
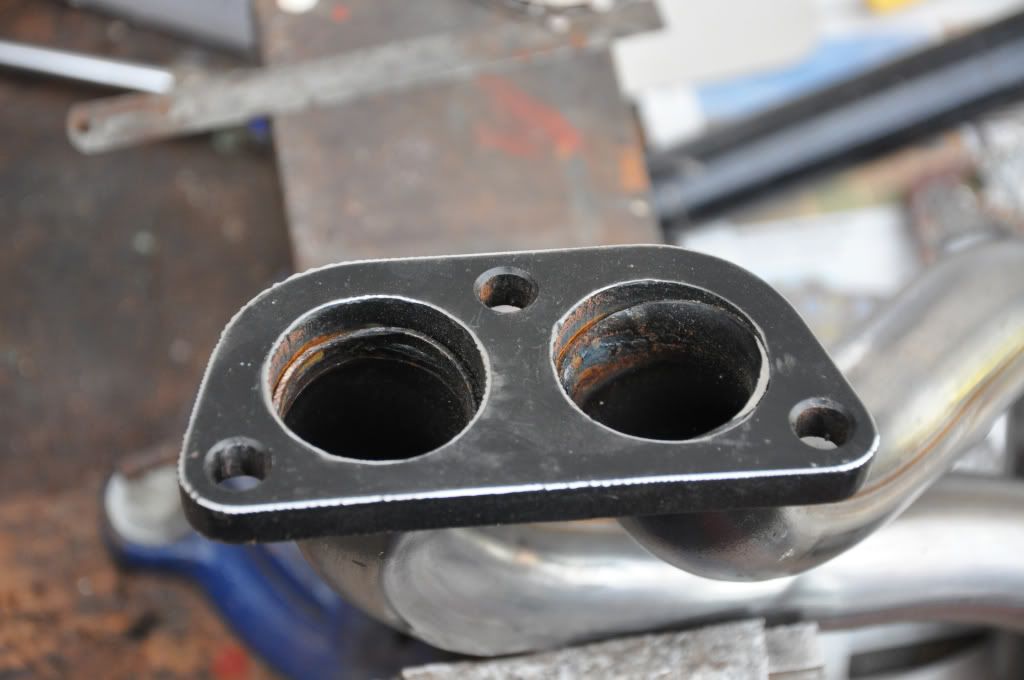
Not much i can do about the flatness though.
Image
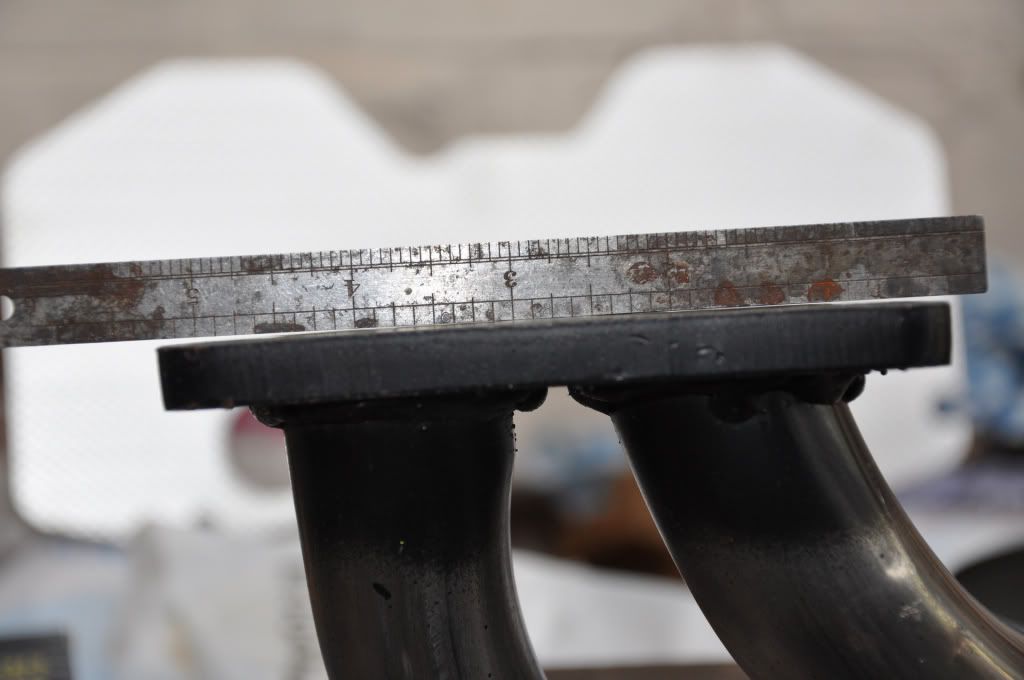
Didn't seem too bad though and the fit was much better.
Image
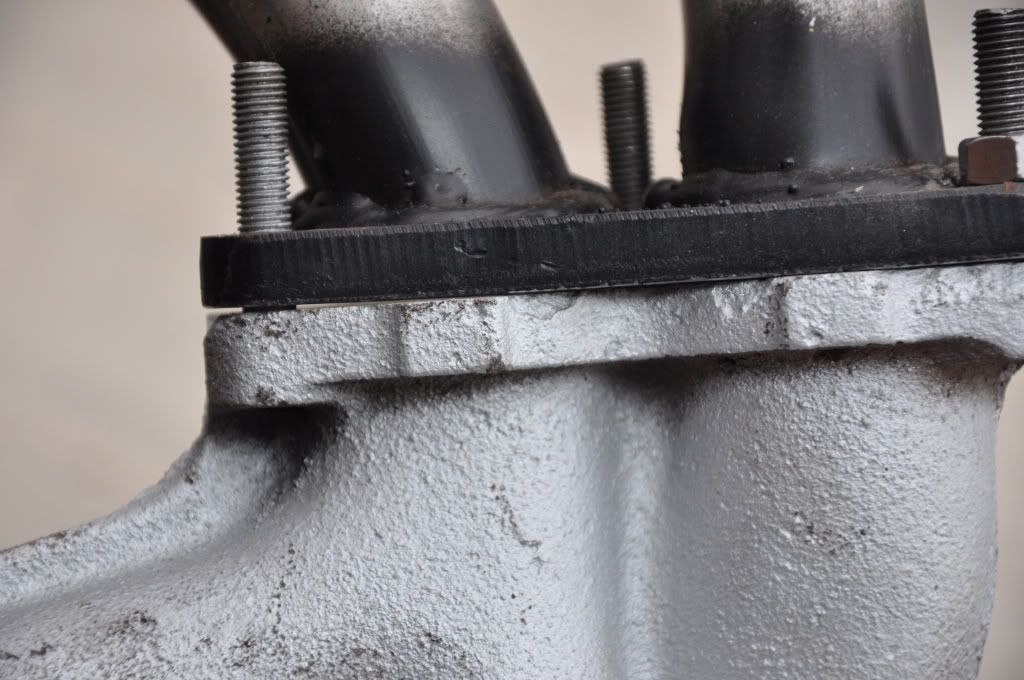
Manifold dry fitted to head:
Image
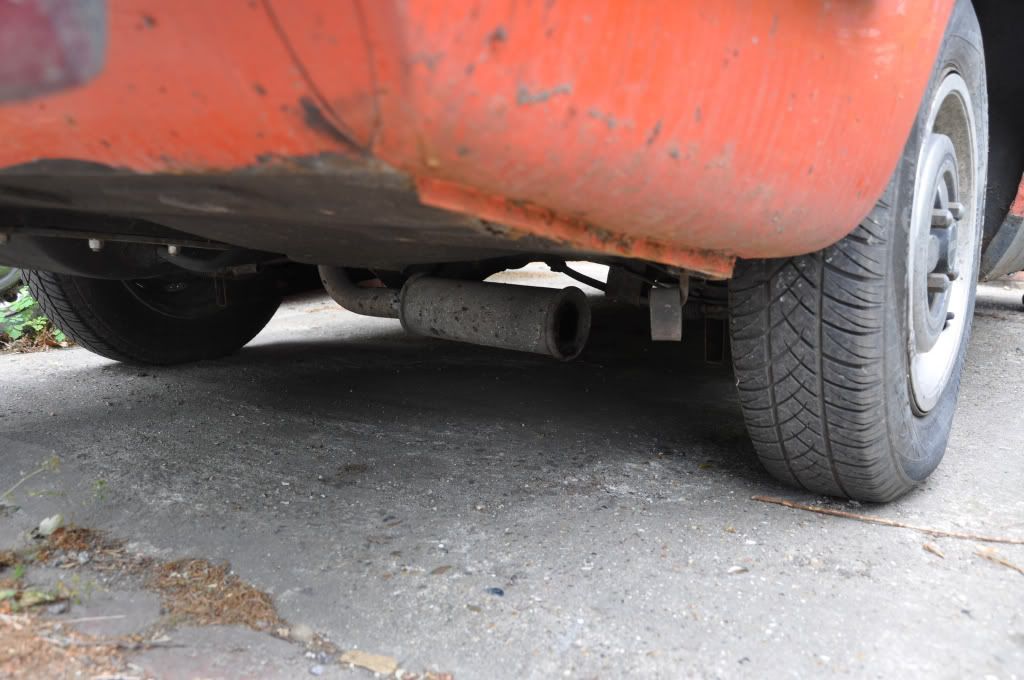
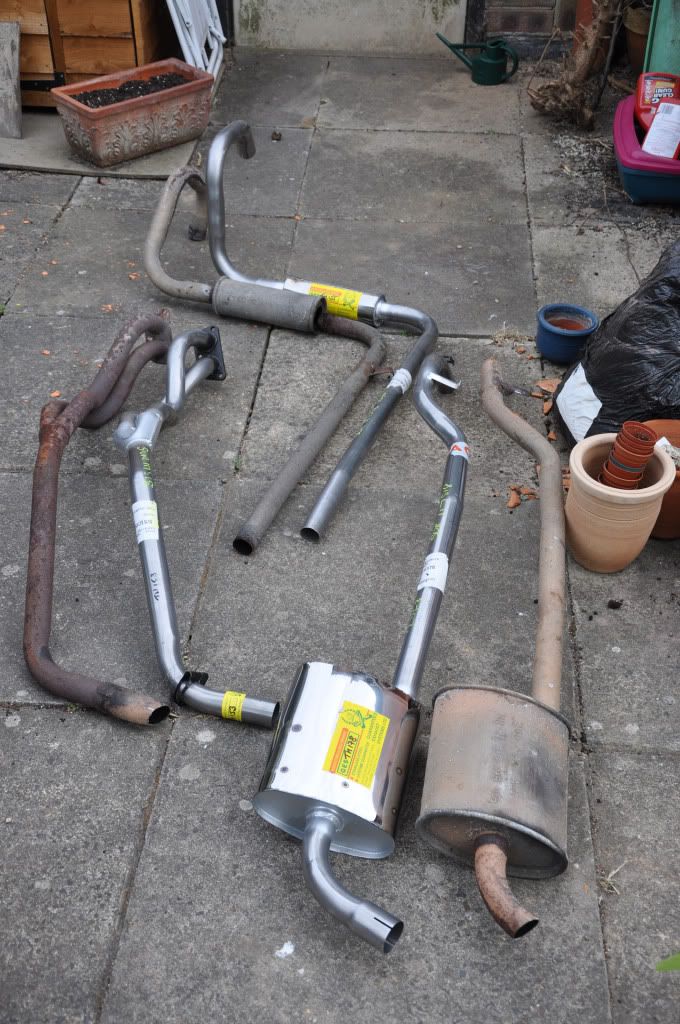
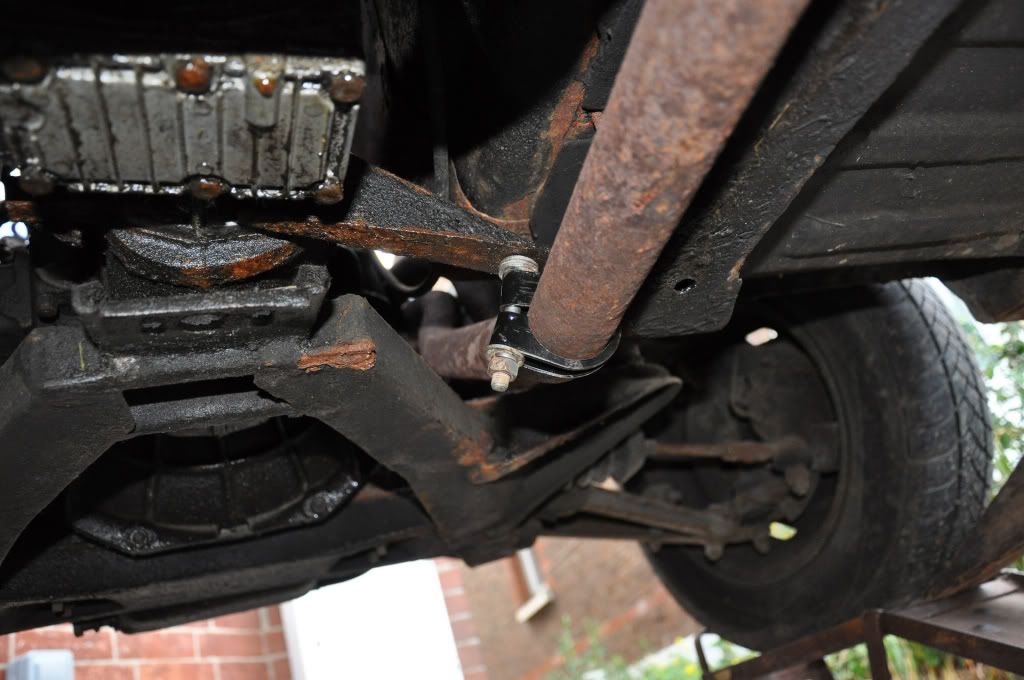
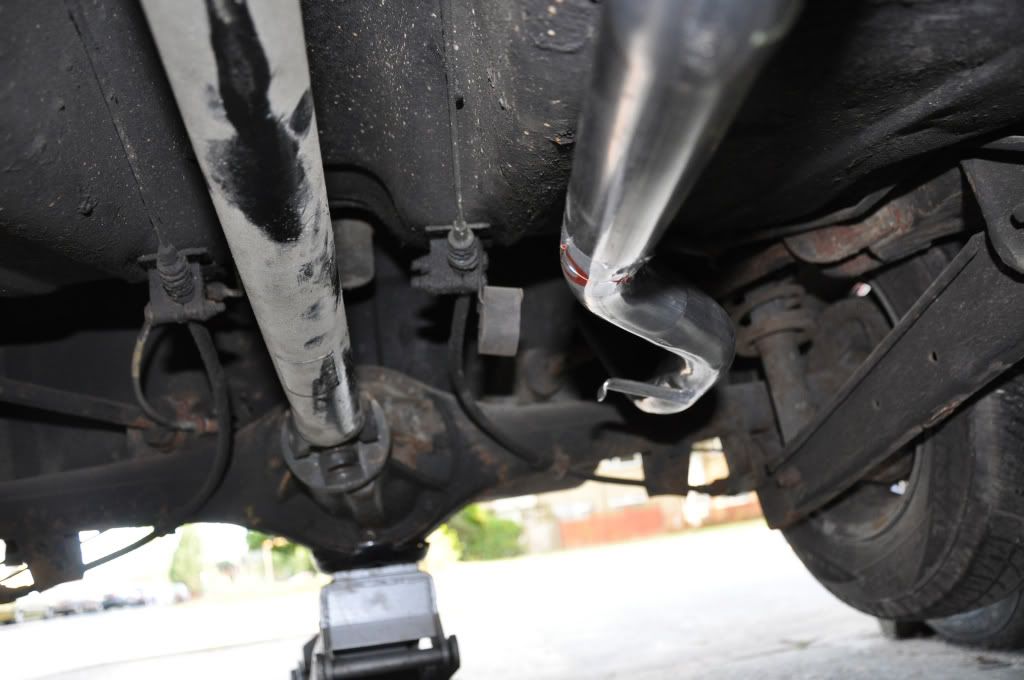
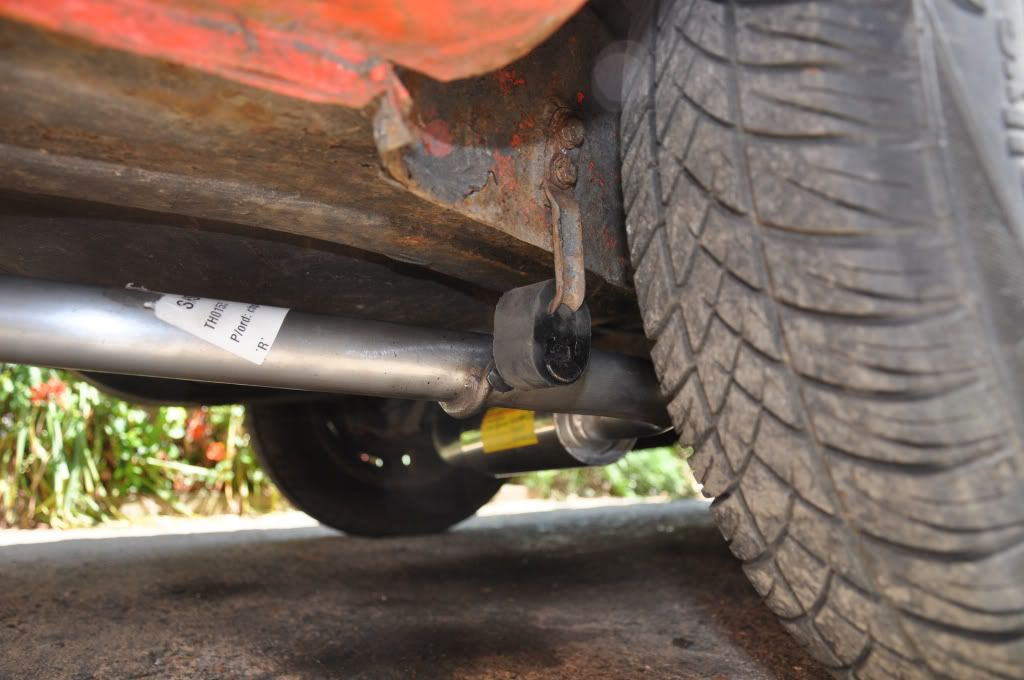
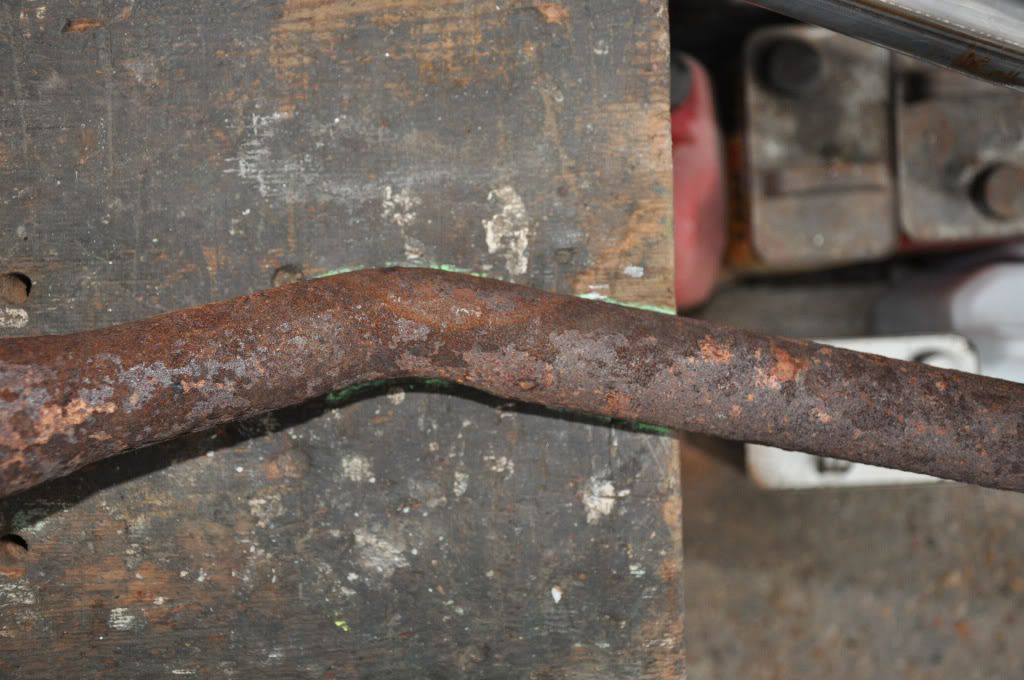
Next was to dry fit the downpipe at which point the day went distinctly poo. The manifold would not fit by a country mile, I couldn't even get it far enough down to pass onto the studs. In the end the only way I could get the downpipe in was to remove the manifold again and with studs already engaged fit the two together. With the manifold tightened to the head the downpipe was wedged solidly in place with the flanges a mile off mating.
Image
And that's as close as it can get due to clashes with the bell housing, steering and chassis rail.
Image
Image
Image
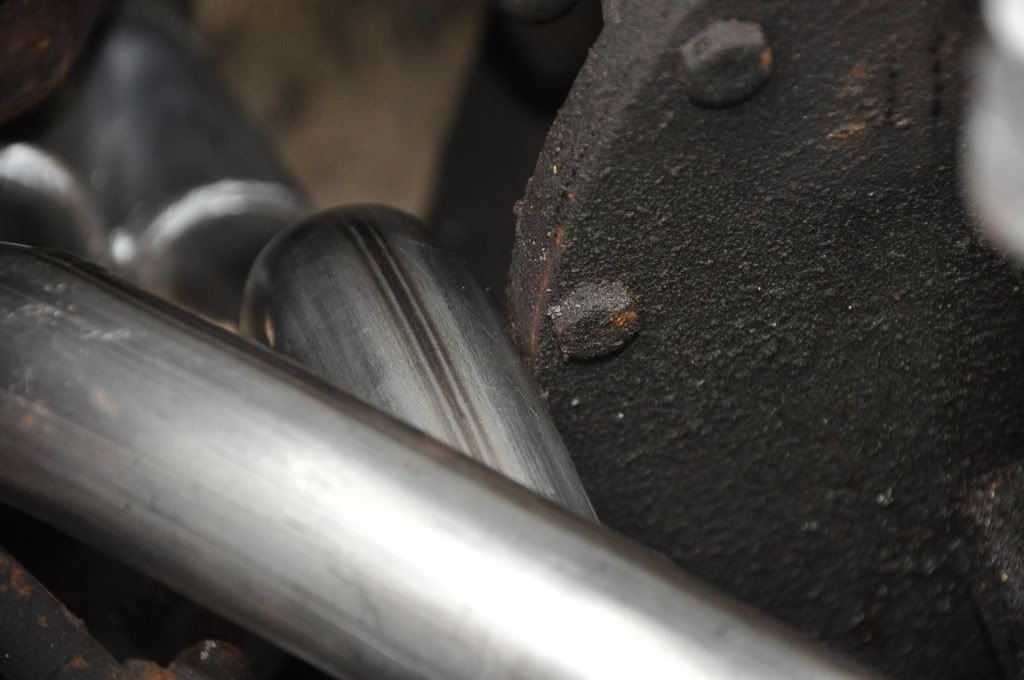
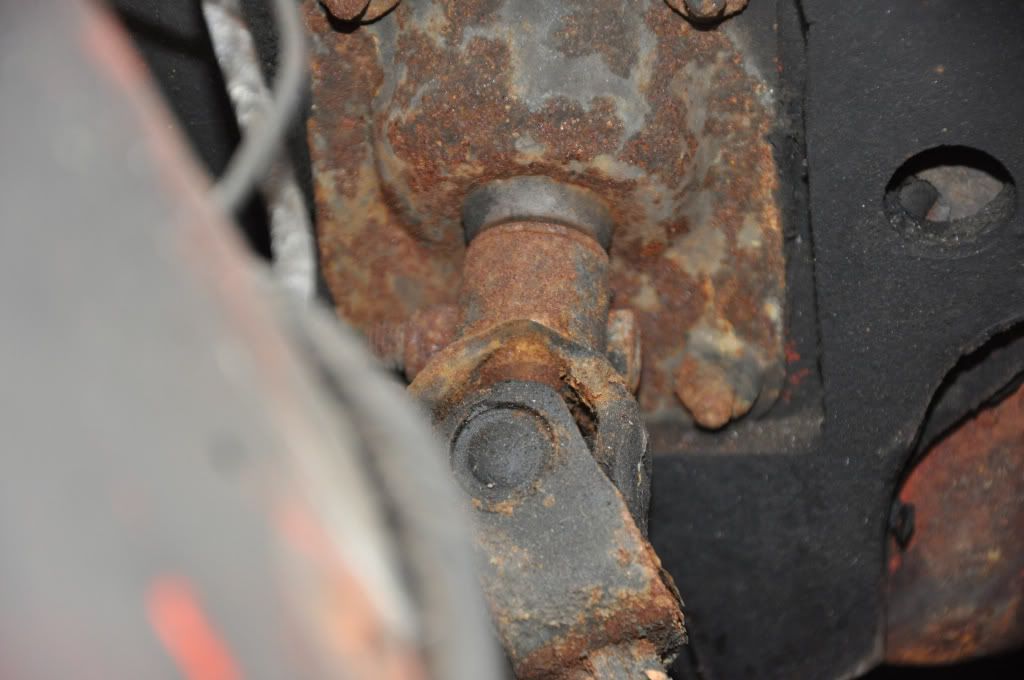
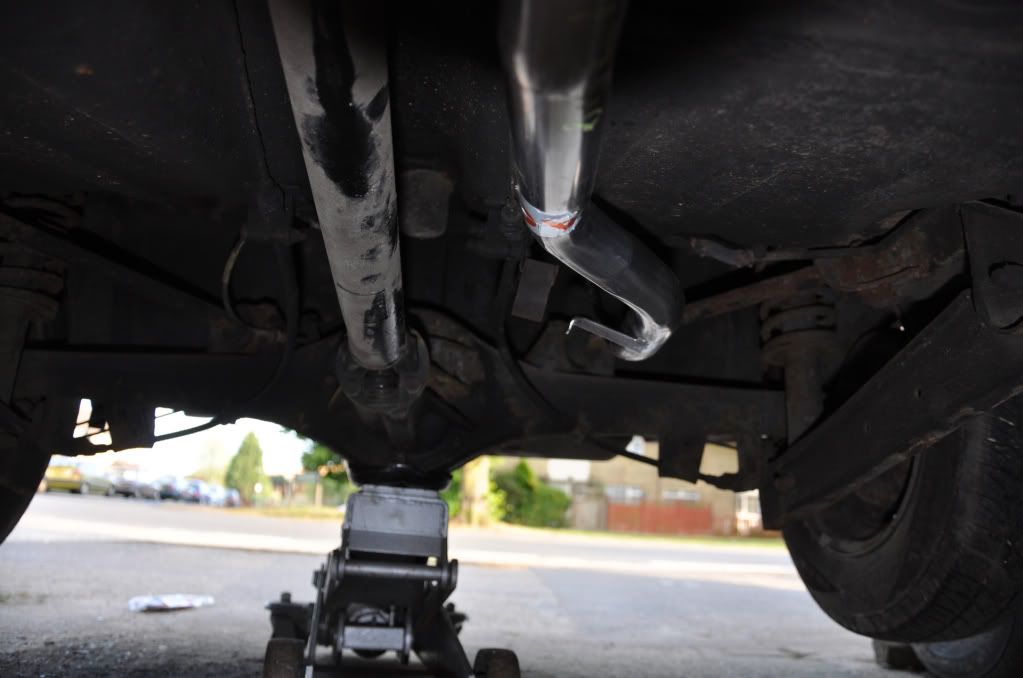
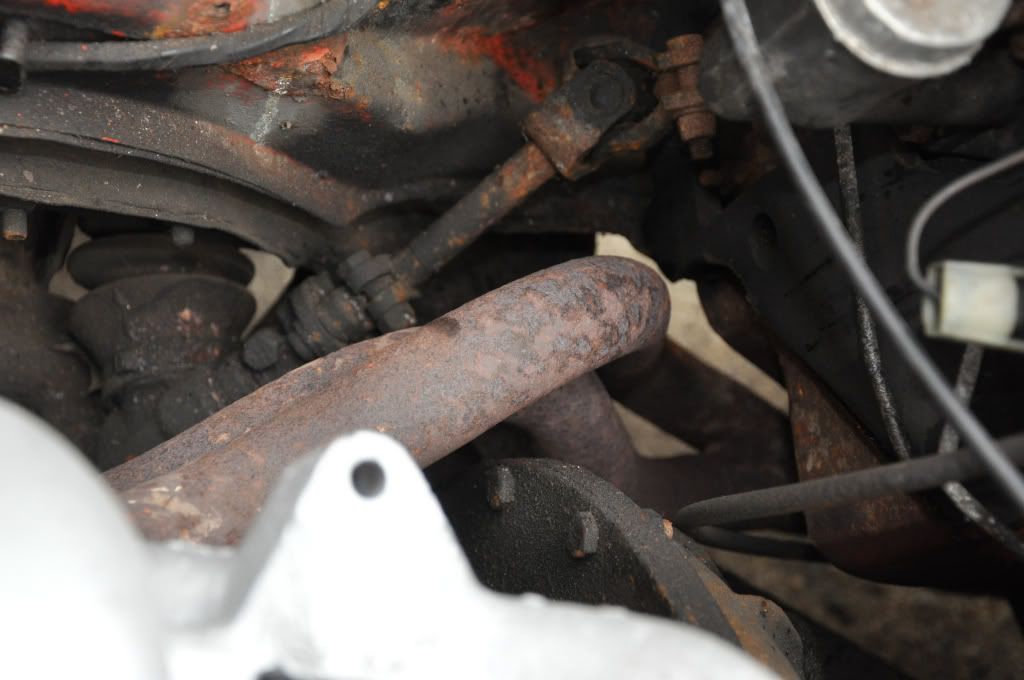
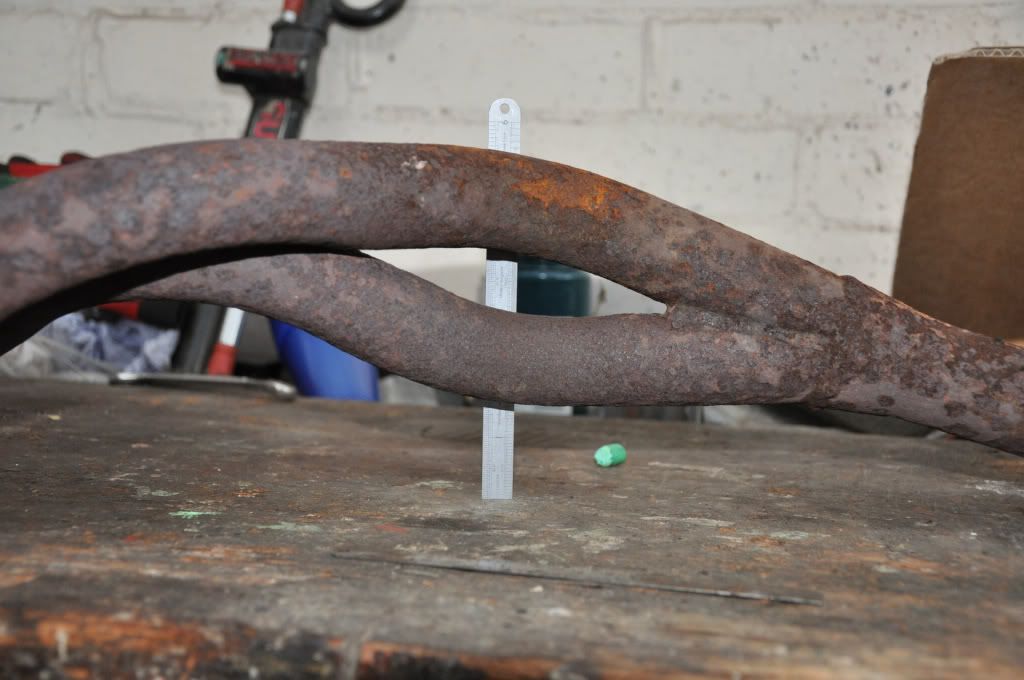
I popped the old downpipe on to see where it should run, this is how much space there should be by the bell housing and steering coupling:
Image
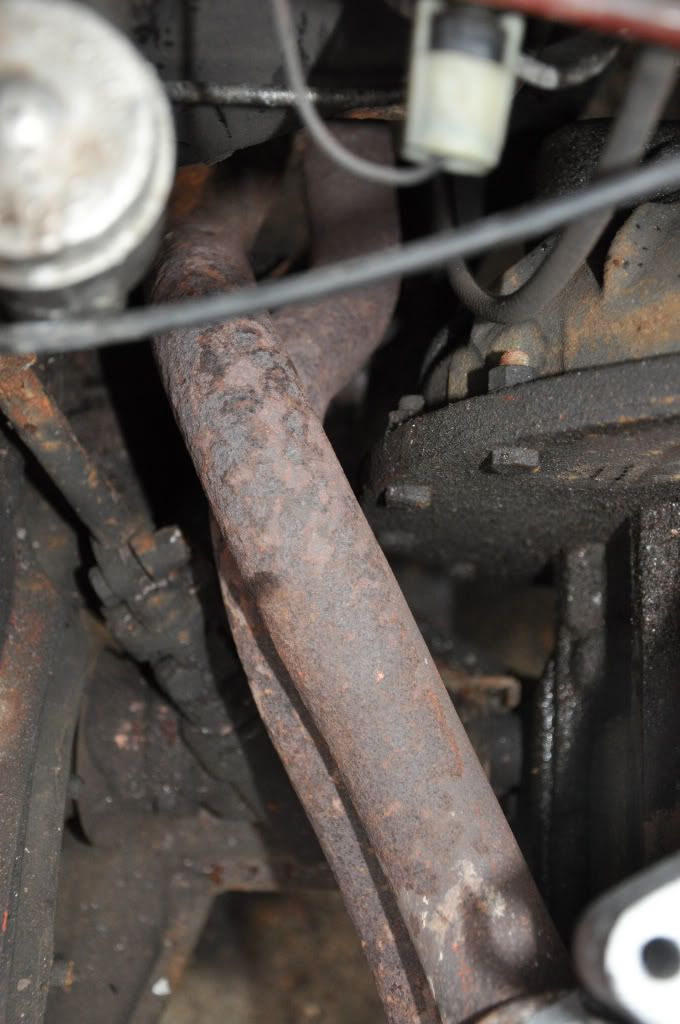
And down there is clear daylight between the pipe and the chassis rail.
Image
Side by side on the bench it's clear that they are different but not exactly why it's such an appalling fit.
Image
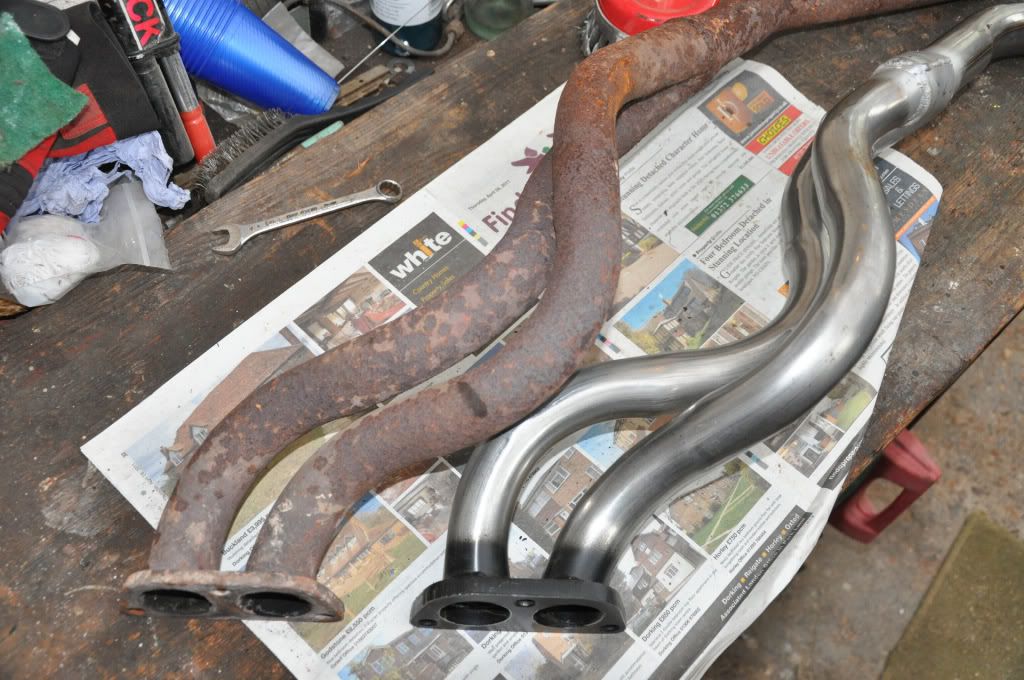
A block of wood and some chalk marks the position of the old pipe.
Image
Image
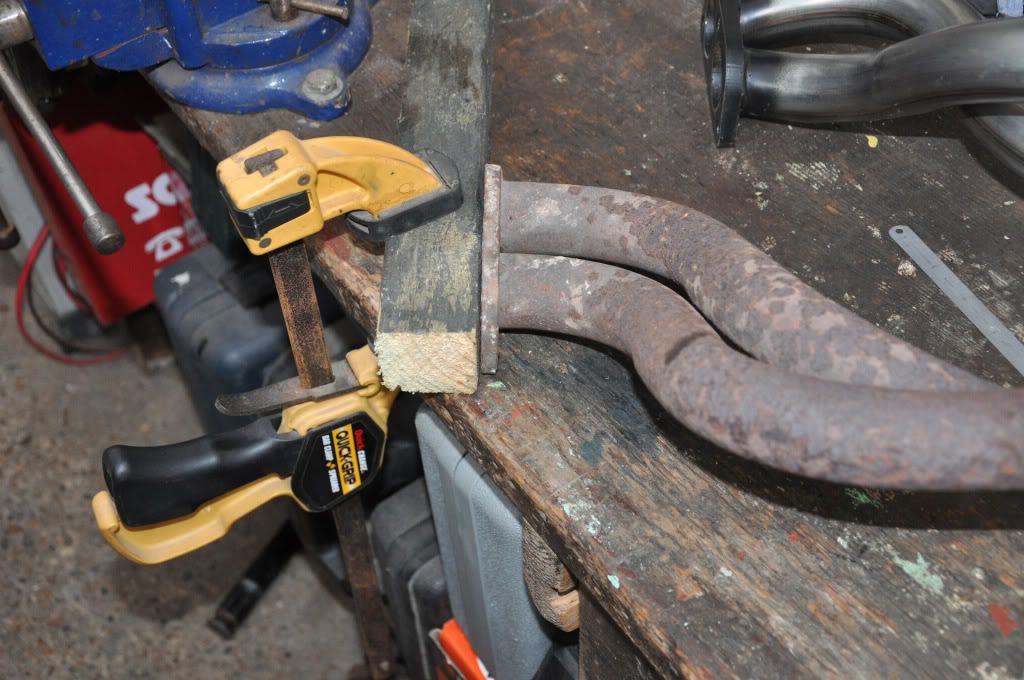
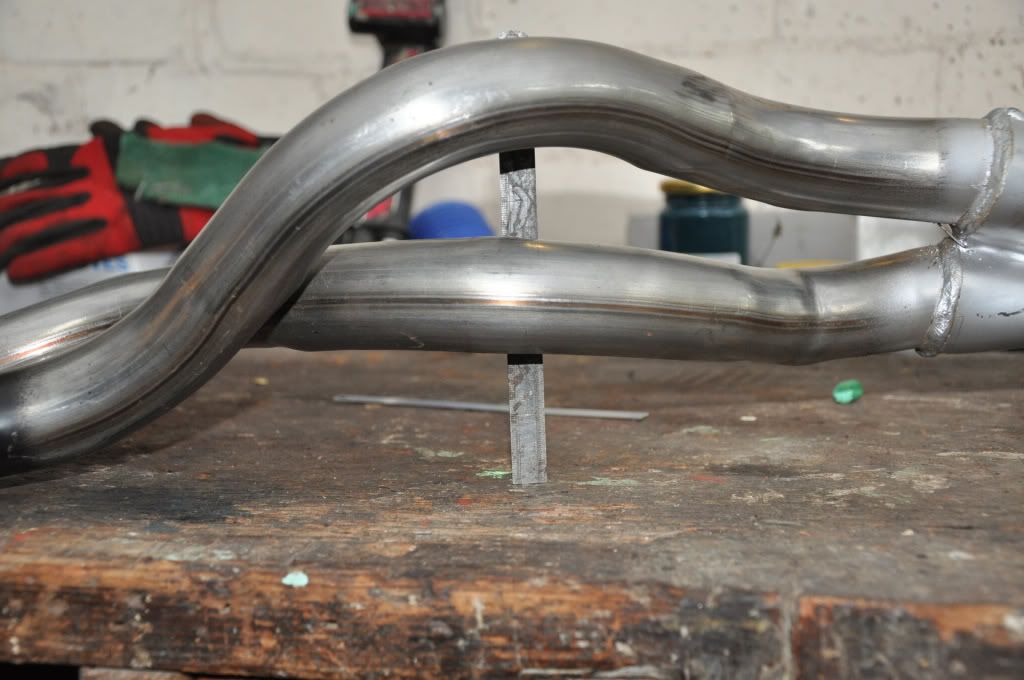
From above with the flange in the same location the new pipe really isn't far out.
Image
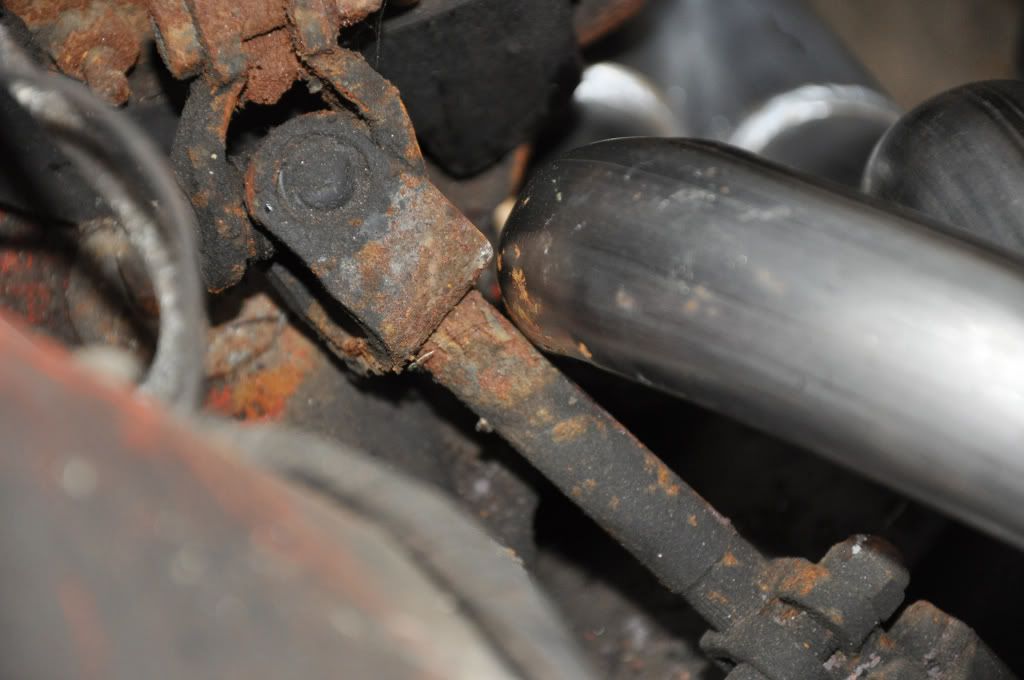
But from the side (which would be above-ish on the car) at the point the pipes pass between the bellhousing and steering joint the difference is stark
Image
Image
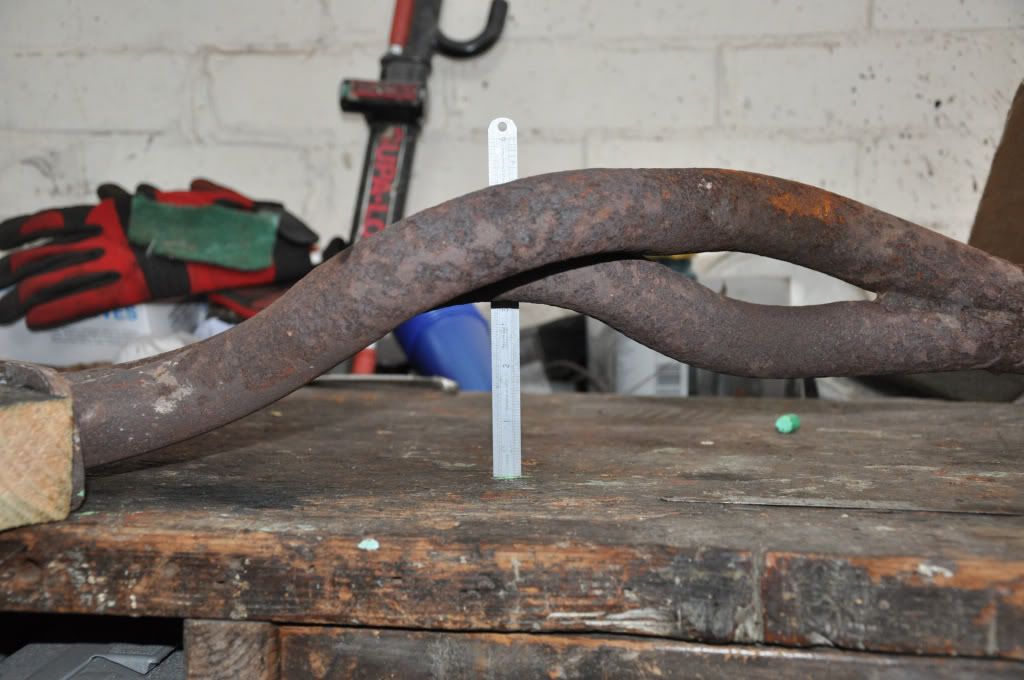
It's better a bit further back but still well wrong.
Image
Image

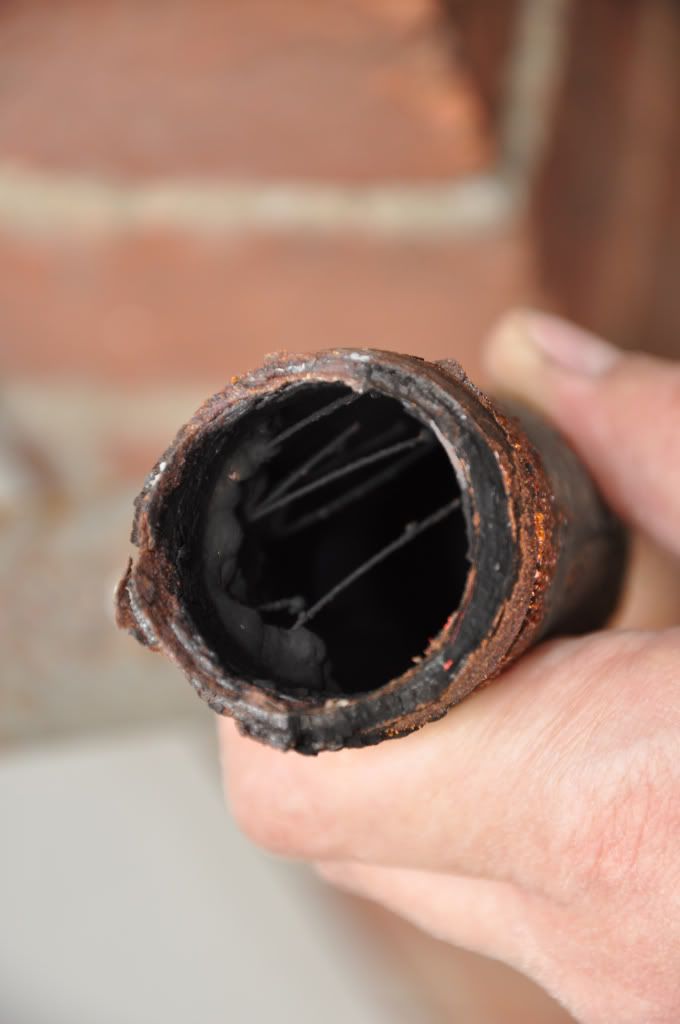
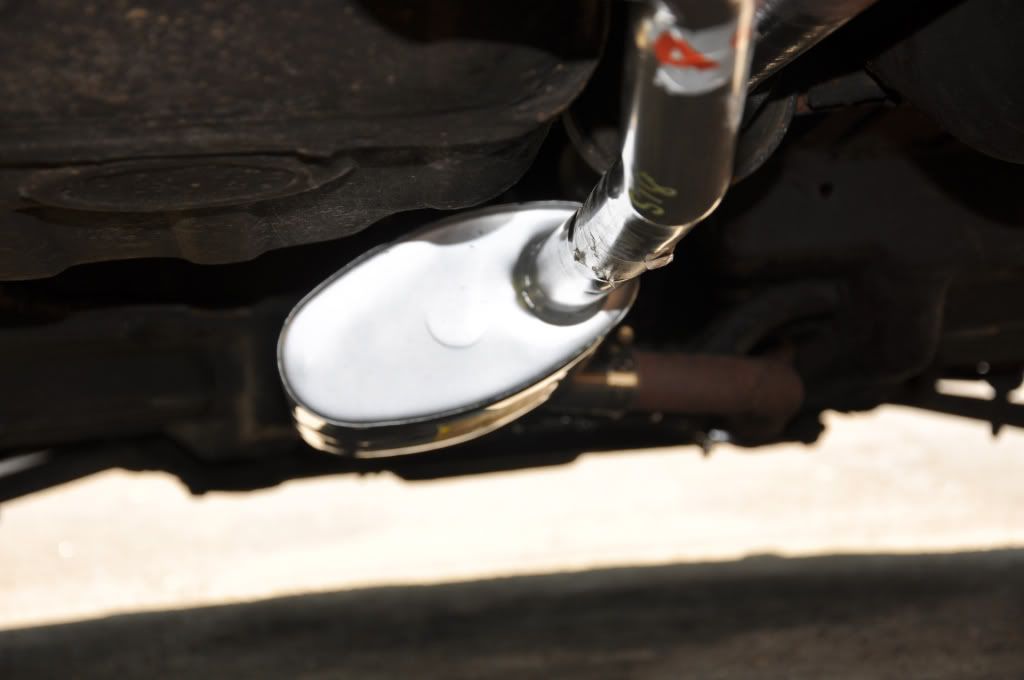
So tomorrow I'll be fitting the old downpipe again and then I'll find out if the rest of the shiny new system is as s##t as the downpipe. I didn't want to mix old with new as I'll be filling the new boxes with rust flakes, this is why I've gone on bodging the back box until I had time to do the job properly. Ah well, if the rest of the stainless system is as s##t as the downpipe the whole lot will be staying on the shelf a while longer and we'll be chugging to cornwall very slowly indeed in Mrs Weevils auto. Maybe I should call in at GES on my way through devon and see if their current production is as p155 poor.

Off to find my dolly mixtures now, didn't Richard Old fit a new exhaust recently?
1978 Pageant Sprint - the rustomite, 1972 Spitfire IV - sprintfire project, 1968 Valencia GT6 II - little Blue, 1980 Vermillion 1500HL - resting. 1974 Sienna 1500TC, Mrs Weevils big brown.
Purplebargeken

Re: Stainless exhaust with a lambda probe (fat chance) pic heavy

#5 Post by Purplebargeken »

That is an abysmal fit. Please tell me that wasn't a club system was it Julian?
User avatar
tinweevil
Guest contributor
Guest contributor
Posts: 3936
Joined: Tue Oct 03, 2006 5:42 pm
Location: Forest of Dean

Re: Stainless exhaust with a lambda probe (fat chance) pic heavy

#6 Post by tinweevil »

No, I got it 2nd hand. It was pristine though so I don't believe any of the previous owner had trial fitted it. The only slight concern is that it came from Rimmers at some time it it's life and in Richard Old's article in DM 141 it is mentioned that the club uses the same supplier as Rimmers.
1978 Pageant Sprint - the rustomite, 1972 Spitfire IV - sprintfire project, 1968 Valencia GT6 II - little Blue, 1980 Vermillion 1500HL - resting. 1974 Sienna 1500TC, Mrs Weevils big brown.
User avatar
sprint95m
TDC Member
Posts: 6502
Joined: Thu Aug 09, 2007 1:22 pm
Location: Caithness, Scotland

Well actually..........

#7 Post by sprint95m »

I was going to suggest some heat would sort the problem until I saw the photos showing the differences :shock: .
TDC Forum moderator
PLEASE help us to maintain a friendly forum,
either PM or use Report Post if you see anything you are unhappy with. Thanks.
JPB

Re: Stainless exhaust with a lambda probe (fat chance) pic heavy

#8 Post by JPB »

tinweevil wrote:.....The only slight concern is that it came from Rimmers at some time it it's life and in Richard Old's article in DM 141 it is mentioned that the club uses the same supplier as Rimmers.
The steel used in current supplies of Rimmer exhausts, assuming that they didn't balls mine and its warranty replacement up on purpose, isn't "stainless" in the sense that we ought to have the right to expect; the wraps aren't too bad but the pipework is ferritic and the endplates are mild steel, at least I believe that's how they're a) magnetic and b) can rust through in a few months. :evil:
Looking at the endplates on that, they appear the same, the clue's in the paint......
User avatar
Howard81
TDC Member
Posts: 3415
Joined: Fri Jan 11, 2008 9:02 am
Location: London

Re: Stainless exhaust with a lambda probe (fat chance) pic heavy

#9 Post by Howard81 »

That's shocking!! I know you said you didn't buy it new, but I'd still contact the maker of the exhaust as it quite obviously isn't fit for purpose!
1978 Triumph Dolomite Sprint (project thread)
1966 Volkswagen 1300 (project thread)
1962 Austin Mini (project)
1962 MGA 1600 Mark II
1965 Mobylette SP50 (project)
2001 Rover 75 2.5-litre V6
User avatar
SprintMWU773V
TDC Staffs Area Organiser
Posts: 5429
Joined: Wed Oct 18, 2006 2:08 pm
Location: The Old Asylum

Re: Stainless exhaust with a lambda probe (fat chance) pic heavy

#10 Post by SprintMWU773V »

I found the fit on my 1500 tight too but it was no where near that bad. I have to take it all off again now as the manifold gasket is blowing so i'll take a closer loo on the measurements. Interestingly I see you have fitted the exhaust manifold but not the inlet, is that the way to go when assembling for real? I bolted the 2 together then added the carbs once they were all fitted.
Mark

1961 Chevrolet Corvair Greenbrier Sportswagon
1980 Dolomite Sprint project using brand new shell
2009 Mazda MX5 2.0 Sport
2018 Infiniti Q30
User avatar
tinweevil
Guest contributor
Guest contributor
Posts: 3936
Joined: Tue Oct 03, 2006 5:42 pm
Location: Forest of Dean

Re: Stainless exhaust with a lambda probe (fat chance) pic heavy

#11 Post by tinweevil »

For final assembly I'll have the bolts that hold the manifolds together in but not fully tightened. I will tighten the manifold to head and manifold to manifold bolts progressively all together. This I think is the best way to avoid stressing the alloy lugs on the bottom of the inlet.
1978 Pageant Sprint - the rustomite, 1972 Spitfire IV - sprintfire project, 1968 Valencia GT6 II - little Blue, 1980 Vermillion 1500HL - resting. 1974 Sienna 1500TC, Mrs Weevils big brown.
User avatar
sprint95m
TDC Member
Posts: 6502
Joined: Thu Aug 09, 2007 1:22 pm
Location: Caithness, Scotland

Hmmm..................

#12 Post by sprint95m »

tinweevil wrote: Image
Julian, the upper steering shaft is not original?
That looks like a pressed joint?

I actually had a new unused replica(?) s/shaft with a pressed joint some time ago. The splined section of the steering
column is circular but this s/shaft's joint was oval (very oval) so I threw it away. This particular shaft was not actually
the same in appearance as the one on your car (the joint itself being more compact).


The superior forged joints (as fitted to our cars new) are a little more expensive.
I note that T2000 specialist Chris Witor only sells this OE type......


I did post a thread a while back warning of the perils of pressed solid lower joints and since then, I note that one
supplier (Rally Design) still sell these, but now with a disclaimer pointing out they also stock the forged type.
TDC Forum moderator
PLEASE help us to maintain a friendly forum,
either PM or use Report Post if you see anything you are unhappy with. Thanks.
User avatar
tinweevil
Guest contributor
Guest contributor
Posts: 3936
Joined: Tue Oct 03, 2006 5:42 pm
Location: Forest of Dean

Re: Stainless exhaust with a lambda probe (fat chance) pic heavy

#13 Post by tinweevil »

Didn't get much time on the car today due to tax returns. I did get it all dry fitted to establish whether or not the the whole system is scrap. Thankfully it isn't. The fit isn't great and I'll get pictures tomorrow but I think it will suffice. What is a lovely fit is the correct GEX7509 clamp to the gearbox bracket. It needs a few packing washers but the alignment is lovely and there will be no strain at all applied to the downpipe joint.

Once I'd stripped it all off again from the dry fit I started fitting properly. Everything went smoothly fitting the 'fold to the head. Can't say the same for the downpipe though. I pinched that up to take out the slack but left it movable, then I fitted the lovely gearbox bracket clamp then progressively started to tighten the brass nuts. Second time around and still far from fully tightened the centre stud pulled out so after a spot of colourful language I stripped it all down yet again and I'll be back to Wins first thing in the morning.

Modern parts workmanship - ain't it just great?
sprint95m wrote:Julian, the upper steering shaft is not original?
That looks like a pressed joint?
ISWYM Ian, I'll have a closer peer at it tomorrow. IIRC I have a NOS one of those in the loft, if anything looks untoward I'll deal with it while I have lots of lovely space to work.
1978 Pageant Sprint - the rustomite, 1972 Spitfire IV - sprintfire project, 1968 Valencia GT6 II - little Blue, 1980 Vermillion 1500HL - resting. 1974 Sienna 1500TC, Mrs Weevils big brown.
JPB

Re: Stainless exhaust with a lambda probe (fat chance) pic heavy

#14 Post by JPB »

It's taken me a while to work out why it has the fit problem but I believe I'm there:
Look at the two pipes that make up the front section. Now, compare the old mild steel system with the newer one; the front pipes are attached to the wrong places at the flange, so, by the time they reach the trouser joint, each has already gone off in the direction that the other was supposed to follow.
In other words, the one at the top on the old section is underneath in the new.

Still, if you decide to remove each pipe from the flange and trouser joint ends & reattach them in the correct places, at least you'll not need stainless wire to do the job. :wink:
User avatar
tinweevil
Guest contributor
Guest contributor
Posts: 3936
Joined: Tue Oct 03, 2006 5:42 pm
Location: Forest of Dean

Re: Stainless exhaust with a lambda probe (fat chance) pic heavy

#15 Post by tinweevil »

Been a long time but here's how the story ended. First of all I checked the steering joint. Not terribly clear pic but I turned the wheel 180 degrees and there's no gap between the steering shaft and the clamp of the joint, full contact all the way around.
Image
Next the face of the block was cleaned up thoroughly including a wipe over with thinners to give it the best chance of sealing.
Image
Firegum applied around the exhaust ports both sides of the manifold gasket.
Image
Then the manifolds went on which I forgot to photograph. The last one Wins had on the shelf was 2nd hand with good enough threads instead of overhauled so although not so nice to look at I know the studs are up to the load. Geoff made no bones about the duff manifold, gave me some money back (for the difference between 2nd hand and overhauled) and supplied a pair of new gaskets.
Not much life left in the face of the mild steel downpipe.
Image
But it'll have to do so on it went with firegum and double length brass nuts (Wins) looslely until I'd checked that....
Image
The downpipe lined up a treat with the correct clamp. Once the clamp was attached the top joint was fully tightened.
Image
Later that day the postman brought me a load of fixings I'd ordered so this now has a stainless bolt, washers and a full plus half width lock nut.
Image
Then came the centre section which is a vastly better fit than the downpipe, I'd describe it as just poor. Initially the 'natural' fit of the pipe without the joint clamp tightened put the hanger nowhere near.
Image
Application of unsubtle force with one end in the vice improved it...
Image
but the hanger is welded on the pipe too far forward so the rubber is strained like this.
Image
The box is welded on the pipe at the wrong angle too so it droops.
Image
The rear section is the best of the lot, the natural fit puts the clamp bang on.
Image
The rubber had to be cut a bit to accommodate the hanger on the exhaust, the bar extends inside the rubber instead of being just the curved flat sheet but thats a minor inconvenience. The fit of the rear section is far better than the Bosal one I removed.
Image
Once is was back on its wheels the rear end went up on the ramps so that I could give the rear section a bit more adjustment to miss the tunnel and axle. Job done.
A couple of while I'm at it jobs. New carb heat shield:
Image
New rad drain tap, the handle just goes round and round on the old one.
Image
The thermostat housing has been weeping for ages so that came off. The face was very corroded so that got flatted with wet & dry on a surface plate. Lastly I tested the expansion bottle which was blowing at 8 lbs. A new cap didn't fix it which was no surprise because the metal insert in the neck was very corroded. Brass otoh doesn't corrode so on went this which pressurises to exactly the value on the cap (13, 15? I can't remember now).
Image
With that we headed off to Cornwall. I took a spare set of gaskets and brass nuts just in case but didn't need 'em, she behave perfectly. Noise from the rear is a bit more than I'd like but from the rest of the system is fine.

I'll have a go at contacting GEX about the downpipe though it'll probably be a waste of time. Instead I'll probably get a downpipe from Rimmers in January so that's it for this year unless the mild steel downpipe fails, it is getting very thin.
1978 Pageant Sprint - the rustomite, 1972 Spitfire IV - sprintfire project, 1968 Valencia GT6 II - little Blue, 1980 Vermillion 1500HL - resting. 1974 Sienna 1500TC, Mrs Weevils big brown.
Post Reply