sprint #2 South Australia

Restoring your car? Tell us about it here!
Message
Author
straylight

Re: sprint #2 South Australia

#31 Post by straylight »

No, I haven't been sitting around here on my elbow, despite the lack of posts in this thread, work has been continuing on the second sprint.

After mucking around with the water pump, extracting the pump from the green 1850 engine to get the proper flinger and then rebuilding the water pump, it was reinstalled, clearances adjusted and all bolted back on. Not sure what it is with impellers, but another 6 vane one broke getting it off the shaft, all care taken, soaked in penetrene and heat used, but she shattered under moderate vice pressure. No more spares left.

Then around the the front of the engine. Crankbolt out, inspected the timing chain, helicoiled two threads in the block and cleaned it all up. I've made the decision not to undertake a full engine rebuild and I'm leaving the head on, fingers crossed the engine is sound. Finances are one factor in this decision, the other is holding myself back from undertaking another bare metal resto and trying to draw the line on how mch work should be done. With the engine turning nicely I'm taking the gamble and if the engine has to come out again, then so be it. I'm stuck on taking the cylinder compressions as well, the tester I've got doesn't have a long enough extension to seat in the plug tubes. Gamble.

Image

The spin on oil filter saga was solved at about this time, so I've decided to go with it, as you can see in the pic. I also had to helicoil three of the 4 threads in the block for the left hand engine mount.

Inside the bay, the rudimentary welding work on the bulkhead was sprayed with zinc black and then rustproof black gloss.


Image

Image
the bulkhead pad was replaced with the last of the closed cell foam I used in the first sprint.

Image


Image
The gearbox was treated to a clean and an exchange of gear oil.


and the oil plug revealed a lot of debri. I have a spare gearbox if needed later.

Image

clutch master was TIG welded to repair the broken flange and fitted out with a seal kit, likewise a kit fitted to the slave. The elongations in the push rods were welded up and redrilled, clevis pins stolen from the spare engine that had less wear were used.

then I dropped the subframe and cleaned it up.

Image


Image
finding Ian's holy grail of flexible steering couplings.....no rubber grommets. This is a good thing yeah ?

Image
gearbox attached to the engine (I've never had any problem doing this, input shaft always slides home, handy stud on top of the gearbox adapter provides a hook while the gearbox is moved around to line up). I simply use a screwdriver handle to align the clutch plate by eye. In fact, I enjoyed doing it so much I took it off again as I handn't greased up the throw out cross shaft and bearing slide. This was a mistake as I pulled a back muscle refitting it the second time.

Image


general view of the shed. The green 1850 (auto) in the background was driven around the paddock but the body is pretty much shot through. I'm planning on taking parts from both 1850s to build one going car. Water pump has been pilfered for the sprint resto.

Image

Image
engine back onto subframe.

the subframe to body bolts were in poor condition. The rear right bolt has seized in the sleeve and 3 weeks of penetrene, rattle gun and hammering didn't free it up, so I've left it in place. Means I didn't have to enlist 12yo son to hold the top while I torqued up the nut. Salvaged some dished plates to replace the rusted ones, used good looking mounting rubbers, as good looking rubbers are important :)

Image
the lift. Such a satisfying afternoon doing this. It just works.

Image
until you remember the stupid exhaust downpipe needs to be wriggled on half way through...grrrrr


Image
this is the assortment of bits and bobs the car came with, all in a couple of tins. Working through them all trying to work out which bolt and nut fits where slowed me down a bit. Quite relaxing though. The car had come mostly disassembled and while most of the pieces were labelled and in bags, a few crucial parts were not. The brake servo for example, has slightly different threads where it mounts through the bulkhead and finding the nuts was time consuming. That and leaving spanners is silly places.

Image
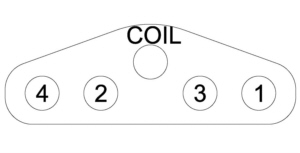
mystery dissie connections ! This is how they are set up, but this appears to be wrong according to the other sprint. I suspect the timing had been set up 180 degrees out. In any case, I've set up static timing on the dissie and checked with the valve timing and TDC on #1 and I'm about to rewire the plug leads. Can someone confirm I'm doing this correctly.
User avatar
Mad Mart
TDC Member
Posts: 8529
Joined: Tue Oct 03, 2006 5:48 pm
Location: Winscombe, North Somerset, England
Contact:

Re: sprint #2 South Australia

#32 Post by Mad Mart »

Stu, this is the correct orientation...

Image

... but they can be oriented differently if the dizzy rotor has been rotated to match.
Sprintless for the first time in 35+ years. :boggle2: ... Still Sprintless.

Engines, Gearboxes, Overdrives etc. rebuilt. PM me.


2012 Porsche Boxster 981 S


Image
straylight

Re: sprint #2 South Australia

#33 Post by straylight »

thanks Mart, that is what I suspected, the PO has timed the car with the dissie 180 degrees out.

simple matter to reconnect them correctly.

two weeks of holidays coming up. I'm hoping to have a driveable sprint at the end of it.

stu
straylight

Re: sprint #2 South Australia

#34 Post by straylight »

went for a start last sunday, but to no avail.

put in the oil, there was spark and the fuel pump was replaced to ensure fuel got to the carbs. I'm worried about the original ignition timing so I'd like some confirmation that everything is correct...
DSCN3871s.jpg
DSCN3871s.jpg (123.17 KiB) Viewed 4280 times
with the timing mark set to TDC, #1 piston is at TDC
DSCN3872s.jpg
DSCN3872s.jpg (149.7 KiB) Viewed 4280 times
the camshaft it set to the mark and #1 inlet and exhaust valves are closed
DSCN3874s.jpg
DSCN3874s.jpg (154.63 KiB) Viewed 4280 times
and the rotor is pointing to #1 lead on the Mart advisory (which is the way I have wired them up)

but not a whimper from the engine.

I'm also uncertain of how the distributor could be set up 180 degrees out, how is that achieved ?

(and the lack of oil on the valve gear is noted, which I'll have to sort, the oil pressure light went out and she was cranked enough to expect some oil on the cam).

tia

stu
User avatar
Mad Mart
TDC Member
Posts: 8529
Joined: Tue Oct 03, 2006 5:48 pm
Location: Winscombe, North Somerset, England
Contact:

Re: sprint #2 South Australia

#35 Post by Mad Mart »

No scrub that, I was looking at the photo the wrong way round.
Sprintless for the first time in 35+ years. :boggle2: ... Still Sprintless.

Engines, Gearboxes, Overdrives etc. rebuilt. PM me.


2012 Porsche Boxster 981 S


Image
User avatar
Mad Mart
TDC Member
Posts: 8529
Joined: Tue Oct 03, 2006 5:48 pm
Location: Winscombe, North Somerset, England
Contact:

Re: sprint #2 South Australia

#36 Post by Mad Mart »

Stu, you've rearranged the leads in the dizzy cap (as per my diagram) and I assume you removed the dizzy so that you could turn the rotor to match the new layout? The rotor arm looks to be in the correct position.
Sprintless for the first time in 35+ years. :boggle2: ... Still Sprintless.

Engines, Gearboxes, Overdrives etc. rebuilt. PM me.


2012 Porsche Boxster 981 S


Image
straylight

Re: sprint #2 South Australia

#37 Post by straylight »

yup, rotor arm points to the small lug near the vacuum takeoff when engine is TDC on #1, cam marks line up, timing mark on pulley lines up and I've replumbed the leads as you suggested.

so I'm gathering this is all correct and I should persist with a start ?

how can the dizzy be put back in so the leads get wired 180 degrees out ?

thanks mart.

stu
User avatar
Mad Mart
TDC Member
Posts: 8529
Joined: Tue Oct 03, 2006 5:48 pm
Location: Winscombe, North Somerset, England
Contact:

Re: sprint #2 South Australia

#38 Post by Mad Mart »

All seems fine then, timing wise. I don't know how people manage to get the leads like that. If you put the leads in the cap as you had them originally then you would need to turn the rotor arm (lifting the dizzy out) so it points opposite the lug.

Set the static timing to give you a better chance of firing it up.
Sprintless for the first time in 35+ years. :boggle2: ... Still Sprintless.

Engines, Gearboxes, Overdrives etc. rebuilt. PM me.


2012 Porsche Boxster 981 S


Image
Jon Tilson
Guest contributor
Guest contributor
Posts: 11179
Joined: Tue Oct 03, 2006 9:45 pm
Location: Middlesex

Re: sprint #2 South Australia

#39 Post by Jon Tilson »

I keep saying this but a Sprint or any slant just wont fire up unless it has either a 12v coil or a 6v coil with the ballast bypass working properly on startup.

DLB105 is the 12 volt coil or 110 is the ballasted (6 volt).

Try a flying lead from battery plus to coil plus next time you try it.....usual checks about sparks out of end of leads to test rotor arm hasnt shorted are also worth doing.

They will fire up and run on only 2 pots with a decent spark at the plugs....

Jonners
Note from Admin: sadly Jon passed away in February 2018 but his humour and wealth of knowledge will be fondly remembered by all. RIP Jonners.
Norwegian sprint

Re: sprint #2 South Australia

#40 Post by Norwegian sprint »

Jon Tilson wrote:I keep saying this but a Sprint or any slant just wont fire up unless it has either a 12v coil or a 6v coil with the ballast bypass working properly on startup.

DLB105 is the 12 volt coil or 110 is the ballasted (6 volt).

Try a flying lead from battery plus to coil plus next time you try it.....usual checks about sparks out of end of leads to test rotor arm hasnt shorted are also worth doing.

They will fire up and run on only 2 pots with a decent spark at the plugs....

Jonners
What is a spark, without gas???? :roll: .....NO FUN!!!! :woohoo: :woohoo:
straylight

Re: sprint #2 South Australia

#41 Post by straylight »

thanks for the help and I'm pleased to report that the engine fired up this afternoon and ran smoothly for a while. I think the problem earlier was just a lack of fuel getting to the carbs. I appreciate the confirmation that everything else was okay and the advice on coils.

anywho, the starting vid is up on the tube if you want to see a noisy engine breathing again:

http://youtu.be/nKeeDc4XrTw

I am very pleased with how it all fired up, eventually. I've edited about a minute of cranking from the front of the clip. The engine has drained about 300ml of fuel getting to that point, I had to fill up the syphon jar twice. There's also an annoying intermittent fault with the starter circuit which I'll have to track down.

A few things worry me though, that horrible clanking noise while the engine is turning over, which is rather clear on the youtube clip, seems to be coming from the timing cover. It doesn't sound healthy at all.

I also inspected the valve gear after that run and a shortage of oil on #2 and #3 rockers was pretty obvious. The others looked okay and plenty of oil on the timing chain.

I got the fan and grilles back on tonight, in preparation for the radiator. Good news though, the garden pavers won't be in for a fortnight so I've been spared a job and can spend the time on cars ! Oh sweet lady at the paving place, she usually gets abused when she can't get the stock in quickly enough, I almost hugged her.

stu
Jon Tilson
Guest contributor
Guest contributor
Posts: 11179
Joined: Tue Oct 03, 2006 9:45 pm
Location: Middlesex

Re: sprint #2 South Australia

#42 Post by Jon Tilson »

Sad to say you really need to see a good pulse of oil out of every rocker. If that isnt the case then you really need to strip and clean the entire rocker gear or you will
damage cam lobes.

This happened to my car donkeys years ago which is now why it has a STR91 and vernier pulley, so its an ill wind....but I doubt that's an option in Oz in this day and age...:-)

You could try a fine jet of compresed air up each dry rocker? The holes in the rocket shaft are very small though and may not unblock easilly.

As to the internittent starter....gearbox loom plug is a good place to look.

Doesnt sound bad at all in the youtube vid though. A good moment.

Jonners...
Note from Admin: sadly Jon passed away in February 2018 but his humour and wealth of knowledge will be fondly remembered by all. RIP Jonners.
straylight

Re: sprint #2 South Australia

#43 Post by straylight »

aye Jonners, I was very happy.

This week's work has involved getting the fuel tank sorted. Full holes on the bottom.
rusted out fuel tank
sDSCN3910.jpg (151.13 KiB) Viewed 3829 times
Took it down to george and we deliberated the best way to fix it. George told me to cut out the base and he would weld another piece in. I nervously dropped a burning rag into the tank and when it went out, I started the angle grinding. I dropped it in this morning, go it back tonight. All time record for George I'd say.
back from george.
back from george.
sDSCN3947.jpg (124.95 KiB) Viewed 3829 times
Just hit it with some primer, black paint to follow.
primered up.
primered up.
sDSCN3950.jpg (107.9 KiB) Viewed 3829 times
I cut around the standoff that takes the outlet tube across the tank holding it off he bottom and was lucky in not cutting into the bowl that confines the fuel float gauge. Not sure how George got the standoff back on, but it is supported. Next step will be to spray the inside with some fuel tank preservative. Any suggestions ? I was disappointed not to take any pics of the inside of the tank, it all happened too fast.

I also got the rear door handle back on as I move towards getting her back on the road. Painstaking job cutting out new gaskets for the handles and working out how the mechanism worked again. Unlike the first resto where all the parts were labelled and put away methodically, this one involves hunting for bits through boxes of parts. Even finding the correct bolt becomes a 15 minute saga of searching.

anyway, progress and a fuel tank where before I had none.

stu
User avatar
sprint95m
TDC Member
Posts: 6502
Joined: Thu Aug 09, 2007 1:22 pm
Location: Caithness, Scotland

Yeaaah.....

#44 Post by sprint95m »

That is a pretty nifty tank repair.

You can buy various tank sealers but I have no opinion on these because I have not used any.


I am concerned about your engine.
Flushing oil? I would try some but I am thinking the engine really needs to be stripped for cleaning :( .
TDC Forum moderator
PLEASE help us to maintain a friendly forum,
either PM or use Report Post if you see anything you are unhappy with. Thanks.
straylight

Re: sprint #2 South Australia

#45 Post by straylight »

I hope not, but fear you may be right.

I'll run it up for 10 minutes or so, now I've got the radiator and fuel tank sorted and see how the oil situation looks then. No load on the car and no silly revs.

stu
Post Reply