

Operation Orange - 1980 Sprint restoration
Re: Operation Orange - 1980 Sprint restoration
Or an idea if you don't use the drivers dash vent.

-
Jon Tilson
- Guest contributor

- Posts: 11179
- Joined: Tue Oct 03, 2006 9:45 pm
- Location: Middlesex
Re: Operation Orange - 1980 Sprint restoration
The other alternative is to use the dual oil and temp gauge from the early BMC sports cars (B and spridget) but it is quite expensive.
It also shows the temp all the time being gas capilliary.
Nice job on the wood. I use Colron American Walnut in mine too...
Jonners
It also shows the temp all the time being gas capilliary.
Nice job on the wood. I use Colron American Walnut in mine too...
Jonners
Note from Admin: sadly Jon passed away in February 2018 but his humour and wealth of knowledge will be fondly remembered by all. RIP Jonners.
-
mwu773vforever!
Re: Operation Orange - 1980 Sprint restoration
Ah ha, at last, an update! Have been keeping a keen eye on events. Kind of liked the orangegy wood work, guess I had got used to it. Glad to see the engine is still serviceable and will 'live on'. I do remember swapping out the volt meter for the oil pressure guage. Just seemed alot more useful/critical information than volts. Think, but can't be sure, that the volt meter came from Rimmers. Anyway it was a Smiths so was a natural match. Seeing the engine in bits again and all the work on the new car going on brings back many memories. Looks great, look forward with envy to the completed car. Maybe I can buy it back?!!!
Paul.
Paul.
-
SprintMWU773V

- TDC Staffs Area Organiser
- Posts: 5429
- Joined: Wed Oct 18, 2006 2:08 pm
- Location: The Old Asylum
Re: Operation Orange - 1980 Sprint restoration
Well it looks like I have finally managed to sort out the majority of my brake pipes!
My ‘new’ shell left the factory minus the mounting holes for the Load Proportioning Valve fitted to Sprints. In the rush to get the shell off to be dipped in 2012 I never got round to marking up and drilling the holes until now.
I’d previously taken careful note of the location of the holes and marked up the shell underneath the rear seat squab. After a significant amount of time was spent finding a selection of decent sharp drill bits I embarked on the tense moment of drilling the holes. The metal proved pretty easy to drill and quickly all 5 holes were made.
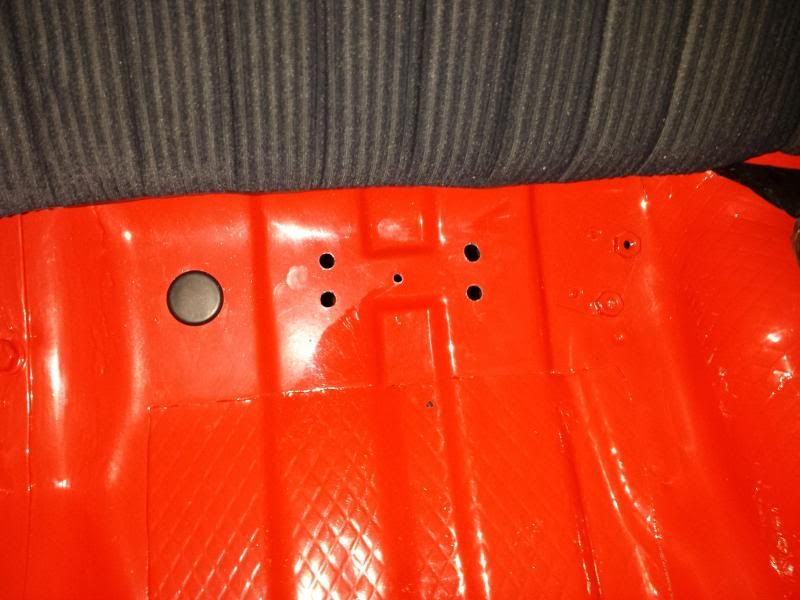
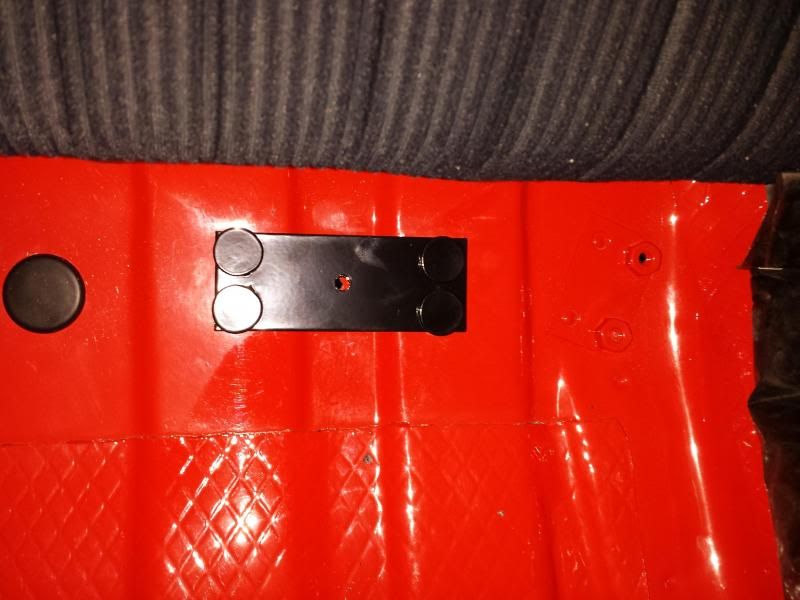
I offered up the mounting bracket and despite my best efforts the holes were just a little bit out so I had to adjust them slightly. The bracket then fitted fine, I haven’t yet added the rivet to the bracket but will do so at some point.
I chose to use Kunifer for my brake pipes as Copper has reportedly got some issues with fatigue cracking, the cost difference was about a tenner over the whole set. Each pipe was supplied cut to length, flared and fitted with unions.
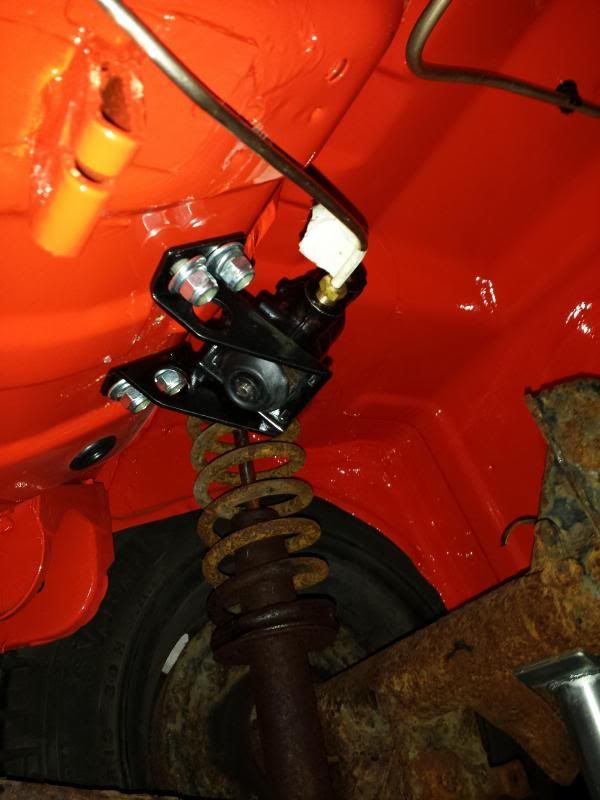
Underneath I was able to then fit the valve in position so that I could then shape my brake pipe to the right location. I’ll need to fit the valve on properly at some point and reinstate the swivelly bit that attaches to the rear axle. As you can see the temporary axle is on at the moment.
The pipes were bent to roughly the right shape vs the pipes I took off the car as a guide. Actually bending them didn’t take that long, fettling them and getting the fit to my satisfaction was quite another thing. I had to order some extra pipes of the correct size as a couple were wrong plus I messed one up so it has taken me a considerable amount of time to do what I hoped would be quite a quick job. I'm satisfied with the result though and I've gained some useful skills.
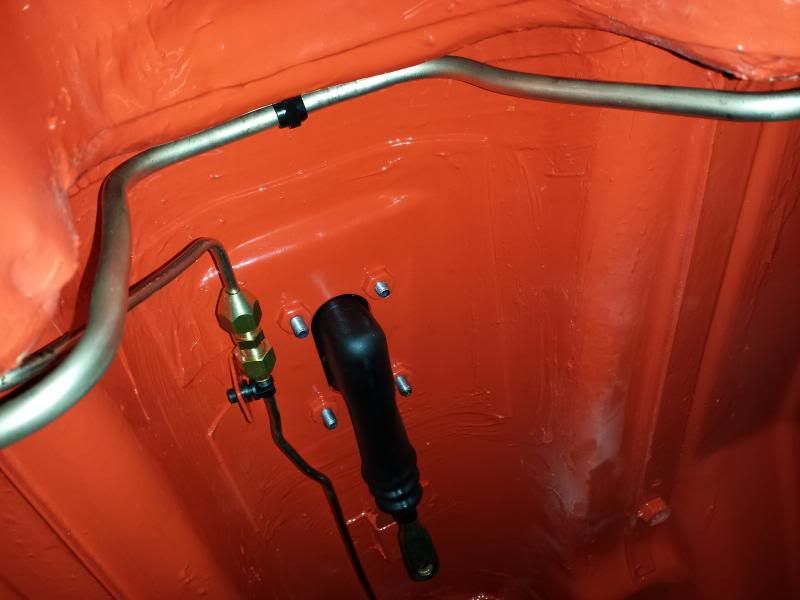
As well as the front to rear pipe there’s also pipes that go from the bulkhead valve to the front wheels and two pipes to the master cylinder. The shape and routing of these two pipes in particular was quite difficult, I wish it were slightly better but it's certainly good enough.
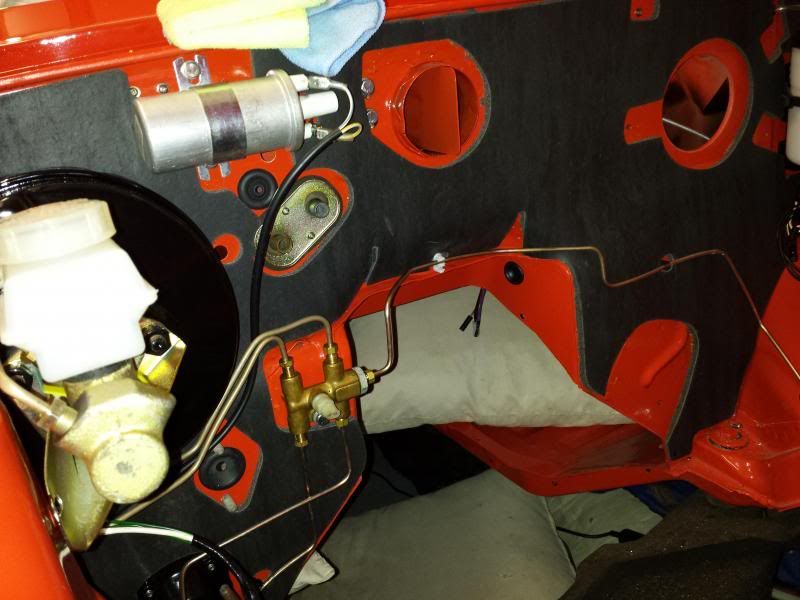
At some point one of my front wheel pipes had been replaced with a copper one. I didn’t really like the shape or routing of this pipe so after some experiments with a piece of stiff wire I bent my final pipe to my chosen design.
As I have not yet fitted my refurbished rear axle I’ll leave the final rear brake pipes until I'm ready to fit it, likewise I'm still sporting a temporary front subframe and will leave fitting the flexible hoses and last bits of Kunifer pipe till then.
My ‘new’ shell left the factory minus the mounting holes for the Load Proportioning Valve fitted to Sprints. In the rush to get the shell off to be dipped in 2012 I never got round to marking up and drilling the holes until now.
I’d previously taken careful note of the location of the holes and marked up the shell underneath the rear seat squab. After a significant amount of time was spent finding a selection of decent sharp drill bits I embarked on the tense moment of drilling the holes. The metal proved pretty easy to drill and quickly all 5 holes were made.

I offered up the mounting bracket and despite my best efforts the holes were just a little bit out so I had to adjust them slightly. The bracket then fitted fine, I haven’t yet added the rivet to the bracket but will do so at some point.

I chose to use Kunifer for my brake pipes as Copper has reportedly got some issues with fatigue cracking, the cost difference was about a tenner over the whole set. Each pipe was supplied cut to length, flared and fitted with unions.
Underneath I was able to then fit the valve in position so that I could then shape my brake pipe to the right location. I’ll need to fit the valve on properly at some point and reinstate the swivelly bit that attaches to the rear axle. As you can see the temporary axle is on at the moment.

The pipes were bent to roughly the right shape vs the pipes I took off the car as a guide. Actually bending them didn’t take that long, fettling them and getting the fit to my satisfaction was quite another thing. I had to order some extra pipes of the correct size as a couple were wrong plus I messed one up so it has taken me a considerable amount of time to do what I hoped would be quite a quick job. I'm satisfied with the result though and I've gained some useful skills.

As well as the front to rear pipe there’s also pipes that go from the bulkhead valve to the front wheels and two pipes to the master cylinder. The shape and routing of these two pipes in particular was quite difficult, I wish it were slightly better but it's certainly good enough.


At some point one of my front wheel pipes had been replaced with a copper one. I didn’t really like the shape or routing of this pipe so after some experiments with a piece of stiff wire I bent my final pipe to my chosen design.
As I have not yet fitted my refurbished rear axle I’ll leave the final rear brake pipes until I'm ready to fit it, likewise I'm still sporting a temporary front subframe and will leave fitting the flexible hoses and last bits of Kunifer pipe till then.
Last edited by SprintMWU773V on Wed Jul 26, 2017 2:17 pm, edited 1 time in total.
Mark
1961 Chevrolet Corvair Greenbrier Sportswagon
1980 Dolomite Sprint project using brand new shell
2009 Mazda MX5 2.0 Sport
2018 Infiniti Q30
1961 Chevrolet Corvair Greenbrier Sportswagon
1980 Dolomite Sprint project using brand new shell
2009 Mazda MX5 2.0 Sport
2018 Infiniti Q30

Re: Operation Orange - 1980 Sprint restoration
Nice job on those brake pipes, they are difficult to get perfect, yours look good.
Hope you have painted those newly drilled holes, it's horrible having to drill holes in new paint, I have had to do a few on mine & I am really annoyed at myself for not drilling them before!
Hope you have painted those newly drilled holes, it's horrible having to drill holes in new paint, I have had to do a few on mine & I am really annoyed at myself for not drilling them before!
Modified Dolomite Sprint MSO 662P VA485 1973 Mimosa Sprint


-
mbellinger

- TDC Member
- Posts: 2403
- Joined: Tue Oct 03, 2006 4:29 pm
- Location: Bromley, Kent
Re: Operation Orange - 1980 Sprint restoration
Great stuff. I love watching this come together.
Martin.
2021 Land Rover Discovery Sport HSE PHEV
2021 Dacia Duster 1.3 TCe
1963 Austin A40 Rally Car
2021 Honda Cross Tourer Highlander
2021 Land Rover Discovery Sport HSE PHEV
2021 Dacia Duster 1.3 TCe
1963 Austin A40 Rally Car
2021 Honda Cross Tourer Highlander
-
SprintMWU773V
- TDC Staffs Area Organiser
- Posts: 5429
- Joined: Wed Oct 18, 2006 2:08 pm
- Location: The Old Asylum
Re: Operation Orange - 1980 Sprint restoration
Whilst I seem to have opened a small can of worms following my propshaft discovery/conundrum I have at least managed to take delivery of a new radiator. Whilst it'll be some time before it gets fitted I though it'd be a good thing to order and keep ready for when I do need it. I've always thought Sprint cooling is a bit marginal. Modern high temp fuels, more traffic jams and the fact that it's inevitably a summer use car for many mean that the standard rad is only just about up to the job. Like many Sprint owners I have often spent more time looking at the temp gauge rather than the road.
I decided to improve my cooling efficiency whilst retaining the original look. My car was fitted with a fairly new, reconditioned radiator back in 2004/5 and ran reasonably well until it went off the road in 2008 though always warmer than I would have liked. The original rad is a 3 row design which uses 3 rows of narrow tubes in a cross flow between the two side tanks.
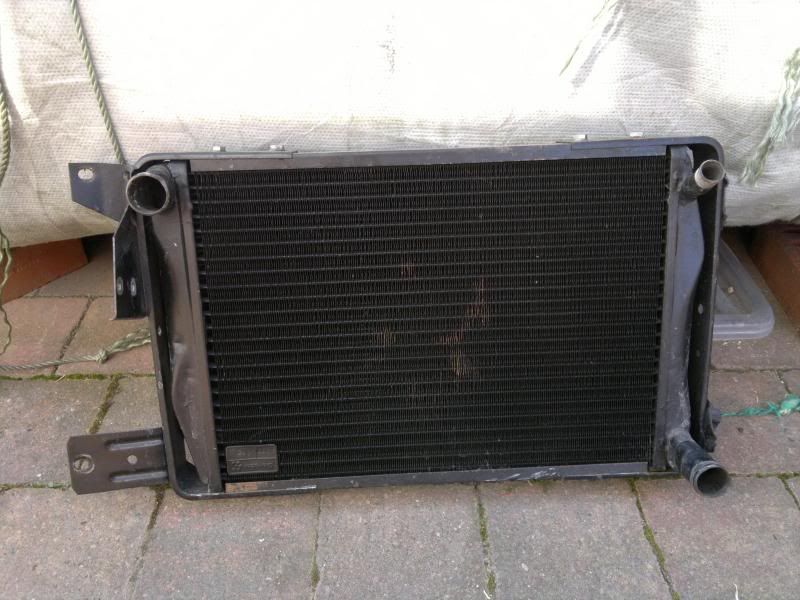
Rather than refit this one though I've instead had a new radiator custom made by Coolex Heat Transfer in Nottingham.
As you can see the radiator has been made from aluminium. A more modern and efficient core design has been utilised along with aluminium tanks. The manufacturer was even able to reproduce the more curved shape to the side tanks, which are also slightly larger than the original. Those who know anything about heat transfer will know that aluminium is not as good a heat conductor as copper/brass. The increase in efficiency comes therefore from the design of the core. Aluminum radiators are able to use 1” or wider tubes creating much more surface area to dissipate heat. The original design features 3 rows of narrow tubes which can easily become blocked and due to the design of the core are not as efficiently packaged as the aluminium one. This features more rows and more surface area and a better fin design than the original to improve overall efficiency. Fins per inch, tube spacing and tube size has more to do with a radiators efficiency than whether it is made out of aluminum or copper. The aluminium one also weighs significantly less too.
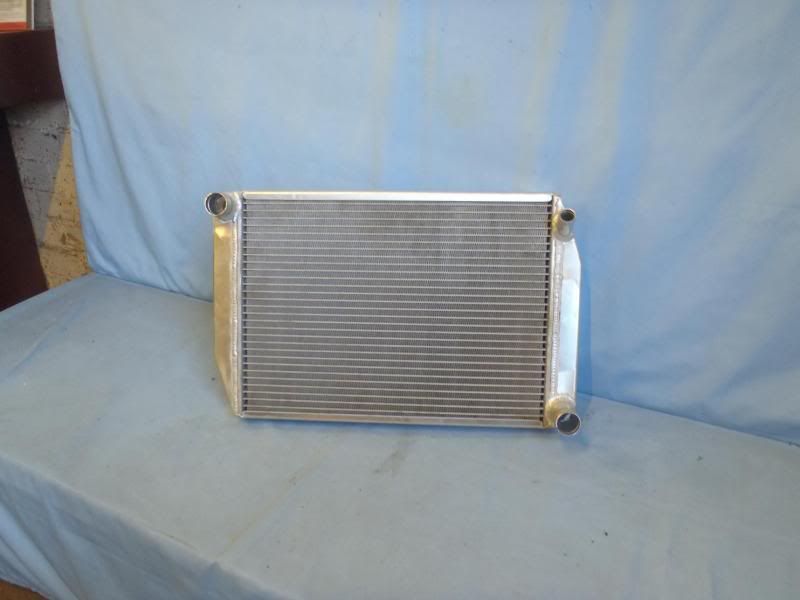
The core and tanks are then fitted with top and bottom frames which contain the captive nuts to attach the radiator support brackets to. In order to keep the original look I opted to have the radiator etch primed and painted in satin black. I've fitted some temporary support brackets which I had lying around.
The more efficient core design should give ample margin even during hot and demanding conditions. The turnaround time was very quick at just a couple of weeks. It was nice to get a few pictures before and after painting, you can see the whole process on their website http://www.coolexperts.co.uk/motor-vehi ... to-finish/
I decided to improve my cooling efficiency whilst retaining the original look. My car was fitted with a fairly new, reconditioned radiator back in 2004/5 and ran reasonably well until it went off the road in 2008 though always warmer than I would have liked. The original rad is a 3 row design which uses 3 rows of narrow tubes in a cross flow between the two side tanks.

Rather than refit this one though I've instead had a new radiator custom made by Coolex Heat Transfer in Nottingham.
As you can see the radiator has been made from aluminium. A more modern and efficient core design has been utilised along with aluminium tanks. The manufacturer was even able to reproduce the more curved shape to the side tanks, which are also slightly larger than the original. Those who know anything about heat transfer will know that aluminium is not as good a heat conductor as copper/brass. The increase in efficiency comes therefore from the design of the core. Aluminum radiators are able to use 1” or wider tubes creating much more surface area to dissipate heat. The original design features 3 rows of narrow tubes which can easily become blocked and due to the design of the core are not as efficiently packaged as the aluminium one. This features more rows and more surface area and a better fin design than the original to improve overall efficiency. Fins per inch, tube spacing and tube size has more to do with a radiators efficiency than whether it is made out of aluminum or copper. The aluminium one also weighs significantly less too.

The core and tanks are then fitted with top and bottom frames which contain the captive nuts to attach the radiator support brackets to. In order to keep the original look I opted to have the radiator etch primed and painted in satin black. I've fitted some temporary support brackets which I had lying around.

The more efficient core design should give ample margin even during hot and demanding conditions. The turnaround time was very quick at just a couple of weeks. It was nice to get a few pictures before and after painting, you can see the whole process on their website http://www.coolexperts.co.uk/motor-vehi ... to-finish/
Last edited by SprintMWU773V on Wed Jul 26, 2017 2:17 pm, edited 1 time in total.
Mark
1961 Chevrolet Corvair Greenbrier Sportswagon
1980 Dolomite Sprint project using brand new shell
2009 Mazda MX5 2.0 Sport
2018 Infiniti Q30
1961 Chevrolet Corvair Greenbrier Sportswagon
1980 Dolomite Sprint project using brand new shell
2009 Mazda MX5 2.0 Sport
2018 Infiniti Q30

Hmmm.......
That is questionable because you are retaining the weak link in the cooling system which is the expansion bottle, Mark.SprintMWU773V wrote:The more efficient core design should give ample margin even during hot and demanding conditions.
What will definitely work is to use Evans waterless coolant because it does not pressurise the system, therefore the weakness of the expansion bottle
is negated. Other than the fact is is red in colour, you won't change the originality of the engine bay's appearance.
I know you were negative in the thread I started about Evans coolant but I think you should reconsider......
Jod Clark wrote an excellent piece in Dolly Mixture some years ago which illustrates the weakness of the EB.
http://www.evanscoolants.co.uk/AutoCool.html
Ian.
TDC Forum moderator
PLEASE help us to maintain a friendly forum,
either PM or use Report Post if you see anything you are unhappy with. Thanks.
PLEASE help us to maintain a friendly forum,
either PM or use Report Post if you see anything you are unhappy with. Thanks.
-
SprintMWU773V
- TDC Staffs Area Organiser
- Posts: 5429
- Joined: Wed Oct 18, 2006 2:08 pm
- Location: The Old Asylum
Re: Operation Orange - 1980 Sprint restoration
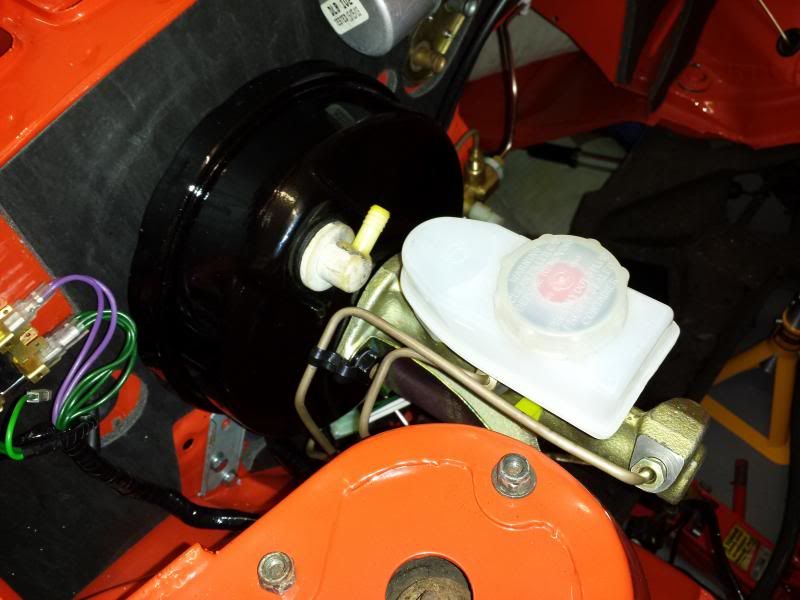
You raise a good point on coolant and the EB. Of course being a late car it has a plastic EB and these are becoming difficult to find in good condition and they are prone to failure. The one I have fitted is new, I picked one up at Stoneleigh new for £5 but inevitably either one could fail.
On the subject of coolant for the vast majority of classic cars the Evans coolant offers no significant advantage because many classics have a cooling system that is not under a great deal of stress in terms of pressure and heat and it's also very expensive in terms of initial outlay. I think there are benefits to be had for using the stuff on cars where cooling is an issue and where there are advantages to reducing pressure in the system. I may well opt to use the stuff when I come to re-filling. I've never been a big fan of standard BS spec, silicate based anti-freeze. It's functional just about but the stuff gloops up over time and the silicates damage the hoses and pump seals. The Japanese always got this right as they specified a low or silicate free formula. This is more of a organic acid formula though which makes it unsuitable. I have previously used a Hybrid Organic Acid Technology (HOAT), ethylene glycol based, silicate free stuff and it was fine for the 8 years or so it was in there. No damage to radiator or heater matrix.
The world of coolant is just very complicated, over complicated in fact. I need to purchase some more for my Mazda and give it a change which means I'll have to run the gauntlet at the motor factors and scrutinise every label to check the formula!
Mark
1961 Chevrolet Corvair Greenbrier Sportswagon
1980 Dolomite Sprint project using brand new shell
2009 Mazda MX5 2.0 Sport
2018 Infiniti Q30
1961 Chevrolet Corvair Greenbrier Sportswagon
1980 Dolomite Sprint project using brand new shell
2009 Mazda MX5 2.0 Sport
2018 Infiniti Q30
Yes but.....
It does however not need to be changed, so (for long term owners) the cost can be recouped in about seven or eight years.SprintMWU773V wrote:On the subject of coolant for the vast majority of classic cars the Evans coolant offers no significant advantage because many classics have a cooling system that is not under a great deal of stress in terms of pressure and heat and it's also very expensive in terms of initial outlay.
With their high alloy content, Dolomite 1850 and Sprint engines should be considered as modern, hence the link I posted.
Given that your engine is rebuilt and you have a new radiator, you won't need to buy Prep Fluid to do the "conversion" to Evans Coolant
Ian.
TDC Forum moderator
PLEASE help us to maintain a friendly forum,
either PM or use Report Post if you see anything you are unhappy with. Thanks.
PLEASE help us to maintain a friendly forum,
either PM or use Report Post if you see anything you are unhappy with. Thanks.
-
SprintMWU773V
- TDC Staffs Area Organiser
- Posts: 5429
- Joined: Wed Oct 18, 2006 2:08 pm
- Location: The Old Asylum
Re: Operation Orange - 1980 Sprint restoration
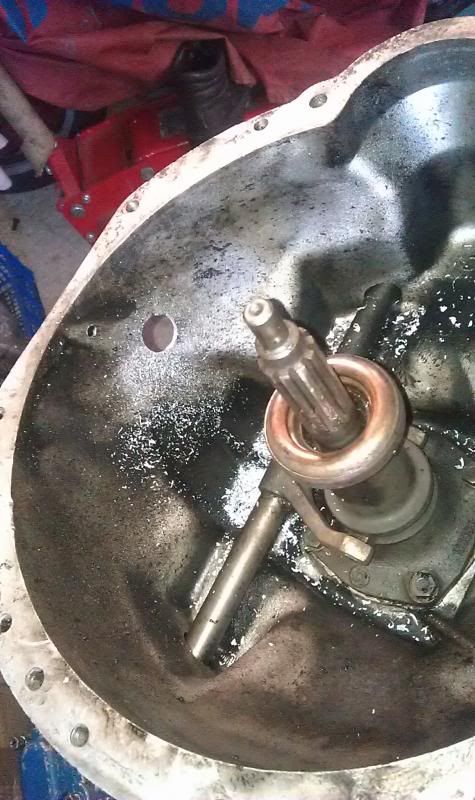
I've also now moved onto looking at my gearbox.
The gearbox when the car was on the road back in 2008 worked pretty well, it wasn't noisy at all and had a nice shift action. The overdrive operated pretty well too, even more so when I added oil to the correct level. It did though leak a bit not to mention is was very dirty.
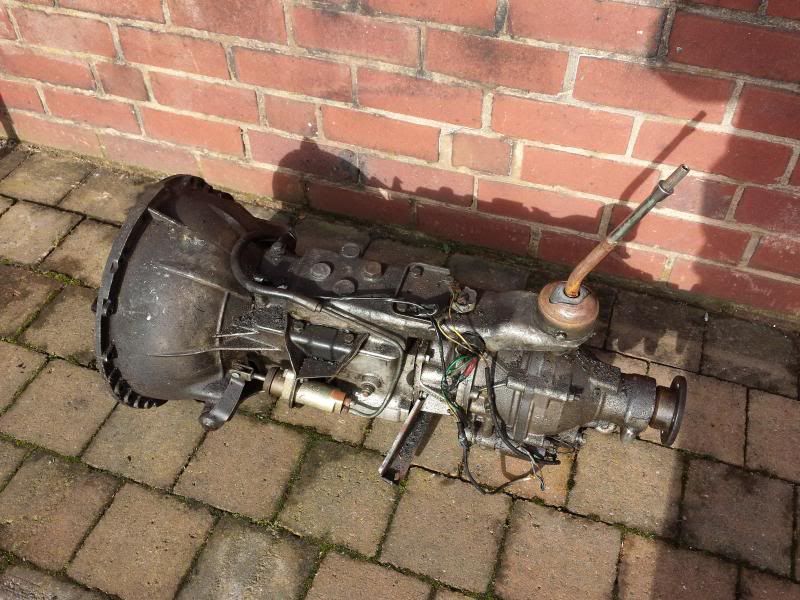
Whilst the gearbox was working fine it seems a bit silly to just clean it and put it back in so I have opted to have it overhauled prior to being refitted. I've called upon the services of Mike Papworth who seems to be a legend when it comes to Triumph gearboxes. I dropped the unit down to him at Stoneleigh and he's already got to work on it.
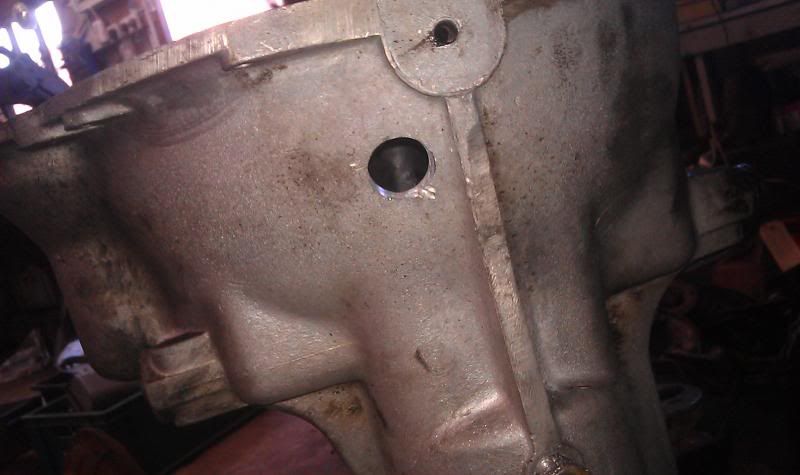
Firstly he has cleaned it up to get the worst of the muck off of it. Now you might remember that for former owner of MWU 773V mentioned that an accident involving a man hole cover had damaged the bell housing. As you can see from Mike's pictures the damage is a bit of a mess.
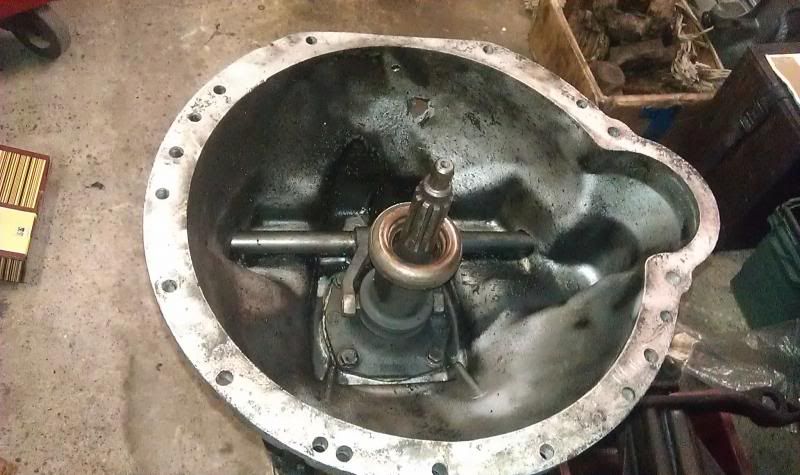
Mike's main concern though is that such a jagged bit of damage could promote a crack in the casting. Given that the bell housing is not removable he gave me the choice of a replacement casing or he could round off the damage to leave a hole. It seems a shame to swap the casing for a non original one, the battle damage is character and is part of the car's story so I opted to have it rounded off. It won't do any harm to have a hole in it and I'll fit a grommet in it anyway to keep anything out that shouldn't get in there.
it'll be a little while before Mike properly strips the unit down to ascertain what if anything needs doing.
The gearbox when the car was on the road back in 2008 worked pretty well, it wasn't noisy at all and had a nice shift action. The overdrive operated pretty well too, even more so when I added oil to the correct level. It did though leak a bit not to mention is was very dirty.

Whilst the gearbox was working fine it seems a bit silly to just clean it and put it back in so I have opted to have it overhauled prior to being refitted. I've called upon the services of Mike Papworth who seems to be a legend when it comes to Triumph gearboxes. I dropped the unit down to him at Stoneleigh and he's already got to work on it.
Firstly he has cleaned it up to get the worst of the muck off of it. Now you might remember that for former owner of MWU 773V mentioned that an accident involving a man hole cover had damaged the bell housing. As you can see from Mike's pictures the damage is a bit of a mess.


Mike's main concern though is that such a jagged bit of damage could promote a crack in the casting. Given that the bell housing is not removable he gave me the choice of a replacement casing or he could round off the damage to leave a hole. It seems a shame to swap the casing for a non original one, the battle damage is character and is part of the car's story so I opted to have it rounded off. It won't do any harm to have a hole in it and I'll fit a grommet in it anyway to keep anything out that shouldn't get in there.


it'll be a little while before Mike properly strips the unit down to ascertain what if anything needs doing.
Last edited by SprintMWU773V on Wed Jul 26, 2017 2:18 pm, edited 1 time in total.
Mark
1961 Chevrolet Corvair Greenbrier Sportswagon
1980 Dolomite Sprint project using brand new shell
2009 Mazda MX5 2.0 Sport
2018 Infiniti Q30
1961 Chevrolet Corvair Greenbrier Sportswagon
1980 Dolomite Sprint project using brand new shell
2009 Mazda MX5 2.0 Sport
2018 Infiniti Q30
-
Jon Tilson
- Guest contributor
- Posts: 11179
- Joined: Tue Oct 03, 2006 9:45 pm
- Location: Middlesex
Re: Operation Orange - 1980 Sprint restoration
I would just change the front and rear oil seals and be done with it.
If it was fine before taking bearings out and putting them back in again doesnt do them any good
and epalcing them for potentially inferior ones seems a bit pointless.
Still Mike knows his onions...
I have a casting to change myself, unless anyone wants a Robin Hood modified one...
Jonners
If it was fine before taking bearings out and putting them back in again doesnt do them any good
and epalcing them for potentially inferior ones seems a bit pointless.
Still Mike knows his onions...
I have a casting to change myself, unless anyone wants a Robin Hood modified one...
Jonners
Note from Admin: sadly Jon passed away in February 2018 but his humour and wealth of knowledge will be fondly remembered by all. RIP Jonners.
-
SprintMWU773V
- TDC Staffs Area Organiser
- Posts: 5429
- Joined: Wed Oct 18, 2006 2:08 pm
- Location: The Old Asylum
Re: Operation Orange - 1980 Sprint restoration
I've now hopefully finished my Chartered Marketing course. It's beneficial from a work point of view but left me with little time or energy to get stuck into my project.
Having had my engine machined late last year it has stayed stuck on my bench ever since. With the promise of assistance from my Dad I finally got round to commencing the engine rebuild last weekend.
First step was to fit the crankshaft. The mains had had a 10 thou grind and fortunately I'd come across a set of NOS Vandervell Mains in the right size.
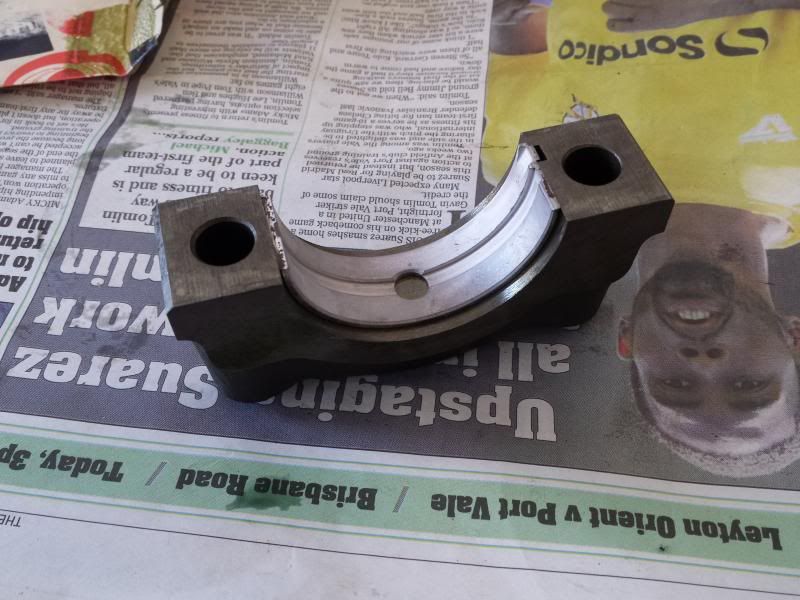
The bearings are slid into the mains before a smear of Graphogen assembly lube is wiped onto the bearing surface.
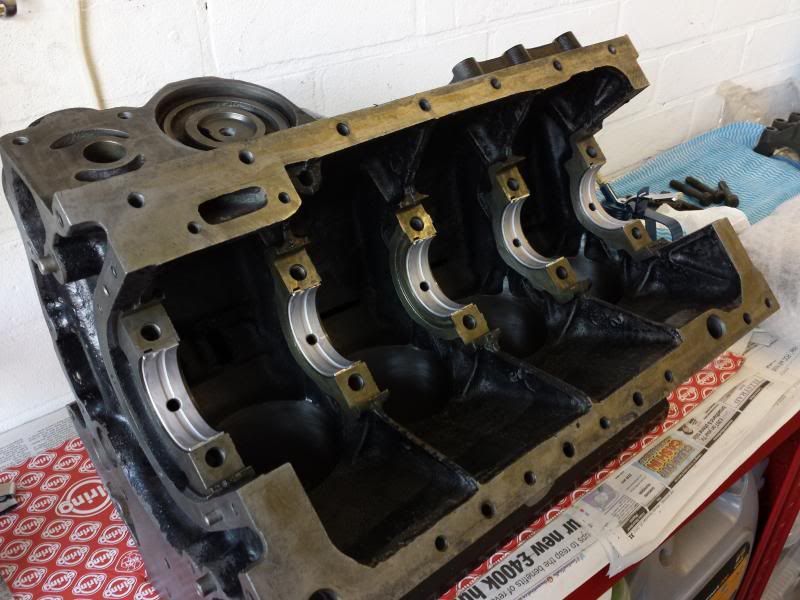
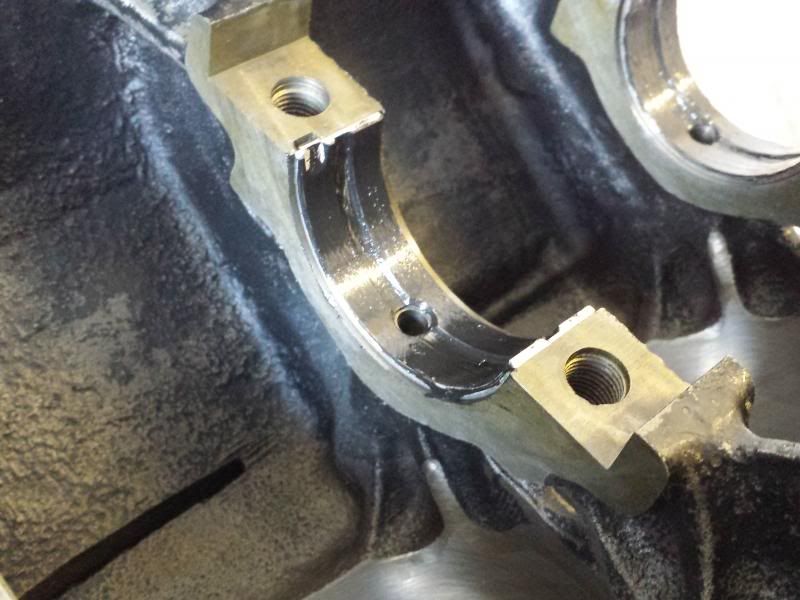
Graphogen is esentially oil suspended in a paste so it doesn't run off and provides essential lubrication during the first run.
The the crank is lowered into position, again a smear of graphogen was used on the journals before the caps are fitted and torqued down
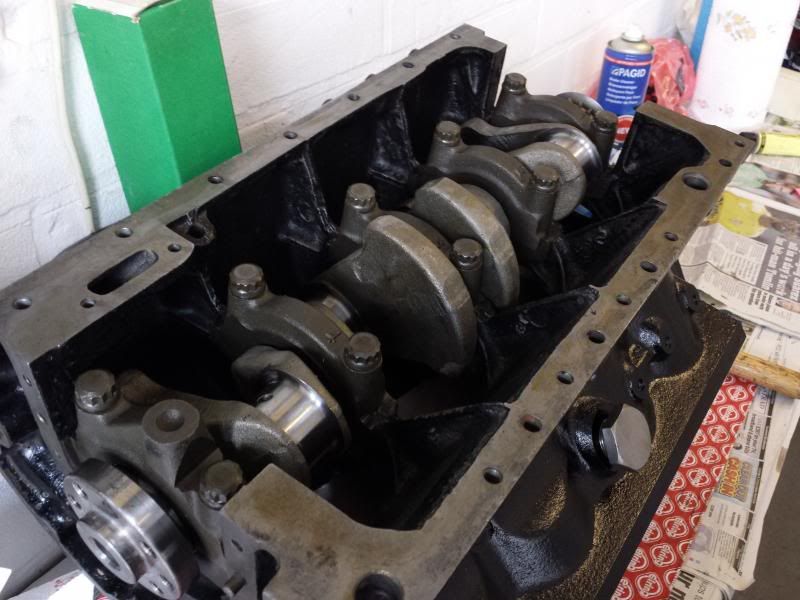
Then its onto the pistons. Crewe engines had fitted the pistons to the rods and balanced them for me so they were ready for fitting. Actually getting them in the bores was a challenge. Despite using the correct ring compressor tool and plenty of oil they were all a little relucatant to go in. Eventually they all did though before everything was torqued down. With all the pistons and crank in it's difficult to turn the engine by hand but it does turn nice and smoothly.
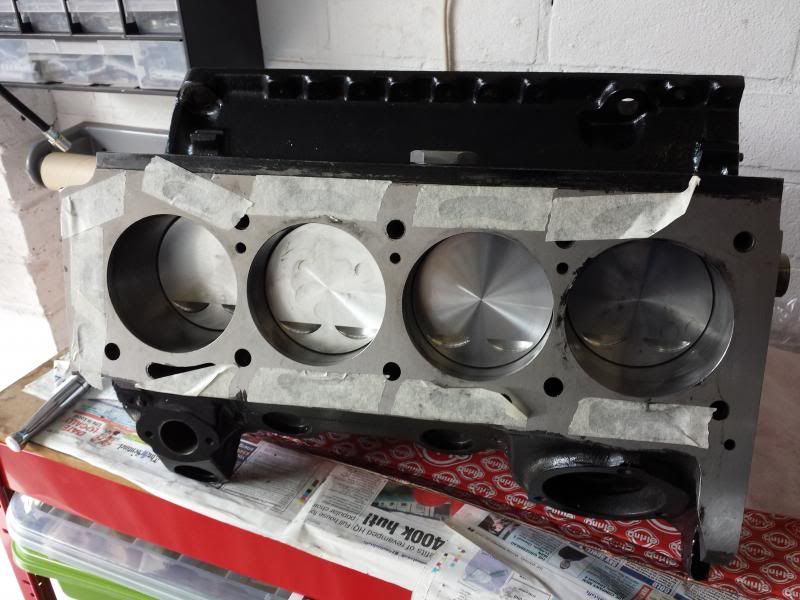
The next stage will be to put the block onto the stand and then commence fitting the timing gear, sump etc before it's re-united with the head which is currently awaiting work.
Last edited by SprintMWU773V on Wed Jul 26, 2017 2:19 pm, edited 1 time in total.
Mark
1961 Chevrolet Corvair Greenbrier Sportswagon
1980 Dolomite Sprint project using brand new shell
2009 Mazda MX5 2.0 Sport
2018 Infiniti Q30
1961 Chevrolet Corvair Greenbrier Sportswagon
1980 Dolomite Sprint project using brand new shell
2009 Mazda MX5 2.0 Sport
2018 Infiniti Q30
-
Jon Tilson
- Guest contributor
- Posts: 11179
- Joined: Tue Oct 03, 2006 9:45 pm
- Location: Middlesex
Re: Operation Orange - 1980 Sprint restoration
I'd put the timing cover and pulley on first and check the TDC marks line up with TDC before you put the head on.
Its easy to get true TDC with the head off. You can see how accurate the marks and pulley notch are then.
Then pull off the timing cover, move to pistons at half bore and fit the head before putting on the valve timing setup.
You may need some adjustment if you aren't using the std cam or have had a lot skimmed off.
Jonners
Note from Admin: sadly Jon passed away in February 2018 but his humour and wealth of knowledge will be fondly remembered by all. RIP Jonners.

Re: Operation Orange - 1980 Sprint restoration
The graphogen stuff looks a bit scary to me. The slants are easy to lubricate before the first run. Leave the dizzy out and run the oilpump with a battery drill through the dizzy hole. Oil will be everywhere in the engine and if you do it before fitting the valve cover it can easily be checked if oil gets also there. If not turn the engine a bit by hand till the oil flows in the head.
Then you are save to start.
Jeroen
Then you are save to start.
Jeroen
Classic Kabelboom Company. For all your wiring needs. http://www.classickabelboomcompany.com