
Thanks for the comments guys!
Jonners, feel free to use the photos on the Wiki, I'll PM you and let you know how to download them.
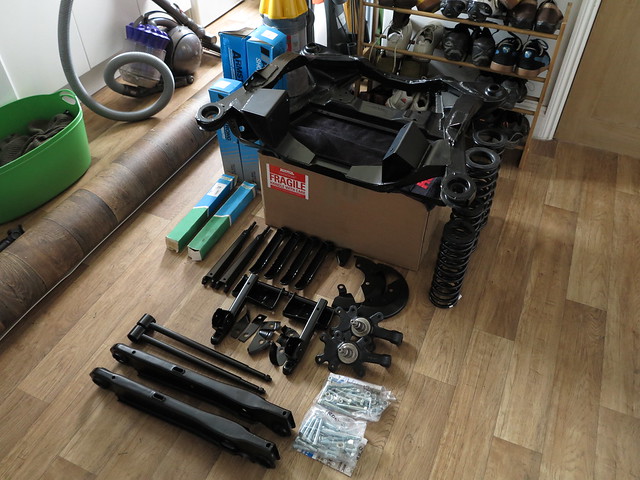
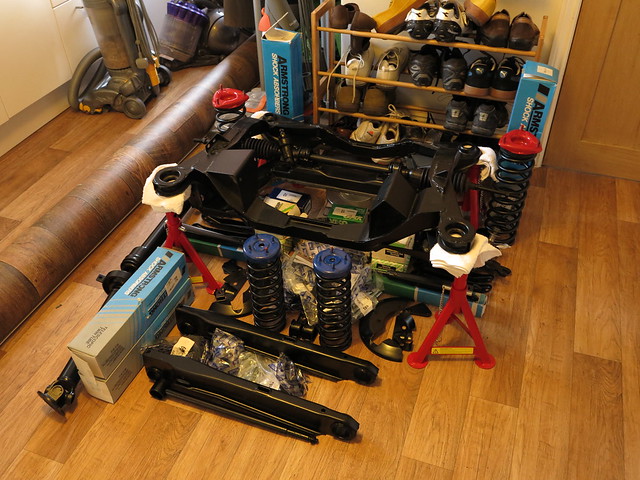
Picked up the rest of the powder coated parts a couple of days ago looking splendid in satin black, particularly the subframe which looks brand new! I've decided that I'm not a fan of gloss black suspension components!
The Copper-Nickel brake pipes have arrived from Automec along with some silicone fluid so when the plated parts arrive I can start to build up the front and rear ends.
Hopefully by then the engine will be back and I can start that in the new year then onto a new garage roof, bodywork and re-assembly ready for some summer driving.
NWL – Project Concours Carmine Sprint
Re: NWL – Project Carmine Sprint
Sorry forgot to mention that the rust remover is just plain old Jenolite.
-
bodgerben
Re: NWL – Project Carmine Sprint
Great work you're doingJames467 wrote: In the meantime I have put it in the garage for storage whilst I find a hub puller so I can take those back plates off and have them powder coated.
You don't need a hub puller for the backplates. Simply remove the drums, shoes and brake cylinder then undo the six bolts going through the back plates and pull the half shaft out - leave that in one bit if the bearings are all fine. Keep the shims for each side as they were, its best to check when you put it back together that it's all shimmed up OK.
That will give you chance to replace the axle oil seals - Rimmers and the like now supply lip seals rather than leather seals but you'll get the lip seal part number if you do a google search.
Get your backplates coated, check the shims and bolt it back together. You only need a hub puller if you're replacing the wheel bearings, I pop the whole half shaft down to my local garage and get them to pop them apart in the press. £10 well spent.
Whilst the half shafts are out it makes the axle much lighter for stripping back and painting satin - just block the axle tubes with rag or the like.
-
MalcGE
Re: NWL – Project Carmine Sprint
Epic on that prop repair, always wondered how they came apart, you made it look as easy as replacing a CV Gaitor on a FWD MGZR. An ex BL Management Car Plan (MCP) car. At one time in the late 70's early 80's the car park at House was full of MCP scheme Sprint's, they were very popular.
Re: NWL – Project Carmine Sprint
Thanks Ben, that's great advice, I'll do that. Is this the right seal?You don't need a hub puller for the backplates. Simply remove the drums, shoes and brake cylinder then undo the six bolts going through the back plates and pull the half shaft out - leave that in one bit if the bearings are all fine. Keep the shims for each side as they were, its best to check when you put it back together that it's all shimmed up OK.
http://www.rimmerbros.co.uk/Item--i-GHS185
Thanks Malc, we'll see if the prop repair has worked when it goes back on the car! The CV boot looked as thick as the old one so it should be ok with the rpm.
-
bodgerben
Re: NWL – Project Carmine Sprint
Yes, that's the seal, but you'll note the picture shows an original leather seal, not a lip seal. If you order that and they send a smooth leather seal, don't fit it.
Whereas the bearing kits (as in the link below) show the lip seals
http://www.rimmerbros.co.uk/Item--i-GHK1144
The recent bearing kits I've had include a lip seal.
But see this post (which is what I meant by do a google but I should have done that to be clear) this post details an alternative gearbox seal that was cheaper than the axle seal, so check that out first
viewtopic.php?f=4&t=7209
Whereas the bearing kits (as in the link below) show the lip seals
http://www.rimmerbros.co.uk/Item--i-GHK1144
The recent bearing kits I've had include a lip seal.
But see this post (which is what I meant by do a google
viewtopic.php?f=4&t=7209
-
straylight
Re: NWL – Project Carmine Sprint
I'll second everyone's comments on the prop shaft repair, fantastic work and really well documented, great set of reference pics. Also good work on the brake sensing valve and rear axle, I wish I had seen your resto before doing mine, I reckon I would have put an extra few yards in with this kind of inspiration !
well done, a great effort.
stu
well done, a great effort.
stu
Re: NWL – Project Carmine Sprint
Thanks Ben, I'll get one ordered in the new year. I have also ordered some new locking tabs and I'll have to get some diff cover bolts when I get the chance.
Thanks Stu, I'll crack on with the back axle and the brake valve when everything back from plating in the new year I think.
How would the original rear axles have looked? Did they just spray the whole thing black covering all of the bolts etc, or spray up individual components then assemble leaving all of the bolts/lock tabs exposed (which is what I prefer).
Now that I have my new bigger compressor I have been able to run all of the parts that need to be plated through the sandblaster. I'll take them for plating in the new year, obviously ignore the steering rack, that's not being plated!!
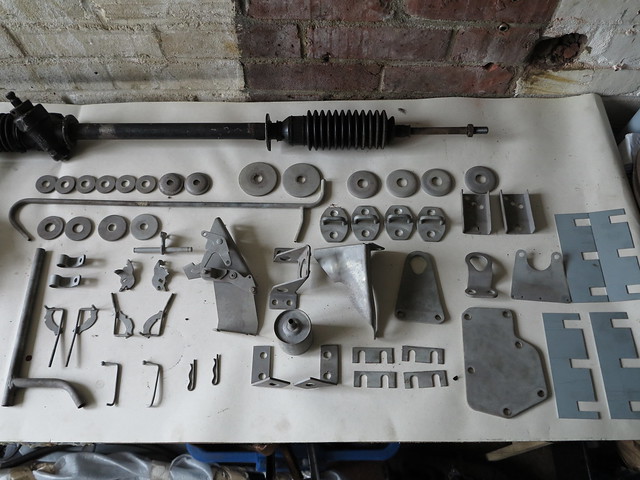
I have collected all of the powder-coated parts, have to say I'm really pleased with them. I have boxes of bits everywhere so I've started organising all of the front and rear chassis parts on the utility room floor ready for reassembly in the new year.
Thanks Stu, I'll crack on with the back axle and the brake valve when everything back from plating in the new year I think.
How would the original rear axles have looked? Did they just spray the whole thing black covering all of the bolts etc, or spray up individual components then assemble leaving all of the bolts/lock tabs exposed (which is what I prefer).
Now that I have my new bigger compressor I have been able to run all of the parts that need to be plated through the sandblaster. I'll take them for plating in the new year, obviously ignore the steering rack, that's not being plated!!
I have collected all of the powder-coated parts, have to say I'm really pleased with them. I have boxes of bits everywhere so I've started organising all of the front and rear chassis parts on the utility room floor ready for reassembly in the new year.

Re: NWL – Project Carmine Sprint
When your clutch reservoir comes back from plating double check it for leaks, when mine came back it had opened up slightly on the bottom seam & fluid weeped out so I had to scrap it.
Modified Dolomite Sprint MSO 662P VA485 1973 Mimosa Sprint


Re: NWL – Project Carmine Sprint
Thanks Tony, it looks like it's in good condition but I wonder if it's a good idea to just paint it in one of those zinc finished that Frosts do rather than running the risk of damaging it.
Re: NWL – Project Carmine Sprint
Not sure what the original finish was.
Modified Dolomite Sprint MSO 662P VA485 1973 Mimosa Sprint
Re: NWL – Project Carmine Sprint
Neither am I, all the bits being plated have shown signs of past plating underneath washers etc... this doesn't show any. And even after a search through MadMart and MikeyB's restoration threads and a Google image search on Dolomite and Stag engine bays I've drawn a blank. It looks like it was just plain metal.
So I have come up with a cunning solution for rust protection whilst maintaining its original appearance which I am going to try today....
Watch this space!
So I have come up with a cunning solution for rust protection whilst maintaining its original appearance which I am going to try today....
Watch this space!
Re: NWL – Project Carmine Sprint
From what I could find they weren't plated, just left bare metal so I ran it through the sandblaster at low pressure to clean it up then gave it a very light dusting of silver Hammerite to protect it.
So here we have it, one clutch fluid reservoir....
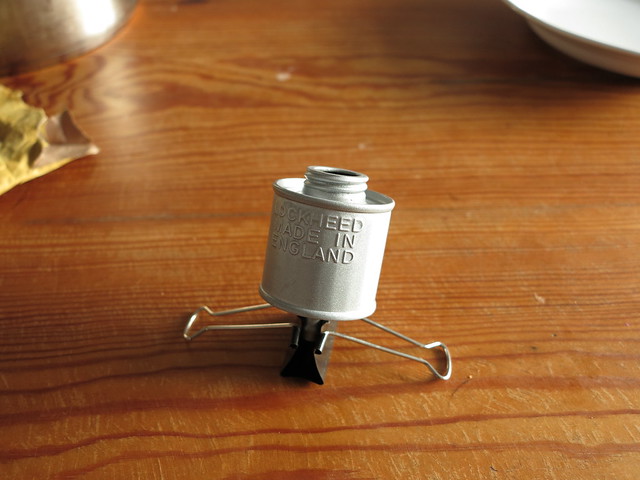
So here we have it, one clutch fluid reservoir....
Re: NWL – Project Carmine Sprint
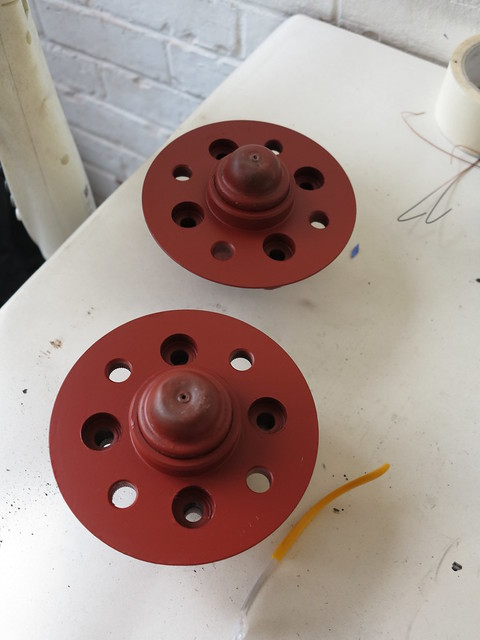
I have also cleaned up the hubs. The outside got a light blast followed by a through degreasing. I let some grease inside to catch the blasting media so we don't get wrecked bearings!
They've had a coat of red oxide with the anti roll bars and I'll give them a few coats of satin black tomorrow.
I'm not powder coating the hubs because I need to retain the machined surfaces, especially where the bolts go through to the discs and where the disc mates to the hub body, pc tends to get everywhere unless you mask up really well which looked like it could be a pain with these so I decided that it's easier to sand off paint than powder coat!
Before and after
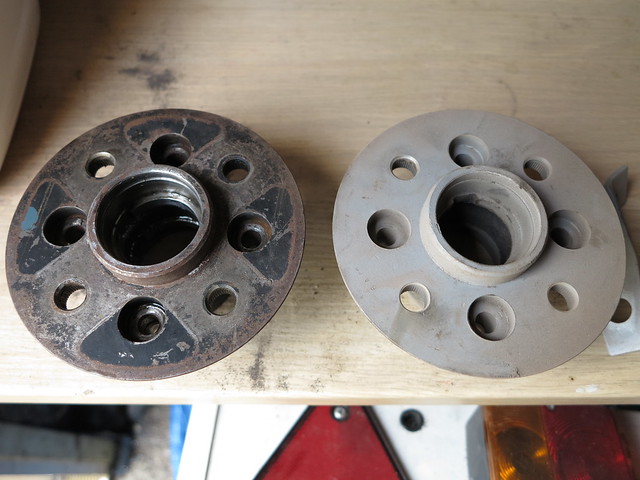
Red oxide
Onto the subject of bolts, I'm sure that there's someone her that can shed some light on this for me. The obsessive compulsive side of me loves shiny bolts on a restored car! So I have run all of the load-bearing bolts and suspension washers for the suspension that I cant replace through the blaster at a low pressure to remove any rust and to generally clean them up. Now I'm not sure about what to do with them, I was going to have them plated but have been told that load bearing bolts can fail after the plating process, I'm not sure how true this is and a quick Google search hasn't found much about it. Alternatively I could just paint them in a chrome paint, that way I know we're safe either way I think they need some sort of protection, any thoughts?

Anyway, the front and rear suspension's coming together nicely, getting close to being able to reassemble soon.
They've had a coat of red oxide with the anti roll bars and I'll give them a few coats of satin black tomorrow.
I'm not powder coating the hubs because I need to retain the machined surfaces, especially where the bolts go through to the discs and where the disc mates to the hub body, pc tends to get everywhere unless you mask up really well which looked like it could be a pain with these so I decided that it's easier to sand off paint than powder coat!
Before and after
Red oxide
Onto the subject of bolts, I'm sure that there's someone her that can shed some light on this for me. The obsessive compulsive side of me loves shiny bolts on a restored car! So I have run all of the load-bearing bolts and suspension washers for the suspension that I cant replace through the blaster at a low pressure to remove any rust and to generally clean them up. Now I'm not sure about what to do with them, I was going to have them plated but have been told that load bearing bolts can fail after the plating process, I'm not sure how true this is and a quick Google search hasn't found much about it. Alternatively I could just paint them in a chrome paint, that way I know we're safe either way I think they need some sort of protection, any thoughts?
Anyway, the front and rear suspension's coming together nicely, getting close to being able to reassemble soon.
Re: NWL – Project Carmine Sprint
I did a quick post on my experiences with diy media blasting if anyone's interested.
viewtopic.php?f=13&t=28437
viewtopic.php?f=13&t=28437