
Thanks guys!
That proves my theory that they're alright then! Paul's right about the price, for a bit more you can get a set of forged.
NWL – Project Concours Carmine Sprint
Re: NWL – Project Concours Carmine Sprint
Back from France and I have been thinking about front wings, no actually I have been losing sleep over the front wings!
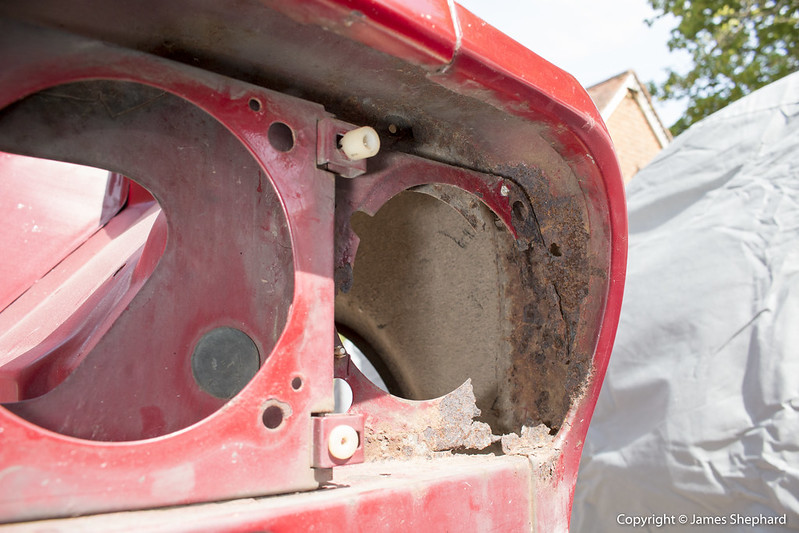
We were discussing this at the restoration show. They need to come off to do the front panel properly as well as the battery tray and to get proper access to repair the front part of the sills. However, I don't want to ruin the rear join between the A pillar and the wing itself, there is no rust up there, they look pretty much perfect.
All the accessible spot welds are ok, I can drill them out but it's just this rear joint that has me worried.
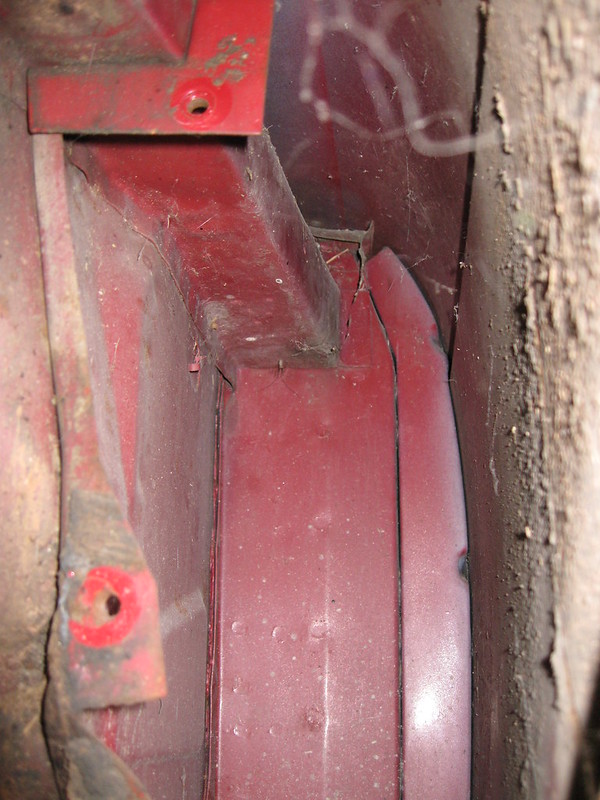
I remember Alun saying the best way is to gently pry the seam apart and use a reciprocating saw to cut the welds which is what Richard did here(thanks Richard4040!!).
Problem is that I want to retain a factory look here.
So as I dont need to do any work on the A pillars and inner wings here I have a proposition.
- Remove the bottoms of the wings to have access to the sills, replace with club panels, one side does have a hole which would need repair anyway.
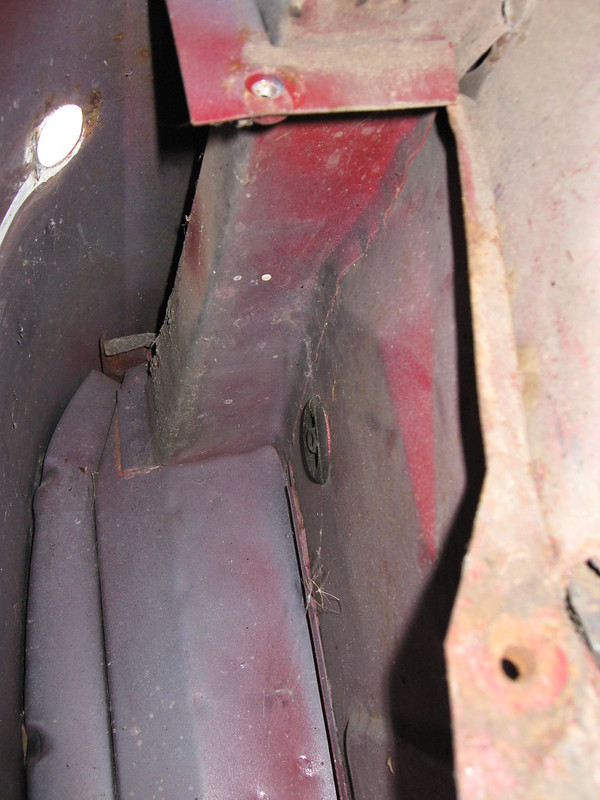
- Remove the front section of the wings. In the below pic, there is what looks like a seam, it isnt' it's just where the mud shield fits, I can cut along here with a 0.8mm disc, remove the front wing sections and remove the front valance by drilling out the spot welds thus gaining me access to the inner valance for repairs. The front wing needs a couple of small repairs here so having a small section will be easier to handle. I also have plenty of space to repair the battery tray with the wing able to support the inner wing if I have to cut a lot of the chassis leg away.
- As I used a 0.8mm disc I should then be able to butt weld the wing back into position and after some linishing the weld should disappear, the other side will be flush with the mud shield and won't be seen. The outer valence will just be plug welded back on, it will then get a healthy dose of cavity wax after paint!
Thoughts?
We were discussing this at the restoration show. They need to come off to do the front panel properly as well as the battery tray and to get proper access to repair the front part of the sills. However, I don't want to ruin the rear join between the A pillar and the wing itself, there is no rust up there, they look pretty much perfect.
All the accessible spot welds are ok, I can drill them out but it's just this rear joint that has me worried.
I remember Alun saying the best way is to gently pry the seam apart and use a reciprocating saw to cut the welds which is what Richard did here(thanks Richard4040!!).
Problem is that I want to retain a factory look here.
So as I dont need to do any work on the A pillars and inner wings here I have a proposition.
- Remove the bottoms of the wings to have access to the sills, replace with club panels, one side does have a hole which would need repair anyway.
- Remove the front section of the wings. In the below pic, there is what looks like a seam, it isnt' it's just where the mud shield fits, I can cut along here with a 0.8mm disc, remove the front wing sections and remove the front valance by drilling out the spot welds thus gaining me access to the inner valance for repairs. The front wing needs a couple of small repairs here so having a small section will be easier to handle. I also have plenty of space to repair the battery tray with the wing able to support the inner wing if I have to cut a lot of the chassis leg away.
- As I used a 0.8mm disc I should then be able to butt weld the wing back into position and after some linishing the weld should disappear, the other side will be flush with the mud shield and won't be seen. The outer valence will just be plug welded back on, it will then get a healthy dose of cavity wax after paint!
Thoughts?
-
Jon Tilson
- Guest contributor

- Posts: 11179
- Joined: Tue Oct 03, 2006 9:45 pm
- Location: Middlesex
Re: NWL – Project Concours Carmine Sprint
Either leave the wing on and just repair it from inside or take the wing off completely.
You can do that inner panel end on its own from inside with the wing in place surely?
Jonners
You can do that inner panel end on its own from inside with the wing in place surely?
Jonners
Note from Admin: sadly Jon passed away in February 2018 but his humour and wealth of knowledge will be fondly remembered by all. RIP Jonners.
Re: NWL – Project Concours Carmine Sprint
You're right Jonners, I'm over complicating the job.
Just had a good look in the sunshine and I can do the near (passenger) side with the wing in place.
The off (drivers) side is a bit more complicated due to the repairs needed to the chassis leg and inner wing but looking at it I should have enough access to do it without taking the wing off.
The question is how to get the club eyebrows in, I may just have to fabricate some repair pieces.
I'll take some photos.
Re: NWL – Project Concours Carmine Sprint
I'll steam clean everything first to get rid of the filth.
Then starting from the 'easy' passengers side!
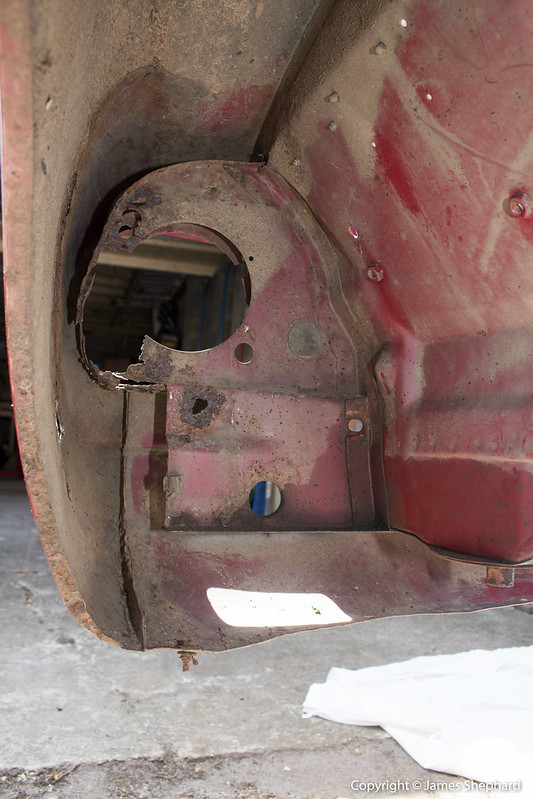
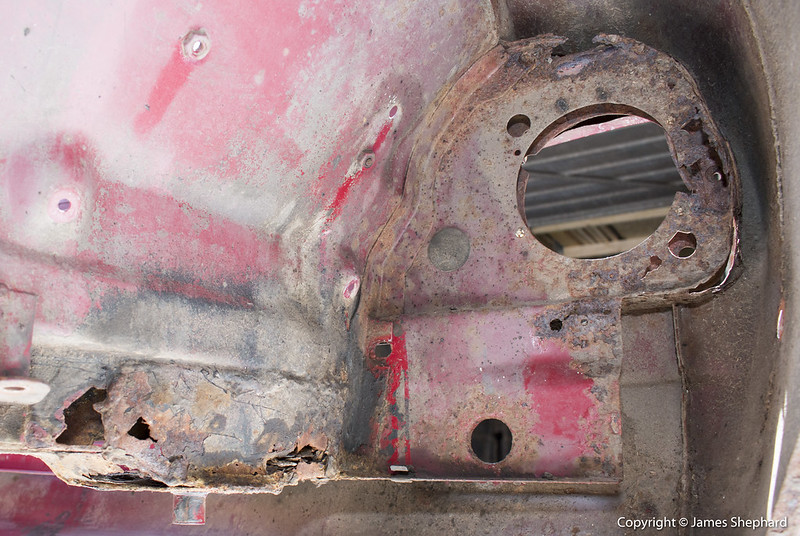
Yes, I have plenty of space to get in there and repair without removing the wing and the eyebrow isn't as bad as it looks.
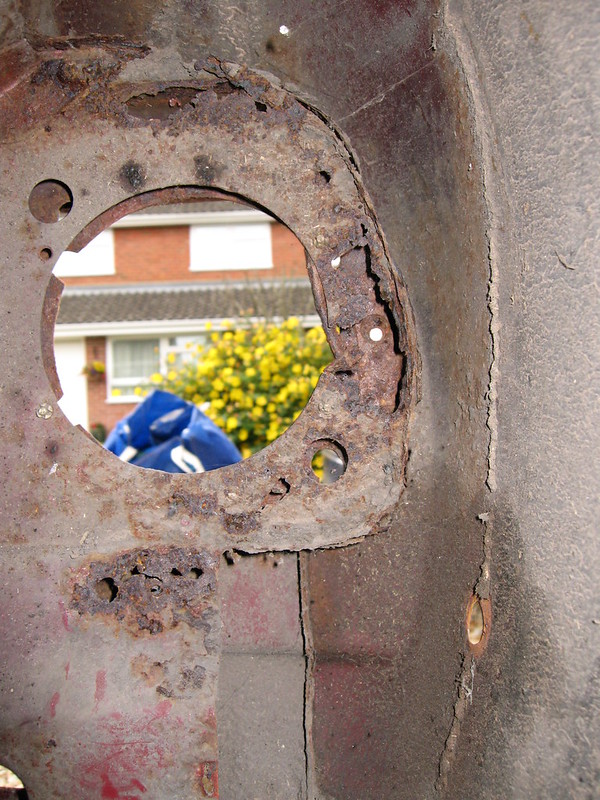
This is the problem with the chassis leg below the battery.
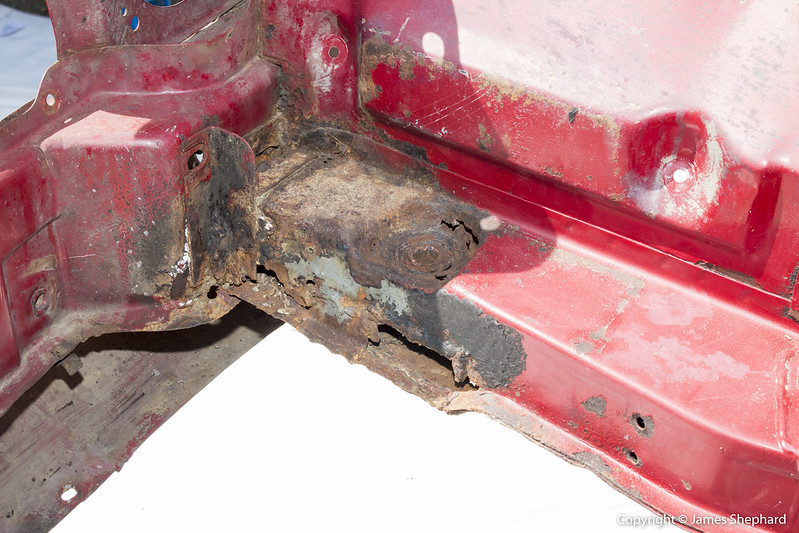

It's just the chassis leg and some rot on the inner valence where it joins. I have a complete inner wing so I'm thinking, cut off the rot from the car, repair the inner valence from the inside including the headlight panel then cut out a section from the inner wing that I have mount it all up, check it aligns with the subframe weld it up properly fit new headlamp panels and we are done!
The eyebrows look like they are ok and just need repair so I can give the club ones back to you if you like Alun.
Easy as pie!
Then starting from the 'easy' passengers side!
Yes, I have plenty of space to get in there and repair without removing the wing and the eyebrow isn't as bad as it looks.
This is the problem with the chassis leg below the battery.
It's just the chassis leg and some rot on the inner valence where it joins. I have a complete inner wing so I'm thinking, cut off the rot from the car, repair the inner valence from the inside including the headlight panel then cut out a section from the inner wing that I have mount it all up, check it aligns with the subframe weld it up properly fit new headlamp panels and we are done!
The eyebrows look like they are ok and just need repair so I can give the club ones back to you if you like Alun.
Easy as pie!
-
Maidstonerob
Re: NWL – Project Concours Carmine Sprint
What a fantastic thread and extensive resto well done
Re: NWL – Project Concours Carmine Sprint
Can't wait for the step by step photos of these repairs.
Re: NWL – Project Concours Carmine Sprint
Thanks Rob, much appreciated!What a fantastic thread and extensive resto well done
The white sheet is out (goes under the car when I'm taking photos to create a mobile light table), the spotlights have been cleaned and I'm ready to take photos!Can't wait for the step by step photos of these repairs.
But..... I won't be able to start this weekend due to some house maintenance that is desperately overdue.
Re: NWL – Project Concours Carmine Sprint
Guys and gals, what was the repair for the accelerator pedal bulkhead cracking issue?
Weld it up and fit the auto pedal brace?
Thanks
Weld it up and fit the auto pedal brace?
Thanks
-
Jon Tilson
- Guest contributor
- Posts: 11179
- Joined: Tue Oct 03, 2006 9:45 pm
- Location: Middlesex
Re: NWL – Project Concours Carmine Sprint
Pretty much. It tends to crack out to the hole for the wiring loom grommet. Alun makes something to strengthen it.
Mine did this so I riveted a support plate over the area.
Jonners
Mine did this so I riveted a support plate over the area.
Jonners
Note from Admin: sadly Jon passed away in February 2018 but his humour and wealth of knowledge will be fondly remembered by all. RIP Jonners.
-
Robert 352
- Guest contributor
- Posts: 389
- Joined: Tue Sep 25, 2012 2:08 am
- Location: Christchurch, New Zealand
Accelerator pedal stiffening
I guess you have a bit of a quandary here for if you are striving for originality then you have few options other than to weld where the cracking has occurred and fit the plate which was fitted to the automatic gearbox optioned cars.
Originality was not an issue with me. I set out to overcome the problem by reinforcing the area by bolting two plates, one on either side of the bulkhead. I utilised an additional hole in the bulkhead which the previous owner had drilled so that he could install an oil gauge. The plates were designed to transfer as much of the force generated back to the curved edge of the inner wheel arch which stiffens the whole bulkhead.
This is the plate on the interior side of the bulkhead which goes right out to the inner wheel arch.
This is the plate which matches the function of the auto reinforcing plate. I have shaped it so that it sits snugly up against the inner wheel arch.
If you are anything like me you will be wanting to enjoy the effort which you are putting into your car by driving it for that is where the real enjoyment comes so I would suggest the practical solution of at least stiffening the panel on one side after welding. The bigger the stiffening plate the better.
Robert
Originality was not an issue with me. I set out to overcome the problem by reinforcing the area by bolting two plates, one on either side of the bulkhead. I utilised an additional hole in the bulkhead which the previous owner had drilled so that he could install an oil gauge. The plates were designed to transfer as much of the force generated back to the curved edge of the inner wheel arch which stiffens the whole bulkhead.
This is the plate on the interior side of the bulkhead which goes right out to the inner wheel arch.
- 20121022-3628Pw bulkhead reinforcing plate.jpg (75.47 KiB) Viewed 3639 times
- 20121022-3627Pw bulkhead reinforcing plate.jpg (54.93 KiB) Viewed 3639 times
Robert

Re: NWL – Project Concours Carmine Sprint
Nice solution and Pics Robert, Im just looking at doing mine on the blue car so I'll copy yours 
Cheers
Tony
Cheers
Tony
Membership 2014047
Re: NWL – Project Concours Carmine Sprint
Thanks for the pics Robert.
1 - Just fit the automatic bracket to all cars
2 - Reinforce the area by spot welding a plate in place over it during manufacture
I think what a normal car company would have done would be to issue a recall and apply 1 to existing models during a service and implement number 2 during the manufacturing process.
No hang on it's BL we're talking about, there would have been an industrial dispute over it because some militant shop steward didn't want to bend over that far to operate the spot welder or something and then probably just ignored the issue!
I want to weld up the crack and do number 2 because I feel that's what would have happened to late cars, the area would have been reinforced with a spot welded plate. I'll have a look at that this weekend.
Pretty much yes, I imagine if BL spotted this early on then I imagine there would be two options:you have few options other than to weld where the cracking has occurred and fit the plate which was fitted to the automatic gearbox optioned cars.
1 - Just fit the automatic bracket to all cars
2 - Reinforce the area by spot welding a plate in place over it during manufacture
I think what a normal car company would have done would be to issue a recall and apply 1 to existing models during a service and implement number 2 during the manufacturing process.
No hang on it's BL we're talking about, there would have been an industrial dispute over it because some militant shop steward didn't want to bend over that far to operate the spot welder or something and then probably just ignored the issue!
I want to weld up the crack and do number 2 because I feel that's what would have happened to late cars, the area would have been reinforced with a spot welded plate. I'll have a look at that this weekend.
Re: NWL – Project Concours Carmine Sprint
Damn this really nice british weather!
I can't get any welding done due to the really nice weather. Problem is that I have a thousand and one things to do on the house so whilst the weather is good then I need to do them, the good news is that as soon as the usual british summer arrives I'll be able to move into the garage and do some bodywork!
In the meantime I have been finishing off some painting, the pedals and brackets have gone off to be enamelled and the radiator surround and some other bits have gone to be powder coated, I'll post some photos of those when they come back.
If you're new to this thread, this is the level of detail that I go to.
I painted the sump a while ago but wasn't happy with the finish, there were a couple of runs and pitting from surface rust, so I decided to do it again.
Stripped off all the paint.
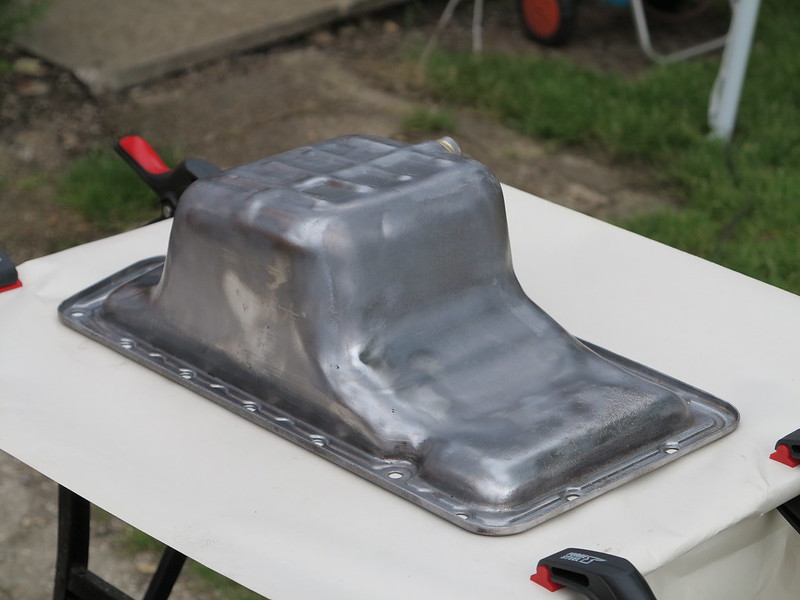
Then some metal filler to smooth out the pitting and some minor dings. Flat back, high build primer, guide coat, rinse and repeat and you get a nice smooth surface. Primer and guide coat are designed for high heat applications.

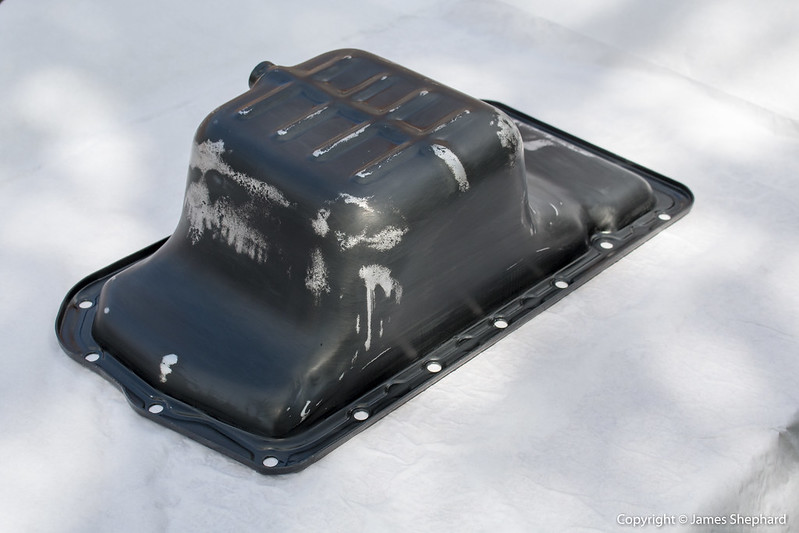
First of er.. I lost count of how many coats of engine paint I applied!!

I tend to spray coats thin then thick etc...
Looking better, bit of orange peel...

Some nice flowers in my garden whilst I waited for the paint fo flash off!

As you apply more paint you loose the orange peel and it gets smoother.

Eventually getting a nice finish ready for a flat and polish.
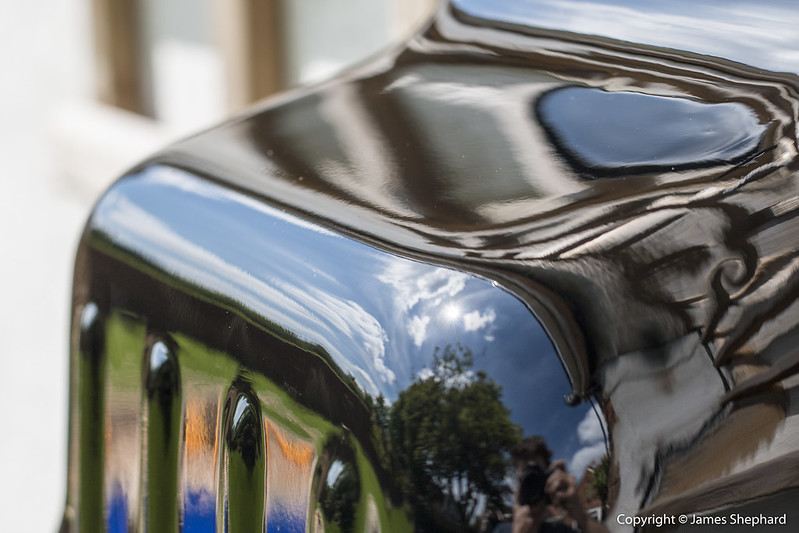


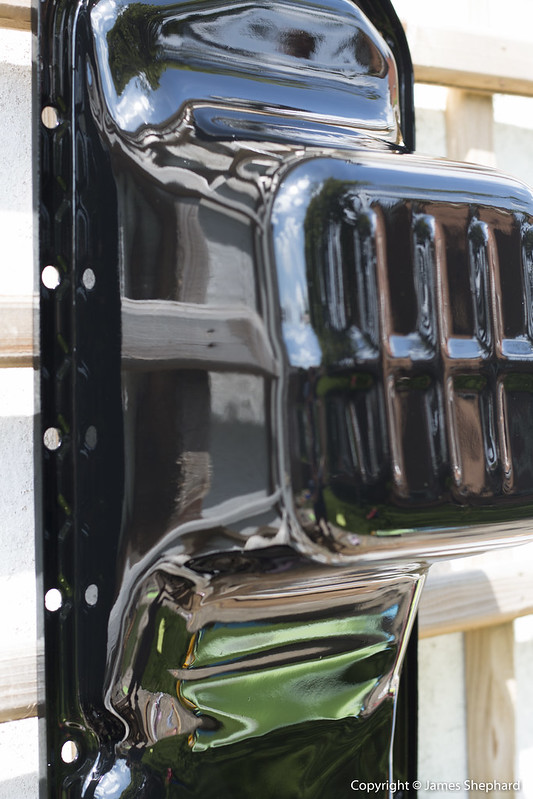
There is some orange peel but I can flat that back and give it a polish like the servo.
I can't get any welding done due to the really nice weather. Problem is that I have a thousand and one things to do on the house so whilst the weather is good then I need to do them, the good news is that as soon as the usual british summer arrives I'll be able to move into the garage and do some bodywork!
In the meantime I have been finishing off some painting, the pedals and brackets have gone off to be enamelled and the radiator surround and some other bits have gone to be powder coated, I'll post some photos of those when they come back.
If you're new to this thread, this is the level of detail that I go to.
I painted the sump a while ago but wasn't happy with the finish, there were a couple of runs and pitting from surface rust, so I decided to do it again.
Stripped off all the paint.
Then some metal filler to smooth out the pitting and some minor dings. Flat back, high build primer, guide coat, rinse and repeat and you get a nice smooth surface. Primer and guide coat are designed for high heat applications.
First of er.. I lost count of how many coats of engine paint I applied!!
I tend to spray coats thin then thick etc...
Looking better, bit of orange peel...
Some nice flowers in my garden whilst I waited for the paint fo flash off!
As you apply more paint you loose the orange peel and it gets smoother.
Eventually getting a nice finish ready for a flat and polish.
There is some orange peel but I can flat that back and give it a polish like the servo.
Re: NWL – Project Concours Carmine Sprint
I like the selfies in the mirror finish.
Do you have another sump, just to be sure the finish was not a fluke, ( I don't need to say the rest )
Do you have another sump, just to be sure the finish was not a fluke, ( I don't need to say the rest )
NRW 581W Sprint
On the motorway no one can hear me sing!
Construed as a public service, self preservation in reality.
On the motorway no one can hear me sing!
Construed as a public service, self preservation in reality.