Operation Orange - 1980 Sprint restoration
-
SprintMWU773V

- TDC Staffs Area Organiser
- Posts: 5429
- Joined: Wed Oct 18, 2006 2:08 pm
- Location: The Old Asylum
Re: Operation Orange - 1980 Sprint restoration
I certainly feel better than I have for probably 2 years, definately in the mood to get some work done. I just want the plating kit to arrive now. Bench is cleared and I'm ready to go. I'll definately show some pics on here.
Mark
1961 Chevrolet Corvair Greenbrier Sportswagon
1980 Dolomite Sprint project using brand new shell
2009 Mazda MX5 2.0 Sport
2018 Infiniti Q30
1961 Chevrolet Corvair Greenbrier Sportswagon
1980 Dolomite Sprint project using brand new shell
2009 Mazda MX5 2.0 Sport
2018 Infiniti Q30
Re: Operation Orange - 1980 Sprint restoration
Glad to hear you're feeling better, and great to see the progress. Maybe done by April 12th? 
-
SprintMWU773V
- TDC Staffs Area Organiser
- Posts: 5429
- Joined: Wed Oct 18, 2006 2:08 pm
- Location: The Old Asylum
Re: Operation Orange - 1980 Sprint restoration
No idea what's going on April 12th, but certainly not April 12th 2017! One part at a time.
Mark
1961 Chevrolet Corvair Greenbrier Sportswagon
1980 Dolomite Sprint project using brand new shell
2009 Mazda MX5 2.0 Sport
2018 Infiniti Q30
1961 Chevrolet Corvair Greenbrier Sportswagon
1980 Dolomite Sprint project using brand new shell
2009 Mazda MX5 2.0 Sport
2018 Infiniti Q30

Re: Operation Orange - 1980 Sprint restoration
Great work Mark, I'm interested to see how you get on with the plating kit. I worked out that they weren't really economical and it was easier for me to take the parts down to my local place.
-
SprintMWU773V
- TDC Staffs Area Organiser
- Posts: 5429
- Joined: Wed Oct 18, 2006 2:08 pm
- Location: The Old Asylum
Re: Operation Orange - 1980 Sprint restoration
No it's not economical at all but I thought it might be good fun to give it a go. I used to live much closer to a place that offered plating, although they were always a bit funny about small quantity work. Now I've moved it's no longer convenient to visit them so I thought I'd give it a go myself.
Some accessories arrived today such as an air pump to help aerate the mixture and a heater to keep it warm and get the best finish, all will be useful spares for my fish tank anyway. Sadly the important part of the kit has not yet arrived so perhaps it will come later on.
Some accessories arrived today such as an air pump to help aerate the mixture and a heater to keep it warm and get the best finish, all will be useful spares for my fish tank anyway. Sadly the important part of the kit has not yet arrived so perhaps it will come later on.
Mark
1961 Chevrolet Corvair Greenbrier Sportswagon
1980 Dolomite Sprint project using brand new shell
2009 Mazda MX5 2.0 Sport
2018 Infiniti Q30
1961 Chevrolet Corvair Greenbrier Sportswagon
1980 Dolomite Sprint project using brand new shell
2009 Mazda MX5 2.0 Sport
2018 Infiniti Q30
-
Toledo Man

- Guest contributor

- Posts: 7542
- Joined: Tue Oct 03, 2006 5:52 pm
- Location: Halifax, West Yorkshire
- Contact:
Re: Operation Orange - 1980 Sprint restoration
Glad to see you're getting your "mojo" back. What bushes did you use on the rear axle? The Super Flex ones are highly recommended and Chris Witor gives TDC members a discount on Super Flex bushes. The Club also sells some of the Super Flex bushes. This is the perfect example of "you get what you pay for". They're worth the extra money they cost.
Toledo Man
West Yorkshire Area Organiser
Meetings take place on the first Wednesday of the month at 8.00pm at The Railway, 1 Birstall Lane, Drighlington, Bradford, BD11 1JJ
2003 Volvo XC90 D5 SE (PX53 OVZ - The daily driver)
2009 Mercedes-Benz W204 C200 CDI Sport (BJ58 NCV - The 2nd car)
1991 Toyota Celica GT (J481 ONB - a project car)
Former stable of SAY 414M (1974 Toledo), GRH 244D (1966 1300fwd), CDB 324L (1973 1500fwd), GGN 573J (1971 1500fwd), DCP 625S (1977 Dolomite 1300) & LCG 367N (1975 Dolomite Sprint), NYE 751L (1972 Dolomite 1850 auto) plus 5 Acclaims and that's just the Triumphs!
Check my blog at http://triumphtoledo.blogspot.com
My YouTube Channel with a bit of Dolomite content.
"There is only one way to avoid criticsm: Do nothing, say nothing and BE nothing." Aristotle
-
SprintMWU773V
- TDC Staffs Area Organiser
- Posts: 5429
- Joined: Wed Oct 18, 2006 2:08 pm
- Location: The Old Asylum
Re: Operation Orange - 1980 Sprint restoration
The upper radius arms and shocks are Superflex and the trailing arms are Polybush (comfort grade). The Polybush ones are easier to fit than the Superflex here because they are in 2 halves. Plus the Polybush ones here are much closer to the original shore hardness of the rubber bushes. I wanted to choose fit and forget items but not risk too much stress on the arms. My arms are new so totally free of rust, plus I'm not going to hoon it around so I think the arms and mounts will be fine.
Mark
1961 Chevrolet Corvair Greenbrier Sportswagon
1980 Dolomite Sprint project using brand new shell
2009 Mazda MX5 2.0 Sport
2018 Infiniti Q30
1961 Chevrolet Corvair Greenbrier Sportswagon
1980 Dolomite Sprint project using brand new shell
2009 Mazda MX5 2.0 Sport
2018 Infiniti Q30
-
shaunroche
- TDC Member
- Posts: 1054
- Joined: Sun Apr 06, 2014 10:49 pm
- Location: Northwich
Re: Operation Orange - 1980 Sprint restoration
Hi Mark, glad to see you're back on it!
I had a nightmare fitting my radius arms......I've the orange bushes from Superflex and can't remember the grade but I know they're not he hardest....no amount of Squeezey and brute force would force them in!
In the end I dropped the axle and fitted the radius arms first and then put the trailing arms in, but this still was very taxing, though they went in eventually.
Another one of those thirty minute jobs that take all day!
Great work and Keep the faith!
Keep the pics coming please!
Come and see some pretty shoddy, slow driving of a really well prepared competition Sprint here!
http://www.youtube.com/@theunknownworrier
Club Triumph Round Britain Reliability Run 2025 Fund raising page:
https://wonderful.org/fundraisers/n8AYV ... derful.org
http://www.youtube.com/@theunknownworrier
Club Triumph Round Britain Reliability Run 2025 Fund raising page:
https://wonderful.org/fundraisers/n8AYV ... derful.org
-
Toledo Man
- Guest contributor
- Posts: 7542
- Joined: Tue Oct 03, 2006 5:52 pm
- Location: Halifax, West Yorkshire
- Contact:
Re: Operation Orange - 1980 Sprint restoration
I never knew Super Flex did orange bushes for the Dolomite. I've only ever seen them in navy blue although my front tiebar bushes were red. Polybush do orange bushes (is that what you're thinking of?) and they're the only other bushes I'd recommend aside from Super Flex. Super Flex aren't that much harder then original rubber so you're getting the best of both worlds.
The tie bars can be a mare to fit at the axle end. The outer washer won't go on at first so you will need to wind the nut on to compress the outer (rear) bush enough to get the washer on and leave enough thread for the nut. The nut just needs to be done up far enough to allow the R clips to be fitted. I don't know if it would be easier to fit the tie bars to the axle first. There would be less room to fit them at the body end with the axle in situ.
The tie bars can be a mare to fit at the axle end. The outer washer won't go on at first so you will need to wind the nut on to compress the outer (rear) bush enough to get the washer on and leave enough thread for the nut. The nut just needs to be done up far enough to allow the R clips to be fitted. I don't know if it would be easier to fit the tie bars to the axle first. There would be less room to fit them at the body end with the axle in situ.
Toledo Man
West Yorkshire Area Organiser
Meetings take place on the first Wednesday of the month at 8.00pm at The Railway, 1 Birstall Lane, Drighlington, Bradford, BD11 1JJ
2003 Volvo XC90 D5 SE (PX53 OVZ - The daily driver)
2009 Mercedes-Benz W204 C200 CDI Sport (BJ58 NCV - The 2nd car)
1991 Toyota Celica GT (J481 ONB - a project car)
Former stable of SAY 414M (1974 Toledo), GRH 244D (1966 1300fwd), CDB 324L (1973 1500fwd), GGN 573J (1971 1500fwd), DCP 625S (1977 Dolomite 1300) & LCG 367N (1975 Dolomite Sprint), NYE 751L (1972 Dolomite 1850 auto) plus 5 Acclaims and that's just the Triumphs!
Check my blog at http://triumphtoledo.blogspot.com
My YouTube Channel with a bit of Dolomite content.
"There is only one way to avoid criticsm: Do nothing, say nothing and BE nothing." Aristotle
-
SprintMWU773V
- TDC Staffs Area Organiser
- Posts: 5429
- Joined: Wed Oct 18, 2006 2:08 pm
- Location: The Old Asylum
Re: Operation Orange - 1980 Sprint restoration
Fitting the tie bars wasn't too difficult. I fitted one bush and poked them through the bits on the axle. I undid the trailing arms and then raised the axle so I could fit the body end of the tie bar. I found it was necessary to mess with the angle of the axle (no prop attached), the height and moving it forward and back and then by all this wiggling around I was able to then add the other bushes, washer and nut on the axle end. I've tightened them a bit but not sufficiently to fit the R clips yet but they will fit easily enough.
I wouldn't say fitting the back end was especially easy but actually with some thinking and forward planning it went OK. Best of all everything is clean, dealing with anything underneath a car inevitably means bits falling in your face which isn't very nice.
I wouldn't say fitting the back end was especially easy but actually with some thinking and forward planning it went OK. Best of all everything is clean, dealing with anything underneath a car inevitably means bits falling in your face which isn't very nice.
Mark
1961 Chevrolet Corvair Greenbrier Sportswagon
1980 Dolomite Sprint project using brand new shell
2009 Mazda MX5 2.0 Sport
2018 Infiniti Q30
1961 Chevrolet Corvair Greenbrier Sportswagon
1980 Dolomite Sprint project using brand new shell
2009 Mazda MX5 2.0 Sport
2018 Infiniti Q30
-
shaunroche
- TDC Member
- Posts: 1054
- Joined: Sun Apr 06, 2014 10:49 pm
- Location: Northwich
Re: Operation Orange - 1980 Sprint restoration
Ha, no you're right, they are Polybush..my mistake!!Toledo Man wrote:I never knew Super Flex did orange bushes for the Dolomite. I've only ever seen them in navy blue although my front tiebar bushes were red. Polybush do orange bushes .......
Come and see some pretty shoddy, slow driving of a really well prepared competition Sprint here!
http://www.youtube.com/@theunknownworrier
Club Triumph Round Britain Reliability Run 2025 Fund raising page:
https://wonderful.org/fundraisers/n8AYV ... derful.org
http://www.youtube.com/@theunknownworrier
Club Triumph Round Britain Reliability Run 2025 Fund raising page:
https://wonderful.org/fundraisers/n8AYV ... derful.org
-
SprintMWU773V
- TDC Staffs Area Organiser
- Posts: 5429
- Joined: Wed Oct 18, 2006 2:08 pm
- Location: The Old Asylum
Re: Operation Orange - 1980 Sprint restoration
Thought I’d have a go at electroplating this weekend.
I purchased a kit online from a company called Classic Plating. It came with most things that are needed to do some zinc plating:
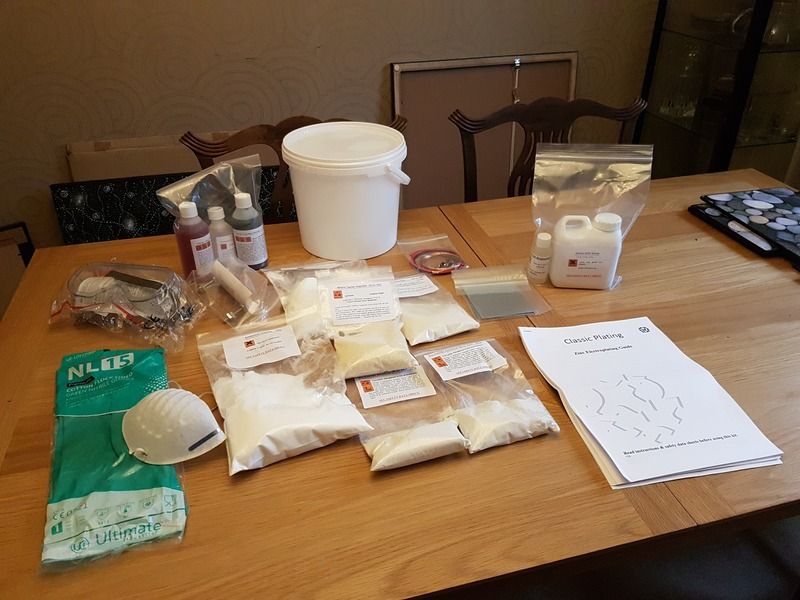
Alkaline Cleaner Chemicals
Dry Acid Pickle granules
Zinc Chloride
Ammonium Chloride
Various other start up chemicals
Clear Passivate
Yellow Passivate
Zinc Anodes
Copper and Steel Wires
Plastic Bucket (used as tank)
Current adjuster
Power Supply wires and clips
Gloves and goggles.
The only things I needed to buy were some more buckets with lids to use with some of the other chemicals and a small fish tank heater to keep the solution above 20 degrees C. This is optional but you will find the process is easier and better with the temperature above 18 degrees C.
I started by labelling buckets for the various pre-processes and and mixed up these chemicals as well as opting to mix the Yellow passivate, which again needed its own bucket. I wore a mask and goggles as these chemicals are pretty nasty. I used RO (distilled) water rather than take my chances with the tap stuff. I then moved onto wiring up the anodes before removing them to mix the zinc plating chemicals, again pretty easy. Though the kit came supplied with a current resistor to enable the use of a 12V car or leisure battery I already have an adjustable power supply which seemed easier and safer so I cut my wires to suit that.
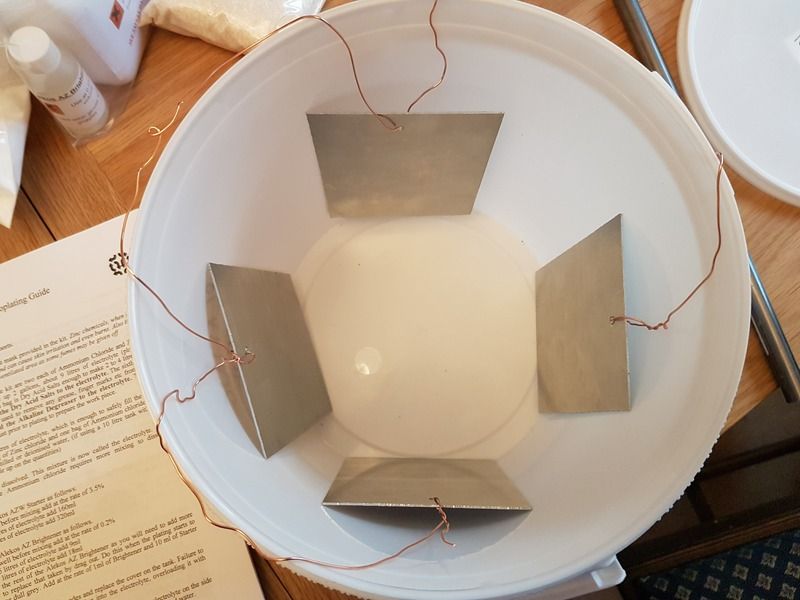
I chose a couple of old bits and pieces to practice on and to see if the kit worked and to tinker with the voltage on the power supply. What I did discover was that actually some of my parts were pretty manky and needed quite a bit of cleaning before I even started.
Step 1 is really to brush down, and get rid of loose bits. I found using a Dremel quite useful with a small drum sander on it and/or a wire brush.
Step 2 – Thoroughly de-grease your item in the Alkaline degreaser and then rinse in water
Step 3 – Place your piece into the Acid Pickle for a few minutes. This helps to etch the surface and clean off any remaining grease and muck
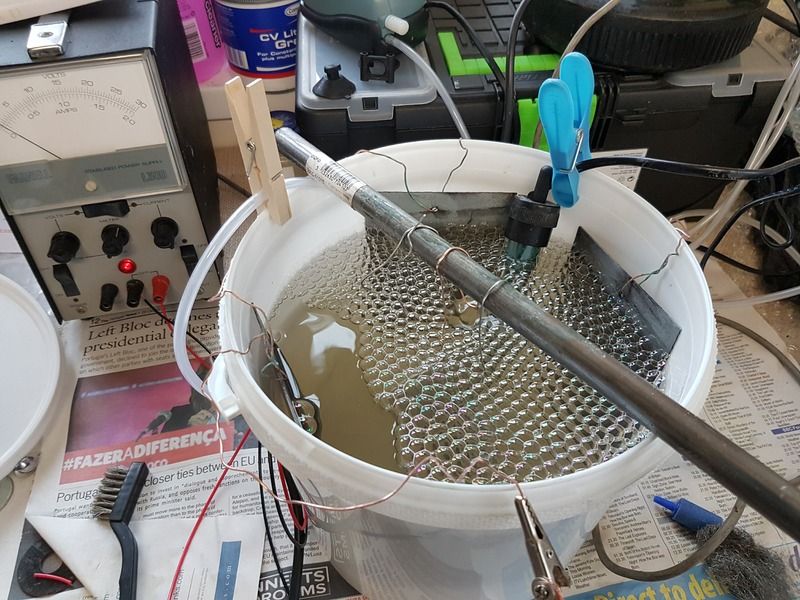
Step 4 – Place into the plating tank and attach the negative lead to the wire the piece is hung from or attach to the bar across the top if you’re doing multiple items. The positive lead is attached to the anodes.
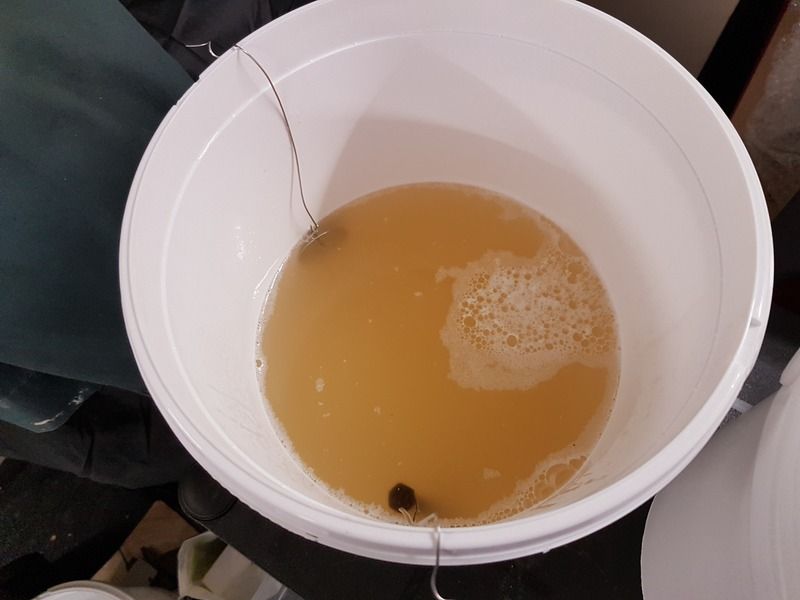
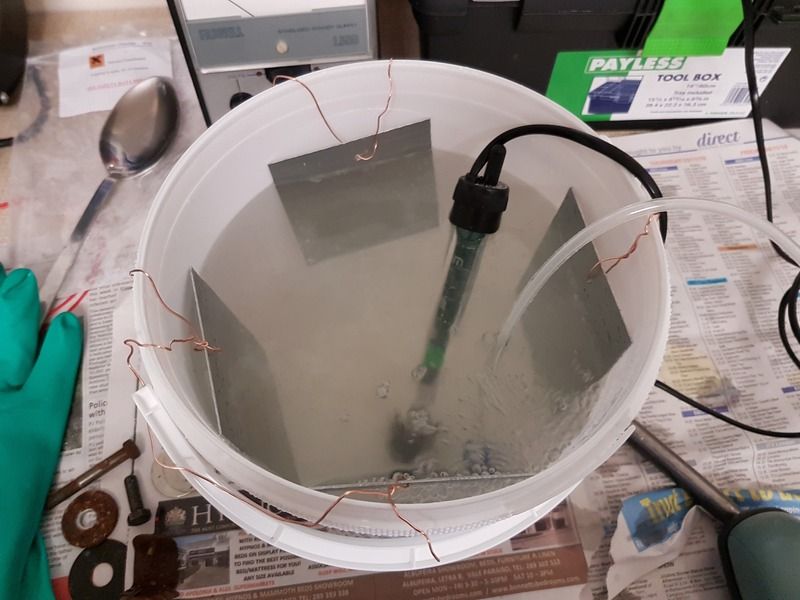
Switch on the power supply and wait. After a few minutes you might see some bubbling from the surface of the piece and then it will start to turn zinc coloured as the zinc molecules are attached to it. When the plating is complete switch off the current, remove from the tank and wash in water.
Step 5 is passivation. This is optional but will help to provide better corrosion protection. Simply dip the piece into the passivate solution for 30 seconds or so, remove and rinse. Then hang it somewhere to dry for at least 12 hours. You can also put in an oven if you're in a hurry.

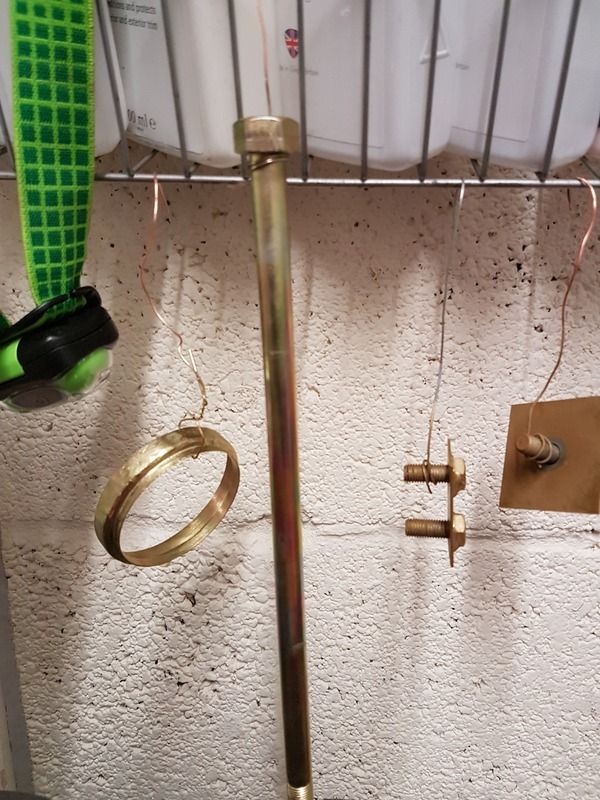
Overall I’m pleased with the results I’ve achieved. It’s not especially economical to do but it’s more the fun of doing it. To get the best results the piece you’re plating must be extremely clean so time spent here will result in a better finish. I’ve still got some more pieces to plate and passivate for my project and then I’ll do a few more whilst I’m set up. The electrolyte and other chemicals lasts a long time if stored correctly so I’ll do the work I need to and then pack it away.
I purchased a kit online from a company called Classic Plating. It came with most things that are needed to do some zinc plating:

Alkaline Cleaner Chemicals
Dry Acid Pickle granules
Zinc Chloride
Ammonium Chloride
Various other start up chemicals
Clear Passivate
Yellow Passivate
Zinc Anodes
Copper and Steel Wires
Plastic Bucket (used as tank)
Current adjuster
Power Supply wires and clips
Gloves and goggles.
The only things I needed to buy were some more buckets with lids to use with some of the other chemicals and a small fish tank heater to keep the solution above 20 degrees C. This is optional but you will find the process is easier and better with the temperature above 18 degrees C.
I started by labelling buckets for the various pre-processes and and mixed up these chemicals as well as opting to mix the Yellow passivate, which again needed its own bucket. I wore a mask and goggles as these chemicals are pretty nasty. I used RO (distilled) water rather than take my chances with the tap stuff. I then moved onto wiring up the anodes before removing them to mix the zinc plating chemicals, again pretty easy. Though the kit came supplied with a current resistor to enable the use of a 12V car or leisure battery I already have an adjustable power supply which seemed easier and safer so I cut my wires to suit that.

I chose a couple of old bits and pieces to practice on and to see if the kit worked and to tinker with the voltage on the power supply. What I did discover was that actually some of my parts were pretty manky and needed quite a bit of cleaning before I even started.
Step 1 is really to brush down, and get rid of loose bits. I found using a Dremel quite useful with a small drum sander on it and/or a wire brush.
Step 2 – Thoroughly de-grease your item in the Alkaline degreaser and then rinse in water
Step 3 – Place your piece into the Acid Pickle for a few minutes. This helps to etch the surface and clean off any remaining grease and muck
Step 4 – Place into the plating tank and attach the negative lead to the wire the piece is hung from or attach to the bar across the top if you’re doing multiple items. The positive lead is attached to the anodes.


Switch on the power supply and wait. After a few minutes you might see some bubbling from the surface of the piece and then it will start to turn zinc coloured as the zinc molecules are attached to it. When the plating is complete switch off the current, remove from the tank and wash in water.

Step 5 is passivation. This is optional but will help to provide better corrosion protection. Simply dip the piece into the passivate solution for 30 seconds or so, remove and rinse. Then hang it somewhere to dry for at least 12 hours. You can also put in an oven if you're in a hurry.


Overall I’m pleased with the results I’ve achieved. It’s not especially economical to do but it’s more the fun of doing it. To get the best results the piece you’re plating must be extremely clean so time spent here will result in a better finish. I’ve still got some more pieces to plate and passivate for my project and then I’ll do a few more whilst I’m set up. The electrolyte and other chemicals lasts a long time if stored correctly so I’ll do the work I need to and then pack it away.
Last edited by SprintMWU773V on Wed Jul 26, 2017 2:23 pm, edited 1 time in total.
Mark
1961 Chevrolet Corvair Greenbrier Sportswagon
1980 Dolomite Sprint project using brand new shell
2009 Mazda MX5 2.0 Sport
2018 Infiniti Q30
1961 Chevrolet Corvair Greenbrier Sportswagon
1980 Dolomite Sprint project using brand new shell
2009 Mazda MX5 2.0 Sport
2018 Infiniti Q30

Re: Operation Orange - 1980 Sprint restoration
Holy chemistry set Batman!
It isn't Orange!!!!!!
The other one wasn't Purple either!!!
One of the new ones will probably be green, very green.
Another new one is green too but not as green as the previous one. Still pretty green. No, now it's Blue.
The other new one will be white with stripes. Actually it might not. No, it will be.
BUT, that one is definitely Yellow :=}
Re: Operation Orange - 1980 Sprint restoration
Thanks Mark, the results look great!
What was the cost of the kit as a whole?
What is the risk of hydrogen embrittlement when using the kit as well? My plater always asks me to separate critical items and he is very careful to bake them before giving them back.
What was the cost of the kit as a whole?
What is the risk of hydrogen embrittlement when using the kit as well? My plater always asks me to separate critical items and he is very careful to bake them before giving them back.
-
SprintMWU773V
- TDC Staffs Area Organiser
- Posts: 5429
- Joined: Wed Oct 18, 2006 2:08 pm
- Location: The Old Asylum
Re: Operation Orange - 1980 Sprint restoration
The basic kit which included the chemicals and 1 bucket to use as the tank was about £60. I also bought some other buckets with lids for other chemicals from Amazon which cost £6, and also an aquarium heater which cost another £9 but if you're plating in colder climes is definitely worth it. I already had the power supply but if you did want one they are very cheap on Ebay!
I wouldn't be overly concerned about hydrogen embrittlement using this kit. If you set up well you're using extremely low current and as such you'll be promoting the uptake of hydrogen at a very low level. HE is more of a problem in larger commercial operations where you're running much hotter and at a much higher current which is necessitated by the need to up production. Also the parts I've plated are mostly pretty small, therefore they don't take a huge time to plate. It's also worth noting that since cyanide is no longer used as part of the electrolyte the baths are much more efficient and there's less risk of HE.
There's actually also risk of HE from long exposure to the acid pickle so I would recommend mechanical cleaning where possible and on any critical parts to just flash them in the acid pickle for a short period rather than using it as a cleaner.
If you're at all unsure you can always heat treat your parts at the end of the process in an oven at 180-220 deg C for 6-8 hours.
Mark
1961 Chevrolet Corvair Greenbrier Sportswagon
1980 Dolomite Sprint project using brand new shell
2009 Mazda MX5 2.0 Sport
2018 Infiniti Q30
1961 Chevrolet Corvair Greenbrier Sportswagon
1980 Dolomite Sprint project using brand new shell
2009 Mazda MX5 2.0 Sport
2018 Infiniti Q30