Hello everyone!
I'm having terrible trouble sourcing quality parts - I've gone through maybe 5 indicator stalks in the last few years, the last one lasting only 3 months, then the headlights failed. I keep trying to bodge fix them, but they always just fall to bits - indicator connections snapping off, plastic melting, connectors bending badly, all sorts. At about £50 a pop its no joke, and I'm being super careful with them.
Any suggestions on where to source some better ones?!
Indicator stalks
-
HQentity

- Guest contributor

- Posts: 309
- Joined: Mon Jan 05, 2015 12:42 pm
- Location: Ashington, West Sussex
Indicator stalks
HQentity (Kyle)
1975 TRIUMPH DOLOMITE 1850 in Honeysuckle (Nina) 2015-2020

"The harder the conflict, the more glorious the Triumph." - Thomas Paine
1975 TRIUMPH DOLOMITE 1850 in Honeysuckle (Nina) 2015-2020
"The harder the conflict, the more glorious the Triumph." - Thomas Paine
Re: Indicator stalks
You do have relays fitted for the headlights?
-
HQentity
- Guest contributor
- Posts: 309
- Joined: Mon Jan 05, 2015 12:42 pm
- Location: Ashington, West Sussex
Re: Indicator stalks
No. The headlights didn't fail, the indicator stalk did (the headlamp circuit).
HQentity (Kyle)
1975 TRIUMPH DOLOMITE 1850 in Honeysuckle (Nina) 2015-2020
"The harder the conflict, the more glorious the Triumph." - Thomas Paine
1975 TRIUMPH DOLOMITE 1850 in Honeysuckle (Nina) 2015-2020
"The harder the conflict, the more glorious the Triumph." - Thomas Paine

Re: Indicator stalks
Not saying don't have relays (I have, bought a superb loom of Jerome) but the stalks were designed to switch (quad lamp car) originally 75w to 270w but with halogen from 110w to 240w, surely that's a drop in maximum switching load? Though I grant you that's a higher normal running load. Halogen may have a higher inrush current over tungsten but I can't find anything to support that, and anyway, we are talking 0.05 second or so.
IIRC the Lucas 119 stalk was fitted with variations to all sorts of things, Fords, Morgans etc. I kinda suspect it's the curse of the green boxed Lucas kit here.
Just musing out aloud...
IIRC the Lucas 119 stalk was fitted with variations to all sorts of things, Fords, Morgans etc. I kinda suspect it's the curse of the green boxed Lucas kit here.
Just musing out aloud...
Current fleet: '75 Sprint, '73 1850, Daihatsu Fourtrak, Honda CG125, Yamaha Fazer 600, Shetland 570 (yes it's a boat!)
Past fleet: Triumph 2000, Lancia Beta Coupe, BL Mini Clubman, Austin Metro, Vauxhall Cavalier MK1 & MK2, Renault 18 D, Rover 216 GSI, Honda Accord (most expensive car purchase, hated, made out of magnetic metal as only car I've ever been crashed into...4 times), BMW 318, Golf GTi MK3 16v x 3
Past fleet: Triumph 2000, Lancia Beta Coupe, BL Mini Clubman, Austin Metro, Vauxhall Cavalier MK1 & MK2, Renault 18 D, Rover 216 GSI, Honda Accord (most expensive car purchase, hated, made out of magnetic metal as only car I've ever been crashed into...4 times), BMW 318, Golf GTi MK3 16v x 3
-
HQentity
- Guest contributor
- Posts: 309
- Joined: Mon Jan 05, 2015 12:42 pm
- Location: Ashington, West Sussex
Re: Indicator stalks
I'm guessing no ones really suffered the same fate as me then with the stalks? They're absolute tat, just fall to pieces. There's these sort of, 'switches' that actuate the circuits for indicating, or the headlamps, and they break one way or another after 3-5000 miles. I've had the horn circuit fail, The plastic end installed backwards, all sorts. I've bodged the latest one so everything except full beam works for now.
Is there another stalk apart from the dreaded green boxes?
Is there another stalk apart from the dreaded green boxes?
HQentity (Kyle)
1975 TRIUMPH DOLOMITE 1850 in Honeysuckle (Nina) 2015-2020
"The harder the conflict, the more glorious the Triumph." - Thomas Paine
1975 TRIUMPH DOLOMITE 1850 in Honeysuckle (Nina) 2015-2020
"The harder the conflict, the more glorious the Triumph." - Thomas Paine
-
GrahamFountain
- Guest contributor
- Posts: 1735
- Joined: Sun Sep 08, 2013 3:35 pm
- Location: St Annes on Sea, Lancs.
Re: Indicator stalks
It depends on how and where the switches are falling apart? But if it's the switch bodies that are failing, then I still think taking the load off the switches with headlight relays may help. I assume that, like the TR7, the main beam flash is prone to causing the switch to melt.
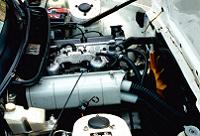
The headlight relays on mine are under the dash, as shown - just a pair of spire clips on the cardboard sheeting to hold them. Since they're just inserted into the cut wires, with a fused (inline) power and earth feed, it's a relatively simple job to fit them there, where the blue/red and blue/white wires from the switch are accessible, etc. And they're only a couple of quid each.
Hard part, as ever, is getting a crimp tool and Lucar connectors that will give good connections - those insulated ones where you crimp the end through the red, blue, or yellow plastic are crap. I've got a tool that does the uninsulated ones properly, and also does the 3mm RISTS multipin connectors. The aircraft fitters at work assure me that a properly crimped connector is more reliable and longer lasting than a soldered one.
I've also had to put a relay in the washer pump circuit because of resistance in the button switch stopping the pump. That much resistance in the headlight circuits would have to cause something to get hot somewhere. Currently, that's tucked under the engine bay gutter, but I'm thinking of moving it to under the dash like the headlight ones.
Graham
- Attachments
-
- IMG_20190627_204813.jpg (135.8 KiB) Viewed 2585 times
The 16v Slant 4 engine is more fun than the 3.5 V8, because you mostly drive it on the upslope of the torque curve.
Factory 1977 TR7 Sprint FHC VVC 697S (Now all of, but still needs putting together)
B&Y 73 Dolomite Sprint UVB 274M (kids!)
1970 Maroon 13/60 Herald Convertable (wife's fun car).
Factory 1977 TR7 Sprint FHC VVC 697S (Now all of, but still needs putting together)
B&Y 73 Dolomite Sprint UVB 274M (kids!)
1970 Maroon 13/60 Herald Convertable (wife's fun car).
-
Carledo
- TDC Shropshire Area Organiser
- Posts: 7248
- Joined: Sun Aug 21, 2011 5:12 pm
- Location: Highley, Shropshire
Re: Indicator stalks
Galileo wrote: ↑Thu Jun 27, 2019 11:07 pm Not saying don't have relays (I have, bought a superb loom of Jerome) but the stalks were designed to switch (quad lamp car) originally 75w to 270w but with halogen from 110w to 240w, surely that's a drop in maximum switching load? Though I grant you that's a higher normal running load. Halogen may have a higher inrush current over tungsten but I can't find anything to support that, and anyway, we are talking 0.05 second or so.
IIRC the Lucas 119 stalk was fitted with variations to all sorts of things, Fords, Morgans etc. I kinda suspect it's the curse of the green boxed Lucas kit here.
Just musing out aloud...
I have to take issue with your figures there Rafe, Max load on an original early Sprint with sealed beams and the 75w inners (only early Sprints had these) is 240w (2x75 + 2x45w) with a minimum of 80w on dip (2x40)
But all quad light cars EXCEPT the early Sprints only had 45w inners for a max of 180w.
The minimum main beam load on halogens is 260w (4x65 on "standard" H1 bulbs), go to readily available (if somewhat illegal) 100/80 halogen bulbs and max load could be 400w! And goodnight and good luck to the switch!
There is little doubt that modern green box Lucas stuff is rubbish, but short of finding NOS or good used that's the only way possible. Taking this into account, it behooves us all to fit the relays, even if we have the original sealed beams, just to prolong the life of the switches we have!
Steve
'73 2 door Toledo with Vauxhall Carlton 2.0 8v engine (The Carledo)
'78 Sprint Auto with Vauxhall Omega 2.2 16v engine (The Dolomega)
'72 Triumph 1500FWD in Slate Grey, Now with RWD and Carledo powertrain!
Maverick Triumph, Servicing, Repairs, Electrical, Recomissioning, MOT prep, Trackerjack brake fitting service.
Apprentice served Triumph Specialist for 50 years. PM for more info or quotes.
Re: Indicator stalks
It's all cool, but I'm not sure about your figures there, so in the tried and tested fashion I thought I'd show my workings out, and did research rather than from memory!
Based on the figures in the ROM (2nd Edition) for my Sprint, and cross referenced with the Haynes book of lies, the outers are stated as being 37.5/60w, inners 75w.
Sealed beam
Dipped 37.5w x 2 = 75w
Full beam 60w x 2 + 75w x 2 = 270w
Halogen
Dipped 2 x H4 (60/)55w = 110w
Full beam 2 x H4 60(/55w) + 2 x H1 55w = 230w
So apart from I got the standard H1 bulb wattage wrong originally, thought they were 60w, where have I gone wrong here?
Edit: Can't tell my inners from my outers!
Last edited by Galileo on Fri Jun 28, 2019 8:59 pm, edited 2 times in total.
Current fleet: '75 Sprint, '73 1850, Daihatsu Fourtrak, Honda CG125, Yamaha Fazer 600, Shetland 570 (yes it's a boat!)
Past fleet: Triumph 2000, Lancia Beta Coupe, BL Mini Clubman, Austin Metro, Vauxhall Cavalier MK1 & MK2, Renault 18 D, Rover 216 GSI, Honda Accord (most expensive car purchase, hated, made out of magnetic metal as only car I've ever been crashed into...4 times), BMW 318, Golf GTi MK3 16v x 3
Past fleet: Triumph 2000, Lancia Beta Coupe, BL Mini Clubman, Austin Metro, Vauxhall Cavalier MK1 & MK2, Renault 18 D, Rover 216 GSI, Honda Accord (most expensive car purchase, hated, made out of magnetic metal as only car I've ever been crashed into...4 times), BMW 318, Golf GTi MK3 16v x 3

Aye,....
Going back to the days of the Dolomite Sprint Register, the stalks are a known weakness.
As has been said, fitting relays avoids this scenario.
T2000 mark 2 and Stag stalks are the same, which broadens the search for secondhand or NOS
(but please do note that early models have different plugs which will need swapping though).
Alternatively, the kit car world has "universal" switchgear.
It will be possible to come up with a compromise but it will be a compromise,
expect not to have self cancelling indicators for example?).
Me, I would try a wanted ad for secondhand.....
Ian.
TDC Forum moderator
PLEASE help us to maintain a friendly forum,
either PM or use Report Post if you see anything you are unhappy with. Thanks.
PLEASE help us to maintain a friendly forum,
either PM or use Report Post if you see anything you are unhappy with. Thanks.
-
HQentity
- Guest contributor
- Posts: 309
- Joined: Mon Jan 05, 2015 12:42 pm
- Location: Ashington, West Sussex
Re: Indicator stalks
Thanks for the help everybody.
I don't feel like I'm getting any issues from too much current, more poor build quality. I'll admit electrics are a known weakness of mine though. How do I fit these "relays" please?
I don't feel like I'm getting any issues from too much current, more poor build quality. I'll admit electrics are a known weakness of mine though. How do I fit these "relays" please?
HQentity (Kyle)
1975 TRIUMPH DOLOMITE 1850 in Honeysuckle (Nina) 2015-2020
"The harder the conflict, the more glorious the Triumph." - Thomas Paine
1975 TRIUMPH DOLOMITE 1850 in Honeysuckle (Nina) 2015-2020
"The harder the conflict, the more glorious the Triumph." - Thomas Paine
Re: Indicator stalks
I have this on the shopping list for my wreck repair "A quality reproduction of a Lucas SQB119", mainly because I'd get some warranty with it and they don't say it's a Lucas sourced one, still, it's £50 again.
Really basically,
Trace the blue/white wire that goes to the headlights (for full beam)
Find a suitable location for your relay along the length
Cut the wire
Run a new battery positive (to take the headlight load) and negative to the same location
Wire blue/white from the headlight switch to the relay coil, same with battery negative
New battery positive and blue/white to the headlights on the contacts
Edit: For the cost of a couple of new stalks or so, you could ask Jeroen (soe8m) to make you a new loom up, he gives full fitting instructions, and comes with the added benefit of slightly brighter lights due to less resistance.
Current fleet: '75 Sprint, '73 1850, Daihatsu Fourtrak, Honda CG125, Yamaha Fazer 600, Shetland 570 (yes it's a boat!)
Past fleet: Triumph 2000, Lancia Beta Coupe, BL Mini Clubman, Austin Metro, Vauxhall Cavalier MK1 & MK2, Renault 18 D, Rover 216 GSI, Honda Accord (most expensive car purchase, hated, made out of magnetic metal as only car I've ever been crashed into...4 times), BMW 318, Golf GTi MK3 16v x 3
Past fleet: Triumph 2000, Lancia Beta Coupe, BL Mini Clubman, Austin Metro, Vauxhall Cavalier MK1 & MK2, Renault 18 D, Rover 216 GSI, Honda Accord (most expensive car purchase, hated, made out of magnetic metal as only car I've ever been crashed into...4 times), BMW 318, Golf GTi MK3 16v x 3
-
new to this
- TDC Member
- Posts: 1793
- Joined: Mon Dec 12, 2016 9:53 pm
- Location: Harrow Middlesex
Re: Indicator stalks
Was that a new loom for the whole car or just headlight circuit'sGalileo wrote: ↑Fri Jun 28, 2019 9:22 pm I have this on the shopping list for my wreck repair "A quality reproduction of a Lucas SQB119", mainly because I'd get some warranty with it and they don't say it's a Lucas sourced one, still, it's £50 again.
Really basically,
Trace the blue/white wire that goes to the headlights (for full beam)
Find a suitable location for your relay along the length
Cut the wire
Run a new battery positive (to take the headlight load) and negative to the same location
Wire blue/white from the headlight switch to the relay coil, same with battery negative
New battery positive and blue/white to the headlights on the contacts
Edit: For the cost of a couple of new stalks or so, you could ask Jeroen (soe8m) to make you a new loom up, he gives full fitting instructions, and comes with the added benefit of slightly brighter lights due to less resistance.
Dave
-
GrahamFountain
- Guest contributor
- Posts: 1735
- Joined: Sun Sep 08, 2013 3:35 pm
- Location: St Annes on Sea, Lancs.
Re: Indicator stalks
The version for beginners, with apologies if it's a bit noddy:
For the main and dip beams: You will need two automotive relays with 6.3mm Lucas spade connectors, some (10 or more) 6.3mm female crimp connectors, at least two colours of 2.0mm squared cross section area (25A) thinwall wire long enough to reach the relays from a supply of power (see below) and third colour to twice reach to an earth point (I would earth each relay separately, so if one falls off you still have some lights) - probably a meter or so of each power wire and 2 metres of earth wire -, and a crimp tool (see below). Some sticky backed plastic and an empty washing-up bottle are optional.
30Amp relays (for 360W@12V) should do, but a higher rating won't hurt. You can get ones with 4 pins that only close an internal switch connection when powered or ones that have 5 pins and a single pole changeover switch. Either will do. You can get others, with more pins and smaller and bigger connectors, but that complicates the issue. You can also get ones with built in fuse holders, but they'll be blade type fuses and I like to keep them all 6x30mm glass ones so there's only one set of spares. Also, my fuse holders are by the fuse box not hidden away under the dash (there is one under there and I'll find out what it does one of these days).
It may be worth looking to buy wire to carry power and earth that match the standard wiring colours, i.e. blue/red, blue/white, and black.
I would mount the relays close to where the wires run to minimize having to join wires. The main beam is blue with a white stripe and the dip is blue with red. As said, mine are under the dash to the left of the column, and the wires are easily accessed there. I'm nor sure where else is easy.
I assume I don't need to tell you to disconnect the battery earth first.
In each case, cut the wire where the cut ends will both reach the relay when mounted, and terminate both ends with a female 6.3mm Lucar connector. The wire coming from the column switch goes to the top (+ve) of the relay coil. That's frequently labeled pin 85 - there's usually a picture on the relay showing what's what and what the pin numbers are. The wire going to the light goes to one side of the relay switch. If there's a normally open and a normally closed switch terminal, it's the normally open one you want. Frequently that's labeled pin 87.
The other side of the relay coil should be connected to earth. That one's frequently labelled 86.
The other side of the relay switch should be connected to the battery live (+ve). That's frequently labelled 30, both with fused or unfused relays.
If you get an unfused relay I strongly recommend a separate fuse in line with the supply to the relay, one for each. That may mean splicing wires together, as the leads on the fuse holders won't be long enough. I got two fuse holders with crimp terminals to avoid such joins, but it's a personal choice. The supply should be from somewhere that is not switched by the ignition and not fused and fed by a thick enough wire - effectively straight off the battery. In my case that's off the input to the unswitched fuse in the fusebox.
Check it's wired right and then reconnect the battery (+ve first then earth).
With all that done, when you apply power by turning on the column switch or main beam flash, the relay coil closes the relay switch and the lights come on.
As said, I find the big problem with all that is crimping the Lucar connectors on the wires - the insulated connectors, where you crimp through the plastic, are crap. They will work, but reliability ain't their strength. So I'm slowly replacing as many of them on my car as I can with "Uninsulated Female Spade Terminal Connectors".
Also as said a good crimp tool is essential. I have an RS toolkit for the insulated type, and they still fail too often. For the uninsulated ones, I think this is the same as the one I use - https://www.ebay.co.uk/itm/Non-Insulate ... xyuOtRbOF6. I like it, but it's probably worth getting extra connectors and having a practice to get the hang of it - it's not like they're expensive. There are online tutorials like this one: https://www.youtube.com/watch?v=_ClY1pssIQs
I know the others will check I got the right values and pin numbers etc.
Graham
The 16v Slant 4 engine is more fun than the 3.5 V8, because you mostly drive it on the upslope of the torque curve.
Factory 1977 TR7 Sprint FHC VVC 697S (Now all of, but still needs putting together)
B&Y 73 Dolomite Sprint UVB 274M (kids!)
1970 Maroon 13/60 Herald Convertable (wife's fun car).
Factory 1977 TR7 Sprint FHC VVC 697S (Now all of, but still needs putting together)
B&Y 73 Dolomite Sprint UVB 274M (kids!)
1970 Maroon 13/60 Herald Convertable (wife's fun car).
-
GrahamFountain
- Guest contributor
- Posts: 1735
- Joined: Sun Sep 08, 2013 3:35 pm
- Location: St Annes on Sea, Lancs.
Re: Indicator stalks
Blue/white and blue/red etc., wire: https://www.autoelectricsupplies.co.uk/ ... tegory/114
The 16v Slant 4 engine is more fun than the 3.5 V8, because you mostly drive it on the upslope of the torque curve.
Factory 1977 TR7 Sprint FHC VVC 697S (Now all of, but still needs putting together)
B&Y 73 Dolomite Sprint UVB 274M (kids!)
1970 Maroon 13/60 Herald Convertable (wife's fun car).
Factory 1977 TR7 Sprint FHC VVC 697S (Now all of, but still needs putting together)
B&Y 73 Dolomite Sprint UVB 274M (kids!)
1970 Maroon 13/60 Herald Convertable (wife's fun car).
Re: Indicator stalks
Full front loom, lights, horn and in my case custom electric fan wiring. If you need a full loom then Autosparks will do one for somewhere in the region of £450 I believe.new to this wrote: ↑Fri Jun 28, 2019 9:46 pm
Was that a new loom for the whole car or just headlight circuit's
Dave
Current fleet: '75 Sprint, '73 1850, Daihatsu Fourtrak, Honda CG125, Yamaha Fazer 600, Shetland 570 (yes it's a boat!)
Past fleet: Triumph 2000, Lancia Beta Coupe, BL Mini Clubman, Austin Metro, Vauxhall Cavalier MK1 & MK2, Renault 18 D, Rover 216 GSI, Honda Accord (most expensive car purchase, hated, made out of magnetic metal as only car I've ever been crashed into...4 times), BMW 318, Golf GTi MK3 16v x 3
Past fleet: Triumph 2000, Lancia Beta Coupe, BL Mini Clubman, Austin Metro, Vauxhall Cavalier MK1 & MK2, Renault 18 D, Rover 216 GSI, Honda Accord (most expensive car purchase, hated, made out of magnetic metal as only car I've ever been crashed into...4 times), BMW 318, Golf GTi MK3 16v x 3