Dolomite Nismo
Re: Dolomite Nismo
Any updates on this great project? Eager to see how it turns out!
'75 Dolomite Sprint (Mimosa Yellow) - currently restoring back to life
- RichardHyde
- Guest contributor

- Posts: 329
- Joined: Sun Dec 08, 2013 8:03 am
- Location: High Wycombe
Re: Dolomite Nismo
Looks absolutely superb Richard 
-
new to this
- TDC Member
- Posts: 1793
- Joined: Mon Dec 12, 2016 9:53 pm
- Location: Harrow Middlesex
Re: Dolomite Nismo
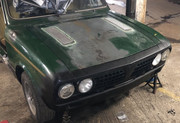
Its starting to take shape,the bonnet vents suit the car,whats next to do ?
Dave
Dave
Re: Dolomite Nismo
Utter beast!!! Love it mate..
'75 Dolomite Sprint (Mimosa Yellow) - currently restoring back to life
- RichardHyde
- Guest contributor

- Posts: 329
- Joined: Sun Dec 08, 2013 8:03 am
- Location: High Wycombe
Re: Dolomite Nismo
Electrics
My goal here was to :-
- simplify the existing loom by removing any redundant wires
- integrate various CA18DET items
- add relays for higher current components / take the load off the original loom & switches
- have more than 2 fuses !!
I carefully completed and tested only one modification at a time so that I could be sure that the modification had worked. Overall, this probably took longer, but if I had modified everything in one go, it would have been more difficult to identify any problems. I’ve lost count how many times I’ve removed the loom, made a change and reinstalled it.
In no particular order, here goes :-
I removed a few metres of wire that didn’t seem to go anywhere. I reasoned that with less wires, there’s less to go wrong.
- Long loop of red wire under the heater believed to be for fog lights. Can always retrofit later.
- Removed white & pink auxiliary heater and choke warning light wires.
- Shortened the long earth wire that runs behind the dashboard. This goes out of the passenger compartment and is earthed / bolted to the suspension turret. Every time I removed the loom to modify it, I had to unbolt the earth and feed the wires back through the bulkhead aperture. In the end, I shortened it, added a plug connector and earthed it using one of the heater matrix to bulkhead bolts. This cut out about 2m of wire and made it easier to get the loom in and out.
- I also cut the long wires to the seats belt warning switches and added another connector. Again, this made getting the loom in and out much easier.
I added a few extra components too :-
- Original Kenlowe fan over-ride switch and thermostatic switch.
- Digital turbo boost and oil pressure gauges. I looked for dial gauges but couldn’t find 2 that looked the same that were in the measurement range I wanted. I’m going to run fairly low turbo boost and with most of the dial gauges, the needle would hardly move when I’m giving it full beans, which would look rubbish on the dial gauge. Digital gauges are also a good contrast to the other gauges.
- To get the tacho to work, I had to buy a convertor from Spidya to convert the Nissan ECU output signal to the Dolomite tacho input signal. This needed power, earth, input from the Nissan ECU and output to the Dolomite tacho.
- I swapped the old instrument lights for LEDs, but they are a little bright !
I used self-tapping screws to fix a busbar to the underside of the heater matrix, just behind the vents. This has 6 rows of 3 x 6.3mm male spade connectors. I used 4 x 3 rows (1 input 11 output) for positive and 2 x 3 rows (1 input 5 output) for earth. In hindsight, I could have used my old fuse box instead ! This powered other components like the boost guage, oil pressure gauge, Nissan ECU, Kenlowe fan switch, tacho convertor etc.
The battery has been relocated to the boot. The thick positive cable goes straight to a 175A fuse for safety. When everything is running, I’ll measure the current with all lights on etc while cranking the motor and reduce the amp rating accordingly – 175A is probably way too high. The thick cable is connected to the starter terminal which spurs off to the alternator and an ignition side inhibitor switch.
I’ve now got 10 fuses in the engine compartment for battery side power and 6 fuses in the passenger compartment for ignition side power. I also moved the club voltage regulator next to the ignition fuse box to reduce wire length again and to keep it dry.
Close to the engine compartment fuse box, I’ve got 4 relays connected to the battery side fuses :-
- Horns
- Twin Kenlowe fan 9 inch fans
- Both dipped beam lights
- Both main beam lights
I’ve got 3 additional fused relays in the boot where the battery is :-
- Facet fuel pump that feeds the swirl pot
- Bosch 044 fuel pump that fuels the engine
- Heated rear windscreen
The time clock is luckily the West German quartz clock. Seems to work ok and ticks nicely, though I did add a shroud to the positive terminal.
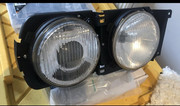
The lights are BMW E30 projector / Smiley units which have been cut down to fit into the Dolomite headlamp bracket, which also needed some adjustment. To wire these up, I spliced the blue/red wire in the steering nacelle into the blue wire that goes to the headlamp selector switch. Doing this makes all 4 lights come on when I select full beam.
My CA18DET engine loom had been cut and spliced in the past, so I took the plunge and bought a universal / plug and play loom from Wiring Specialities. This was expensive but probably saved me hours of trouble shooting. I just needed to connect up this loom to :-
- battery feed on the starter
- chassis earth
- Triumph temperature gauge
- Triumph oil pressure light
- Triumph ignition light
- Tacho as above
The loom incorporated the same spark plugs / coil packs as used on Audi R8s / Lambo Gallardos. Apparently the difference between these and standard parts is incredible.
Fuel
The CA18DET needed a completely new fueling set-up. The fuel flow is as follows :-
- Standard fuel tank with banjo output
- Fuel filter
- Facet fuel pump
- Swirl pot
- Gravity fed Bosch 044 high pressure fuel pump
- Fuel injectors
- Return to swirl pot
- Swirl pot overflow to fuel tank via a T piece
All seems to work well, though if I did this again, I’d probably try installing a modern fuel pump into the tank.
Engine
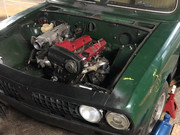
I gave the engine a bit of a refresh – new water pump, oil pump, timing belt and tensioner. After all of the work above, the engine fired up first time !!
Thanks to James, Carledo, Alun, Dave, Dan and Rob for assisting me with this conversion. More to follow…
- Attachments
-
- ign fuse.jpg (84.52 KiB) Viewed 89755 times
-
- boot.jpg (113.14 KiB) Viewed 89755 times
-
- big fuse.jpg (109.07 KiB) Viewed 89755 times
-
- battery fuse.jpg (90.91 KiB) Viewed 89755 times
-
jackharper
- TDC Member
- Posts: 161
- Joined: Mon Apr 29, 2019 10:31 pm
- Location: Oxfordshire
Re: Dolomite Nismo
Looks great Richard, I had a 180sx years ago with a CA in, despite the stigma vs the SR20 I don't think they're bad little engines. I had a fat old external wastegate on mine which made some noise on full chat 
Would this work without a swirl pot? I am thinking of doing the same with my Dolly as I'm going EFI on the standard engine, not sure whether or not to do the same as you did to retain the standard tank and use an external swirl pot and high pressure pump, or try and fit a tank from another car...RichardHyde wrote: ↑Tue Oct 12, 2021 8:56 pm All seems to work well, though if I did this again, I’d probably try installing a modern fuel pump into the tank.
1973 2-door honeysuckle Triumph Toledo 1300 Thread here
-
new to this
- TDC Member
- Posts: 1793
- Joined: Mon Dec 12, 2016 9:53 pm
- Location: Harrow Middlesex
Re: Dolomite Nismo
Thats what ive done on mine,pump in the tank,so no swirl pot,lucky my tank was in good condition no rustjackharper wrote: ↑Wed Oct 13, 2021 9:19 am Looks great Richard, I had a 180sx years ago with a CA in, despite the stigma vs the SR20 I don't think they're bad little engines. I had a fat old external wastegate on mine which made some noise on full chat
Would this work without a swirl pot? I am thinking of doing the same with my Dolly as I'm going EFI on the standard engine, not sure whether or not to do the same as you did to retain the standard tank and use an external swirl pot and high pressure pump, or try and fit a tank from another car...RichardHyde wrote: ↑Tue Oct 12, 2021 8:56 pm All seems to work well, though if I did this again, I’d probably try installing a modern fuel pump into the tank.
Dave
-
Carledo
- TDC Shropshire Area Organiser
- Posts: 7253
- Joined: Sun Aug 21, 2011 5:12 pm
- Location: Highley, Shropshire
Re: Dolomite Nismo
I'm running the Dolomega without a swirl pot, by the simple expedient of having the pump below the boot floor so it's gravity fed. This works on EFi Tr6s etc (also on the Carledo) so why not?
What I HAVE got and don't like at all, is an incredibly noisy pump! I've tried several different ones, some better some worse but all loud enough to hear above the engine AND the stereo. Despite the fuel high pressure line having more than 1 rubber joiner present, including 1 either side of the rubber mounted pump, I can, with the engine running, sit in the driving seat, reach under the sill and FEEL the vibration in the pipe! Plus the whole thing has a wavering, uneven note quality that sounds as if it's on the verge of expiry. It clearly isn't, as i'm still driving it around, but it sounds like it!
So i'm also looking at putting some sort of in-tank pump into the car, possibly using a clip in plastic swirl pot from a modern and a modified Cavalier pump housing (well, what else would I use?)
I have the tank I removed from the car a few weeks ago because it had a large rust patch at bottom centre. So I can hopefully cut the rotten bit out and get some kind soul to weld it up again AFTER i've made a mount for the swirl pot and a hole for the pump. Having an access hatch will help with making it all fit correctly. If I can't get it repaired after, it will still serve as a pattern for doing another without the gaping hole in the bottom. Also, most in-tank pumps have a built in pre-filter on the bottom which makes a remote one un-necessary. I'll keep the original pick up hole and just bung it up as a tank drain plug.
More on this as I start experimenting!
Steve
'73 2 door Toledo with Vauxhall Carlton 2.0 8v engine (The Carledo)
'78 Sprint Auto with Vauxhall Omega 2.2 16v engine (The Dolomega)
'72 Triumph 1500FWD in Slate Grey, Now with RWD and Carledo powertrain!
Maverick Triumph, Servicing, Repairs, Electrical, Recomissioning, MOT prep, Trackerjack brake fitting service.
Apprentice served Triumph Specialist for 50 years. PM for more info or quotes.
- RichardHyde
- Guest contributor

- Posts: 329
- Joined: Sun Dec 08, 2013 8:03 am
- Location: High Wycombe
-
Carledo
- TDC Shropshire Area Organiser
- Posts: 7253
- Joined: Sun Aug 21, 2011 5:12 pm
- Location: Highley, Shropshire
Re: Dolomite Nismo
Nice one mate!


Steve
Steve
'73 2 door Toledo with Vauxhall Carlton 2.0 8v engine (The Carledo)
'78 Sprint Auto with Vauxhall Omega 2.2 16v engine (The Dolomega)
'72 Triumph 1500FWD in Slate Grey, Now with RWD and Carledo powertrain!
Maverick Triumph, Servicing, Repairs, Electrical, Recomissioning, MOT prep, Trackerjack brake fitting service.
Apprentice served Triumph Specialist for 50 years. PM for more info or quotes.
'78 Sprint Auto with Vauxhall Omega 2.2 16v engine (The Dolomega)
'72 Triumph 1500FWD in Slate Grey, Now with RWD and Carledo powertrain!
Maverick Triumph, Servicing, Repairs, Electrical, Recomissioning, MOT prep, Trackerjack brake fitting service.
Apprentice served Triumph Specialist for 50 years. PM for more info or quotes.
- lazeruspete
- Guest contributor

- Posts: 822
- Joined: Sun Oct 21, 2012 11:15 pm
Re: Dolomite Nismo
i'm looking forward to seeing all of our modified dollies and toledos lined up next to each other somewhere/someday.RichardHyde wrote: ↑Mon Jan 03, 2022 4:15 pm Coming along nicely now. Engine runs, can change gear with no crunching and the rear wheels turn !!
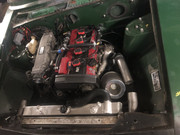
Brilliant work, your wiring post gave me alot of ideas and food for thought.
1980 Dolomite Sprint Track Day Car....KLJ 895W. now redtopiffied 
viewtopic.php?f=19&t=23031
Volkswagen Golf MK3 Gti....R301UUJ. RIP 22-5-13
Volkswagen Golf MK4 TDGTI 150 MM53VNT Sold 7-8-17
BMW 320d Coupe M-Sport YL08 XBZ with factory fitted Performance Pack - Sold 22/05/21
BMW 330d Touring M-Sport WN63 XPY - best daily ever
Proud TDC Member!
viewtopic.php?f=19&t=23031
Volkswagen Golf MK3 Gti....R301UUJ. RIP 22-5-13
Volkswagen Golf MK4 TDGTI 150 MM53VNT Sold 7-8-17
BMW 320d Coupe M-Sport YL08 XBZ with factory fitted Performance Pack - Sold 22/05/21
BMW 330d Touring M-Sport WN63 XPY - best daily ever
Proud TDC Member!
- RichardHyde
- Guest contributor

- Posts: 329
- Joined: Sun Dec 08, 2013 8:03 am
- Location: High Wycombe
Re: Dolomite Nismo
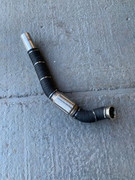
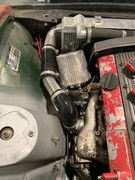
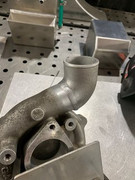
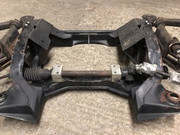
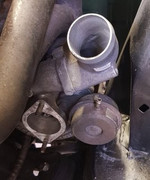
The turbo initially fouled the N/S front suspension turret so Max (awesome fabricator in Reading 07528 688098) cut off the turbo / compressor elbow flanges and welded them together. This gave significant clearance and meant I didn’t have to modify the turret for clearance. Max also made a bracket to move the wastegate actuator forwards and lengthened the wastegate actuator rod.
The original Nissan S13 had belt driven alternator & water pump, air con and power steering units, with drive from a triple stacked pulley. I only needed the alternator & water pump pulley and there was very little clearance between the S13 pulley and radiator. I discovered that Nissan also used the CA18DET engine in the Aussie market Nissan Exa, which only had double stacked pulleys. I found a bloke in Oz who had a spare Exa pulley and thermostat housing (see below). This twin pulley gave me about 12mm additional clearance. Size does sometimes matter !!
Exhaust
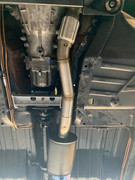
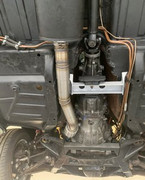
James467 made my original custom exhaust, but it was very difficult to disconnect the downpipe from the turbo elbow as the bolts were made inaccessible by the subframe. Max redesigned the downpipe and incorporated a V-band coupling which makes removing the exhaust MUCH easier. The system is 2.5 inch in diameter with a centre silencer and a rear stainless steel twin pipe rear silencer.
Clutch
I used the standard Triumph master cylinder and Nissan slave cylinder with a custom stainless steel braided hose. The clevis pin bolt had slightly ovalled (is that a word ?) the hole in the clutch pedal, so Max welded it up and re-drilled it to minimise play in the pedal.
Gearbox
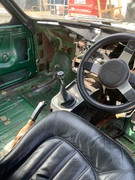
I split the original Nissan 5W71C gearbox and fitted a TX1 taxi bell housing. This shortened the gearbox enough to fit the Sprint gearbox tunnel. While it was apart, I found that several bearings needed replacing. Max modified the Nissan gearstick by fitting the overdrive switch to retain the standard look. He also made a custom cross member / rear gearbox support using a new TX1 rubber mount.
Rear axle
Mad Mart kindly reconditioned my axle by replacing all bearings and seals. This included the common gearbox seal swap and he fitted an ATB diff. Dave helped me tap an M12 thread into the underside of the axle casing, where I fitted a magnetic sump plug.
Cooling
The original S13 CA18DET radiator top hose inlet and the thermostat housing outlet are both on the O/S and are only a couple of inches apart. This didn’t give me sufficient room to fit a temperature sender in the hose for the twin 9 inch electric cooling fans and to allow for some engine movement.
I noticed that the SR20DET radiator top hose inlet was on N/S of the radiator, which would give me enough hose length to fit the sender.
This presented a new challenge - the thermostat outlet pointed to the O/S and the top hose inlet was on the N/S pointing rearwards. My initial solution was to use the 180 degree bend hose from a Pinto and the question mark shaped hose from a Maestro with the sender fitted as a joiner. I really didn’t like that solution as the water flow was quite convoluted. I also found that the bottom hose outlet hose was almost fouling the subframe !!
My solution started with using the thermostat housing from the Nissan Exa which pointed to the N/S. A local custom radiator manufacturer cut off the top hose radiator inlet at 45 degrees and welded on another inlet cut off at 45 degrees so the top hose radiator inlet pointed towards the thermostat outlet. Coolant now flows out of the thermostat housing straight into the radiator top hose inlet through the temperature sender joiner. He used the same 45 degree trick and modified the bottom hose outlet so that it now points upwards, giving sufficient clearance with the subframe. I found that a Defender hose fitted perfectly as a bottom hose !!
Front subframe
As well as Dan’s original CA18DET mount rails, Max modified further by making the rear cross member removable. This has made it MUCH easier to remove the gearbox.
Electrics
I found a small device that converts the Nissan ECU tacho output signal to the same type of output signal as the standard Lucas coil, meaning that the original rev counter works !! I also commissioned a custom Nissan / Sprint speedo cable that allows me to use the original speedo.
As an additional safety feature, I fitted a brake fluid level sensor. I found a company that made me a small black plastic rectangle with the word BRAKE printed in translucent red. I swapped this with the FASTEN BELTS insert in the dash warning light and wired it up. I figured that I always wear a seatbelt out of habit these days and I don’t know if my brake fluid is low whereas I do know if my seatbelt isn’t on.
A common modification for the CA18DET is to replace the original spark plug coil packs with those installed in many Audis. They are supposed to be MUCH better than the 30 year old Nissan product. They are apparently used in R8s and some Lamborghinis - how could I resist !!


-
new to this
- TDC Member
- Posts: 1793
- Joined: Mon Dec 12, 2016 9:53 pm
- Location: Harrow Middlesex
Re: Dolomite Nismo
Looks like you've been busy 

Dave
Dave

