I agree, I think that head should clean up OK. If there is deep groove across the head face, get it welded and then shim it. The damage looks to have been caused by dentonation from to much ignition timing or lack of fuel or low octane fuel or massive overheat.
The valve shim has come out because something (piece of piston) has jammed under the valve seat allowing the valve to stay open increasing rocker clearance and shim pops out. You may also have some bent valves.
We run all our Sprints on ULP with no problems or mods. The race cars use 98 RON ULP and the road car ususlly usues 95 RON ULP.
Mark
PS. I think that a new set of pistons might not be a bad idea!!
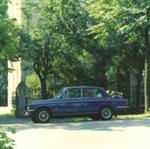
Sprint Restoration in South Australia (pic heavy)
-
straylight
thanks guys....
new pistons ? surely you jest ?
The valve shim, (sorry, they weren't tappets, obviously) theory is sound, there was a largish piece of piston "swarf" in the cylinder......could easily have jammed under the valves. I've seen this with a valve seat on a lawnmower, dropping and jamming the valve open, makes sense.
'kay, contacting a head refurbisher in Naracoorte....if he isn't up to it, I need a head expert in Oz. Knowing how important it is to get the head tikkety-boo.....any suggestions Mark ? worth shipping it to sydney ?
worth doing this properly......
and honest opinions, how much of the engine dissassembly can I do myself ? Or shall I load it on the ute and cart it to the local garage mechanic....(who is pretty good).....
as to the original cause, speculation now, I was watching the temp gauge, the sequence, from memory 8 or so years ago was a slight loss of power, smell of smoke, I slowed down a bit, then the tempo gauge buried the needle as I pulled over.
stu
-
SPRINTPARTS
Head Machining.
If you find a machine shop that knows what he is talking about get it done local. Ideally an "older craftsman" who has good experience with Jaguar Heads would be the man. If you have no luck locally we should be able o help out in Sydney. The guy that we use has doing our machining for 20+ years and knows his stuff. There is not one piece of automated machinery in the place, all old manual equipment that he knows how to use properly. Unfortuantely he is currently not working due to health problem but will be up and running in the next couple of weeks.
If you know how to use tools, can read, and also ask the correct questions, why not do the motor yourself. The bottom end is the same as any normal motor, the only "hard part' is shimming the valve clearances. If we help with the head it could be supplied already shimmed and ready to bolt back onto the motor. You just need to get the cam timing correct.
Mark
-
straylight
thanks mark, I have the workshop manual and the parts book, so I'll have a good read tonight.....I can see the head heading your way....the engine block might be a collaborative effort between me and the local mechanic.
I've taken the head off myself and replaced it before (succesfully I might add, no relation to the latest incident which was after a rebuild/recon by a mechanic in sydney), so with guidance, it is on the cards....
stu
I've taken the head off myself and replaced it before (succesfully I might add, no relation to the latest incident which was after a rebuild/recon by a mechanic in sydney), so with guidance, it is on the cards....
stu
-
Lee Flintoft
-
straylight
thanks Lee, yeah, a bit of a wash wouldn't hurt....I'm going to get the engine out first and strip her down. The inside is in quite good nick. I recovered the seats in 1988 (ish) and they still look very, very smart, so winner there. I'll get some more pics when I clean out the interior.
Thanks Mark, there is a place in Mount Gambier that looks like they can do the work. They have a shim making machine and have worked on Jag heads in the past, so they look like getting the gig to refurbish the head.
They can also rebore the block and insert cylinder sleeves if needed. They want the engine in pieces though, they don't have the time to mess around.
I guess they'll need to do the rebore /hone before I can order the new pistons since they'll need to know the sizes ? Or are the sizes constant and the rings different ?
stu
-
SPRINTPARTS
Pistons
Stu, the motor should be machined to match the pistons. The machine shop/engine reconditioner should be able to measure the block and then say if +020" or + 040" will be required to clean the bore. Then the block is machined to match the pistons.
Mark
PS. If there enough water left in SA for car washing??
Mark
PS. If there enough water left in SA for car washing??
-
straylight
heh, heh, we've just had 35mm fall out of the sky, so water is good !
Which means I should be under the car this 'arvo, but I've been distracted trying to sort out ADSL connections for the house....no luck.
Incidentally, we are on rainwater tanks and bore water. the bore water is around 1700ppm "salt".....which is high enough to taste and leave an 'orrible residue if you try and wash a car with it. The Murray is running dry, but we are almost underwater here.
The engineer has already said he won't know how much he needs to machine out, since he can't measure the depth of the scores in the side of the cylinder, this was over the phone....when I get the engine block down to them I'll have a good chat about where they will go with the machining. Are the pistons only available in 40 thou multiples or something ? Will the engineer need to have the new pistons and rings on hand when he bores the thing out ?
Good news, he has given me a rough idea of the cost of the head refurb and engine rebore, which I can fund....
I'm really looking forward to knocking out the pistons....sounds like a fun job....the one liner in the workshop manual suggests it will take, oh, 30 seconds ?....
-
straylight
success ! of sorts
having wasted yesterday mucking around with computers, got an early start on the engine removal today.
very slow work to start with, spent ages trying to follow the instructions on removing the intermediate steering linkage. There is no way there is enough play to allow it to slide off the splined shaft, so took the steering column out. I was doing this so I could get at the right hand rear sub frame bolt. With my 8yo in the engine bay holding the spanner on the bolt from above, me underneath the car with a large socket extension, I managed to snap the jaw off a 3/4" spanner. The damn thing was seized fast. Even a rattle gun couldn't shift it, so I got out a junior hacksaw and cut through the mounting bolt. Noting the other side was badly pitted so would need replacing anyway, first bit of savagery.
then, couldn't get enough access to the clutch slave cylinder, so left it on the bell housing and disconnected the hydraulic line.....
then, with a quick prayer to the shed builders, and using an endless chain I had picked up ages ago at a "clearing sale", lifted the engine out.....and out she came....brilliant, absolutely brilliant, very happy.


apart from oil and water spillage on the floor, I'm quite happy to see the engine out. Second time I've removed an engine, the first being on a mini when I was 17. This was a bit harder !
I'm in a bit of a quandry now....do I drop the sub frame off in the shed, or take it down to the spray painters and do it there. Obviously I'll strip out the interior of the car first. If I drop the sub frame in situ, I'll have a hell of a job moving her. Steering rack is locked in place, easy enough to reconnect the steering. Sub frame is still unbolted at the back mounts.
stu
having wasted yesterday mucking around with computers, got an early start on the engine removal today.
very slow work to start with, spent ages trying to follow the instructions on removing the intermediate steering linkage. There is no way there is enough play to allow it to slide off the splined shaft, so took the steering column out. I was doing this so I could get at the right hand rear sub frame bolt. With my 8yo in the engine bay holding the spanner on the bolt from above, me underneath the car with a large socket extension, I managed to snap the jaw off a 3/4" spanner. The damn thing was seized fast. Even a rattle gun couldn't shift it, so I got out a junior hacksaw and cut through the mounting bolt. Noting the other side was badly pitted so would need replacing anyway, first bit of savagery.
then, couldn't get enough access to the clutch slave cylinder, so left it on the bell housing and disconnected the hydraulic line.....
then, with a quick prayer to the shed builders, and using an endless chain I had picked up ages ago at a "clearing sale", lifted the engine out.....and out she came....brilliant, absolutely brilliant, very happy.
apart from oil and water spillage on the floor, I'm quite happy to see the engine out. Second time I've removed an engine, the first being on a mini when I was 17. This was a bit harder !
I'm in a bit of a quandry now....do I drop the sub frame off in the shed, or take it down to the spray painters and do it there. Obviously I'll strip out the interior of the car first. If I drop the sub frame in situ, I'll have a hell of a job moving her. Steering rack is locked in place, easy enough to reconnect the steering. Sub frame is still unbolted at the back mounts.
stu
Last edited by straylight on Sat Jan 19, 2008 2:01 pm, edited 1 time in total.
-
Neil907
When it comes to the steering yu can leave the column bolted in and just slide the lower half of the column up. As for the sub frame I would take it off now and free all the bolts and the pop it back on to take it to the spray shop. Better to be doing any potentialy orkward jobs where you have all the gear. Plus it will give you a chance to inspet the condition of the chassis rails first.

-
AberdeenSprinter
- TDC Member
- Posts: 56
- Joined: Wed Oct 04, 2006 12:46 pm
- Location: Aberdeen
Subframe
Would dropping the sub on this be a bit risky? If the Chassis legs are rotten you could get some warping. Just a thought, but as this is an Aussie car, I guess you don't suffer the tin worm like us in the UK. Getting the frame off though does mean you can refurb everything in comfort and does make repair work easier on the tub.
Appreciate the story board, cant wait to get into the guts of mine again.
Appreciate the story board, cant wait to get into the guts of mine again.
-
SPRINTPARTS
Subframe
I agree, remove the subframe, inspect area and temp fit for repairs and repaint. It is very unlikely to see rusty chassis rails on Australian Dolomites, most likely problem will be rusted attach bolts, (you know that already), cracks just aft of rear attach point from stress on crap roads. Have a good look at the rear attach point and check that the alignment spigot is still on the rail as they have a tendency to either rust away or break free.
Mark
Mark
-
straylight
right, spent a few more hours, it was raining and I had nothing else to do....
gearbox came off easily, removed various bits off the engine (oil pump, filter, distributor, mounting block, starter motor) and then saw the problem...

at the botom of #1 cylinder, there is a channel for the coolant. Or there should be. The head gasket doesn't have a corrseponding hole in it. Which would explain why, the first time it was put under any real load, #1 cylinder overheated, melted the piston and put the car off the road for 10 years.
This was the doing of a mechanic in sydney. The car was unregistered and I was due to move to South Australia. So I forked out some bucks to have the engine rebuilt. That was in 1995. The drive across was done to run the engine in, a nice sedate 3000rpm all the way, some 1500km. When in South Oz the car was reregistered (the inspection in SA is a lot less stringent than NSW, and is done only once, not every year). My wife registerd the car behind my back as a birthday present. It was then driven intermittently until the "race" to the bushfire, 5 burly guys in it, long straight road, 130km/hr....and the overheat.
that makes me happy, to discover why the engine trashed itself, but very angry at the "mechanic" in sydney. I'm finding other pieces of his handwork as well. The occasional metric headed bolt/nut. Missing nuts, short cuts.
Thanks for the info on the sub frame....the car had a hard life. She was left near the sea for extended periods of time (I was in the Navy, so when I went out, she was left at the base), but despite that, there is little evidence of rust. I've had a look at the sub frame and it looks solid. The only rust appears to be superficial body rust and in places a bit of welding will be needed, but overall I'm confident the sub frame will come out and not be badly warped or rusted. I'll watch out for the brake lines.
While attempting to remove the flywheel bolts, The engine turned, quite easily too, which was great news. I'm taking care not to score the cylinder bores more than I have to. But I am having trouble removing the flywheel bolts. They have a cranellation on them so I've been careful not to damage them until I've checked. The workshop manual doesn't mention thay are LH thread. Are they ?
There is also a mark on the flywheel and the crankcase flange, but they do not line up (obviously, since the engine was not in the same position). The manual advises the relative positions be marked, but this doesn't make sense, since the engine can rotate, which would rotate the position of the marks. Is the workshop manual simply suggesting the flywheel bolts should be re-assembled in the same threads on the crank ?
More nostalgia, I'm amazed that I ever replaced the clutch myself with the engine still in the car back in the 80's. On the roadside ! I remember dropping the gearbox onto my chest. I must have been mad. Did it several times, car on blocks of wood, working to a dead line so I could use her again. Now I can see the extent of the gearbox again, with overdrive, and the difficulty I would have had removing the bell housing bolts, it was an outstanding effort, even if it was insane.
thanks again for the advice.
stu
gearbox came off easily, removed various bits off the engine (oil pump, filter, distributor, mounting block, starter motor) and then saw the problem...
at the botom of #1 cylinder, there is a channel for the coolant. Or there should be. The head gasket doesn't have a corrseponding hole in it. Which would explain why, the first time it was put under any real load, #1 cylinder overheated, melted the piston and put the car off the road for 10 years.
This was the doing of a mechanic in sydney. The car was unregistered and I was due to move to South Australia. So I forked out some bucks to have the engine rebuilt. That was in 1995. The drive across was done to run the engine in, a nice sedate 3000rpm all the way, some 1500km. When in South Oz the car was reregistered (the inspection in SA is a lot less stringent than NSW, and is done only once, not every year). My wife registerd the car behind my back as a birthday present. It was then driven intermittently until the "race" to the bushfire, 5 burly guys in it, long straight road, 130km/hr....and the overheat.
that makes me happy, to discover why the engine trashed itself, but very angry at the "mechanic" in sydney. I'm finding other pieces of his handwork as well. The occasional metric headed bolt/nut. Missing nuts, short cuts.
Thanks for the info on the sub frame....the car had a hard life. She was left near the sea for extended periods of time (I was in the Navy, so when I went out, she was left at the base), but despite that, there is little evidence of rust. I've had a look at the sub frame and it looks solid. The only rust appears to be superficial body rust and in places a bit of welding will be needed, but overall I'm confident the sub frame will come out and not be badly warped or rusted. I'll watch out for the brake lines.
While attempting to remove the flywheel bolts, The engine turned, quite easily too, which was great news. I'm taking care not to score the cylinder bores more than I have to. But I am having trouble removing the flywheel bolts. They have a cranellation on them so I've been careful not to damage them until I've checked. The workshop manual doesn't mention thay are LH thread. Are they ?
There is also a mark on the flywheel and the crankcase flange, but they do not line up (obviously, since the engine was not in the same position). The manual advises the relative positions be marked, but this doesn't make sense, since the engine can rotate, which would rotate the position of the marks. Is the workshop manual simply suggesting the flywheel bolts should be re-assembled in the same threads on the crank ?
More nostalgia, I'm amazed that I ever replaced the clutch myself with the engine still in the car back in the 80's. On the roadside ! I remember dropping the gearbox onto my chest. I must have been mad. Did it several times, car on blocks of wood, working to a dead line so I could use her again. Now I can see the extent of the gearbox again, with overdrive, and the difficulty I would have had removing the bell housing bolts, it was an outstanding effort, even if it was insane.
thanks again for the advice.
stu
Last edited by straylight on Sat Jan 19, 2008 2:02 pm, edited 1 time in total.