Sprint Restoration in South Australia (pic heavy)
-
Lee Flintoft
Re: Sprint Restoration in South Australia (pic heavy)
I, like you, can't wait to see it come together. She's gonna be a beaut!
Re: Sprint Restoration in South Australia (pic heavy)
So close to paint!!! 
1978 Triumph Dolomite Sprint (project thread)
1966 Volkswagen 1300 (project thread)
1962 Austin Mini (project)
1962 MGA 1600 Mark II
1965 Mobylette SP50 (project)
2001 Rover 75 2.5-litre V6
1966 Volkswagen 1300 (project thread)
1962 Austin Mini (project)
1962 MGA 1600 Mark II
1965 Mobylette SP50 (project)
2001 Rover 75 2.5-litre V6
-
straylight
Re: Sprint Restoration in South Australia (pic heavy)
thanks guys. It is a bit late, I've just spent 6 hours reassembling the subframe, steering rack, calipers etc so that they are ready to fit up (temporarily) to shift the car home. Photos up tomorrow. It went well. The flies and midges stayed off until the paint was dry, and today's 38 degrees (hotter inside George's shed) meant the paint was dry very quickly. George went through 5 litres of paint and applied about 12 coats.
stu
stu
-
newguy
Re: Sprint Restoration in South Australia (pic heavy)
Hey Stu
Where are the Pictures of that virgin paint!!!!!
Where are the Pictures of that virgin paint!!!!!
-
straylight
Re: Sprint Restoration in South Australia (pic heavy)
I'l have you know I'm missing the Bill doing this update 

spray under way, about the third coat

boot has come up well

about 6 coats in


water on the floor to keep the dust down, very hot day and stinking hot inside the shed


best shot ever !

even with the high temp, George worked under the heat lights.


Colour on top of stoneguard

back to the subframe. Ignore the anti-roll bar which is laid on top

bit worried about the steering mounts. The new poly bushes seem to cause the mounts to sit at a slight angle. Not sure if the extra brackets are standard, I have a recollection of trying to sort out play in the rack at a suspension place in Kirrawee, Dean Gall, and think he might have welded on the extra bits.

the left hand side, same problem. I followed the instructions about butting the plate up on the left, under the rack. Should I be worried about the splaying effect of the mounts on the poly bushes. The other problem, which I recall from about 1987, was one of the U-bolts holding the rack mounts stripped partially on the thread. I ended up using washers to bite the nyloc nut a bit higher up. This time I need to source a new U-bolt though.

Following Ian's advice, everything that will flex under the weight of the car has been left to tighten up later.
Apart from fitting everything I could onto the subframe, had to leave the car work today and crack on with house jobs. But I did spend the afternoon rearranging my shed, donor is back into the corner, "Cino" is out in the cold (well, heat really) and space is ready for the painted shell which I'll try and get home tomorrow (last day of holidays).
The plan at the moment is to push her home, about 1500m. All flat (relatively). Problem is I haven't got access to a car trailer tomorrow (it is not available until next week) and without steering or brakes, I'm not game to try even a gentle car tow. I figure it'll take about an hour, got the kids to help push and once we get out of the main street I might get the 4wheeler down for a gentle, long tow rope tow. See how we go, but that is the tentative plan. Compared to faffing around with the trailer, I think it is actually less risky in terms of damaging the car.
stu
(didn't miss the Bill either, family tradtion and all that !)
spray under way, about the third coat
boot has come up well
about 6 coats in
water on the floor to keep the dust down, very hot day and stinking hot inside the shed
best shot ever !
even with the high temp, George worked under the heat lights.
Colour on top of stoneguard
back to the subframe. Ignore the anti-roll bar which is laid on top
bit worried about the steering mounts. The new poly bushes seem to cause the mounts to sit at a slight angle. Not sure if the extra brackets are standard, I have a recollection of trying to sort out play in the rack at a suspension place in Kirrawee, Dean Gall, and think he might have welded on the extra bits.
the left hand side, same problem. I followed the instructions about butting the plate up on the left, under the rack. Should I be worried about the splaying effect of the mounts on the poly bushes. The other problem, which I recall from about 1987, was one of the U-bolts holding the rack mounts stripped partially on the thread. I ended up using washers to bite the nyloc nut a bit higher up. This time I need to source a new U-bolt though.
Following Ian's advice, everything that will flex under the weight of the car has been left to tighten up later.
Apart from fitting everything I could onto the subframe, had to leave the car work today and crack on with house jobs. But I did spend the afternoon rearranging my shed, donor is back into the corner, "Cino" is out in the cold (well, heat really) and space is ready for the painted shell which I'll try and get home tomorrow (last day of holidays).
The plan at the moment is to push her home, about 1500m. All flat (relatively). Problem is I haven't got access to a car trailer tomorrow (it is not available until next week) and without steering or brakes, I'm not game to try even a gentle car tow. I figure it'll take about an hour, got the kids to help push and once we get out of the main street I might get the 4wheeler down for a gentle, long tow rope tow. See how we go, but that is the tentative plan. Compared to faffing around with the trailer, I think it is actually less risky in terms of damaging the car.
stu
(didn't miss the Bill either, family tradtion and all that !)
-
Mad Mart

- TDC Member
- Posts: 8529
- Joined: Tue Oct 03, 2006 5:48 pm
- Location: Winscombe, North Somerset, England
- Contact:
Re: Sprint Restoration in South Australia (pic heavy)
Excellent Stu. It's great once the paint has been applied, now the fun begins!
Are the sills & the rear panel being painted black?
Are the sills & the rear panel being painted black?
Sprintless for the first time in 35+ years.  ... Still Sprintless.
Engines, Gearboxes, Overdrives etc. rebuilt. PM me.
2012 Porsche Boxster 981 S

Engines, Gearboxes, Overdrives etc. rebuilt. PM me.
2012 Porsche Boxster 981 S
-
straylight
Re: Sprint Restoration in South Australia (pic heavy)
yes, the longer term plan is to return the car to george for buffing, he will paint the sills and rear in black then (and hopefully give me a hand applying the vinyl roof).


Stu, this is..........
EXCELLENT.
TDC Forum moderator
PLEASE help us to maintain a friendly forum,
either PM or use Report Post if you see anything you are unhappy with. Thanks.
PLEASE help us to maintain a friendly forum,
either PM or use Report Post if you see anything you are unhappy with. Thanks.
-
Mad Mart
- TDC Member
- Posts: 8529
- Joined: Tue Oct 03, 2006 5:48 pm
- Location: Winscombe, North Somerset, England
- Contact:
Re: Sprint Restoration in South Australia (pic heavy)
Stu, Mary said why don't you have a "sponsored push"?
Sprintless for the first time in 35+ years. ... Still Sprintless.
Engines, Gearboxes, Overdrives etc. rebuilt. PM me.
2012 Porsche Boxster 981 S
Engines, Gearboxes, Overdrives etc. rebuilt. PM me.
2012 Porsche Boxster 981 S
-
mbellinger
- TDC Member
- Posts: 2403
- Joined: Tue Oct 03, 2006 4:29 pm
- Location: Bromley, Kent
Re: Sprint Restoration in South Australia (pic heavy)
Absolutely brilliant job Stu. I always love the look of fresh paint on a "virgin" shell.
Martin.
2021 Land Rover Discovery Sport HSE PHEV
2021 Dacia Duster 1.3 TCe
1963 Austin A40 Rally Car
2021 Honda Cross Tourer Highlander
2021 Land Rover Discovery Sport HSE PHEV
2021 Dacia Duster 1.3 TCe
1963 Austin A40 Rally Car
2021 Honda Cross Tourer Highlander
-
SPRINTPARTS
Re: Sprint Restoration in South Australia (pic heavy)
Hi Stu,
It is looking good. I just had a look an your first post, it was March 2007. I think that it wasn't long after this time that we spoke for the first time. I seem to remember saying in one of our early conversations that whatever it was going to cost and how long it was going to take, double both and you should be close to the mark. How is formula looking at present??
Keep up all the hard work, this is the best bit now reassembly, stuff going back to work (school) just chuck a few good "Aussie sickies" and things will progress a lot faster.
If interested I might have some second hand shocks (Koni, or other brands) if interested.
Mark
-
straylight
Re: Sprint Restoration in South Australia (pic heavy)
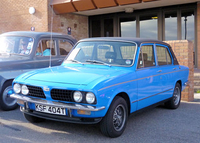
today was collection day.

subframe in

I put the s[prings in first and fitted the subframe up top the body and botton of the dampers. Probably better to put the dampers onto the subframe and then locate the top of the coils in the turrets. Unfortunately, the upper ball joints didn't arrive in time, so they'll need replacing when I drop the subframe again to put the engine in, using Mart's recommended method of lowering the car onto the subframe and engine rather than risk damaging the engine bay by lowering the engine in.

On her own feet again


sunshine


better light to judge the colour. More green in the yellow than I remember

George freaked when I said i was going to push it home and employ kick steering. A few phone calls later and a car trip, he found a trailer and his brother helped shift her back to my place. Country people are take another persons problem as a challenge to find a solution. Appreciated their help.

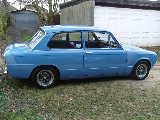
home again

in the shed version one.

brand spankers

a trip down memory lane. As Mark (sprintparts said), it took a while. His classic comment on page one of the thread:


and Lee Flintoff:
I really appreciate all of the positive comments, suggestions and help guys.
Unfortunately it will be a while before I can make significant progress. As mark said, back to work (school) tomorrow. 3 pallets of pavers and a pool fence arrive on Friday, so that will dent me in two ways, time and money. or those curious, George reckons he took 12 weeks of work and he charges $750 a week, plus paint. So all up we topped out over $10k, which was in the realm of the original quote. Having spent a lot of time working with george, about 4 of those 12 weeks, I can see how utterly time consuming and skillful it is. I don't begrudge george one cent of his money. Considering the cost of keeping up his workshop, I think he undercharges. I've just given mrs straylight a tour of the car and the work George did, it didn't help the justification part, but reinforced how much has been done in remedial work.
Ultimately, as Mark said during a phone call, the pleasure of driving a premium car around is worth more than the money that is invested in it. It ain't about the money and I've enjoyed every minute of working with George.
Where to from here ? Actually I'm overwhelmed by what is ahead and I'm tentative about where to start. Probably a nice simple job like taking her out of the shed and hitting the underside with a pressure cleaner, wire brushing her down and spraying with stoneguard, then wiring loom, then brake/fuel lines. Take off the rear axle and do some routine maintenance. Something that is cheap !
Stu
subframe in
I put the s[prings in first and fitted the subframe up top the body and botton of the dampers. Probably better to put the dampers onto the subframe and then locate the top of the coils in the turrets. Unfortunately, the upper ball joints didn't arrive in time, so they'll need replacing when I drop the subframe again to put the engine in, using Mart's recommended method of lowering the car onto the subframe and engine rather than risk damaging the engine bay by lowering the engine in.
On her own feet again
sunshine
better light to judge the colour. More green in the yellow than I remember
George freaked when I said i was going to push it home and employ kick steering. A few phone calls later and a car trip, he found a trailer and his brother helped shift her back to my place. Country people are take another persons problem as a challenge to find a solution. Appreciated their help.
home again
in the shed version one.
brand spankers
a trip down memory lane. As Mark (sprintparts said), it took a while. His classic comment on page one of the thread:
After looking a the photos of the rest of the car, I think that you have plenty of time to sort the motor out while rbuilding/restoring the rest of the car.
and Lee Flintoff:
A good wash wouldn't go a miss.
I really appreciate all of the positive comments, suggestions and help guys.
Unfortunately it will be a while before I can make significant progress. As mark said, back to work (school) tomorrow. 3 pallets of pavers and a pool fence arrive on Friday, so that will dent me in two ways, time and money. or those curious, George reckons he took 12 weeks of work and he charges $750 a week, plus paint. So all up we topped out over $10k, which was in the realm of the original quote. Having spent a lot of time working with george, about 4 of those 12 weeks, I can see how utterly time consuming and skillful it is. I don't begrudge george one cent of his money. Considering the cost of keeping up his workshop, I think he undercharges. I've just given mrs straylight a tour of the car and the work George did, it didn't help the justification part, but reinforced how much has been done in remedial work.
Ultimately, as Mark said during a phone call, the pleasure of driving a premium car around is worth more than the money that is invested in it. It ain't about the money and I've enjoyed every minute of working with George.
Where to from here ? Actually I'm overwhelmed by what is ahead and I'm tentative about where to start. Probably a nice simple job like taking her out of the shed and hitting the underside with a pressure cleaner, wire brushing her down and spraying with stoneguard, then wiring loom, then brake/fuel lines. Take off the rear axle and do some routine maintenance. Something that is cheap !
Stu