Page 6 of 28
Re: Project PFJ (French Blue Sprint)
Posted: Thu Dec 11, 2008 5:25 pm
by Mad Mart
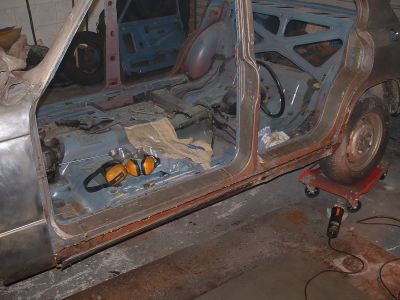
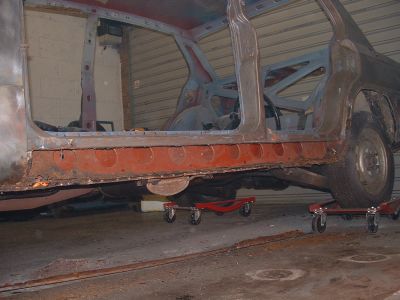
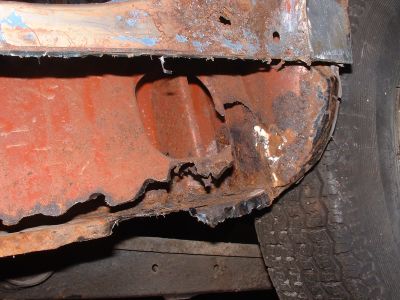
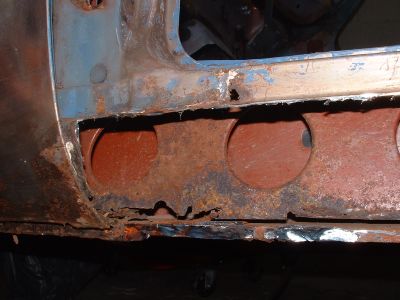
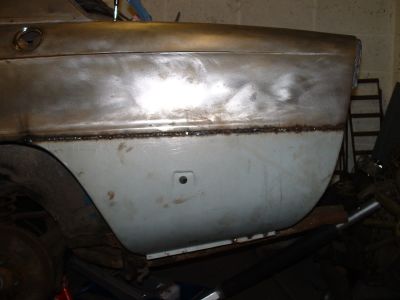
Just about all the paint has been stripped off now (shame I have another 4 doors to strip). All the doors are now off & the nearside sill has been removed. Apart from a bit of rust at either end, the sill reinforcer looks pretty good.
Re: Project PFJ (French Blue Sprint)
Posted: Thu Dec 11, 2008 5:27 pm
by xvivalve
Are you going to use original cills Mart or shall I put a pair aside for you?
Re: Project PFJ (French Blue Sprint)
Posted: Thu Dec 11, 2008 6:33 pm
by MalcGE
Mart, Can't quite tell form the photo how much metal of original sill is left, providing the sill return under the doors is OK, i'd leave a bit more of the upper Sill there, The remanent can be joddled to allow the replacement to sit tin the jodlle. Seam weld, linish, finish and you would be hard pressed to tell the sll has been replaced. It doesn't compromise the sill return under the doors.
Re: Project PFJ (French Blue Sprint)
Posted: Thu Dec 11, 2008 6:48 pm
by Mad Mart
xvivalve wrote:Are you going to use original cills Mart or shall I put a pair aside for you?
I already had a pair of sills which came with SFB (the red one). So may as well use those.

Good thinking Malc, I think there is about 8-10mm. left. I was going to drill & plug weld, then try to hide the seam somehow.
Re: Project PFJ (French Blue Sprint)
Posted: Thu Dec 11, 2008 7:50 pm
by MalcGE
Cut the return lip off the new sill, put the joddle in the top of the new sill and slip it up behind the original sill, then you can either drill or plug weld through old sill onto new, or, even better, leave a small gap between old sill and the edge of the jodlle and seam weld in sections with the weld sitting mainly in the recess between old sill, joddlle section up behind old sill and the joddle return to surface of new sill, do a section at a time going back to fill in between sections as things cool, you can then grind down, linish then skim fill to get a great surface.
That is how I did XAA front sill sections, even I forget I've done them sometimes, people always comment, orginal sills, well 90% of them are, just the front 10 inches, you would never know.
you can drill and plug weld lower section to recreate spot welds, although technically I think you are supposed to seam weld, but done well, god only knows how any one would be able to tell
Mart.........
Posted: Thu Dec 11, 2008 8:54 pm
by sprint95m
The inside of the sill doesn't look bad at all

.
On my car it looked like that too, but when I peered inside (with the help of a torch and mirror) the lower sill was badly corroded but not actually holed. So, I cut it out and put in new 1.6mm steel.
Are you fitting original or pattern sills?
Re: Project PFJ (French Blue Sprint)
Posted: Fri Dec 12, 2008 5:31 pm
by Mad Mart
I'm going to fit pattern sills Ian.
Spent a lot of time today getting the rest of the sill off the reinforcing strip & generally cleaning up. My grinder gave up the ghost as well, so off to Argos to get another (only a tenner).
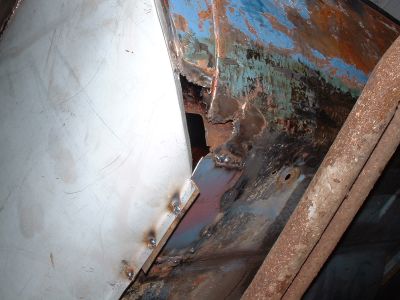
The majority of the reinforcing panel is very good...
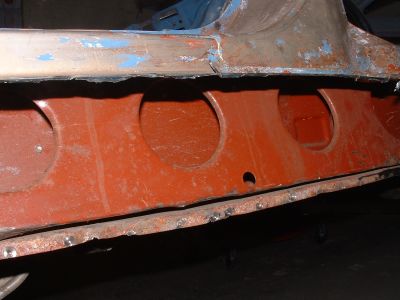
...just the ends are a bit crusty.
Re: Project PFJ (French Blue Sprint)
Posted: Fri Dec 12, 2008 5:48 pm
by xvivalve
Not only do they leak, condensation forms on them which then drips down your neck...OK if you like that sort of thing!
Dave's roof was fitted successfully...wasn't it?
bollox...wrong post!

All things considered........
Posted: Fri Dec 12, 2008 5:51 pm
by sprint95m
That is not too bad at all, Mart.
If they are from xvivalve, the pattern sills are a good fit. I tend to agree with Malcolm's comments, in that I wouldn't have cut so much of the outer sill from the door step, but there are no hard and fast rules for this.
When I did my car, I left the doors on for as long as possible. That way I could check alignment as I proceeded, for reassurance. Again, no hard and fast rules for this.
Almost certainly, you'll need to cut off the lower front wing sections to repair the front of the sills (you did repairs here on BFR?). I'll post a couple of pictures of my car for a comparison later or tomorrow. The internet connection is too slow at present to do this.
Re: Project PFJ (French Blue Sprint)
Posted: Sat Dec 20, 2008 6:15 pm
by Mad Mart
Had a bit of a break from doing anything on PFJ last week so thought I'd get stuck in today.
Started on the rear panel:-
Cut about an inch below the swage line to start with just to be on the safe side.
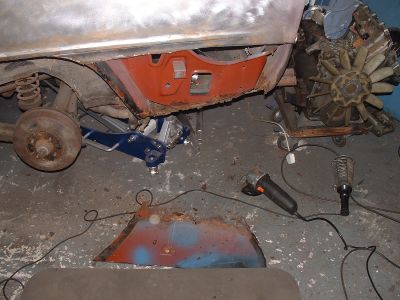
Got rid of all the rusty bits & give it a coat of sealer.
Re: Project PFJ (French Blue Sprint)
Posted: Mon Dec 29, 2008 5:10 pm
by Mad Mart
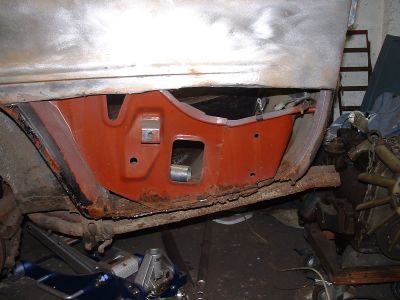
Got back to it today & spent all day putting the rear panel on.
Still haven't quite finished it and need to weld a couple of small plates on.
Re: Project PFJ (French Blue Sprint)
Posted: Mon Dec 29, 2008 9:46 pm
by xvivalve
Looking good Mart, it looks as if you trimmed off the rear flange?
Yes......................
Posted: Tue Dec 30, 2008 4:51 pm
by sprint95m
MikeyB wrote: New year resolution 4; I must go to the local college and track down a welding course.
That's a good resolution, Mike. What are the other three?
I contend that the best way to
really learn is by experience.
Now, don't you still have a Sprint auto residing in a lockup....................
Re: Project PFJ (French Blue Sprint)
Posted: Wed Dec 31, 2008 11:28 pm
by Mad Mart
Yesterday this "welding panels on" thing got the better of me. I didn't want to give up on PFJ but I was making a right pigs ear of the smaller repairs, it just wasn't good enough.

I was thinking about selling it on as an "ongoing project" but then I decided to call Glen, a local guy who has his own classic resto business in Weston (and has recently started Sprinting/Hill climbing in a Sprint). He came over this afternoon & we had a good long chat. Bottom line is, PFJ will be travelling to his HQ at the end of January & he will be doing all the welding, including putting the new roof on. I can't tell you how much that has cheered me up, like a weight has been lifted off my shoulders.
I'd already made a start on stripping down the engine which put me in a much better mood. Before I started I lined the timing marks up, or rather I didn't. The camshaft was on it's mark but the crankshaft was at about 12 degs. BTDC. Someone had put spring washers on the bolts behind the flywheel so the bolt heads had been touching the flywheel and the rear crankshaft seal had only been put in half way.

I took the head off & the tops of the pistons are clean so it could be that they are new pistons.
The water pump impeller.
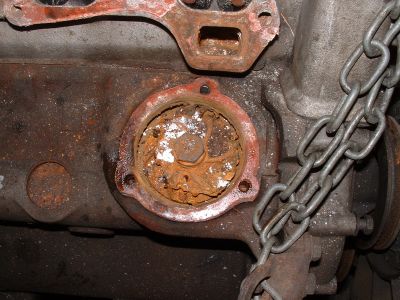
I managed to get the main body of the pump out but the brass cage was left behind. Time to make a super duper brass cage getter outer thingy.
HAPPY NEW YEAR!!!!
Re: Project PFJ (French Blue Sprint)
Posted: Thu Jan 01, 2009 6:13 am
by straylight
good work Mart,
Someone had put spring washers on the bolts behind the flywheel so the bolt heads had been touching the flywheel and the rear crankshaft seal had only been put in half way.
which reminded me instantly of my own wrong turn down that route !
scraping sound found....
I had put split washers on the adaptor plate bolts. This elevated them and one was just proud enough to brush up on the flywheel. (Which also tells me the flywheel has a slight runout/wobble).
stu