Page 1 of 1
1850 points replacement in pictures 3.
Posted: Tue Nov 01, 2011 1:36 pm
by MIG Wielder
Check the points are on the peak of the cam after replacement.

- 1850 points pic 7.jpg (100.75 KiB) Viewed 2447 times
Reconnect the wires, and replace both screws and back off about 1/8 turn so it is just possible to move them with a screwdriver in the adjustment slot.
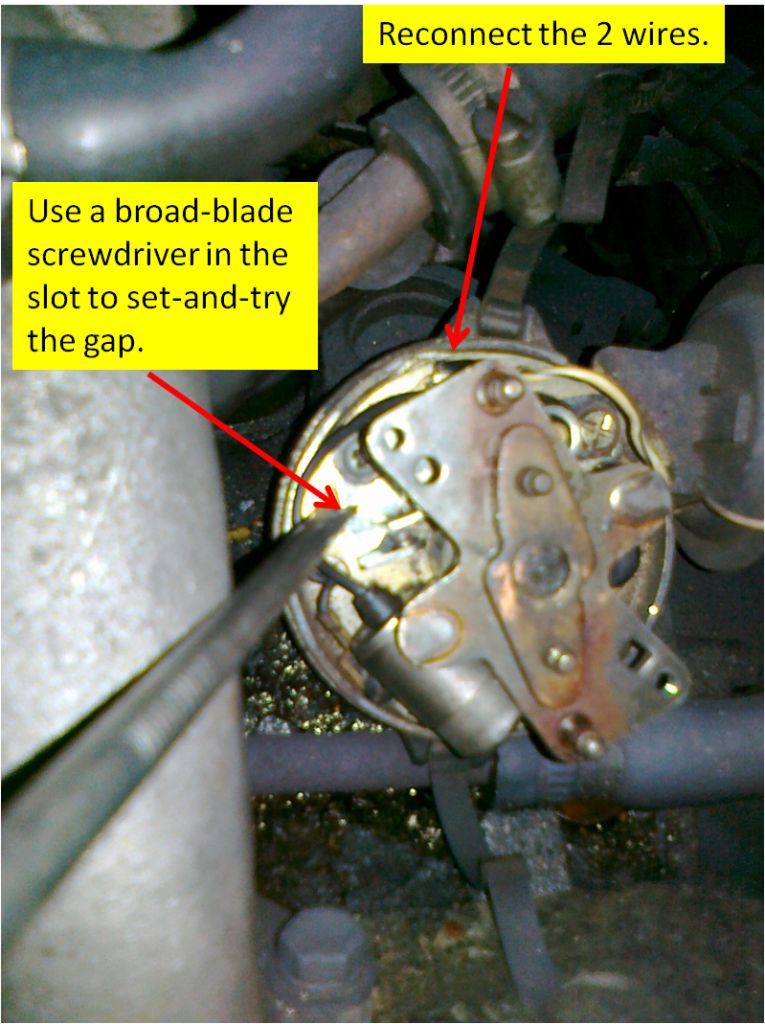
- 1850 points pic 8.jpg (114.26 KiB) Viewed 2447 times
Using one hand to check the points gap, use the other on the screrwdriver to open / close the gap.
Re-assemble in the reverse order.
There ! 52 minutes of a lunch-hour including cleaning up the old points with a fine file.
Anyone know why I'm restricted to 3 uploaded attachments ? I've seen postings with many pictures.
Cheers All,
Tony.
Re: 1850 points replacement in pictures 3.
Posted: Tue Nov 01, 2011 10:00 pm
by Toledo Man
The reason is because you uploaded your photos directly to the forum server. Some of us upload our photos on a hosting site such as Photobucket and post links on our threads.
Re: 1850 points replacement in pictures 3.
Posted: Wed Nov 02, 2011 7:58 pm
by Henk
Nice slideshow.
Personally I find it not very precise to use the feeler gauge because it has to be used perfectly perpendicular in order to get a correct gap. I'd like to preset it by eye and check this after install with a "strobe light" which also measures dwell angle (don't know the correct name for the device, mine is a Hella-make). Just checked it during starting and later on (when distributor is closed and plug leads connected again) with running engine.
Main complaint from my side to the original distributor is the need to replace a condensor or points during long trips when the engine is hot. Several weeks ago travelling at sunday night from Goodwood to the Netherlands and *snap* faulty condenser... The system isn't very reliable, but on the other hand that's a minor complaint that comes with the endless joy of driving such car!
Re: 1850 points replacement in pictures 3.
Posted: Thu Nov 03, 2011 7:30 am
by mbellinger
Excellent pictures Tony, and a very straightforward guide.
Thanks for taking the time to do this.
Re: 1850 points replacement in pictures 3.
Posted: Thu Nov 03, 2011 7:30 am
by mbellinger
Excellent pictures Tony, and a very straightforward guide.
Thanks for taking the time to do this.
Re: 1850 points replacement in pictures 3.
Posted: Thu Nov 03, 2011 12:07 pm
by longboarder
Come on, who remembers the old fag paper trick? My old dad (ex-reme) got my old motor bikes running many times this way, seems they (the fag paper) were less then 2thou, while the fag packet was 15thou. (near enough). Near enough ain't good enough, its got to be exact,.... it is exact,.... near enough then! Ship yard mantra when I was a boy, when we had shipyards!
