Dave
Sills
-
new to this
- TDC Member
- Posts: 1793
- Joined: Mon Dec 12, 2016 9:53 pm
- Location: Harrow Middlesex
Sills
After seeing how James took his covers sills off,i thought id do the same, but my sill were not in as good condition,  my middle sill needs replacing,i know the sill is sandwiched at the top between outer sill and inner sill,how do most people fit it,is it best to cut the new one and only fit the bottom half,didnt want to take the outer step of
Dave
Dave
-
grahamwatson
- TDC Member
- Posts: 62
- Joined: Tue Oct 25, 2016 10:19 pm
- Location: Inverness
Re: Sills
new to this wrote: ↑Sun May 21, 2017 5:24 pm After seeing how James took his covers sills off,i thought id do the same, but my sill were not in as good condition,
Dave
I did it like this:
Following the advice in this recent thread:
http://forum.triumphdolomite.com/viewto ... 1619a8502f
Like you, I did not want to disturb the top seam, where all was solid. I cut the club reinforcer along the top - there is a crease where it would fit into the top seam - so that it fitted up behind what was left of the old reinforcer and against the inside of the top of the sill.
Hope this helps.
-
new to this
- TDC Member
- Posts: 1793
- Joined: Mon Dec 12, 2016 9:53 pm
- Location: Harrow Middlesex
Re: Sills
grahamwatson wrote: ↑Sun May 21, 2017 8:14 pmnew to this wrote: ↑Sun May 21, 2017 5:24 pm After seeing how James took his covers sills off,i thought id do the same, but my sill were not in as good condition,
Dave
I did it like this:
Following the advice in this recent thread:
http://forum.triumphdolomite.com/viewto ... 1619a8502f
Like you, I did not want to disturb the top seam, where all was solid. I cut the club reinforcer along the top - there is a crease where it would fit into the top seam - so that it fitted up behind what was left of the old reinforcer and against the inside of the top of the sill.
Hope this helps.
Graham
how are you planing on welding the bottom edge of the reinforcer to the inner sill,i didn't know they were bend at right
thanks Dave angle
-
grahamwatson
- TDC Member
- Posts: 62
- Joined: Tue Oct 25, 2016 10:19 pm
- Location: Inverness
Re: Sills
Don't think I took any pics of that, and it's now covered up as the outer sill is also on. Yes. the lower edge of the reinforcer is turned at right angles, inwards. That sits on top of the inner sill repair panel (this is really just the bottom of the original inner sill, the bit that sits parallel to the road surface) and the inner sill repair panel itself has a right angle turn downwards at its outside edge. The outer sill fixes to this downturn along its bottom edge.
I just welded along the seam that you can see in my pic, and then ground that weld back with a flapdisc so that it was flush and did not impede the outer sill fixing.
Is that what you were asking?
I just welded along the seam that you can see in my pic, and then ground that weld back with a flapdisc so that it was flush and did not impede the outer sill fixing.
Is that what you were asking?
-
Carledo
- TDC Shropshire Area Organiser
- Posts: 7249
- Joined: Sun Aug 21, 2011 5:12 pm
- Location: Highley, Shropshire
Re: Sills
This is what most people do! When I did the sills on the Carledo, I actually found the diaphragm panels intact, must be a record! I used a length of 1"x1" L section steel to make a joining panel the full length so I had 3 thicknesses of steel at the bottom sill joint to the soffit.grahamwatson wrote: ↑Mon May 22, 2017 12:34 am Don't think I took any pics of that, and it's now covered up as the outer sill is also on. Yes. the lower edge of the reinforcer is turned at right angles, inwards. That sits on top of the inner sill repair panel (this is really just the bottom of the original inner sill, the bit that sits parallel to the road surface) and the inner sill repair panel itself has a right angle turn downwards at its outside edge. The outer sill fixes to this downturn along its bottom edge.
I just welded along the seam that you can see in my pic, and then ground that weld back with a flapdisc so that it was flush and did not impede the outer sill fixing.
Is that what you were asking?
But it is technically possible, if you are lucky and clever, to drill the sill along the line where the diaphragm meets it, fit the sill and then plug weld through to the bottom of the diaphragm, mimicking the original design. Plug welds here would be acceptable to MOT standard since the original join was spot welded. Take your pick! only one choice per customer!
Steve
'73 2 door Toledo with Vauxhall Carlton 2.0 8v engine (The Carledo)
'78 Sprint Auto with Vauxhall Omega 2.2 16v engine (The Dolomega)
'72 Triumph 1500FWD in Slate Grey, Now with RWD and Carledo powertrain!
Maverick Triumph, Servicing, Repairs, Electrical, Recomissioning, MOT prep, Trackerjack brake fitting service.
Apprentice served Triumph Specialist for 50 years. PM for more info or quotes.
-
new to this
- TDC Member
- Posts: 1793
- Joined: Mon Dec 12, 2016 9:53 pm
- Location: Harrow Middlesex
Re: Sills
Thanks for your advice,looking at your pictures again,i mite try and straighten the bottom right angle and if i can clean the bottom edge of inner sill enough,spot weld the reinforcer direct to the bottom lip of the inner sillgrahamwatson wrote: ↑Mon May 22, 2017 12:34 am Don't think I took any pics of that, and it's now covered up as the outer sill is also on. Yes. the lower edge of the reinforcer is turned at right angles, inwards. That sits on top of the inner sill repair panel (this is really just the bottom of the original inner sill, the bit that sits parallel to the road surface) and the inner sill repair panel itself has a right angle turn downwards at its outside edge. The outer sill fixes to this downturn along its bottom edge.
I just welded along the seam that you can see in my pic, and then ground that weld back with a flapdisc so that it was flush and did not impede the outer sill fixing.
Is that what you were asking?
thanks Dave
-
new to this
- TDC Member
- Posts: 1793
- Joined: Mon Dec 12, 2016 9:53 pm
- Location: Harrow Middlesex
Re: Sills
SteveCarledo wrote: ↑Mon May 22, 2017 10:00 amThis is what most people do! When I did the sills on the Carledo, I actually found the diaphragm panels intact, must be a record! I used a length of 1"x1" L section steel to make a joining panel the full length so I had 3 thicknesses of steel at the bottom sill joint to the soffit.grahamwatson wrote: ↑Mon May 22, 2017 12:34 am Don't think I took any pics of that, and it's now covered up as the outer sill is also on. Yes. the lower edge of the reinforcer is turned at right angles, inwards. That sits on top of the inner sill repair panel (this is really just the bottom of the original inner sill, the bit that sits parallel to the road surface) and the inner sill repair panel itself has a right angle turn downwards at its outside edge. The outer sill fixes to this downturn along its bottom edge.
I just welded along the seam that you can see in my pic, and then ground that weld back with a flapdisc so that it was flush and did not impede the outer sill fixing.
Is that what you were asking?
But it is technically possible, if you are lucky and clever, to drill the sill along the line where the diaphragm meets it, fit the sill and then plug weld through to the bottom of the diaphragm, mimicking the original design. Plug welds here would be acceptable to MOT standard since the original join was spot welded. Take your pick! only one choice per customer!
Steve
i know there's a jacking point at the rear,is there one behind the front wing ?
Dave
-
Carledo
- TDC Shropshire Area Organiser
- Posts: 7249
- Joined: Sun Aug 21, 2011 5:12 pm
- Location: Highley, Shropshire
Re: Sills
OH Yesssss!new to this wrote: ↑Mon May 22, 2017 7:09 pmSteveCarledo wrote: ↑Mon May 22, 2017 10:00 amThis is what most people do! When I did the sills on the Carledo, I actually found the diaphragm panels intact, must be a record! I used a length of 1"x1" L section steel to make a joining panel the full length so I had 3 thicknesses of steel at the bottom sill joint to the soffit.grahamwatson wrote: ↑Mon May 22, 2017 12:34 am Don't think I took any pics of that, and it's now covered up as the outer sill is also on. Yes. the lower edge of the reinforcer is turned at right angles, inwards. That sits on top of the inner sill repair panel (this is really just the bottom of the original inner sill, the bit that sits parallel to the road surface) and the inner sill repair panel itself has a right angle turn downwards at its outside edge. The outer sill fixes to this downturn along its bottom edge.
I just welded along the seam that you can see in my pic, and then ground that weld back with a flapdisc so that it was flush and did not impede the outer sill fixing.
Is that what you were asking?
But it is technically possible, if you are lucky and clever, to drill the sill along the line where the diaphragm meets it, fit the sill and then plug weld through to the bottom of the diaphragm, mimicking the original design. Plug welds here would be acceptable to MOT standard since the original join was spot welded. Take your pick! only one choice per customer!
Steve
i know there's a jacking point at the rear,is there one behind the front wing ?
Dave
Steve
'73 2 door Toledo with Vauxhall Carlton 2.0 8v engine (The Carledo)
'78 Sprint Auto with Vauxhall Omega 2.2 16v engine (The Dolomega)
'72 Triumph 1500FWD in Slate Grey, Now with RWD and Carledo powertrain!
Maverick Triumph, Servicing, Repairs, Electrical, Recomissioning, MOT prep, Trackerjack brake fitting service.
Apprentice served Triumph Specialist for 50 years. PM for more info or quotes.
'78 Sprint Auto with Vauxhall Omega 2.2 16v engine (The Dolomega)
'72 Triumph 1500FWD in Slate Grey, Now with RWD and Carledo powertrain!
Maverick Triumph, Servicing, Repairs, Electrical, Recomissioning, MOT prep, Trackerjack brake fitting service.
Apprentice served Triumph Specialist for 50 years. PM for more info or quotes.
-
new to this
- TDC Member
- Posts: 1793
- Joined: Mon Dec 12, 2016 9:53 pm
- Location: Harrow Middlesex
Re: Sills
Graham
What condition were your door post bottom's in,mine are shot,been repairing the B and C post still got to tackle the D post but need to repair the sill step first
Dave
What condition were your door post bottom's in,mine are shot,been repairing the B and C post still got to tackle the D post but need to repair the sill step first
Dave
-
grahamwatson
- TDC Member
- Posts: 62
- Joined: Tue Oct 25, 2016 10:19 pm
- Location: Inverness
Re: Sills
Dave,
My door posts are in good shape. Just one small hole in the O/S D post, where the sill meets the wheel arch, fixed with a small patch.
I have also had to replace both chassis legs (gearbox sides). Also a new O/S front floorpan which had rusted though. I could have got away without replacing the N/S floorpan but it was a lot easier just to cut it out with the chassis leg and the club repair panels slot in nicely without too much fettling, so I am replacing that one too.
For the jacking points I saw that someone on here had welded short (approx. 1cm?) lengths of box section pipe to the under sill to provide a location point. Seems like a good arrangement which I may well copy.
Graham
-
Carledo
- TDC Shropshire Area Organiser
- Posts: 7249
- Joined: Sun Aug 21, 2011 5:12 pm
- Location: Highley, Shropshire
Re: Sills
If I was having to do that much work, i'd make the jacking points MUCH stronger by inserting a chunk of 2" or 2.5" x 2mm square box section in, shaped to go right to the top of the inner sill and welded to the inner sill, wheel arch closing panel, sill diaphragm and soffit and made long enough that it protrudes 5-10mm below the level of the soffit. then blank off the square hole in the bottom with a recessed square of 2mm plate. That should take any amount of stick dished out by Thicktwit fitters!
Steve
Steve
'73 2 door Toledo with Vauxhall Carlton 2.0 8v engine (The Carledo)
'78 Sprint Auto with Vauxhall Omega 2.2 16v engine (The Dolomega)
'72 Triumph 1500FWD in Slate Grey, Now with RWD and Carledo powertrain!
Maverick Triumph, Servicing, Repairs, Electrical, Recomissioning, MOT prep, Trackerjack brake fitting service.
Apprentice served Triumph Specialist for 50 years. PM for more info or quotes.
'78 Sprint Auto with Vauxhall Omega 2.2 16v engine (The Dolomega)
'72 Triumph 1500FWD in Slate Grey, Now with RWD and Carledo powertrain!
Maverick Triumph, Servicing, Repairs, Electrical, Recomissioning, MOT prep, Trackerjack brake fitting service.
Apprentice served Triumph Specialist for 50 years. PM for more info or quotes.
-
new to this
- TDC Member
- Posts: 1793
- Joined: Mon Dec 12, 2016 9:53 pm
- Location: Harrow Middlesex
Re: Sills
grahamwatson wrote: ↑Sat May 27, 2017 4:26 pm Dave,
My door posts are in good shape. Just one small hole in the O/S D post, where the sill meets the wheel arch, fixed with a small patch.
I have also had to replace both chassis legs (gearbox sides). Also a new O/S front floorpan which had rusted though. I could have got away without replacing the N/S floorpan but it was a lot easier just to cut it out with the chassis leg and the club repair panels slot in nicely without too much fettling, so I am replacing that one too.
For the jacking points I saw that someone on here had welded short (approx. 1cm?) lengths of box section pipe to the under sill to provide a location point. Seems like a good arrangement which I may well copy.
Graham
Graham
I think my chassis legs by gearbox,also need attention there bend and buckled,ive spot welded the lower section of the middle sill,mig welder went wrong so couldnt finish
Dave
-
new to this
- TDC Member
- Posts: 1793
- Joined: Mon Dec 12, 2016 9:53 pm
- Location: Harrow Middlesex
Re: Sills
SteveCarledo wrote: ↑Sun May 28, 2017 12:01 am If I was having to do that much work, i'd make the jacking points MUCH stronger by inserting a chunk of 2" or 2.5" x 2mm square box section in, shaped to go right to the top of the inner sill and welded to the inner sill, wheel arch closing panel, sill diaphragm and soffit and made long enough that it protrudes 5-10mm below the level of the soffit. then blank off the square hole in the bottom with a recessed square of 2mm plate. That should take any amount of stick dished out by Thicktwit fitters!
Steve
Thats what im going to do,found some 3 x 3 box section in work shop,i know its a bit of over kill but its free
Dave


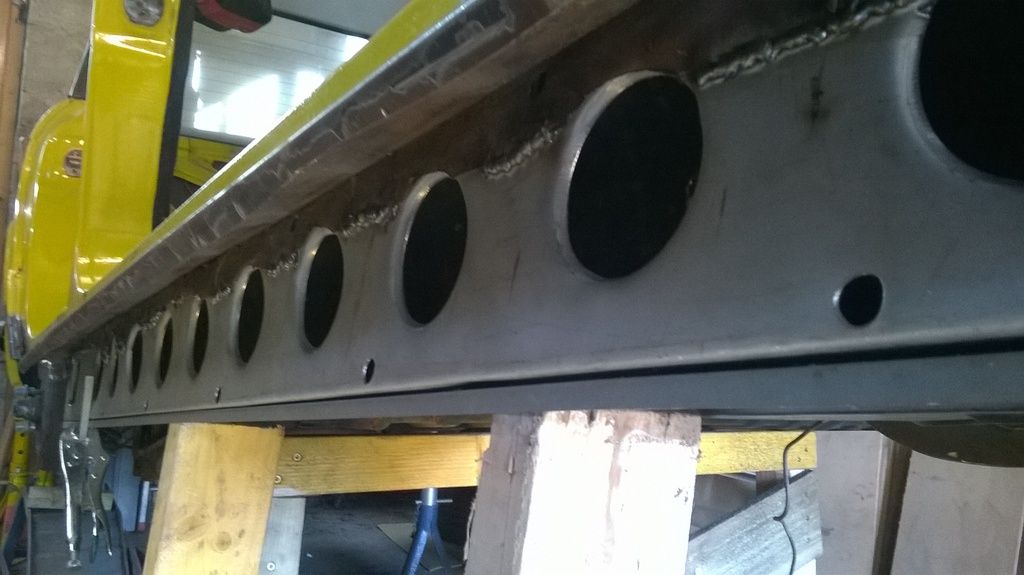
Re: Sills
You may have possibly seen mine,
- Attachments
-
- file.jpg (40.28 KiB) Viewed 2090 times
NRW 581W Sprint
On the motorway no one can hear me sing!
Construed as a public service, self preservation in reality.
On the motorway no one can hear me sing!
Construed as a public service, self preservation in reality.
-
Carledo
- TDC Shropshire Area Organiser
- Posts: 7249
- Joined: Sun Aug 21, 2011 5:12 pm
- Location: Highley, Shropshire
Re: Sills
That's the way to do it!
But I wouldn't put a jacking point in the middle as Dave suggested, too much weight in one spot! I know Paul Booker has on his race car, but his shell is seam welded and it has a mahoosive cage to boot!
Steve
'73 2 door Toledo with Vauxhall Carlton 2.0 8v engine (The Carledo)
'78 Sprint Auto with Vauxhall Omega 2.2 16v engine (The Dolomega)
'72 Triumph 1500FWD in Slate Grey, Now with RWD and Carledo powertrain!
Maverick Triumph, Servicing, Repairs, Electrical, Recomissioning, MOT prep, Trackerjack brake fitting service.
Apprentice served Triumph Specialist for 50 years. PM for more info or quotes.
'78 Sprint Auto with Vauxhall Omega 2.2 16v engine (The Dolomega)
'72 Triumph 1500FWD in Slate Grey, Now with RWD and Carledo powertrain!
Maverick Triumph, Servicing, Repairs, Electrical, Recomissioning, MOT prep, Trackerjack brake fitting service.
Apprentice served Triumph Specialist for 50 years. PM for more info or quotes.