Page 1 of 1
Folding boot trim?
Posted: Thu Sep 12, 2019 6:07 pm
by DavePoth
I've got some nice new boot trims to fit but I'm struggling to work out how to put the required bends into them. I practiced on the old ones that used to be in the car; first by scoring both sides, then just the inside, then no scoring at all, but each time the surface of the board broke.
I've read that heating might help, but I'm not quite sure how hot or which side to do the heating on. Has anyone got any tips? Thanks!
Re: Folding boot trim?
Posted: Fri Sep 13, 2019 7:33 am
by oily66
I’m going through a similar situation myself with the lower dash back boards.
Like you I have practiced on some scrap and found wetting the board the best way, so far
I’m also going to try wetting it in a solution of pva that will give it some rigidity, but will have to be careful on the faced side, I’ll let you know how I get on.
Re: Folding boot trim?
Posted: Fri Sep 13, 2019 9:59 am
by SprintMWU773V
Or do what I did, cover the board with van lining carpet. Looks great and covers any score marks. Not original at all but looks great.
Re: Folding boot trim?
Posted: Fri Sep 13, 2019 8:08 pm
by TrustNo1
if using the original type trim board then you score the side that will be the outside edge of the fold.
Re: Folding boot trim?
Posted: Sun Sep 15, 2019 4:20 pm
by DavePoth
It's at times like this that I remember why it's taken me this long to not restore my car.

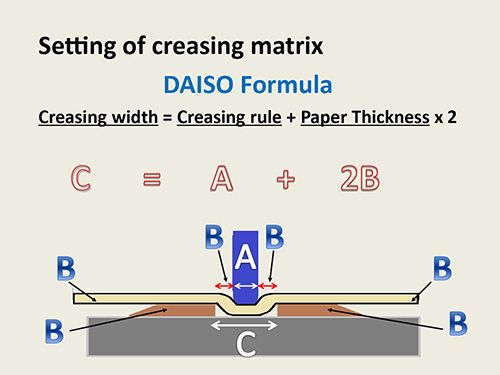
After spending the weekend reading about folding cardboard I've come across this diagram and formula.
C is known (1/4") as is B (the millboard is 1/16").
So A = 1/4" - 2(1/16") or 1/8".
And another one here with slightly different calculations, but much the same result:
https://www.cito.de/en/GB/boxline/creas ... h/?m=0.063
If I can put together a jig/tool to do this I
should be able to put the correct creases into the board without cracking it. Whether I actually can is another matter entirely...
Re: Folding boot trim?
Posted: Sat Sep 28, 2019 1:23 pm
by DavePoth
So after a bit of shonky tool making and balancing the whole lot onto the jaws of a vise which was itself sat end on to the workbench, I managed to press a crease into a bit of scrap board. The results are in the two attachments, and doesn't look all that bad - the crease is a bit thicker than standard at 5/16" instead of 1/4" but I think I could fix that by repositioning the guides, and it looks like a thinner than 1/8" creasing rule was used too.
but certainly progress.