Recovering a Britax Weathershield (Webasto lookalike) Sunroof

Restoring your car? Tell us about it here!
Post Reply
Message
Author
marshman
TDC Member
Posts: 303
Joined: Tue Oct 15, 2019 9:00 pm

Recovering a Britax Weathershield (Webasto lookalike) Sunroof

#1 Post by marshman »

When I bought my Sprint it had a Britax full length folding sunroof (often called a Webasto - the Britax Weathershield was I believe a cheaper option). At some point someone had decided that they could break into the car by slashing the roof and reaching in to unlock the door. This left a hole. When I bought it the tear was covered in gaffer tape. Looking at the rest of the sunroof it was clear it was well past its best with splits and holes all around the edges.

Image

Image

Image


After some research I determined that while you could get a outer cover for an MGB there were none that I could find for a Dolomite. So I bought some outer material and some headlining material and went ahead to have ago on my own. It didn't take long to get the roof out - just lift out the runners (3 off each side) by canting the sliding bits over at an angle and drill out/sheer off the four fixing screws along the back (all rusted solid).

That was the easy bit.

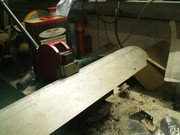
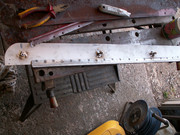
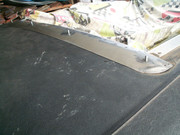
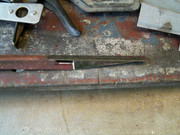
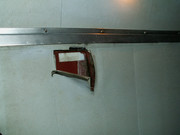
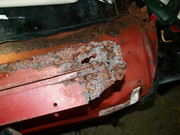
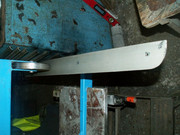
Once I started pulling it all to bits it was obvious that the front a back steel plates were badly rusted all round the edges and unusable - in fact I was worried that they wasn't enough metal left at the ends to make a template. By looking at the top covering, marks left on the roof of the car I averaged out the outline and produced two new plates! it took a few hours to bend and shape them to the correct gentle curves to match the roof using a combination of an English Wheel and a shrinker/stretcher. I also had to remake/repair a couple of retaining bars spot welded to the original metal work.

Image

Image

Image


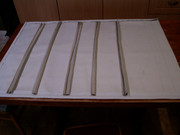
Next was remaking the headlining. I obtained a length of the correct material. Using the old one as kind of template I stitched in the reinforcing tapes along the edges and the fabric "tubes" which the reinforcing hoops slip through. I also stitched in the rope beading on the back edge that secures the lining to the rear metal work. It was all a little bit of guess work as the original material had stretched over the years so I was never sure of the exact correct size.


Image

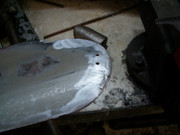
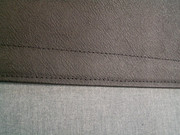
The top/outside "cover" was next. What a nightmare. The material was quite thick and heavy and the sewing machine didn't like it one bit! The original was Heat sealed or welded together along the two outer edges. I had a go on a small section of the new material but it wasn't going to happen so sewing was the only option. The seam is needed to secure a webbing strip along each edge. I got there eventually and it does look quite neat.

Image

Image


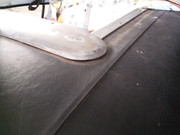
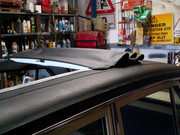
Next stage was to put it all back together. Very fiddly and has to be done in the right order as once the top cover is stuck onto the two metal end parts you can't get to some of the other bits. I used Evostick 528 impact adhesive to stick the edges of the material to the metal work. Time will tell if it will last. I had several trial fits along the way to make sure I had the length correct so that the material (both head lining and the top cover) pulled taut when the roof was closed.

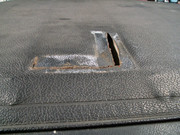
As you can see the end result looks OK. It still needs a few tweeks to tighten the lining up I the back corners.


Image

Image

Image


I normally encourage people to have a go but I think this has been one of the most challenging jobs I have done on a car, requiring all the skills I have learnt over the years plus a few more. (metal bashing and shaping,English Wheel, Shrinking, stretching, turning (threaded inserts for the back edge), sewing, fabric stretching and shaping, hemming, bonding, sealing) and I would say it is not for the faint hearted. If someone produced the correct cutout fabric as per the MGB it would be easier but there would still be the issue of the rotted metal work - which has to be pretty spot on otherwise the front will not close down snugly.
1975 Sprint Man O/D in Honeysuckle Yellow
1971 Stag Auto White

Too many cars, too little time!
User avatar
tinweevil
Guest contributor
Guest contributor
Posts: 3936
Joined: Tue Oct 03, 2006 5:42 pm
Location: Forest of Dean

Re: Recovering a Britax Weathershield (Webasto lookalike) Sunroof

#2 Post by tinweevil »

:shock: That's the bravest repair job I've seen in a damn long time. And what a result! Chapeau sir, chapeau. :thumbsup:
1978 Pageant Sprint - the rustomite, 1972 Spitfire IV - sprintfire project, 1968 Valencia GT6 II - little Blue, 1980 Vermillion 1500HL - resting. 1974 Sienna 1500TC, Mrs Weevils big brown.
new to this
TDC Member
Posts: 1792
Joined: Mon Dec 12, 2016 9:53 pm
Location: Harrow Middlesex

Re: Recovering a Britax Weathershield (Webasto lookalike) Sunroof

#3 Post by new to this »

Looks a nice repair,was the english wheel for putting the groove in the metal plates,never got to use one myself

Dave
Carledo
TDC Shropshire Area Organiser
Posts: 7242
Joined: Sun Aug 21, 2011 5:12 pm
Location: Highley, Shropshire

Re: Recovering a Britax Weathershield (Webasto lookalike) Sunroof

#4 Post by Carledo »

I used to fit the Weathershields roof for Car Hood Company in South Harrow, back in he 70s. And whilst i'd have a go at transplanting a roof from a scrapper to a solid car or something of that nature, i'd not want to recover one! However, i've been around a long time and I have a man for that!

Kudos to you sir, for even taking it on, let alone making a decent job of it!

On the roof stiffeners, you went a bit overboard, we had no shrinkers/stretchers or English wheel! We were doing 2-3 installs a day EACH and the way we made them, was, given a predetermined length of bar and a "profile pattern" for the end shape, you'd stick the end in a vise and bend the metal strip cold (by hand) till it matched the profile, then turn it round and do the other end! Total time to make 2 bars around 15 mins! These would then be secured to the cantrails with 3 large pop rivets per end!

Back in the day, you couldn't buy one for home fitting, only authorised agents/installers could get them. If you had a split or damaged top like yours, we would just supply and fit a new moving section to your frame. Though we could and did make bespoke soft tops for cars and had the ability to recover, it wasn't economically practical to do it, 4 screws (which then mostly WOULD have come undone) and some fettling of the front edge to ensure a snug fit (You REALLY don't WANT to know how this was done) and it was all over in 20 mins!

Steve
'73 2 door Toledo with Vauxhall Carlton 2.0 8v engine (The Carledo)
'78 Sprint Auto with Vauxhall Omega 2.2 16v engine (The Dolomega)
'72 Triumph 1500FWD in Slate Grey, Now with RWD and Carledo powertrain!

Maverick Triumph, Servicing, Repairs, Electrical, Recomissioning, MOT prep, Trackerjack brake fitting service.
Apprentice served Triumph Specialist for 50 years. PM for more info or quotes.
User avatar
Reg
Guest contributor
Guest contributor
Posts: 1264
Joined: Wed Oct 04, 2006 8:10 pm
Location: Darn saarf..

Re: Recovering a Britax Weathershield (Webasto lookalike) Sunroof

#5 Post by Reg »

Fabulous job indeed.. 8) I would not be brave enough to tackle that! :shock:
new to this
TDC Member
Posts: 1792
Joined: Mon Dec 12, 2016 9:53 pm
Location: Harrow Middlesex

Re: Recovering a Britax Weathershield (Webasto lookalike) Sunroof

#6 Post by new to this »

Carledo wrote: Fri Apr 17, 2020 12:36 pm I used to fit the Weathershields roof for Car Hood Company in South Harrow, back in he 70s. And whilst i'd have a go at transplanting a roof from a scrapper to a solid car or something of that nature, i'd not want to recover one! However, i've been around a long time and I have a man for that!

Kudos to you sir, for even taking it on, let alone making a decent job of it!

On the roof stiffeners, you went a bit overboard, we had no shrinkers/stretchers or English wheel! We were doing 2-3 installs a day EACH and the way we made them, was, given a predetermined length of bar and a "profile pattern" for the end shape, you'd stick the end in a vise and bend the metal strip cold (by hand) till it matched the profile, then turn it round and do the other end! Total time to make 2 bars around 15 mins! These would then be secured to the cantrails with 3 large pop rivets per end!

Back in the day, you couldn't buy one for home fitting, only authorised agents/installers could get them. If you had a split or damaged top like yours, we would just supply and fit a new moving section to your frame. Though we could and did make bespoke soft tops for cars and had the ability to recover, it wasn't economically practical to do it, 4 screws (which then mostly WOULD have come undone) and some fettling of the front edge to ensure a snug fit (You REALLY don't WANT to know how this was done) and it was all over in 20 mins!

Steve
Steve

car hoods are still there

Dave
dollyman
TDC Cheshire Area Organiser
Posts: 1410
Joined: Wed May 17, 2017 6:28 pm
Location: NANTWICH.

Re: Recovering a Britax Weathershield (Webasto lookalike) Sunroof

#7 Post by dollyman »

I admire anyone brave enough to tackle trim when it is not their trade :shock: A real credit to you and your car Roger 8)

Tony.
NOW A CLUB MEMBER 2017057 :bluewave:
marshman
TDC Member
Posts: 303
Joined: Tue Oct 15, 2019 9:00 pm

Re: Recovering a Britax Weathershield (Webasto lookalike) Sunroof

#8 Post by marshman »

Thanks everyone. It did feel pretty good when I had it finished and it did actually close up nicely. I have made my own headlinings before with reasonable success so I am not a total newby when it comes to trim work, life would be easier with an industrial sewing machine though.

The metal work involved remaking the two end plates of the opening part, the fixed part (frame/roof bars/stiffeners) were not touched. The end plates must be shaped to fit the roof profile and also curved the other way - these plates would have been included in any replacement folding part and would not have been corroded away early in their life, but after 45 years!!!!). The following pictures show the various stages involved in getting the correct shape. The English wheel was used to form the very shallow/subtle curve in the rear plate.


Image

English Wheel used to form slight curve profile, also introduced shallow curve end to end.


Image


Image

Front edge of front plate has much sharper curve, produced using a hammer and dolly.


Image

Shrinker used to get gentle curve from end to end.


Image

Finished rear piece which threaded inserts and lining retainer (another faff to make!)


Image

Rear piece fitted to car to check the fit - screws were cut down to length at this stage.


Image

Repair piece grafted onto locking bar (fixed to front plate)


Image

Nearly finished front piece, just need to shape the ends

Image

Image

Image


Image

Image

Front plate finished.
1975 Sprint Man O/D in Honeysuckle Yellow
1971 Stag Auto White

Too many cars, too little time!
User avatar
80Sprint
TDC Member
Posts: 1173
Joined: Sat Oct 07, 2006 8:23 pm
Location: East Staffordshire

Re: Recovering a Britax Weathershield (Webasto lookalike) Sunroof

#9 Post by 80Sprint »

Great job !!

I thought you could still get outer replacements. I was hoping to do mine this year... Maybe it depends on the size..
Mike

1980 Vermillion Sprint - 174bhp
Carledo
TDC Shropshire Area Organiser
Posts: 7242
Joined: Sun Aug 21, 2011 5:12 pm
Location: Highley, Shropshire

Re: Recovering a Britax Weathershield (Webasto lookalike) Sunroof

#10 Post by Carledo »

80Sprint wrote: Fri Apr 17, 2020 10:48 pm Great job !!

I thought you could still get outer replacements. I was hoping to do mine this year... Maybe it depends on the size..
If Car Hood are still going as Dave suggests, give them a try! IIRC, it's what we called a "B" roof back in the day, "A" being bigger, the "C" roof was in Heralds etc, the "D" was the MGBGT roof and the "E", little better than a letterbox was for TR7 and the like.

Steve
'73 2 door Toledo with Vauxhall Carlton 2.0 8v engine (The Carledo)
'78 Sprint Auto with Vauxhall Omega 2.2 16v engine (The Dolomega)
'72 Triumph 1500FWD in Slate Grey, Now with RWD and Carledo powertrain!

Maverick Triumph, Servicing, Repairs, Electrical, Recomissioning, MOT prep, Trackerjack brake fitting service.
Apprentice served Triumph Specialist for 50 years. PM for more info or quotes.
Ron1966
Guest contributor
Guest contributor
Posts: 188
Joined: Mon Mar 25, 2013 9:12 pm

Re: Recovering a Britax Weathershield (Webasto lookalike) Sunroof

#11 Post by Ron1966 »

Superb repair, I had a sprint with the Webasto roof but it was sadly wrote off. I miss mine on the sunny days.
marshman
TDC Member
Posts: 303
Joined: Tue Oct 15, 2019 9:00 pm

Re: Recovering a Britax Weathershield (Webasto lookalike) Sunroof

#12 Post by marshman »

80Sprint wrote: Fri Apr 17, 2020 10:48 pm Great job !!

I thought you could still get outer replacements. I was hoping to do mine this year... Maybe it depends on the size..
That's what I thought I could do at the start. I contacted Bristol Sunroof Centre - they list one for the MGB GT on eBay and they also come up on Google when your search (pretty much the only UK one). But they came back and said no they did not do one for the Dolomite, I did supply them with the sizes, but they were not very forthcoming.

https://www.tasc-auto.co.uk/sunroofs.php

There is a company in the states that have some new old stock complete kits in 2 sizes - neither of which seem to be the same as mine. They are $1300 plus shipping !!

Mine measures 30" x 36" (hole in the roof) and approx 34" wide x 40" overall, this doesn't seem to match any "standard" roof I could find.

As I also needed the lining and wanted the correct Longhorn material to match the original so decided to DIY.

There is a guy in France who seems to be an expert and supplies parts, but again for MGB GT's - he is on their forum. I have his details somewhere as I was going to contact him, but didn't need to in the end. His name is Dave Balkwill and he posted some instructions - which I didn't use!!

https://www.dropbox.com/sh/e3hl7ke7iuvc ... MVMha?dl=0

Roger
1975 Sprint Man O/D in Honeysuckle Yellow
1971 Stag Auto White

Too many cars, too little time!
Post Reply