Hi All,
After some advice/sanity check. Finally refitted the engine back in my sprint, and connected everything back up. I span the oil pump over with a cordless drill to build up oil pressure. For first spin over on starter, the plugs were removed and span on starter until oil light went out (about 10 seconds). Plugs back in and went for a start, turns over nicely, but no sign of firing.
So far checks I have done
-Confirmed fuel in carb floats bowls (running mechanical pump and took a while of spinning over to pull fuel up)
-Replaced dizzy cap and leads
-New coil
-Checked points and condenser (both replaced Feb 22)
-Removed a spark plug and spun over to confirm spark at plug (tested after above replaced).
-Carried out a compression test, which as I expected are not wonderful as engine has not run and rings, and head gasket etc not settled in (still getting 125PSI even across all cylinders)
Try as I might I just can't get the engine started! Was wondering if I could be 180degrees out on the distributor, however I really can’t see how I could be due the design of the sprint dizzy surely the vacuum advance unit would be pointing inwards toward the front of the car if it was wrong. I set the static timing as per the work shop manual with the rotor cap facing the projection on the vacuum advance unit as per the diagram in the workshop manual.
When turning over very occasionally I get a pop/back fire out of the back of one of the carbs, roughly were it meets the air box, but that’s the only signs of life seen. Sounds like no spark, but I know there is spark there.
Thanks for any help/advice in advance.
Olie
Newly rebuilt sprint engine wont start
-
sprint-revival
- TDC Member
- Posts: 45
- Joined: Mon Aug 23, 2021 8:19 pm

Re: Newly rebuilt sprint engine wont start
If you have a spark, fuel & compression, then the timing must be out if it is not firing.
180 degrees out does not mean the distributor is rotated 180 degrees, it means the spark is not timed to the compression stroke of the engine.
You need to ensure No1 cylinder is on compression, all valves closed, then check the rotor arm is pointing to number 1 plug lead.
180 degrees out does not mean the distributor is rotated 180 degrees, it means the spark is not timed to the compression stroke of the engine.
You need to ensure No1 cylinder is on compression, all valves closed, then check the rotor arm is pointing to number 1 plug lead.
Modified Dolomite Sprint MSO 662P VA485 1973 Mimosa Sprint


-
shaunroche

- TDC Member
- Posts: 1054
- Joined: Sun Apr 06, 2014 10:49 pm
- Location: Northwich
Re: Newly rebuilt sprint engine wont start
Like Tony said, I would put money on it being the timing...I've I've managed to have everything set up properly only to find I had the drive cog in the bottom of the dizzy one tooth out.
I solved this by taking no.1 plug out and inserting a long screw driver, I then turned the engine over by hand until it reached tdc...at this point the screwdriver reached the top of the stroke; turning the engine further, as it went past tdc, the screwdriver started to fall indicating that the engine timing was correct.
Setting the engine to tdc, I then undid the dizzy, lifted it up and set the rotor arm to the tab on the dizzy body, then lowered the dizzy and wiggled it until the drive cog engaged, making sure that when the dizzy bottomed out, the rotor arm was in the correct place.
I have managed to put the ignition cables to the wrong spark plugs before now, so hopefully the following images might help?


Certainly after doing the above the engine started to catch and when finally started to run, turned the dizzy until it was running smoothly.
BTW, has the car got an o/d or not?
I solved this by taking no.1 plug out and inserting a long screw driver, I then turned the engine over by hand until it reached tdc...at this point the screwdriver reached the top of the stroke; turning the engine further, as it went past tdc, the screwdriver started to fall indicating that the engine timing was correct.
Setting the engine to tdc, I then undid the dizzy, lifted it up and set the rotor arm to the tab on the dizzy body, then lowered the dizzy and wiggled it until the drive cog engaged, making sure that when the dizzy bottomed out, the rotor arm was in the correct place.
I have managed to put the ignition cables to the wrong spark plugs before now, so hopefully the following images might help?
Certainly after doing the above the engine started to catch and when finally started to run, turned the dizzy until it was running smoothly.
BTW, has the car got an o/d or not?
Come and see some pretty shoddy, slow driving of a really well prepared competition Sprint here!
http://www.youtube.com/@theunknownworrier
Club Triumph Round Britain Reliability Run 2025 Fund raising page:
https://wonderful.org/fundraisers/n8AYV ... derful.org
http://www.youtube.com/@theunknownworrier
Club Triumph Round Britain Reliability Run 2025 Fund raising page:
https://wonderful.org/fundraisers/n8AYV ... derful.org
-
Mad Mart

- TDC Member
- Posts: 8529
- Joined: Tue Oct 03, 2006 5:48 pm
- Location: Winscombe, North Somerset, England
- Contact:
Re: Newly rebuilt sprint engine wont start
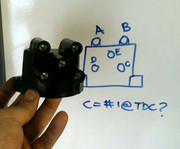
I have to agree, especially if you get the occasional backfire, it has to be the ignition timing (although it could possibly be valve timing). Like has been said, make sure the dizzy is set so it sparks on the compression stroke. Here's a pic of the original Sprint dizzy cap with the HT leads in their original positions. They can, of course, be put in one of four positions, as long as they are in the correct sequence.

Position of rotor arm with no.1 piston at TDC if HT leads are in the original position...

Position of rotor arm with no.1 piston at TDC if HT leads are in the original position...
Sprintless for the first time in 35+ years.  ... Still Sprintless.
Engines, Gearboxes, Overdrives etc. rebuilt. PM me.
2012 Porsche Boxster 981 S

Engines, Gearboxes, Overdrives etc. rebuilt. PM me.
2012 Porsche Boxster 981 S
-
shaunroche
- TDC Member
- Posts: 1054
- Joined: Sun Apr 06, 2014 10:49 pm
- Location: Northwich
Re: Newly rebuilt sprint engine wont start
Oops, sorry, forgot that mine's on electronic ignition so not std....
Come and see some pretty shoddy, slow driving of a really well prepared competition Sprint here!
http://www.youtube.com/@theunknownworrier
Club Triumph Round Britain Reliability Run 2025 Fund raising page:
https://wonderful.org/fundraisers/n8AYV ... derful.org
http://www.youtube.com/@theunknownworrier
Club Triumph Round Britain Reliability Run 2025 Fund raising page:
https://wonderful.org/fundraisers/n8AYV ... derful.org
-
sprint-revival
- TDC Member
- Posts: 45
- Joined: Mon Aug 23, 2021 8:19 pm
Re: Newly rebuilt sprint engine wont start
Thanks for the input guys, much appreciated.
Plenty of progress today! I must admit I cheated a bit, as the consensuses was I was 180 degrees out, I simply marked the location of the rotor on the dizzy, and lifted the dizzy up and spun the rotor 180 degress when it was placed back and meshed with the scew gear on the jack shaft. I also fitted a new old stock condenser, and refitted the original lucas dizzy cap and old HT leads, confirming they are fitted correctly using the diagrams on this thread (I found brass shavings in the dizzy were the new cap is not machined correctly and the rotor arm had been catching!)
First attempt, it coughed and spluttered, second turn of the key it ran! It won’t idle, but I’m sure that’s just timing. I ran it up for a minute or so to warm everything up, and shut it off, leaving the car for several hours to cool off completely. The satisfaction of hearing the engine for the first time was immense (only ever heard a Sprint engine running on 3 cylinders before!). I had a bit of a moment when I spotted oil on the floor, right in the centre below the bell housing were the rear main seal is! I resigned myself to replacing the seal again! but no the leak was traced to the back side of the rocker cover and running down around the back of the bell housing! those gaskets are rubbish!
Engine running for first time:
https://youtu.be/6tkgQbN47P0
The coolant that can be seen under the inlet manifold in the video above is mostly from me spilling it when filling through the thermostat housing (would only take a little at a time)
Still not sure how I was 180 degrees out as I was most careful setting the dizzy's position. Crank + cam marks aligned at TDC and followed work shop manual to set the rotor arm as in Mart's image.
Late afternoon got back to it, re-torqued the head to 55lb ft and began to fill the system with coolant, this is where the fun began! After about 3 litres had gone in I started to see coolant appearing between the cylinder head and the block in the valley behind the water pump! disaster I was rather upset having come so far with this engine. I stopped filling the coolant and wiped the rocker cover off, and went for another torque sequence, this time to 60lb ft. The weeping slowed right down, but was still some coming through. I decided to carry on and see if a engine run up/heat cycle would help (and I could check if coolant was pressurising and if water was mixing with the oil (either through the h/gasket or through my rebuilt water pump). I ran the engine up for approx. a minute then checked the engine oil on the dipstick, and took a look under the rocker cover, all looked good. I then proceeded to run the car up for a few minutes with the heater on to bleed the system. The leak between the block and the head slowed to next to nothing, but very occasionally a drip appears, (the longer it ran the better it got). Once bleed I replaced the radiator cap, and let the engine carry on running for approx. 10 mins. Temp remained bang on the middle of the dial, and had no bubbling etc in expansion bottle so was holding pressure ok from the looks of it. Just praying everything will settle down and be ok.
https://youtu.be/rV_cn4vQzIk
I’m on a bit of a budget with this one, and have completed the engine rebuild totally by myself. Unfortunately when building the engine I wasn’t really happy with either of the 2 cylinder heads I was able to source. I selected the best of the 2 I had sourced (my original was destroyed). The head was dressed as best I could (hours and hours of work) with a piece of glass and varying grades of wet and dry, little by little checked as I went with a straight edge. The valves were then lapped in, new valve stem seals etc, and the head carefully re shimmed (some lotus biscuit type shims were used for the values I didn’t have). All in all I estimate 50 hours + just on the head! It’s a shame I wasn't able to locate a better head, but it was the best I was able to source at the time. H/gasket was fitted dry with no sealants as this seemed the general consensus on here (and I have never used sealants with my Minis in the past either).
Hopefully will all turn out good in the end! not for the lack of trying. Desperately trying to get XLK 467S back on the road for next year and the 50th year of the Sprint.
Finally I have found a stripped thread today on the inlet manifold, were the bracket attaches near the take-off for the vacuum line to the servo, does anyone know the thread used here? so I can order the correct helicoil kit.

I will try and update the project thread in the next few days.
Thanks again
Olie
Plenty of progress today! I must admit I cheated a bit, as the consensuses was I was 180 degrees out, I simply marked the location of the rotor on the dizzy, and lifted the dizzy up and spun the rotor 180 degress when it was placed back and meshed with the scew gear on the jack shaft. I also fitted a new old stock condenser, and refitted the original lucas dizzy cap and old HT leads, confirming they are fitted correctly using the diagrams on this thread (I found brass shavings in the dizzy were the new cap is not machined correctly and the rotor arm had been catching!)
First attempt, it coughed and spluttered, second turn of the key it ran! It won’t idle, but I’m sure that’s just timing. I ran it up for a minute or so to warm everything up, and shut it off, leaving the car for several hours to cool off completely. The satisfaction of hearing the engine for the first time was immense (only ever heard a Sprint engine running on 3 cylinders before!). I had a bit of a moment when I spotted oil on the floor, right in the centre below the bell housing were the rear main seal is! I resigned myself to replacing the seal again! but no the leak was traced to the back side of the rocker cover and running down around the back of the bell housing! those gaskets are rubbish!
Engine running for first time:
https://youtu.be/6tkgQbN47P0
The coolant that can be seen under the inlet manifold in the video above is mostly from me spilling it when filling through the thermostat housing (would only take a little at a time)
Still not sure how I was 180 degrees out as I was most careful setting the dizzy's position. Crank + cam marks aligned at TDC and followed work shop manual to set the rotor arm as in Mart's image.
Late afternoon got back to it, re-torqued the head to 55lb ft and began to fill the system with coolant, this is where the fun began! After about 3 litres had gone in I started to see coolant appearing between the cylinder head and the block in the valley behind the water pump! disaster I was rather upset having come so far with this engine. I stopped filling the coolant and wiped the rocker cover off, and went for another torque sequence, this time to 60lb ft. The weeping slowed right down, but was still some coming through. I decided to carry on and see if a engine run up/heat cycle would help (and I could check if coolant was pressurising and if water was mixing with the oil (either through the h/gasket or through my rebuilt water pump). I ran the engine up for approx. a minute then checked the engine oil on the dipstick, and took a look under the rocker cover, all looked good. I then proceeded to run the car up for a few minutes with the heater on to bleed the system. The leak between the block and the head slowed to next to nothing, but very occasionally a drip appears, (the longer it ran the better it got). Once bleed I replaced the radiator cap, and let the engine carry on running for approx. 10 mins. Temp remained bang on the middle of the dial, and had no bubbling etc in expansion bottle so was holding pressure ok from the looks of it. Just praying everything will settle down and be ok.
https://youtu.be/rV_cn4vQzIk
I’m on a bit of a budget with this one, and have completed the engine rebuild totally by myself. Unfortunately when building the engine I wasn’t really happy with either of the 2 cylinder heads I was able to source. I selected the best of the 2 I had sourced (my original was destroyed). The head was dressed as best I could (hours and hours of work) with a piece of glass and varying grades of wet and dry, little by little checked as I went with a straight edge. The valves were then lapped in, new valve stem seals etc, and the head carefully re shimmed (some lotus biscuit type shims were used for the values I didn’t have). All in all I estimate 50 hours + just on the head! It’s a shame I wasn't able to locate a better head, but it was the best I was able to source at the time. H/gasket was fitted dry with no sealants as this seemed the general consensus on here (and I have never used sealants with my Minis in the past either).
Hopefully will all turn out good in the end! not for the lack of trying. Desperately trying to get XLK 467S back on the road for next year and the 50th year of the Sprint.
Finally I have found a stripped thread today on the inlet manifold, were the bracket attaches near the take-off for the vacuum line to the servo, does anyone know the thread used here? so I can order the correct helicoil kit.
I will try and update the project thread in the next few days.
Thanks again
Olie
-
sprint-revival
- TDC Member
- Posts: 45
- Joined: Mon Aug 23, 2021 8:19 pm
Re: Newly rebuilt sprint engine wont start
Yep its a 1977 car, with o/d, no idea if it works or not, not been out on the road to test.
-
shaunroche
- TDC Member
- Posts: 1054
- Joined: Sun Apr 06, 2014 10:49 pm
- Location: Northwich
Re: Newly rebuilt sprint engine wont start
I only ask as those two green wires that might share a connector with the white and red ignition wire, if that connector is a bit dodgy, I've found that will let the engine turn over but never start....speaking from experience...sprint-revival wrote: ↑Sat Oct 29, 2022 9:29 pmYep its a 1977 car, with o/d, no idea if it works or not, not been out on the road to test.
Come and see some pretty shoddy, slow driving of a really well prepared competition Sprint here!
http://www.youtube.com/@theunknownworrier
Club Triumph Round Britain Reliability Run 2025 Fund raising page:
https://wonderful.org/fundraisers/n8AYV ... derful.org
http://www.youtube.com/@theunknownworrier
Club Triumph Round Britain Reliability Run 2025 Fund raising page:
https://wonderful.org/fundraisers/n8AYV ... derful.org
-
xvivalve

- TDC West Mids Area Organiser
- Posts: 13580
- Joined: Thu Sep 28, 2006 1:13 pm
- Location: Over here...can't you see me?
Re: Newly rebuilt sprint engine wont start
The part number for that bolt is HU0754 which translates to a half inch long 1/4" UNCFinally I have found a stripped thread today on the inlet manifold, were the bracket attaches near the take-off for the vacuum line to the servo, does anyone know the thread used here? so I can order the correct helicoil kit.
-
sprint-revival
- TDC Member
- Posts: 45
- Joined: Mon Aug 23, 2021 8:19 pm
Re: Newly rebuilt sprint engine wont start
Thanks, my 1/4" UNC helicoil kit arrived in the week, unfortunately the weather is poor this weekend so this repair will have to wait another week. Thanks for your help identifying the bolt/thread.xvivalve wrote: ↑Sun Oct 30, 2022 1:58 pmThe part number for that bolt is HU0754 which translates to a half inch long 1/4" UNCFinally I have found a stripped thread today on the inlet manifold, were the bracket attaches near the take-off for the vacuum line to the servo, does anyone know the thread used here? so I can order the correct helicoil kit.