Ooooh yes. Thanks for pointing that out Steve.
Smack wrist !
Cheers for now,
Tony.
Headlamp relays
Re: Headlamp relays
Nice diagram btw. Was it done in some kinda design package or just drawn out in paint/photoshop etc? I've got a lot of loom in my engine swapped car I want to document..
-
Robert 352
- Guest contributor

- Posts: 389
- Joined: Tue Sep 25, 2012 2:08 am
- Location: Christchurch, New Zealand
Re: Headlamp relays
I too modified my wiring harness to incorporate headlamp relays when I restored my car. The photos shown here are duplicates of what I have shown on my restoration thread but I have marked the first photo to show where I broke into the wiring harness.
There is a plug at this point which because I had the engine bay wiring harness out of the car at the time I changed for one with, if I recall correctly, 5 pins. It was a bit of a fiddle to push the original pins out of what I remember was a 4 pin plug but it can be done if you are careful. I took a 12 volt high current wire back to the main junction point on the harness which feeds from the battery across to the starter motor. I then re-taped everything with black tape to match the rest of the wiring harness.
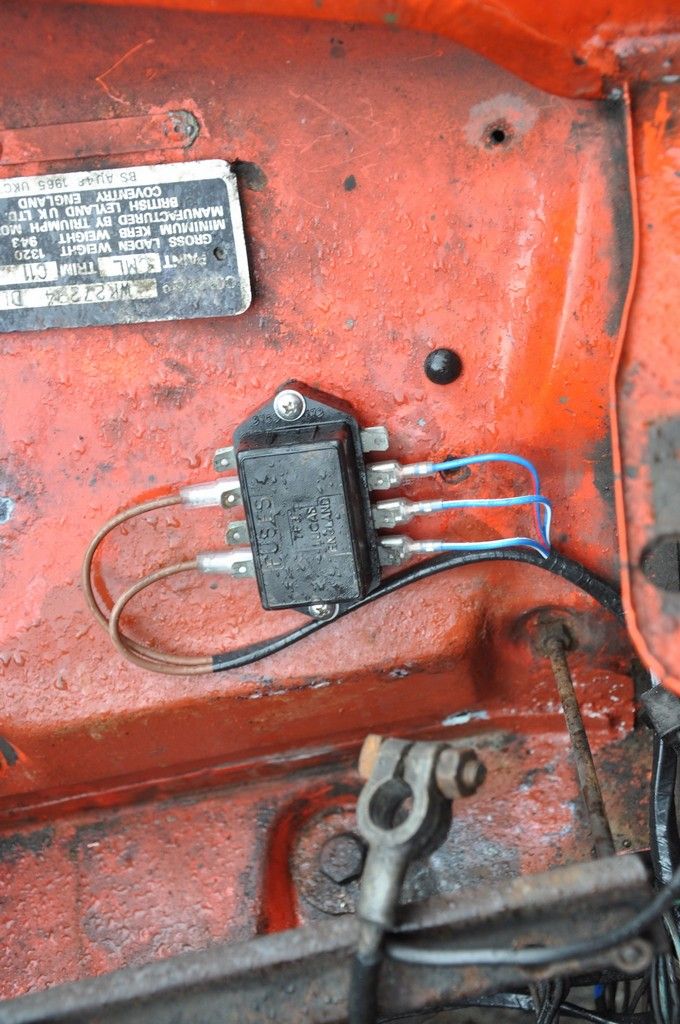
I remember following Tony – Mig Welder’s excellent diagram at the time but realised later that because the halogen dip lamps which I used do not incorporate a separate high beam filament, that it became necessary to fit a third relay so that when you switch to the high beam the dip beam remains on. The photo shown here shows the third relay all mounted on a simple bracket and bolted to the carburettor air intake support which is fitted on the Sprint.
Jonners commented at the time that he thought the relays might be exposed to water coming off the road. I have had no problems what so ever, so far. They are tucked in out of the way, the run from the relays to the lamps themselves is about as short as it is practical to make and the relays are in effect, hidden from view. Each relay is fused and the fuses are accessible if it becomes necessary to change them.
Robert
- 20121105-3630Ptw Headlamp relay position.jpg (202.41 KiB) Viewed 1824 times
I remember following Tony – Mig Welder’s excellent diagram at the time but realised later that because the halogen dip lamps which I used do not incorporate a separate high beam filament, that it became necessary to fit a third relay so that when you switch to the high beam the dip beam remains on. The photo shown here shows the third relay all mounted on a simple bracket and bolted to the carburettor air intake support which is fitted on the Sprint.
- 20130302-4053Ptx HU5000 relay arrangement.jpg (194.57 KiB) Viewed 1824 times
Robert
-
Richard the old one
- TDC Member
- Posts: 1218
- Joined: Thu Sep 28, 2006 10:06 pm
- Location: Bristol
Re: Headlamp relays
Toledo Man I like your simple way of picking up the + supply from the battery. So easy and simple I am glad that I still have to fit relays to my cars.

Re: Headlamp relays
There's a much better option available to you Richard, Those RBY crimps really don't last well. No offence meant to you TM, they simply don't and it's all most people have available.Richard the old one wrote:Toledo Man I like your simple way of picking up the + supply from the battery. So easy and simple I am glad that I still have to fit relays to my cars.
On OHV cars the battery king lead is a a simple beast so what I did was replace it with one from a Sprint/1850. This gives you 4 positions on the mid way connector block to take supplied from. It needs to be shortened ideally which since I have a 'tube' crimp tool I could do.
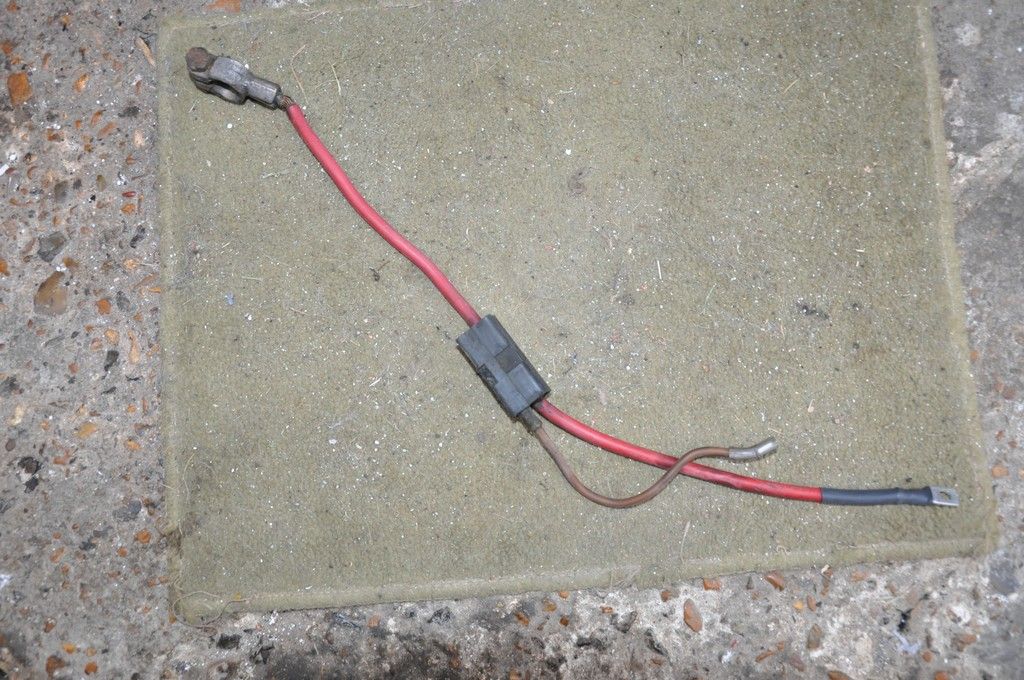
The attached brown wire feeds the starter relay I fitted a couple of years earlier. Up to that point I'd used ring crimps behind the battery bolt which failed due to the slight wiggling they get each time the battery is disconnected. After a similar replacement failed too I did the job properly as above. Some time later when I got around to fitting relays on the lights I have 3 ready and waiting feeds to use.
I put a 4 way fuse box next to the battery, jumper for the 3rd fuse still missing at this point:
I got the fuse box slightly too close to the battery, getting the lid off with the battery in place is a fiddle, an inch further up next time.
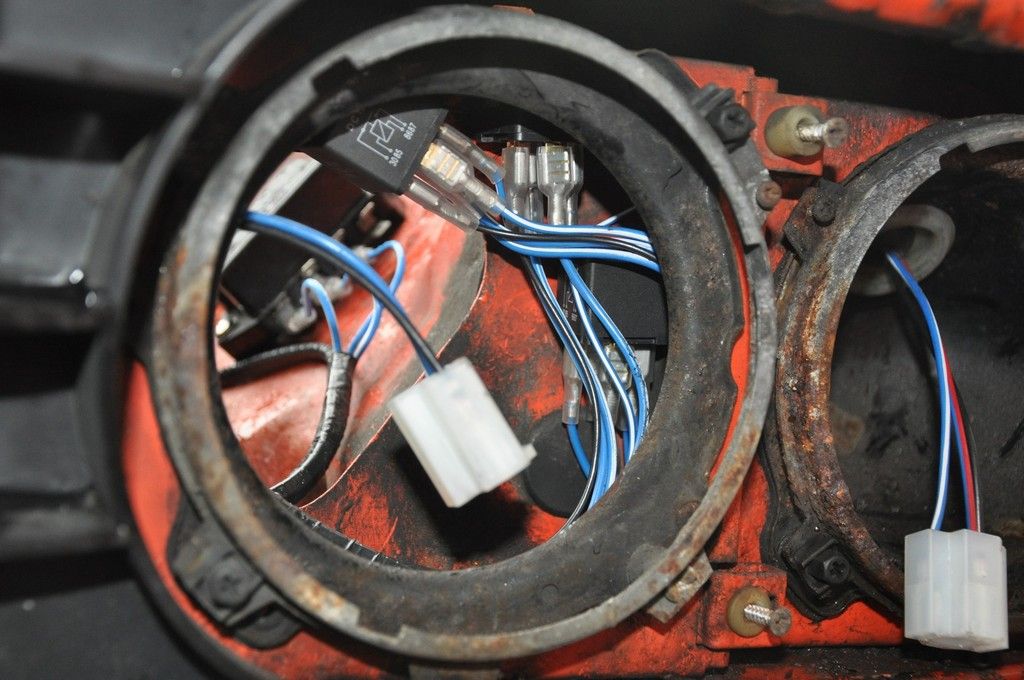
I put the relays between the inner & outer front panels using stainless self tappers:
I made a custom loom which is a 3 stage process.
First you make it up with every wire over long and just a few bits of tape round it as strategic points.
Then you fit it to the car, cut all the wires to the correct length and fit any crimps that seem like they should be done in situ.
Then you remove the whole thing, fit the rest of the crimps and wrap it removing the insulating tape as you go. This is it removed and ready for stage 3.
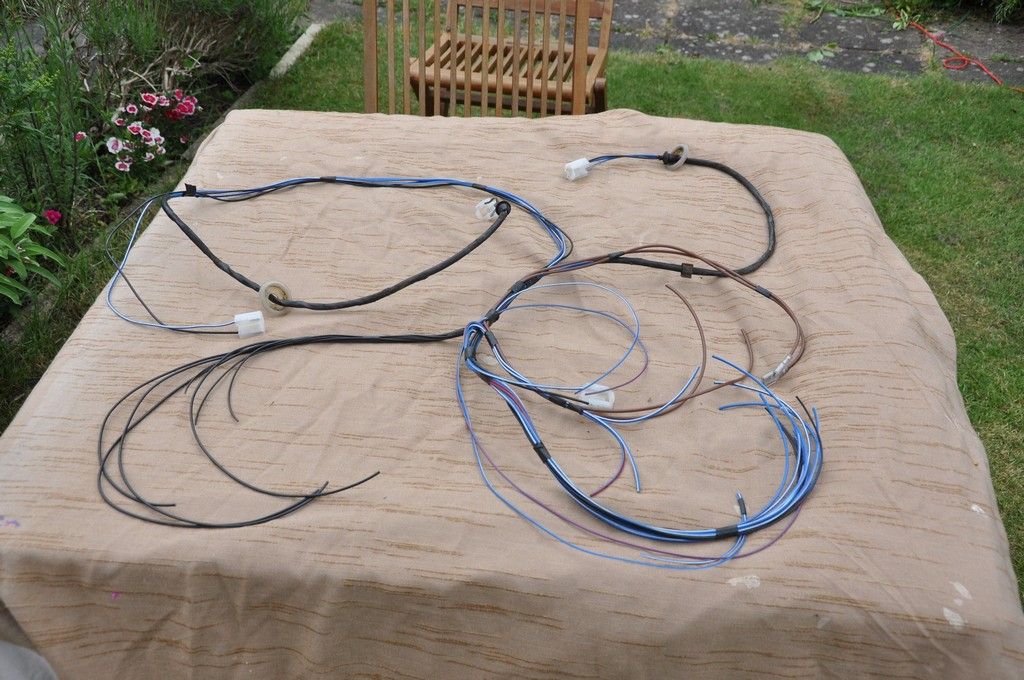
This is the loom finished bar one connector shell.

Bundle of terminals bottom left - Relays
Big ring crimp middle left - 0V, goes behind the same bolt on the inner front panel as the battery 0V to body.
Middle bottom 5 terminals - fuse box
Bottom right two - Feed from the king lead.
Dead center - These are round crimps like the OE ones on the car, these went into a 3 way shell and plugged into the car loom.
I fitted 75w inner sealed beams and the usual Halogen outers. The reason I used 3 fuses not two was that I used wire sizes that would allow me to got to 100/80w outers and 120w inners.
No cutting of the loom. No current path longer than it needs to be. Totally reversible. Only damage to the car is three holes for the relays and one for the fuse box (I used an existing hole IIRC one side). Click the last picture to go to the album with more pictures.
1978 Pageant Sprint - the rustomite, 1972 Spitfire IV - sprintfire project, 1968 Valencia GT6 II - little Blue, 1980 Vermillion 1500HL - resting. 1974 Sienna 1500TC, Mrs Weevils big brown.
Re: Headlamp relays
If anyone has a sprint king lead they'd like shortened for use on an OHV ping me a PM.
1978 Pageant Sprint - the rustomite, 1972 Spitfire IV - sprintfire project, 1968 Valencia GT6 II - little Blue, 1980 Vermillion 1500HL - resting. 1974 Sienna 1500TC, Mrs Weevils big brown.

Yes.......
That is an excellent post Julian.
Hint, hint, I am thinking Dolly Mixture article.......
Having recently acquired their excellent catalogue, I now know that
Car Builder Solutions (who give free postage on large orders and a 10% discount to TDC members (on all orders)) stock the proper connectors
(and the tools to crimp them).
For years now, following advice from my late next door neighbour (who was an electrician in the nuclear industry),
I have used the RBY crimp connectors wrapped with self amalgamating tape to seal out moisture. Touch wood, it has worked so far!
That SA tape is, in my experience, really useful stuff.
Ian.
TDC Forum moderator
PLEASE help us to maintain a friendly forum,
either PM or use Report Post if you see anything you are unhappy with. Thanks.
PLEASE help us to maintain a friendly forum,
either PM or use Report Post if you see anything you are unhappy with. Thanks.
-
Toledo Man

- Guest contributor
- Posts: 7542
- Joined: Tue Oct 03, 2006 5:52 pm
- Location: Halifax, West Yorkshire
- Contact:
Re: Headlamp relays
Julian, no offence taken. I had to redo some of my wiring back then and the connections would benefit from a drop of solder.
Richard, my setup wouldn't be the same in the 1500HL because the battery is on the other side to the 1850 & Sprint.
Richard, my setup wouldn't be the same in the 1500HL because the battery is on the other side to the 1850 & Sprint.
Toledo Man
West Yorkshire Area Organiser
Meetings take place on the first Wednesday of the month at 8.00pm at The Railway, 1 Birstall Lane, Drighlington, Bradford, BD11 1JJ
2003 Volvo XC90 D5 SE (PX53 OVZ - The daily driver)
2009 Mercedes-Benz W204 C200 CDI Sport (BJ58 NCV - The 2nd car)
1991 Toyota Celica GT (J481 ONB - a project car)
Former stable of SAY 414M (1974 Toledo), GRH 244D (1966 1300fwd), CDB 324L (1973 1500fwd), GGN 573J (1971 1500fwd), DCP 625S (1977 Dolomite 1300) & LCG 367N (1975 Dolomite Sprint), NYE 751L (1972 Dolomite 1850 auto) plus 5 Acclaims and that's just the Triumphs!
Check my blog at http://triumphtoledo.blogspot.com
My YouTube Channel with a bit of Dolomite content.
"There is only one way to avoid criticsm: Do nothing, say nothing and BE nothing." Aristotle
-
Richard the old one
- TDC Member
- Posts: 1218
- Joined: Thu Sep 28, 2006 10:06 pm
- Location: Bristol
Re: Headlamp relays
I am glad that I have not been in a hurry to fit relays as I am now able to consider all the options, learning from all the people who have carried out this modification.
It is a pity that in the 1500's the battery is fitted on the nearside and that the main loom runs down the off side. I also have the problem that all my wires were covered in Ziebart or other rustproofing liquids so it is difficult to see the wire colours. The advantage has been that it has kept the water /damp out of the various connectors.
It is a pity that in the 1500's the battery is fitted on the nearside and that the main loom runs down the off side. I also have the problem that all my wires were covered in Ziebart or other rustproofing liquids so it is difficult to see the wire colours. The advantage has been that it has kept the water /damp out of the various connectors.
-
toromod
Re: Headlamp relays
My 1500HL is also covered in a Ziebart coating which is probably why it has survived but a copper pot scrubber will clean enough of the wires to show their colours.Richard the old one wrote:I am glad that I have not been in a hurry to fit relays as I am now able to consider all the options, learning from all the people who have carried out this modification.
It is a pity that in the 1500's the battery is fitted on the nearside and that the main loom runs down the off side. I also have the problem that all my wires were covered in Ziebart or other rustproofing liquids so it is difficult to see the wire colours. The advantage has been that it has kept the water /damp out of the various connectors.
On another note, please excuse my ignorance while I convert to halogen headlights (via relays) but what are RBY connectors?
-
AlanH
Re: Headlamp relays
They last a lot longer if you solder the wire before crimping.Those RBY crimps really don't last well. No offence meant to you TM, they simply don't and it's all most people have available.
I think that it could be worth putting a couple of fused bus bars in, one fed straight from the battery (or fuse box?) and one via a relay operated from the ignition switch. This would give a sort of distribution center that could be used when required.
http://www.vehicle-wiring-products.eu/p ... 4mm-screws.
This is something that I intend to do when I get round to it (intend being the operative word).
Re: Headlamp relays
Please don't take offence, but I would not solder any connections in a car any more,
Been a die hard solder fan since I was 6 years old (yep, hot knife over gas cooker, 100w instant
heat gun, or any other means I could find, quickly learned, solder and skin makes an instant
bond, but not solder and aluminium.
I know those crimp terminals have a bad history, but if you buy even a £10 crimper which is
ratchet driven or preferebly a hydraulic, the crimp is solid and if you use adhesive lined heat shrink tubing
pretty much airtight and corrosion free.
The problem in a car is movement, and solder is inflexible which results in fatige, and the other is damp/wet
conditions which result in the copper wire and solder chemically corroding.
NRW 581W Sprint
On the motorway no one can hear me sing!
Construed as a public service, self preservation in reality.
On the motorway no one can hear me sing!
Construed as a public service, self preservation in reality.
Re: Headlamp relays
Mahesh wrote:...........
The problem in a car is movement, and solder is inflexible which results in fatigue, .....
Spot on Mahesh, crimps all the way, with decent support for the cable into the crimp. Kind of like the original connectors and sleeves
-
andrewwild
Re: Headlamp relays
There are two blue/white cables in the loom alongside the single red/blue.
Which blue/white cable goes to the relay??
Many Thanks
Which blue/white cable goes to the relay??
Many Thanks